PCBを設計するために使用できるさまざまなオブジェクトがあります。PCBドキュメントに配置されたほとんどのオブジェクトは、銅領域または空白を定義します。これは、トラックやパッドなどの電気的オブジェクトと、テキストや寸法などの非電気的オブジェクトの両方に適用されます。したがって、各オブジェクトを定義するために使用される線の幅と、オブジェクトが配置されるレイヤーを念頭に置くことが重要です。
PCBエディターには、プリミティブオブジェクトとグループオブジェクトの2種類のオブジェクトがあります:
-
プリミティブオブジェクトは設計の基本要素であり、トラック、パッド、ビア、フィル、アーク、テキストオブジェクトを含みます。これらは、最も基本的な性質のために「プリミティブ」と呼ばれます。
-
プリミティブで構成され、設計オブジェクトとして識別されるものはグループオブジェクトです。グループオブジェクトの例には、コンポーネント、寸法、ポリゴンプアが含まれます。グループオブジェクトは、設計空間内で単一のオブジェクトとして操作できます。例えば、配置、選択、コピー、変更、移動、削除が可能です。
オブジェクトの配置と編集の共通性
Altium Designerでは、オブジェクトを配置するプロセスは、配置されるオブジェクトに関係なくほぼ同じです。最も単純なレベルでは、プロセスは次のとおりです:
-
ツールバーまたはPlaceメニューから配置するオブジェクトを選択します。
-
マウスを使用して、PCBエディターの設計空間で配置されるオブジェクトの位置とサイズ(該当する場合)を定義します。
-
右クリック(またはEscを押す)してコマンドを終了し、配置モードを終了します。
オブジェクトは現在のレイヤーに配置されます。配置を行う前に正しいレイヤーが現在のレイヤーになっていることを確認してください。配置後にオブジェクトが存在するレイヤーを変更することができます。
配置前の編集
オブジェクトのデフォルトプロパティは、PreferencesダイアログのPCB Editor – Defaultsページでいつでも変更できます。これらのプロパティは、後続のオブジェクトを配置する際に適用されます。
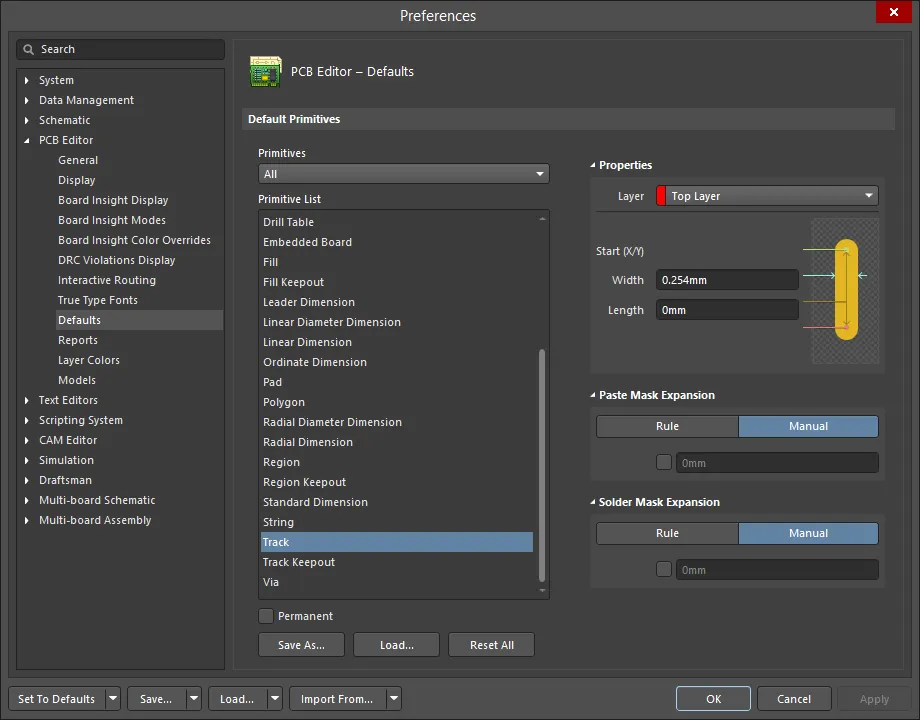
Primitives列を使用してオブジェクトのプロパティにアクセスし、必要に応じてデフォルト値を編集します。
オブジェクトのデフォルト値は、デフォルトではファイルADVPCB.dftに保存されます。オプションで、異なる名前の.dftファイルに値を保存することもできます。.dftファイルを保存および読み込むためのコントロールが用意されており、お気に入りのデフォルトオブジェクト値の「セット」を作成できます。.dftファイルに保存され、読み込まれるすべての設定は、ユーザー定義のデフォルトです。必要に応じて、Set To DefaultsまたはReset Allオプションを使用して、元のデフォルト値をいつでも取り戻すことができます。元のデフォルト値はハードコードされています。
配置中の編集
オブジェクトが最初に配置される際に編集できる属性がいくつかあります。これらの属性にアクセスするには、配置モードでTabキーを押して関連するプロパティパネルを開きます。Tabキーを押すと、オブジェクトの必要な編集を行うために配置が一時停止します。

Padオブジェクトの例のプロパティダイアログ。
編集が完了した後、設計空間の一時停止ボタンオーバーレイ( )をクリックして配置を再開します。
この方法で設定された属性は、PreferencesダイアログのPCB Editor – DefaultsページのPermanentオプションが有効にされていない限り、さらなるオブジェクト配置のデフォルト設定になります。このオプションが有効になっている場合、変更は配置されているオブジェクトと、同じ配置セッション中に配置される後続のオブジェクトにのみ影響します。
配置後の編集
オブジェクトが配置された後、それを編集する方法はいくつかあります。これらは以下のとおりです。
関連するプロパティパネルまたはダイアログ
この編集方法は、関連するPropertiesパネルモードおよびダイアログを使用して、配置されたオブジェクトのプロパティを変更します。
配置後、関連するダイアログにアクセスするには:
配置後、Propertiesパネルの関連モードには次のいずれかの方法でアクセスできます。
PreferencesダイアログのPCB Editor – GeneralページでDouble Click Runs Interactive Propertiesオプションが無効(デフォルト)になっている場合、プリミティブをダブルクリックするか、選択したプリミティブを右クリックしてPropertiesを選択すると、ダイアログが開きます。Double Click Runs Interactive Propertiesオプションが有効になっている場合、Propertiesパネルが開きます。
ダイアログとパネルのオプションは同じですが、オプションの順序や配置はわずかに異なる場合があります。
Ctrl+Qを押すと、パネル/ダイアログで現在使用されている測定単位をメートル法(mm)とインペリアル(mil)間で切り替えることができます。これはパネル/ダイアログ内の測定値の表示にのみ影響し、デザインスペースでオブジェクトが選択されていないときにPropertiesパネルのUnits設定で構成されているボードの測定単位は変更されません。
PCBオブジェクト選択コマンド
標準のオブジェクト選択/選択解除コマンドに加えて、PCBエディタにはオブジェクト選択/選択解除操作を容易にするいくつかの特別なコマンドが含まれています。これらのコマンドは、メインメニューのEdit » SelecおよびEdit » DeSelectサブメニューからアクセスできます。選択コマンドは、Active Barの ボタンメニューからもアクセス可能です。
-
Select overlapped - 重なり合ったオブジェクトのセット内で、選択ポップアップウィンドウを使用せずに次のデザインオブジェクトを単一選択するには、次の固定された優先順位の順序に従って選択を行い、コマンドの連続使用を通じて循環します:
-
パッド
-
ビア
-
トラック/アーク
-
コンポーネント
-
ポリゴン
-
領域/塗りつぶし
-
テキスト
さらに、現在の選択に追加のオブジェクトを追加するためにShiftキーを使用している間、Shift+Tabを使用して元の選択を失うことなく重なっているオブジェクトの選択を循環することができます。
-
このコマンドを使用するには、PreferencesダイアログのPCB Editor - GeneralページでDisplay popup selection dialogオプションが無効になっていることを確認してください。
-
選択順序は、他のレイヤーのオブジェクトに進む前に、まず現在のレイヤーを考慮に入れます。
-
同じ場所にあるオブジェクトの領域をダブルクリックすると、常にポップアップ選択ウィンドウにアクセスできます。
-
Select next(ショートカット:Tab) - デザインで初期オブジェクトが選択されている状態で、このコマンドは論理階層に基づいて次の高レベルのオブジェクト(またはオブジェクト)を選択に含めるために使用されます。次の循環論理選択の「フロー」がサポートされています:
-
トラックセグメント--->同じレイヤー上のすべての接続された(連続した)トラック---> すべての接続された銅 --->関連ネット内のすべての電気オブジェクト
-
接続パッド--->同じ層のすべての接続された(連続した)トラック --->すべての接続された銅 --->関連ネット内のすべての電気オブジェクト
-
未接続のパッド---> 関連ネット内のすべての電気オブジェクト
-
経路を介して--->すべての接続された(連続した)トラック、経路に関連するレイヤー上のすべての接続された銅--->関連ネット内のすべての電気オブジェクト
-
銅(地域/ポリゴン注入/充填)--->すべての接続された銅--->関連ネット内のすべての電気オブジェクト
-
フリーパッド/ビア --->パッドと同じ層、またはビアに関連する層上のすべての接続された(連続した)トラック--->すべての接続された銅 --->関連ネット内のすべての電気オブジェクト。
-
コンポーネント--->ファンアウト、エスケープ、相互接続
ビアファンアウト - パッドからビアへと繋がるトレースが十分に短く、このビアに他のパッドがより短いトレースで接続されていない場合、このトレースとビアはそのパッドのファンアウトとみなされます。
エスケープ - パッドに接続された十分に短いアンテナは、そのパッドのエスケープとみなされます。
インターコネクト - 既に選択された2つのオブジェクト(例えば、パッドやファンアウトビア)を接続するトレースはインターコネクトとみなされます。
さらに、この機能は設計内の異なるネットで選択された複数のオブジェクトをまたがる選択拡張に対応しています。
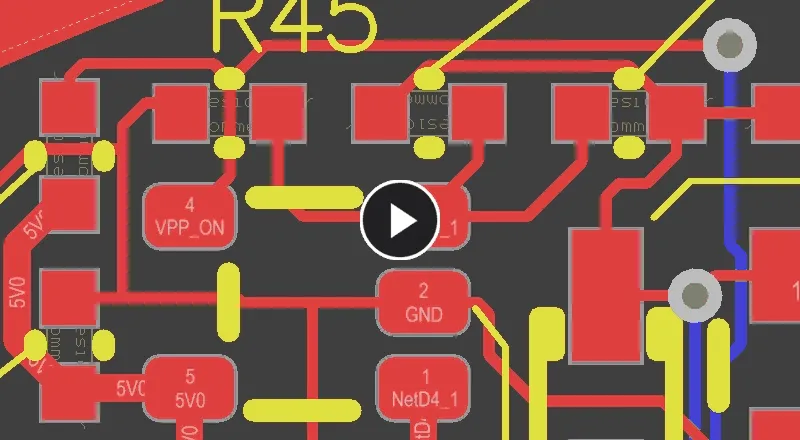
異なるネットをまたがる複数の選択例、初期に選択されたトラックセグメントからより高次の論理階層へと拡張します。
このコマンドは、配線されたネットを選択する際に特に便利です。配線の選択戦略についてもっと学びましょう。
-
Board - 定義されたボード形状の境界内に存在するすべてのオブジェクトを選択するために使用します。
-
Net - 特定のネットに関連するすべての電気オブジェクトを選択するために使用します。
コマンドを起動した後、関連するネットの電気オブジェクトをすべて選択するために電気オブジェクトまたは接続をクリックするか、選択したいネットの名前を知っている場合は、オブジェクトから離れた設計のエリアをクリックします。ネット名ダイアログが開きます。そこから、希望するネット名を入力すると、ダイアログを閉じるとそのネットが選択されます。ネット名がわからない場合は、?を入力してOKをクリックすると、設計で現在ロードされているすべてのネットをリストするNets Loadedダイアログが開きます。

-
Connected Copper - 同じ銅片に接続されているすべての電気オブジェクトを選択するために使用します。
-
Physical Connection - パッドオブジェクト間の物理的に配線されたトラックをすべて選択するために使用します。トラック、パッド、またはビアをクリックすると、別のパッドまでのすべての連続トラックが選択されます(パッド自体は選択に含まれません)。
-
Physical Connection Single Layer - 単一層上のパッドオブジェクト間の物理的に配線されたトラックをすべて選択するために使用します。トラックまたはビアをクリックすると、同じ層上のすべての連続トラックが別のパッドまで選択されます(パッドとビア自体は選択に含まれません)。
-
Component Connections - 選択されたコンポーネントのパッドから発生するすべての配線接続(トラックとビアを含む)を選択するために使用します。各ケースで次に遭遇するパッドまでです(パッド自体は選択に含まれません)。
このコマンドは、配置されたコンポーネント上で右クリックしてからコンテキストメニューからComponent Actions » Select Component Connectionsコマンドを選択することでもアクセスできます。
-
Component Nets - 現在のドキュメントで選択されたコンポーネントに接続されているすべてのネット(およびその中のメンバーネットオブジェクト)を選択するために使用します。
このコマンドは、配置されたコンポーネント上で右クリックしてからコンテキストメニューからComponent Actions » Select Component Connectionsコマンドを選択することでもアクセスできます。
-
Room Connections - 選択されたルームの境界内に完全にあるパッド間の配線接続をすべて選択するために使用します。
このコマンドは、配置されたルーム上で右クリックしてからコンテキストメニューからRoom Actions » Select Room Connectionsコマンドを選択することでもアクセスできます。
-
All on Layer - 現在のレイヤー上のすべてのオブジェクトを選択/選択解除するために使用します。
コンポーネントは特定のレイヤーに配置されることがありますが、DeSelect » All on Layerコマンドを使用して選択解除することはできません。これは、コンポーネントを構成するすべてのプリミティブが同じレイヤーに配置されているわけではないためです。例えば、デザインatorやコメントテキストはトップオーバーレイレイヤーに配置される一方で、構成パッドはマルチレイヤーです。
-
Free Objects - 設計内のすべての自由な原始オブジェクトを選択するために使用します。コンポーネントオブジェクト、座標オブジェクト、寸法オブジェクト、長さ調整オブジェクト、OLEオブジェクト、およびポリゴンポアオブジェクトはすべてグループオブジェクトであり、このコマンドの影響を受けません。
-
All Locked - Lockedプロパティが有効になっているすべてのデザインオブジェクトを選択するために使用します。
-
Off Grid Pads - 現在のスナップグリッドに配置されていないすべてのパッドを選択するために使用します。
PCBエディタでは、Lasso Select / Lasso Deselectコマンドが2つの操作モードを提供することに注意してください:
-
フリーフォーム - 本物のラッソのように、必要なデザインオブジェクトを取り込むためにフリーハンドの選択領域を描くことができます。
-
ポリライン - 多角形の「ラッソ」を提供するこのモードは、オブジェクトをより正確に選択解除する必要がある場合、自由形式モードよりも好まれることがあります。このモードは、45度回転したコンポーネントを持つデザインや、デザインが常に直交していないフレックスで作業する際に非常に便利です。
両方のモードの組み合わせを使用して、選択解除エリアを正確に希望通りに設定することもできます。現在のモード
Status Barに反映されています。
Spacebarを押すと、フリーフォームモードとポリラインモードの間で切り替えられます。
コンポーネントオブジェクトのプリミティブをターゲットにするために、Lasso Select、Inside Area、Outside Area、Touching Line、またはTouching Rectangleコマンドを使用する際は、Ctrlキーを押し続けてください。
グラフィカル編集
この編集方法では、デザインスペース内に配置されたオブジェクトを直接選択し、そのサイズ、形状、または位置をグラフィカルに変更できます。形状および/またはサイズの変更(該当する場合)は、オブジェクトが選択されると表示される編集用の「ハンドル」を使用して行われます。
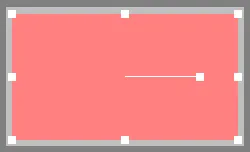
選択したフィルオブジェクトの例編集ハンドル。
編集ハンドル(存在する場合)から離れたオブジェクトの任意の場所をクリックして、オブジェクトをドラッグして再配置します。オブジェクトの種類によっては、ドラッグ中に回転または反転することがあります。
-
オブジェクトを反時計回りに回転させるにはSpacebarを押し、時計回りに回転させるにはShift+Spacebarを押してください。回転は、PreferencesダイアログのPCB Editor – Generalページで定義されたRotation Stepの値に従います。
-
Lキーを押して、オブジェクトをボードの反対側にひっくり返します(該当する場合)。
-
X軸またはY軸に沿ってオブジェクトを反転させるには、XキーまたはYキーを押してください。
-
移動の初期方向に応じて、移動の方向を水平方向または垂直方向に制約するには、Altキーを押してください。
-
オブジェクトを小さな量(現在のスナップグリッド値に従って)で押すには、Ctrlキーを押しながら矢印キーを押します。大きな量(スナップグリッド値の10倍)で押すには、Ctrl+Shiftキーを押しながら矢印キーを押します。
複数の選択されたオブジェクトをドラッグするときに表示されるプリミティブの数は、PCBによって制御されます。Advanced SettingsダイアログのPCB.Rendering.MultiselectionDragオプション(デフォルト値は500)です。
移動コマンド
オブジェクトの位置は、メインメニューのEdit » Moveサブメニューのコマンドや、Active Barの移動サブメニューを使用して変更できます。

-
Move - このコマンドは、現在のドキュメント内の任意のオブジェクトを移動するために使用されます。オブジェクトに関連付けられたネットは接続されたままであり、オブジェクトが移動されるときに接続ラインはオブジェクトに従って移動します(接続モードに応じて表示されるかどうか)。オブジェクトに接続された配線トラックは移動されません。
-
Drag - このコマンドは、現在のドキュメント内の任意のオブジェクトを移動するために使用されます。オブジェクトに接続されたトラックやアーク(例えば、コンポーネント、パッド、またはビア)がある場合、これらはオブジェクトが移動されるときに接続されたままです。
-
コンポーネントとともに接続されたトラックを移動させるには、Comp DragモードをConnected Tracksに設定する必要があります。これはPreferencesダイアログのPCB Editor - Generalページので設定します。このモードがNoneに設定されている場合、コマンドは基本的な移動コマンドと同じように動作します。
-
Comp DragモードをConnected Tracksに設定してコンポーネントをドラッグするとき、回転および反転キーコマンドは使用できなくなります。また、スマートな動作(動的な整列や押し出し)も利用できません。
-
Component - このコマンドを使用すると、現在のドキュメント内のコンポーネントを移動できます。コマンドを起動した後、移動したいデザイン内のコンポーネントをクリックして必要な位置に移動し、クリックします。または、デザインスペース内の任意のオブジェクトから離れた場所をクリックしてChoose Componentダイアログを開きます。このダイアログを使用して、移動したいコンポーネントを探し(コンポーネントにジャンプするか、カーソルにコンポーネントを持ってくることによって)、上記と同じ方法で再配置します。この機能は、対象のコンポーネントがロックされていない場合にのみ機能します。
デザインスペース内のコンポーネントを右クリックしてから、コンテキストメニューからComponent Actions»Move Componentコマンドを選択することで、このコマンドにもアクセスできます。
-
Move Selection - このコマンドを使用すると、現在のドキュメント上で選択されたオブジェクトを手動で再配置できます。選択内のオブジェクトに関連付けられたネットは接続されたままであり、オブジェクトが移動されるときに接続ラインはオブジェクトに従って移動します(接続モードに応じて表示されるかどうか)。オブジェクトに接続された配線トラックは移動されません。
-
Move Selection by X, Y - このコマンドは、選択されたオブジェクトの現在の選択をXおよび/またはY方向に正確な量だけオフセットするために使用されます。コマンドを起動すると、Get X/Y Offsetsダイアログが開きます。このダイアログを使用して、選択を移動するためのdelta Xおよび/またはdelta Yの増分値を指定します。
このコマンドは、デザインスペースで少なくとも1つのオブジェクトが選択されている場合にのみ利用可能です。

Get X/Y Offsetsダイアログ
Get X/Y Offsetsダイアログのオプションとコントロール
-
X Offset - 選択を水平軸に沿って移動する距離を指定するためにこのフィールドを使用します。必要に応じて正または負の値を指定できます。このフィールドの右側にあるボタンを使用して、入力された値を素早く正または負に切り替えます。
-
Y Offset - 選択を垂直軸に沿って移動する距離を指定するためにこのフィールドを使用します。必要に応じて正または負の値を指定できます。このフィールドの右側にあるボタンを使用して、入力された値を素早く正または負に切り替えます。
-
Toggle X/Y Offsets - このボタンをクリックしてオフセット値を素早く入れ替えます。X Offsetの値がY Offsetの値として使用され、その逆も同様です。
-
Reset X/Y Offsets - このボタンをクリックして両方のオフセット値を素早くゼロにリセットします。
-
Define X/Y Offsets Interactively - このボタンをクリックしてオフセットを対話的に計算します。ワークスペースに移動し、開始点と終了点を順番に選択するように求められます。希望する場所をクリックします。dXおよびdYの値がそれぞれX OffsetおよびY Offsetフィールドに入力されます。
ダイアログユニットをインペリアルとメートル法の間で切り替えるには、Ctrl+Qショートカットを押してください。
Rotate Selection - このコマンドは、デザインスペース内の選択したオブジェクトを指定された回転角度で反時計回りまたは時計回りに回転させるために使用されます。コマンドを起動すると、Rotation Angle (Degrees) ダイアログが開きます。0.001°から360.00°(解像度0.001°)の範囲で必要な回転角度を入力します。反時計回りの回転には正の値を、時計回りの回転には負の値を入力します。ダイアログを閉じるにはOKをクリックし、カーソルを位置決めして回転の基準点を定義するためにクリックします。選択したオブジェクトは、入力した角度で基準点の周りに回転します。

Rotation Angleダイアログ
Flip Selection - 選択したオブジェクトを水平方向(Y軸周り)に反転させ、ボードの反対側の対応するレイヤーに移動します。例えば、Top LayerのオブジェクトはBottom Layerに反転し、Top OverlayのオブジェクトはBottom Overlayに反転します。, etc.
-
指定子とコメントテキストは、フリップアクションの後に反転します。
-
マルチレイヤー上に存在するパッドの場合、反転は本質的にXYサイズのペアリングと形状の順序を逆にします。したがって、Top-Middle-Bottomのスタイルが使用され、形状が最初にRound-Rectangle-Octagonalである場合、反転するとスタックが逆になり、上からの形状はOctagonal-Rectangle-Roundになります。
-
複数のオブジェクトが選択されている場合、オブジェクトのセットは選択セットの幾何学的中心を中心に反転します。
選択されたすべてのオブジェクトは、1つ以上のオブジェクトの位置がロックされていない限り、警告なしに反転されることに注意してください。その場合、オブジェクトが反転される前に確認が必要なConfirmダイアログが表示されます。
整列コマンド
オブジェクトは、その配置を変更することで移動することもできます。他のオブジェクトとオブジェクトを整列させるには、選択したオブジェクトを右クリックし、次にAlignを選択します。あるいは、メインメニューのEdit » Alignサブメニューや、Active Barの整列サブメニューを使用します。整列サブメニューには、選択したオブジェクトを分配するためのいくつかのオプションが含まれています。
整列コマンドは、移動可能な選択されたオブジェクトのみを移動させます。ロックされたオブジェクトは移動されません。

Alignコマンドは、現在選択されているデザインオブジェクトのセットを必要に応じて迅速に整列させるためのコントロールを提供するAlign Objectsダイアログにアクセスするために使用されます。ダイアログを使用して、選択したオブジェクトのVerticalおよび/またはHorizontal方向の整列オプションを設定し、必要に応じてOKをクリックして整列を実行します。
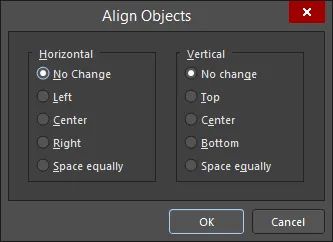
Align Objectsダイアログ
Position Component Textコマンドは、現在のドキュメント内の1つ以上の選択されたコンポーネントの指定子および/またはコメントテキストの位置を変更するために、コンポーネントテキスト位置設定ダイアログを起動するために使用されます。
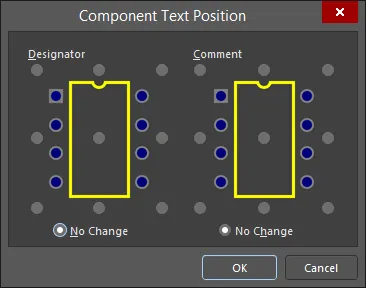
Component Text Position ダイアログ
このダイアログは、基本的に指定子とコメントテキストの2つの領域に分かれています。指定子とコメントの両方について、テキストが選択された位置に基づいて表示される場所を示すために、コンポーネントのグラフィカルな表現が補助として使用されます。テキストに利用可能な次の9つの位置スタイルはすべて、「自動位置」として分類され、コンポーネントが移動および回転されてもテキストは選択された位置に留まります:
-
Left-Above
-
Left-Center
-
Left-Below
-
Center-Above
-
Center
-
Center-Below
-
Right-Above
-
Right-Center
-
Right-Below
テキストを現在の位置に変更せずにそのままにする場合は、No Changeオプションを有効にしておきます。
-
指定子とコメントテキストの位置は、PropertiesパネルのPropertiesセクションを通じて変更することもできます。指定子/コメントまたは親コンポーネントを選択すると、これらのプロパティが表示されます。指定子/コメントの現在のレイヤー、位置、および回転をテキストで要約する関連するコントロールをクリックし、ポップアップウィンドウで必要に応じてAutopositionプロパティを使用します。
-
指定子/コメントテキストを自由に位置設定し、親コンポーネントの動き/方向に従わせるには、ManualスタイルをAutopositionプロパティに設定します(プロパティパネルを通じてプロパティを設定する場合)。また、ワークスペース内で直接テキストをクリックして保持し、必要な位置にドラッグすることもできます。これにより、Autopositionプロパティが自動的にManualに切り替わります。
Align Left / Align Right / Align Top / Align Bottomコマンドにより、選択したデザインオブジェクトをそれぞれの左/右/上/下のエッジに沿って揃えることができます。コマンドを起動した後、最も左/右/上/下にあるオブジェクトの左/右/上/下のエッジが参照として使用され、選択内の他のすべてのオブジェクトが左/右/上/下に移動して、この参照と左のエッジが揃います。
Align Left (maintain spacing) / Align Right (maintain spacing) / Align Top (maintain spacing) / Align Bottom (maintain spacing)コマンドを使用すると、選択したデザインオブジェクトをその左/右/上/下のエッジに沿って整列させることができ、適用されるデザインルールに従って適切な間隔を維持します。コマンドを起動すると、最も左/右/上/下のオブジェクトの左/右/上/下のエッジが基準として使用され、選択された他のすべてのオブジェクトが左/右/上/下に移動し、その左エッジがこの基準に整列します。オブジェクトは、適用されるクリアランスルールが許可する限り、基準オブジェクトにできるだけ近くに左/右/上/下に移動されます:
Align Horizontal Centers / Align Vertical Centersコマンドを使用すると、選択したオブジェクトを単一の列/行に配置し、それらの水平/垂直中心に揃えることができます。コマンドを起動すると、カーソルが十字線に変わり、選択したオブジェクトの1つを選択するように求められます。それをクリックしてください。これが基準オブジェクトになります。選択した他のすべてのオブジェクトは、この基準オブジェクトに対して移動し、それらの水平/垂直中心に揃えられます。
Distribute Horizontally / Distribute Verticallyコマンドを使用すると、オブジェクトの選択範囲の水平/垂直間隔を等しくすることができます。コマンドを起動した後、選択範囲内の最も左側および右側/最も上側および下側のオブジェクトはその位置に固定され、他のすべてのオブジェクトはその間に均等に配置されます。オブジェクトの垂直/水平位置は変更されません。
The Increase Horizontal Spacing / Increase Vertical Spacingコマンドを使用すると、オブジェクトの選択の水平方向/垂直方向の間隔を増やすことができます。コマンドを起動した後、最も左側/最も下側のオブジェクトは固定され、選択された他のオブジェクトは右/上に移動します。移動は、連続するオブジェクトの基準点間の水平方向/垂直方向の距離が、デフォルトのGlobal Board Snap GridのStep X / Step Yフィールドで指定された量だけ増加するように行われます。
Decrease Horizontal Spacing / Decrease Vertical Spacingコマンドを使用すると、オブジェクトの選択の水平方向/垂直方向の間隔を減少させることができます。コマンドを起動した後、最も左側/最も下側のオブジェクトは固定され、選択された他のオブジェクトは左/下に移動します。移動は、連続するオブジェクトの基準点間の水平方向/垂直方向の距離が、デフォルトのGlobal Board Snap GridのStep X / Step Yフィールドで指定された量だけ減少するように行われます。
Align To Gridコマンドは、選択したコンポーネントを適用可能で修正されたスナップグリッドの最寄りのポイントに移動するために使用されます。コマンドを起動した後、選択した各コンポーネントの基準点は、適用可能なスナップグリッドの最寄りのポイントに移動されます。
Move All Components Origin To Gridコマンドは、すべてのコンポーネントの参照点を現在のスナップグリッドに移動するために使用されます。コマンドを起動すると、デザインスペース内のパッドがグリッド上にあるすべてのコンポーネントが、その参照点が現在のスナップグリッドに整列するように移動されます。デフォルトでは、移動されたコンポーネントと移動されていないコンポーネントの詳細を記載したレポート - Move Component(s) Origin To Grid - <PCBDocumentName>.html - が自動的に生成され、アクティブなドキュメントとして開かれます。
現在オフグリッドのパッドを持つコンポーネントは移動されないことに注意してください。
PCBリストパネル経由
PCB Listパネルを使用すると、設計オブジェクトを表形式で表示し、オブジェクト属性の迅速な検査と変更を可能にします。PCB Filterパネルと組み合わせて使用することで、アクティブフィルターの範囲内にあるオブジェクトのみを表示し、複数の設計オブジェクトをより正確かつ効率的にターゲティングおよび編集できます。
アクティブレイヤーの選択
アクティブレイヤーはオブジェクトを配置するレイヤーです。アクティブレイヤーは、設計スペースの下部にあるこのレイヤーのタブをクリックするか、View ConfigurationパネルのLayers & ColorsタブにあるLayers領域のActive Layerドロップダウンを使用することで、現在表示されているレイヤーから選択できます。
次のショートカットを使用して、アクティブレイヤーを迅速に選択することもできます:
マルチレイヤー上に配置されたオブジェクトは、自動的にすべての信号レイヤーに表示されます。
カット/コピーとペーストの使用
PCBエディタでは、PCBドキュメント内またはPCBドキュメント間でオブジェクトをカット/コピーおよびペーストできます。例えば、PCBからコンポーネントを別のPCBドキュメントにコピーできます。オブジェクトをWindowsクリップボードにカット/コピーして、他のドキュメントにペーストできます。
2D Layout Modeを使用する場合、カット/コピーしたいオブジェクトを選択し、メインメニューからEdit » Cut (Ctrl+X) / Edit » Copy (Ctrl+C)をクリックするか、右クリックメニューからCut/Copyコマンドを選択します。カーソルが十字線に変わり、参照点を選択するように求められます。これは、選択したオブジェクトに対して相対的な座標であり、ペーストコマンドを使用する際に選択を正確に配置するために使用されます。
3D Layout Modeでコピー コマンドを使用する場合、設計スペースの現在のビューがビットマップ形式でクリップボードにコピーされます。コピーされた画像の解像度は、その後に開く3Dスナップショット解像度ダイアログを通じて制御できます。
現在選択されている設計オブジェクトをテキスト形式でクリップボードにコピーするには、メインメニューからEdit » Copy As Textコマンドを使用できます。この情報は、任意のテキストフィールドや外部テキストドキュメントに貼り付けることができます。クリップボードにコピーされた詳細には以下が含まれます:
クリップボードにテキストとしてコピーされたコンポーネントの例:
Component Y1-25MHz (100.6mm,1.5mm) on Top Layer
トラックとビアがクリップボードにテキストとしてコピーされた例:
Track (20mm,6mm)(80mm,6mm)  Top Layer

	Via (45mm,6mm) Top Layer to Bottom Layer
クリップボードに最後にカット/コピーされた内容をアクティブドキュメントに配置するには、メインメニューからEdit » Pasteコマンドを選択するか、設計スペース内を右クリックしてコンテキストメニューからPasteコマンドを選択します(ショートカット:Ctrl+V)。最新のクリップボード内容がカーソル上に浮かび上がります。カーソル位置は、CutまたはCopyが使用されて選択がクリップボードに追加されたときに指定された参照点によって決定されます。
Pasteコマンドを使用すると、オブジェクトはソースオブジェクトがコピーされたのと同じレイヤーにペーストされ、エディタで現在アクティブなレイヤーがどれであっても関係ありません。
サポートされているOLEアプリケーションからコピーされたテキストを任意のオープンPCBドキュメントに配置するには、メインメニューのEdit » Paste Textコマンドを使用できます。テキストはPCB文字列オブジェクトとして変換され、貼り付けられます。サポートされているファイルタイプには、CSVやXLS形式のスプレッドシート、DOCやRTF形式のワードドキュメントなどのユニバーサルフォーマットが含まれます。
特定のオブジェクト属性がデザインスペースに戻されたときに何が起こるかを制御するには、メインメニューのEdit » Paste Specialコマンドを使用できます。コマンドを起動すると、Paste Specialダイアログが開きます。
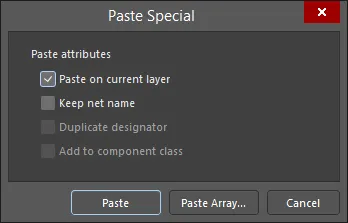
Paste Specialダイアログ
貼り付ける特定の内容に応じて、次の属性を制御できます。
-
オブジェクトは、ソースオブジェクトがコピーされた同じレイヤーに貼り付けるというデフォルトの貼り付け動作ではなく、現在のレイヤーに貼り付けることができます。
デザインスペースでAlt+Insertキーボードショートカットを使用して、現在のレイヤーにコンテンツを直接貼り付けることもできます。
-
割り当てられたネット名を保持する能力。
-
貼り付けたコンポーネントの指定子を複製する能力。
-
元のソースコンポーネントと同じコンポーネントクラスに貼り付けたコンポーネントを追加する能力。
必要に応じてオプションを設定し、次に貼り付け操作を開始するためにPasteボタンをクリックします。
Paste SpecialダイアログでPaste Arrayボタンをクリックすると、Setup Paste Arrayダイアログが開き、クリップボードのオブジェクトを現在の文書に複数コピーして貼り付けることができます。

Setup Paste Arrayダイアログ
このダイアログに適切な値を入力してからOKをクリックして配列を配置します。
-
直線配列を配置する場合、配列の開始点を選択するように求められます。カーソルを位置づけてからクリックまたはEnterを押して配列を配置します。
-
円形配列を配置する場合、配列の中心点と開始点を選択するように求められます。それぞれの場合にカーソルを位置づけてからクリックまたはEnterを押して配列を配置します。オブジェクトは指名された中心点の周りに反時計回りに配置されます。
配列の開始点は、CutまたはCopyが使用されてクリップボードに選択を追加したときに指定された参照点になります。したがって、切り取り/コピーの際に参照点が適切に指定されていることを確認することが望ましいです。そうでないと、配列を貼り付ける際に予期しない結果が発生する可能性があります。
現在のドキュメントで必要な場所に選択したオブジェクトの複数のインスタンスをコピーして貼り付けるには、メインメニューからEdit » Duplicateコマンド(ショートカット:Ctrl+R)も使用できます。コマンドを起動すると、カーソルが十字線に変わり、複製モードに入ります。プロセスには次の一連のステップが含まれます:
-
最初に参照点を選択するように求められます。これは選択が貼り付けられる点です。選択に近い必要な位置にカーソルを移動してからクリックまたはEnterを押します。選択のコピーがカーソルに浮かんで表示されます。
-
カーソルを設計スペースの望ましい位置に移動してからクリックまたはEnterを押してコピーを配置します。
-
別の選択のコピーが配置の準備ができてカーソルに浮かんで表示されます。
-
コピーされた選択のさらなるインスタンスを配置し続ける(まるでゴム印を使用するように)か、右クリックまたはEscを押して終了します。
このコマンドはオブジェクトをコピーして貼り付けるために使用されるため、グループオブジェクトの子を複製するためには使用できません。
オブジェクトを貼り付ける際の優先順位
オブジェクトが銅層に貼り付けられ、異なるタイプのオブジェクトのセットと重なる場合、貼り付けられたオブジェクトには最も優先度の高いオブジェクトのネットが割り当てられます。優先度は以下の通りです(1が最も高い優先度です):
-
Pad
-
Fill
-
Region
-
Track
-
Arc
-
Via
-
Polygon Pour
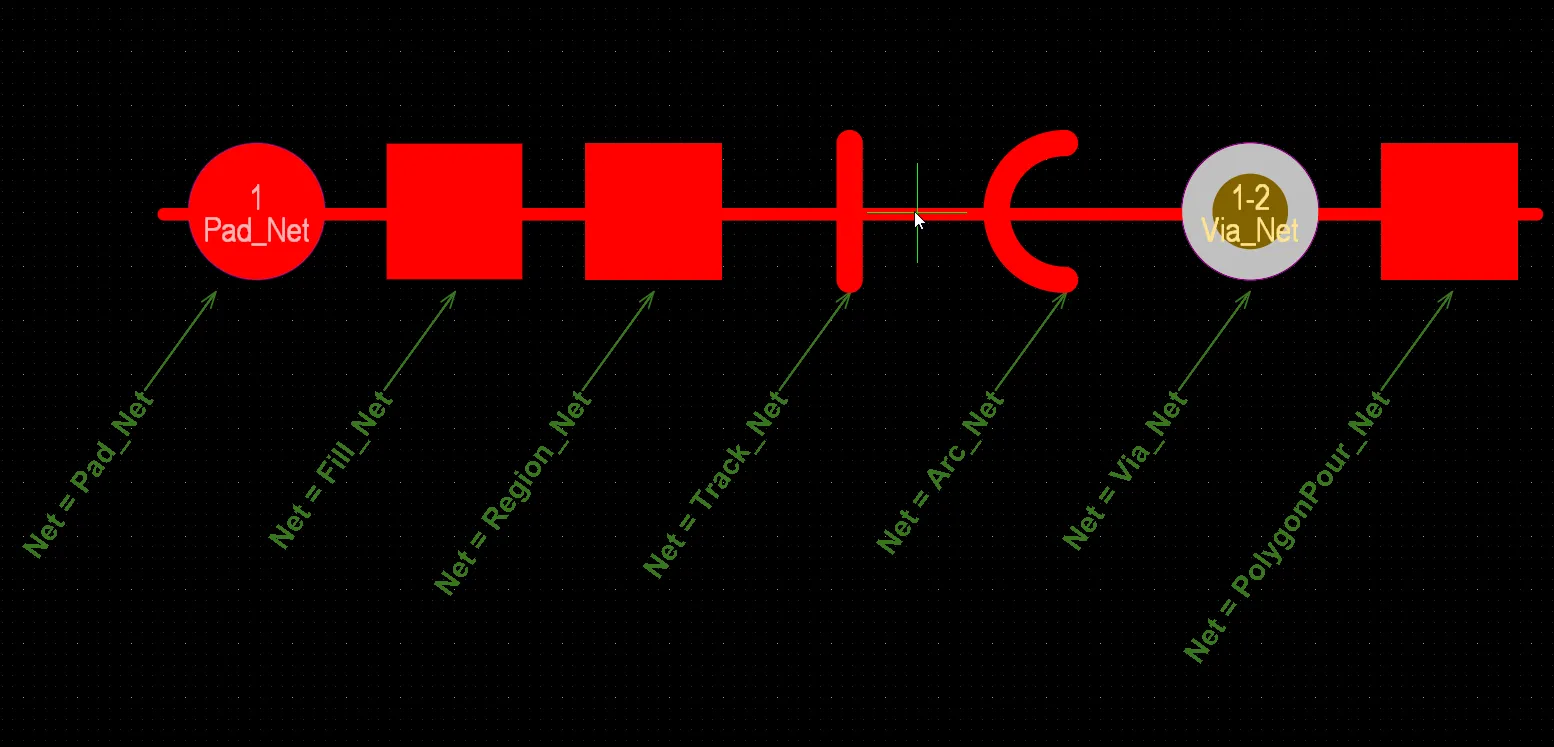
最優先オブジェクトのネットが貼り付けられたオブジェクトに割り当てられます。ここでは、異なるタイプのオブジェクトのセットに異なるネットが割り当てられたオブジェクト(トラック)が貼り付けられています。このセットではパッドが最優先オブジェクトであるため、そのネット(Pad_Net)が貼り付けられたオブジェクトに割り当てられます。画像の上にカーソルを置くと結果が表示されます。
オブジェクトが銅層に貼り付けられ、貼り付け時に同じタイプのオブジェクトのセットと重なる場合、オブジェクトを貼り付けるためにクリックしたときにカーソルの下にあるオブジェクトのネットが割り当てられます。

カーソルの下にあるオブジェクトのネットが貼り付けられたオブジェクトに割り当てられます。ここでは、同じタイプのオブジェクト(パッド)のセットの上に貼り付けられたオブジェクト(トラック)が示されています。オブジェクトを貼り付けるためにクリックしたときにカーソルの下にあるオブジェクトはパッド2であるため、このパッドのネット(Pad2_Net)が貼り付けられたオブジェクトに割り当てられます。画像の上にカーソルをホバーさせて結果を確認してください。
物理的に接続されたオブジェクトのセットが銅層に貼り付けられ、異なるタイプのオブジェクトがこのセット内で異なるネットを持つ既存のオブジェクトと重なる場合、このセット内の最も優先度の高いオブジェクトのネットがすべての貼り付けられたオブジェクトに割り当てられます。上記の優先度がこの場合に適用されます。
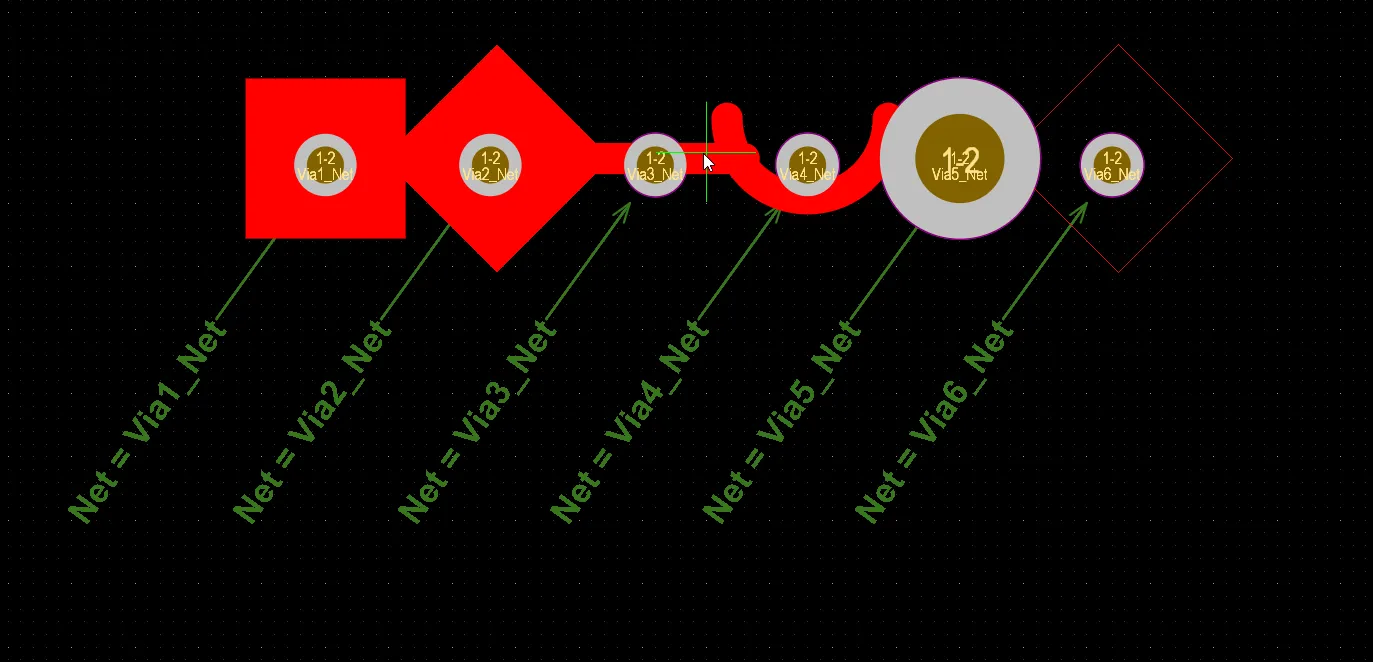
最も優先度の高いオブジェクトに割り当てられたネットは、物理的に接続されたオブジェクトのセットに割り当てられます。ここには、接続されたオブジェクトのセット(左から右へ:フィル、リージョン、トラック、アーク、ビア、ポリゴンポア)が、異なるネットが割り当てられたオブジェクト(ビア)の上に貼り付けられています。この貼り付けられたセットの中でフィルが最も優先度の高いオブジェクトであるため、フィルに割り当てられたネット(Via1_Net)は、このセット内の各オブジェクトに割り当てられます。画像の上にカーソルを置くと結果が表示されます。
デザインオブジェクトのロック
デザインオブジェクトは、Locked属性を有効にすることで、PCBドキュメント上で移動や編集ができないようにロックできます。たとえば、特定のオブジェクトの位置やサイズが重要な場合は、それらをロックしてください。ロックは、以下の例に示すように、Propertiesパネルで目的のオブジェクトのための南京錠アイコン (  ) をクリックすることで行えます。

選択したコンポーネントとパッドのPropertiesパネルにおけるLockアイコンの例。
Lockedプロパティを持つ配置されたオブジェクトのLockedプロパティの状態を切り替えるには、デザインスペース内のオブジェクトを右クリックし、コンテキストメニューから<ObjectType> Lockedコマンドを選択することもできます。オブジェクトがすでにロックされている場合、メニューのコマンドエントリの左側にチェックアイコンが表示されます。
Lockedプロパティが有効なデザインオブジェクトを移動または回転しようとすると、編集を続行するかどうか確認するダイアログが表示されます。
PCBエディタのPCB Editor – GeneralダイアログでProtect Locked Objectsオプションが有効になっていて、デザインオブジェクトがロックされている場合、そのオブジェクトは選択したりグラフィカルに編集したりできません。PropertiesパネルのLockアイコンを使用してオブジェクトのロックを解除するか、Protect Locked Objectsプションを無効にしてこのオブジェクトをグラフィカルに編集してください。
ロックされたオブジェクトと他のオブジェクトを選択しようとすると、ロック解除されたオブジェクトのみが選択され、
Protect Locked Objectsオプションが有効な場合、グループとして移動できます。
コンポーネントプリミティブのロック
PCBコンポーネントのプリミティブがロックされている場合(PropertiesパネルののComponentモードのPrimitivesオプションが 状態にある場合)、これらのプリミティブのほとんどまたはすべてのプロパティは、グラフィカル(例:ドラッグアンドドロップを使用して)および非グラフィカル(例:プロパティパネルやリストパネルを使用して)の編集方法を使用して変更することができません。これにより、コンポーネントのプリミティブが偶発的に変更され、組み立てや製造の出力が正しくない結果になるのを防ぐことができます。
PCBコンポーネントのプリミティブの変更を防止する機能を有効/無効にするには、PreferencesダイアログのPCB Editor – GeneralページのProtect Locked Primitives In Componentオプションを使用します。
例として、プリミティブがロックされたPCBコンポーネントの一部であるパッドのPropertiesパネルのPadモードが下の画像で表示されています。パッドのすべてのプロパティ(NetとTestpointのプロパティを除く)が暗く表示され、編集できないことに注意してください。また、パッドのComponentフィールドの右端に アイコンが表示され、親コンポーネントのプリミティブがロックされており、パッドのプロパティを変更できないことを示しています。
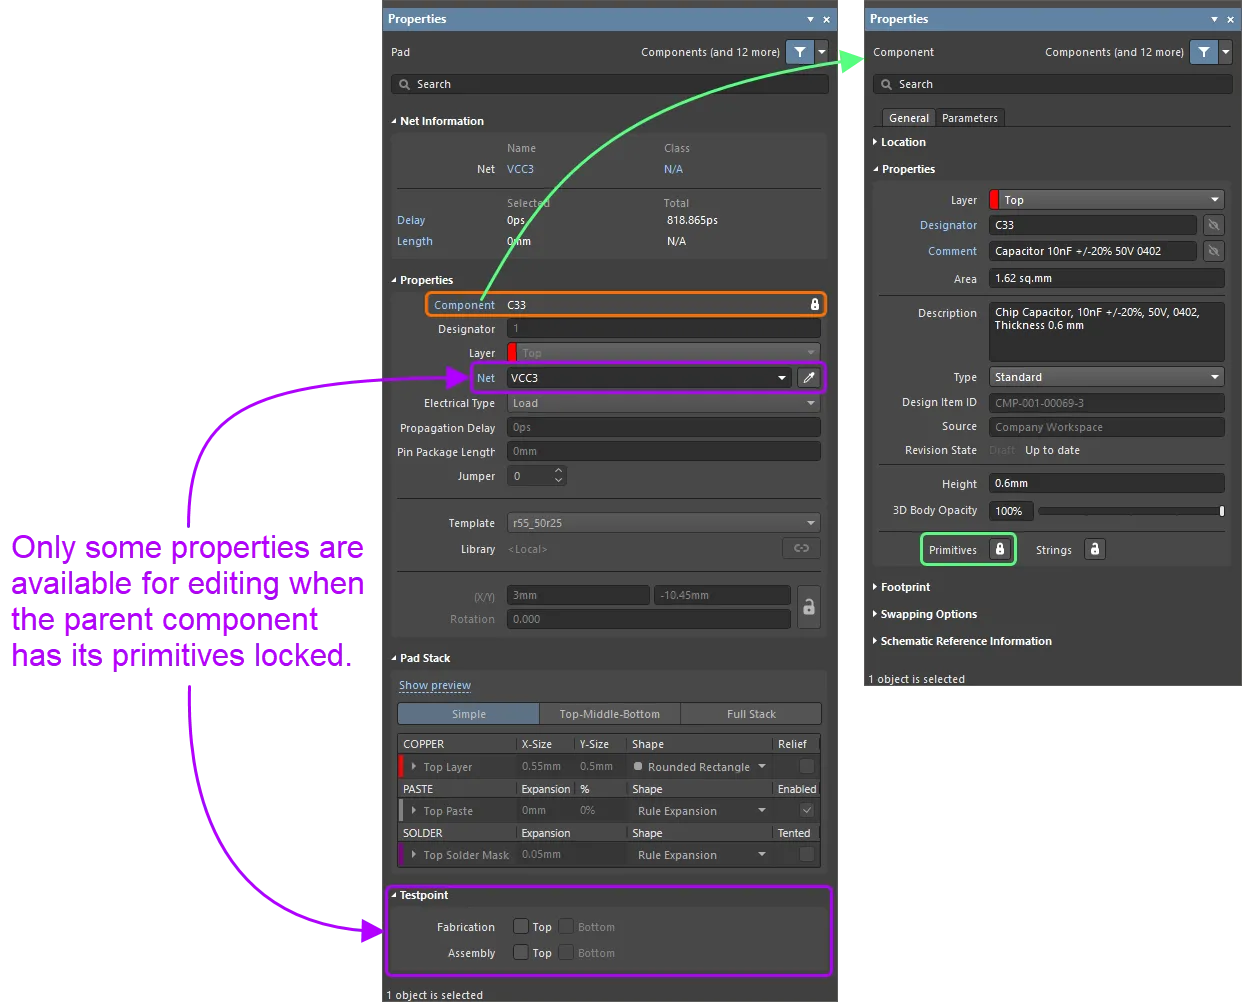
PropertiesパネルのPadモード(左)プリミティブがロックされたPCBコンポーネント(右)。
再入力編集
PCBエディタには、re-entrant editingと呼ばれる強力な機能が含まれています。これにより、現在の操作を終了させることなく、キーボードショートカットを使用して第二の操作を実行できます。再入力編集により、より柔軟で直感的に作業できます。例えば、トラックの配置を開始してから、別のトラックセグメントを削除する必要があることに気づいた場合、Interactive Routing モードから抜ける必要はありません。E、Dのショートカットキーを押して、必要なトラックセグメントを削除し、Escキーを押してデザインのインタラクティブ配線に戻ります。
PCBカーソルの外観設定
デフォルトでは、PCBカーソルは小さな緑色の90度クロスとして設定されています。これは、PreferencesダイアログのPCB Editor – GeneralページのCursor TypeおよびCursor Color設定を使用して構成できます。たとえば、デザインウィンドウの端まで伸びる大きな90度クロス(Large 90オプション)は、デザインオブジェクトの配置と整列に便利かもしれません。また、グリッドラインに対して90度のオプションが見にくい場合は、45度のクロス(Small 45オプション)が便利かもしれません。
True Typeフォントのサポート
PCBエディタは、デザイン内のテキスト関連オブジェクト(テキスト文字列/フレーム、寸法、ドリルテーブル、および/またはレイヤースタックテーブル)にストロークベースまたはTrueTypeフォントを使用する機能を提供します。フォントの選択は、関連するプロパティパネル内から行われます。3つのストロークベースのフォントオプションが利用可能です - Default、Sans Serif、およびSerif.。Defaultスタイルは、ペンプロッティングおよびベクターフォトプロッティングをサポートするシンプルなベクターフォントです。Sans SerifおよびSerif.フォントはより複雑で、Gerberなどのベクター出力生成を遅くします。ストロークベースのフォントはソフトウェアに組み込まれており、変更できません。すべてのフォントには、英語およびその他のヨーロッパ言語をサポートする完全なIBM拡張ASCII文字セットがあります。TrueTypeフォントを使用する場合、\Windows\FontsフォルダにあるTrueTypeおよびOpenType(TrueTypeのスーパーセット)フォントが使用できます。この機能は、完全なUnicodeサポートも提供します。
検出された(そして一意の名前の)ルートフォントのみが使用可能です。たとえば、ArialとArial Blackは利用可能ですが、Arial BoldおよびArial Bold Italicは利用できません。
TrueTypeフォントを使用したテキストオブジェクトのジオメトリは、PCBドキュメント内に自動的に保存されます。PCBドキュメント内のオブジェクトがTrueTypeフォントを使用している場合、他のコンピュータでPCBドキュメントを開いても、そのTrueTypeフォントがインストールされていなくても、同じフォントジオメトリで表示されます。
欠落フォントを使用しているオブジェクトが選択されると、プロパティパネルの上部に警告メッセージが表示されます。テキストに影響を与えるオブジェクトのプロパティを変更すると(例:テキストの高さやテキスト自体)、Missing fonts ダイアログが開き、代替フォント(Replacement))を選択できます。欠落フォントを使用しているPCBドキュメント内のすべてのオブジェクトに代替フォントを適用するには、Apply to all text elementsオプションを有効にします。

ダイアログは、PCB Listパネルからテキスト関連のプロパティを変更する際にも表示されます。
異なる欠落フォントを使用して複数のオブジェクトを編集しようとすると、ダイアログは各欠落フォントの代替を選択できるようにします。

PCB文書内でTrueTypeフォントを使用するテキストオブジェクトのジオメトリを自動的に保存する機能は、Advanced SettingsダイアログでPCB.Text.TTFontSavingオプションが有効になっているときに利用可能です。このオプションが無効になっている場合、Altium Designerを設定してTrueTypeフォントを埋め込むことができます。PreferencesダイアログのPCB Editor – TrueType Fontsページ(Advanced SettingsダイアログでPCB.Text.TTFontSetting.Hideオプションが無効になっているときに利用可能)のでは、設計を保存する際にTrueTypeフォントを埋め込むためのEmbed TrueType fonts inside PCB documentsオプションと、設計を読み込む際に選択したフォントの置き換えを適用するためのSubstitution fontオプションが提供されています。
フォントを埋め込むことは、デザインが読み込まれるターゲットコンピュータにフォントが存在するかどうかにかかわらず、テキストを特定のフォントで表示する必要がある場合に便利です。フォントの置き換えにより、フォントが埋め込まれていないデザインを読み込む際に、コンピュータ上で利用できないフォントの代わりに使用するTrueTypeフォントを指定できます。
ネット情報
PCB上の銅製オブジェクト(トラック、ビア、ポリゴンなど)について、オブジェクトが選択されると、PropertiesパネルのNet Information領域に次の情報が表示されます:
-
親Net、Diff Pairおよび/xSignalと各ケースの関連クラス。オブジェクトがそれぞれ差動ペアまたはxSignalの一部である場合にのみ、Diff PairおよびxSignalのエントリが表示されることに注意してください。
-
Delay – 選択されたオブジェクトの遅延と、ネット全体の配線されたセグメントの遅延を含めます。パッドとビアのPropagation Delay値も、パッドとビアに定義されている場合は含めてください。
ビアの場合、伝播遅延は使用されるビアの長さに比例して計算されます。この機能は、Advanced SettingsダイアログでPCB.Delay.Viaオプションが有効になっているときに利用可能です。PCB.Delay.Viaオプションが無効になっている場合、ビアプロパティで定義されたPropagation Delay値が使用されます。
-
Length – 選択されたオブジェクトの合計長さと総信号長の合計。信号長は、ノード間の距離の正確な計算です。配置されたオブジェクトは、スタックされたり重なったりしているオブジェクトやパッド内の迷走経路を解決するために分析され、経路の長さが含まれます。Pin Package Lengthも、パッドに対して定義されている場合は含まれます。ネットが完全に配線されていない場合、接続ラインのマンハッタン(X + Y)長も含まれます。信号長とその応用に関する詳細については、PCB - Netsパネルに関する情報を参照してください。
-
Max Current - 選択されたトラック、アークまたはビアオブジェクトが運ぶことができる最大電流で、IPC-2221Aの式(セクション6.2)から決定されます:
I = k * ΔT0.44 * A0.725
ここで:
I = 電流 [アンペア]
A = 断面積 [sq mils](トレース幅 * 層スタック銅厚、または下記のようなAバレル)
ΔT = 周囲温度上昇許容値 [°C]
k = 定数で、以下のようになります:
k = 外層の場合は0.048
k = 内層の場合は0.024
複数のオブジェクトが選択された場合、例えばネット全体の場合、そのネットの最大電流は、選択されたオブジェクトの個々の最大電流値の中で最小のものです。
-
Resistance - 選択されたトラック、アーク、ビアオブジェクトの抵抗の合計で、導出された式から決定されます:
R = (ρ * L / A)
ここで:
R = 抵抗 [Ω]
ρ = 銅の抵抗率 [Ω*mm2/m]
L = トレース長さ [m](または下記のようなビア長さ)
A = 断面積 = T * W [mm2](または下記のようなAバレル)
T = トレース厚さ(レイヤースタックから)[mm]
W = トレース幅 [mm]
前提条件:
-
周囲温度 = 22 °C
-
許容温度上昇 = 20 °C
-
スルーホール銅壁厚 = 0.018mm
-
銅の抵抗率 = 0.017 Ω*mm2/m
選択されたオブジェクトの総抵抗は、個々のオブジェクトの抵抗の合計です。
Via Barrel Cross-Sectional Area - 以下のように決定されます:

Abarrel = AViaHoleSize - AFinishedHoleSize
Abarrel = [ π * (ViaHoleSize/2)2 ] - [ π * ((ViaHoleSize - 2 * ViaWallThickness)/2)2 ]
Abarrel = π (ViaHoleSize * ViaWallThickness - ViaWallThickness2)
Via Length = 入口層の中心から出口層の中心までの距離、上記のように示されています
Notes - これらの計算におけるビアの長さは、ビアがネットに属しており、接続されたトラックによって使用される層に依存します。ネットが割り当てられていない選択されたビアは、層の端から端の長さではなく、層の中心から中心の長さを表示します。また、ネットが割り当てられているが接続されたトラックがないビアは、長さがゼロと表示されます。
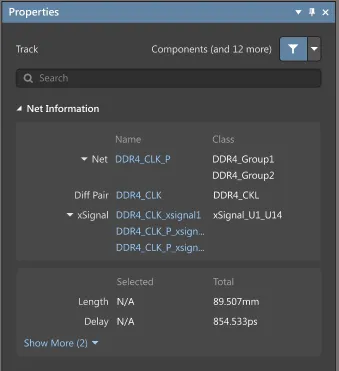
Net Information領域は、Propertiesパネルに表示されます。ここには、選択されたトラックの例が示されています。
Net Information領域のリンクをクリックすると、関連するネット/差動ペア/xSignalがPCBパネルで開きます。
オブジェクトにネットを割り当てる
PCBエディタは、プリミティブオブジェクトにネットを割り当てるためのいくつかの方法を提供します:
-
1つ以上のオブジェクトが選択されている場合は、PropertiesパネルのNetsフィールドのドロップダウンを使用します。アクティブなボードデザインのすべてのネットがドロップダウンリストに表示されます。トラックがどのネットにも接続されていないことを指定するには、No Netを選択します。あるいは、Assign Netアイコン ( )をクリックしてデザインスペース内のオブジェクトを選択すると、そのオブジェクトのネットが選択したオブジェクトに割り当てられます。
-
選択したオブジェクトの上で右クリックし、次にNet Actions » Assign Netを選択します。コマンドを実行すると、十字カーソルが表示されます。オブジェクトを割り当てたいネットの上に十字カーソルを移動させ、クリックしてそのネットを選択します。
-
配線プリミティブのネット名を接続されているパッドのネット名に再同期するには、メインメニューからDesign » Netlist » Update Free Primitives From Componentコマンドを選択します。コマンドを起動すると、フリープリミティブネットをコンポーネントパッドネットで更新するかどうかを尋ねる確認ダイアログが開きます。Yesをクリックし、各パッドから始めると、接続された銅が選択され、各プリミティブのネット名がパッドのものと一致するように設定されます。この操作は内部PCBネットリストには影響しません。
物理的に接続されているオブジェクトが、その物理ネットに属するために正しいネットが割り当てられているかを確認するには、メインメニューからDesign » Netlist » Configure Physical Netsコマンドを選択してアクセスできるConfigure Physical Netsダイアログを使用します。ソフトウェアは設計を分析し、すべてのパッドとそれらを物理的に接続するオブジェクト(トラック、アーク、フィルなど)が同じネット名が割り当てられているかを確認します。すべてのネットオブジェクトが正しい場合、ネットは緑色で表示されます。接触しているが異なるネットが割り当てられているオブジェクトが検出された場合、それらは赤色でフラグが立てられます。このような状況が発生する一般的な例は、コンポーネントフットプリント内に追加の銅オブジェクトがある場合です。このフットプリントが同期中に読み込まれると、パッドには各パッドに割り当てられたネット名が適用されますが、追加の銅には適用されません。このダイアログはインタラクティブで、ネットやプリミティブをクリックすると、そのオブジェクトにクロスプローブできます。ダイアログはインタラクティブで、ネットやプリミティブをクリックすると、そのオブジェクトにクロスプローブできます。右クリックまたはMenuボタンをクリックして、利用可能なコマンドにアクセスします。ダイアログのAction領域は、接続された銅に関する問題を解決するために必要なアクションを指定するためのコントロールを提供します。デフォルトでは、アクションは自動的に設定されますが、必要に応じて調整できます。アクションが設定されたら、Executeボタンをクリックしてネットの割り当てを更新します。
このダイアログのデフォルト状態はOnly Show Errorsであることに注意してください。これは、正しく割り当てられたオブジェクトがリストに表示されないことを意味します。Menuボタンを使用してOnly Show Errorsオプションを無効にすることで、すべてのオブジェクトを表示できます。

Configure Physical ダイアログ(Only Show Errorsオプションが有効(背面)およびOnly Show Errorsオプションが無効(前面)を表示)。
現在の設計ドキュメントからすべてのネットをクリアし、内部PCBネットリストを基本的にフラッシュすることもできます。これは、ソースの回路図ドキュメントでネット情報を変更した場合、PCBをソースの回路図ネットリスト情報と完全に再同期させたい場合に望ましいかもしれません。これを行うには、メインメニューからDesign » Netlist » Clear All Netsコマンドを選択します。コマンドを起動すると、この操作がPCBからすべてのネット情報をクリアすることを警告する確認ダイアログが開きます。 Yesをクリックすると、すべてのネット情報が削除されます。配線されたトラックは配線されたままですが、No Netの割り当てを受けます。配線されていない論理接続は削除されます。
現在の設計によって作成された配線の接続性に基づいてネットリストファイルを作成するには、メインメニューからDesign » Netlist » Create Netlist From Connected Copperコマンドを選択します。開いた確認ダイアログでYesをクリックすると、ネットリスト(Generated <PCBDocumentName>.NetがProjectsパネルのSource Documentsサブフォルダー下に自由文書として追加され、PCB設計ドキュメントと同じフォルダーに作成され、アクティブドキュメントとして自動的に開かれます。ネットリスト内の各ネットは、配線された銅が接続するパッドのいずれかからその名前を取得します。