The PostProcess output type allows non-native Altium Designer file types to be included as part of the output. It copies the targeted files from within the project directory structure, to the folder specified in the configured Folder Structure output container.
PostProcess outputs can be added to the active Output Job file from the menu of the [Add New PostProcess Output] control in the PostProcess Outputs region of the file or from the Edit » Add Post Process Outputs sub-menus of the main menus.

Adding a PostProcess output to an Output Job file
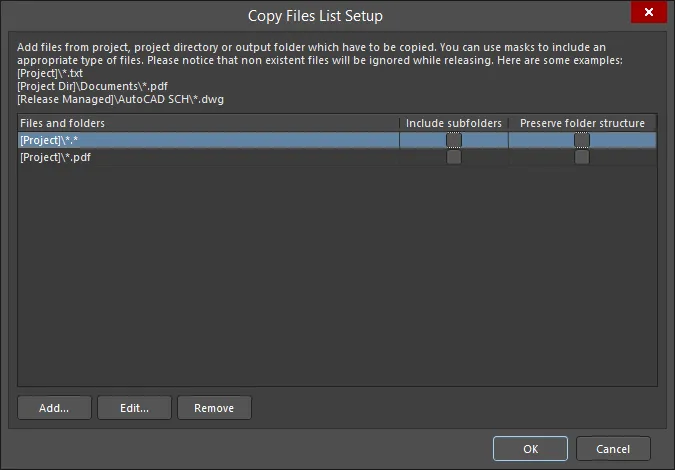
Once a new PostProcess Output has been added, right-click its entry in the main job configuration window, then click Configure to access the Copy Files List Setup dialog. Use this dialog to add multiple files or groups of files to an OutJob.

The Copy Files List Setup dialog
Options and Controls of the Copy Files List Setup Dialog
-
Files and folders - displays the files and folders to be copied.
Any number of Files and folders entries can be added. They all will be located under the PostProcess Outputs entry in the OutJob.
-
Include subfolders - enable to include subfolders of the listed file or folder. This option is available only after a file or folder has been added using the Add button.
-
Preserve folder structure - enable to ensure that the file source folder structure is retained when the Output generator is run. This option is available only after a file or folder has been added using the Add button.
-
Add - click to open the Build Macro Path dialog to search for and add the path for the desired file(s)/folder(s) using an assembled macro string.
Note that any files to be added must be located within the project or its host directory.
-
Edit - click to open the Build Macro Path dialog in which you can edit the path of the selected file(s)/folder(s) using an assembled macro string.
-
Remove - click to remove the selected file(s).

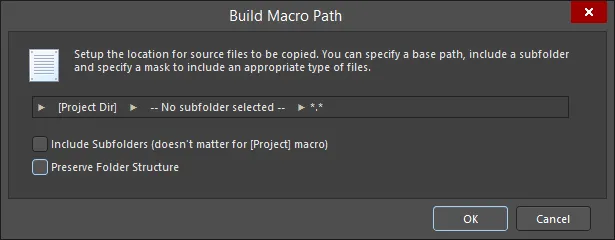
The Build Macro Path dialog
Options and Controls of the Build Macro Path Dialog
-
[Project] (first field) - click to access a sub-menu to create the desired path:
-
[Project] - select to choose the Project itself; this will include only documents that have been added to the Altium Designer project.
-
[Project Dir] - select to choose the local directory that contains the project.
-
[Release Managed] - select to specify that the file source will be dynamically determined by the later project release process.
-
Subfolder (center field) - click to access a sub-menu to create the desired path:
-
Use base path – the file path is the source location, as defined in the initial option above.
-
Choose subfolder – the file path is a nominated subdirectory within the Source path. Directly enter a subfolder path or browse to and select a subfolder using the
 button.
-
Filter (right field) - click to access a drop-down from where you can choose the desired file type extension or manually enter the desired extension.
-
Include Subfolders (doesn't matter for [Project] macro) – enable for the mask filter to apply (and therefore include) files in any subfolders.
-
Preserve Folder Structure – enable to ensure that the file source folder structure is retained when the Output generator is run.
Note that any files to be included must be located within the project or its host directory.
After creating the path, clicking OK will add the path and filter as an entry in the Copy Files List Setup dialog.