Parent page: Tutorial - A Complete Design Walkthrough with Altium Designer
Creating a New PCB Project
Copy Link
Copied
In Altium's electronic design software, a PCB project is the set of design documents (files) required to specify and manufacture a printed circuit board. The project file, for example Multivibrator.PrjPCB, is an ASCII file that lists the documents in the project as well as other project-level settings, such as the required electrical rule checks, project preferences, and project outputs, such as print and CAM settings.
A new project is created by running the File » New » Project command to open the Create Project dialog.

Creating a new project
Copy Link
Copied
- Connect to your Workspace if not already.
- Select File » New » Project from the main menus.
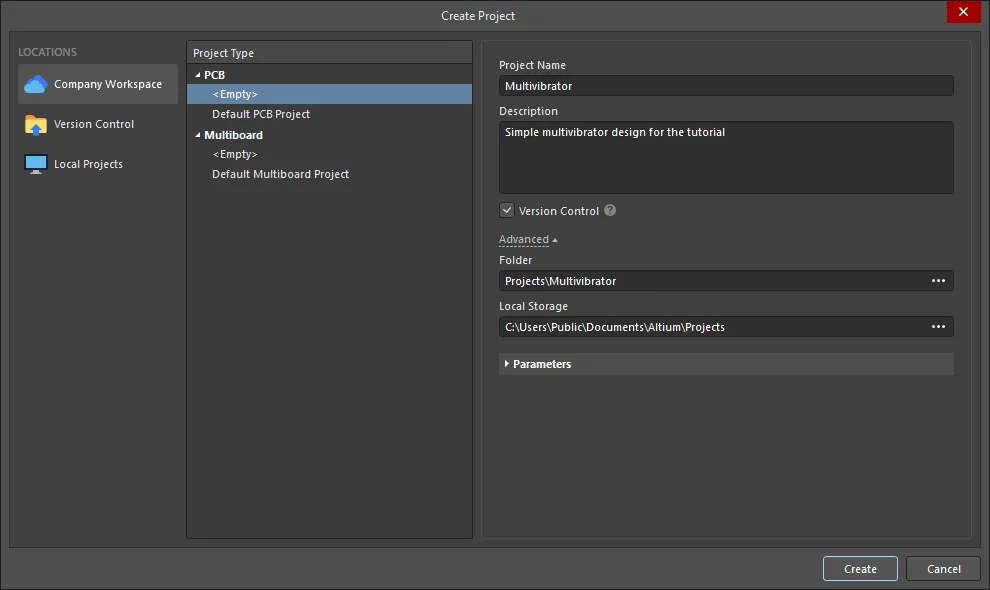
- The Create Project dialog will open:
- Select the required Workspace in the list of Locations. In the image above, the Workspace is named
Company Workspace.
- Confirm that the Project Type is
PCB <Empty>.
- Enter a suitable name in the Project Name field, e.g.,
Multivibrator.
- Enter a suitable description in the Description field, e.g.,
Simple multivibrator design for the tutorial.
- Click the Advanced control. The Folder field defines the name of the folder in the Workspace where your project files are to be stored. The default is to have a Projects folder in the Workspace.
- In the Local Storage field, select a suitable location to store the working copy of the project. A folder of the same name as the project will automatically be created in this location, and the working copy of the project file will be saved in it.
- Click Create to close the dialog and create the project. This will take a few moments, as the project is created in the Workspace and the working folder (as specified in the Local Storage field).
- The new project will appear in the Projects panel. If this panel is not displayed, click the
 button at the bottom right of the design space, and select Project from the menu that appears.
- The project will display a small blue cross next to its name. This indicates that it has been added to the Workspace's version control system (VCS) but is yet to be committed (saved). To commit the project, click the Save to Server control next to the project name in the Projects panel.
-
The Save to Server dialog will open. Confirm that the file Multivibrator.PrjPcb is checked. Add a meaningful comment describing the change into the Comment field (e.g., Initial saving of the new PCB project), then click the OK button. A status dialog will open while the file is written to the version control repository. When this is complete, a small green check will appear next to the project filename in the Projects panel which means that the local working copy of the project file and its counterpart in the Workspace are fully synchronized.
Adding a Schematic to the Project
Copy Link
Copied
The next step is to add a new schematic sheet to the project.

Add a schematic sheet to the project, name and save the schematic, and save the project.
Adding a schematic
Copy Link
Copied
-
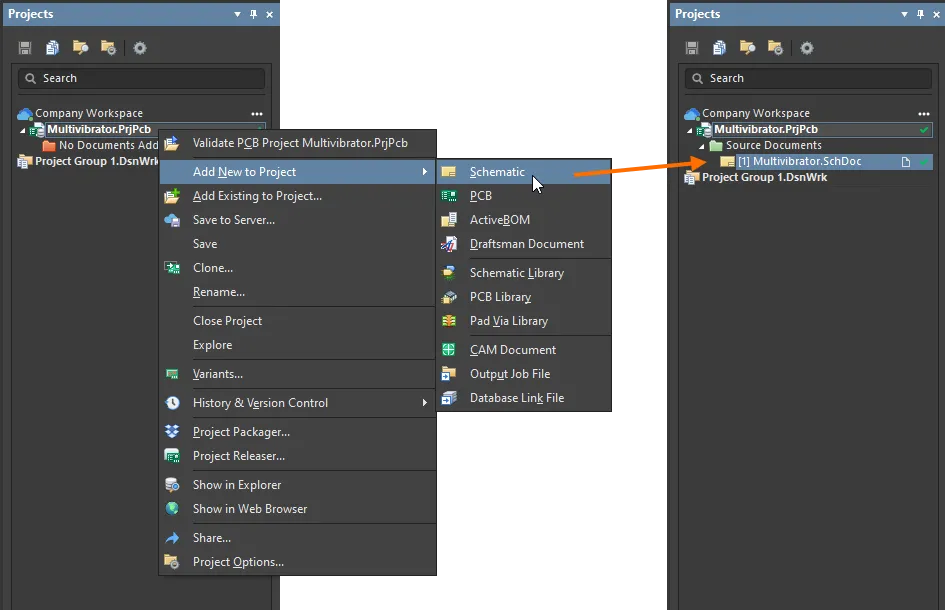
Right-click on the project filename in the Projects panel then select Add New to Project » Schematic, as shown in the image above. A blank schematic sheet named Sheet1.SchDoc will open in the design space and an entry for this schematic will appear linked to the project in the Projects panel under the Source Documents folder icon.
When connected to the Enterprise Server Workspace, the Select configuration item dialog will open after selecting Add New to Project » Schematic. Select a schematic template from those that are stored in your Workspace (e.g. ANSI B Landscape) and click the OK button.
- To save the new schematic sheet locally, select File » Save As from the main menus (or use the Save As from the schematic's right-click menu in the Projects panel). The Save As dialog will open, ready to save the schematic in the same location as the project file. Type the name
Multivibrator in the File name field and click Save (there is no need to type in the extension, as it will be added automatically). Note that files stored in the same folder as the project file itself (or in a child/grandchild folder) are linked to the project using relative referencing, whereas files stored in a different location are linked using absolute referencing.
- Since you have added a schematic to the project, the project file also has changed. Right-click on the project filename in the Projects panel then select Save to save the project locally.
- Save the new schematic and the modified project file to the Workspace. To do this, click the Save to Server control next to the project name in the Projects panel.
- The Save to Server dialog will open. Confirm that the
Multivibrator.PrjPcb and Multivibrator.SchDoc files are checked. Add a meaningful comment describing the change into the Comment field (e.g., A new blank schematic sheet added), then click the OK button. A status dialog will open while the files are written to the Workspace. When this is complete, a small green check will appear next to the filenames in the Projects panel, as shown in the image above.
When the blank schematic sheet opens, you will notice that the design space changes. The main menus bar includes new items, and a bar with buttons becomes visible – you are now in the Schematic Editor. Each editor presents its own set of menus and panels and supports its own set of shortcut keys.
An entire set of grouped panels can be closed using the  icon at the top right of the panel, and an individual panel can be closed by right-clicking on its name and selecting the Close command. When needed, a panel can be reopened via the
  button at the bottom right of the application window. Alternatively, press the F4 shortcut to hide/display all floating panels.
Setting the Document Options
Copy Link
Copied
Main page: Setting Up a Schematic Document
Before you start drawing your circuit, it's good to set up the appropriate document options, including the Sheet Size, and the Snap and Visible grids.

Document options are configured for each schematic sheet, set the sheet size as required.
As well as the technique described in the collapsible section below, the Properties in its Document Options can also be accessed by double-clicking in the sheet border.
Environment options, such as the cursor type, selection color, and autopan behavior, are configured in the Preferences dialog (click the  button located at the top right of the application window or select the Tools » Preferences command from the main menus).
Configuring the Document Options
Copy Link
Copied
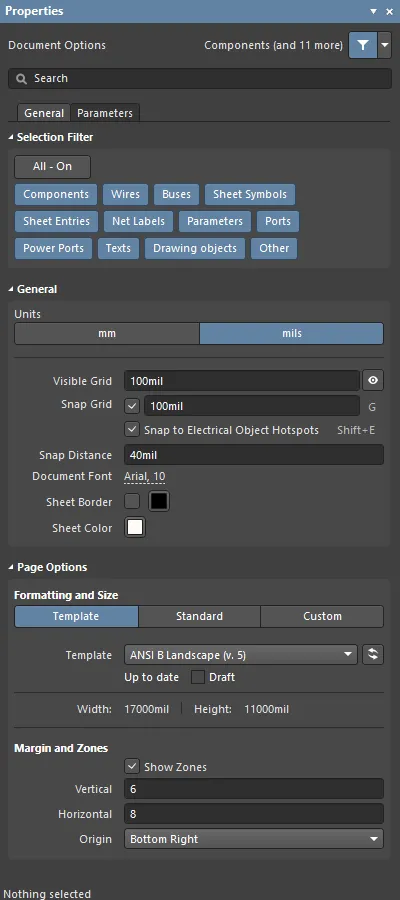
The properties of most objects, including the schematic sheet (or PCB design space), are configured in the Interactive Properties panel. The panel automatically displays the properties of the selected object, or if no object is selected, it displays the properties of the schematic sheet (or PCB design space).
- If the Properties panel is not visible, click the
 button at the bottom right of the application window and select Properties from the menu that opens.
- The General tab of the Properties panel in its Document Options mode (when nothing is selected) is divided into the following sections: Selection Filter, General and Page Options. Each section can be opened/collapsed via the small triangle next to the section name.
- Select a template for the schematic sheet from those that are stored in your Workspace. In the Formatting and Size region of the Page Options section, select the Template mode, then select the
ANSI B Landscape under the section of your Workspace in the Template drop-down.
- The Update Template dialog will open. Select Just this document for the Choose Document Scope option and Add new parameters that exist in the template only for the Choose Parameter Actions, then click the OK button. In the information dialog that opens, click the OK button.
- For the Visible Grid and Snap Grid, set the
100mil value.
- To make the document fill the viewing area, select View » Fit Document (shortcut: V, D).
- Save the schematic locally – right-click the schematic in the Projects panel and select Save.
To learn more about any of the controls in the Properties panel, press F1 when the cursor is over the panel.
Next Lesson →
