ECAD-MCAD CoDesign_AD

現在、バージョン 19.0. をご覧頂いています。最新情報については、バージョン ((ECAD-MCAD CoDesign))_AD の 19.1 をご覧ください。
 

Collaborating between the electronic and mechanical design domains has always been a challenge. ECAD and MCAD tools have different design objectives and have evolved down different paths, and so has the way they store and manage their data.

But today's designs demand that this challenge be solved - small and complex product enclosures that house multiple, irregular shaped printed circuit boards - to successfully design these products the designers must be able to fluidly pass design changes back and forth between the ECAD and MCAD domains.

Passing complex and detailed design changes between different design software is much more than just being able to save data in another format. The electronic and mechanical design teams work independently, and need to be able to transfer changes at any point in their design process. The issue is, how do you manage the flow of changes back and forth between the teams, without impacting on either team's day-to-day design work? The last thing the design teams need is for one team to have to stop work until the other team has accepted their latest change, before both teams can proceed.

This challenge is solved by Altium Concord Pro, creating a bridge between the ECAD and MCAD domains. Both design domains connect transparently to Concord Pro. Whenever they choose, either designer can Push their design changes across to the other. When the receiving designer next opens that design in their ECAD/MCAD software they are immediately notified that there are changes pending, and can review the individual changes and choose to accept them or not.

By working through Altium Concord Pro the update process becomes stateless. That means each side can continue to work independently, there is no need to worry about what the other team is doing.

So when the MCAD designer Pushes a board shape change and then realizes she has forgotten that a mounting hole also needs to move, there's no need to worry. The ECAD design is always compared to the current state of the design in Altium Concord Pro, so when the ECAD designer come back from lunch, their list of changes includes a board shape change and a mounting hole move. Accept the changes and click to Apply, and the ECAD design is in sync with the MCAD design.

What is Altium Concord Pro?

Altium Concord Pro works seamlessly, and in harmony with Altium Designer to provide an elegant answer to the question of handling design data with secured integrity. Concord Pro is available in two hosting methods:
  • Hosted on Altium 365 - delivered as a Workspace through the Altium 365 cloud-based infrastructure platform. The Workspace is a dedicated, cloud-hosted server for all your managed content. It facilitates the seamless connectivity of, and the mechanics for moving data between, the design, manufacturing and supply domains. This variant of Concord Pro is recommended since it opens up a variety of global sharing and collaborative features that can only be experienced and enjoyed through the Altium 365 platform.
  • Self-managed - delivered as a traditional on-site server that you install, setup and manage on a server within your own network. This variant of Concord Pro is suited to those who cannot interface with their data through the cloud (for example, defense companies).
As well as connecting the ECAD and MCAD domains for CoDesign, Altium Concord Pro delivers a host of other design data management features.

Learn more about Altium Concord Pro

When a new project is created in Altium Concord Pro, only the creator and Administrators will have write permissions. Use the links below for detailed information on where to configure project sharing permissions:

To configure project sharing permissions in a Workspace (Altium Concord Pro hosted on Altium 365), see Sharing a Managed Project.

To configure project sharing permissions in Altium Concord Pro (when self-managed), see Sharing a Managed Project.

What MCAD Software is Supported?

The following MCAD platforms and versions are currently supported:

Use of the ECAD-MCAD capability requires no additional licensing when Concord Pro is hosted on Altium 365. For self-managed Concord Pro to work with SOLIDWORKS, you will need to obtain the relevant licensing through your SOLIDWORKS Channel. Note that this is a matter of compliance - reflected through Altium Concord Pro's EULA. It is your responsibility to obtain the relevant licensing from SOLIDWORKS, in order to satisfy this compliance.

The Collaborative Design Interface

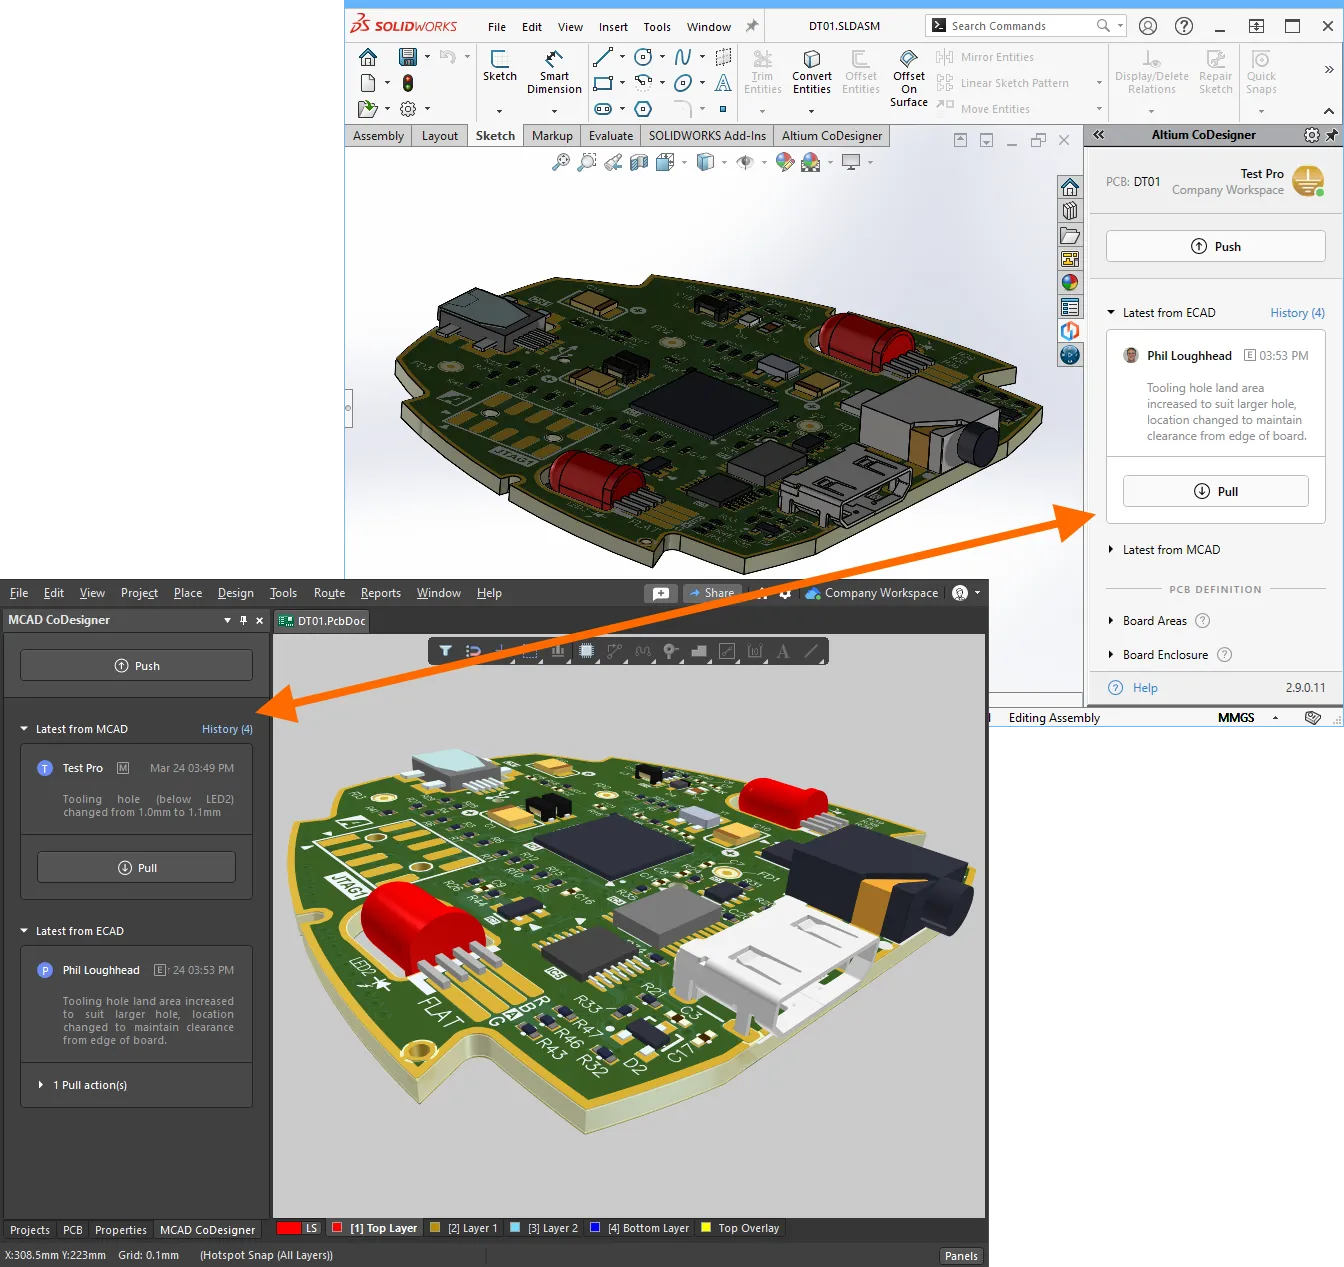
Both Altium Designer and your MCAD software interface to each other through a panel (tab) in the software. In Altium Designer it's the MCAD CoDesigner panel, in your MCAD software it's called the Altium CoDesigner panel, or tab.

Design changes are Pushed and Pulled between the ECAD and MCAD domains through a dedicated panel.Design changes are Pushed and Pulled between the ECAD and MCAD domains through a dedicated panel.

  • In Altium Designer, the MCAD CoDesigner panel is used to Push and Pull design changes back and forth, and display messages.
  • In the MCAD software, the Altium CoDesigner panel is used to:
    • Create new collaboration projects
    • Open an existing collaboration project
    • Configure collaboration options
    • Push and Pull design changes back and forth
    • Display messages

The MCAD CoDesigner panel is always available in Altium Designer's PCB editor. For the Altium CoDesigner panel to be available in the MCAD software requires the installation of an Add-In. Details about configuring each of the supported MCAD applications is outlined below.

Inviting a Mechanical Engineer to Your Workspace - (Concord Pro hosted on Altium 365)

Related page: Specifically Inviting an MCAD User to Your Workspace

As part of support for ECAD-MCAD CoDesign in Altium Designer - in conjunction with having Altium Concord Pro hosted on Altium 365 - you can share a project with a Mechanical Engineer at the time of pushing the PCB to your Workspace and, in doing so, invite that person into your Workspace Team (if not already a member). To do so:

  1. With the required managed project from your Workspace open in Altium Designer, make the PCB document active.
  2. Access the MCAD CoDesigner panel (from the menu associated to the  button at the bottom right of the main design window). Click the  button.
  3. Enter a message for the MCAD designer that describes what you are pushing to them, then click the  button to complete the Push process. A message dialog will appear, reporting the status of the process. During this process, the working copy of the modified PCB file is automatically saved, if it is currently unsaved. The changes are written to a tool-neutral snapshot file, stored in the Workspace.
  4. The Share with a Mechanical Engineer dialog will appear. Enter the email address of the Mechanical Engineer and an optional note (if required). Then click the  button.
  5. You are able to share with a person that is already a member of your Workspace Team, another AltiumLive user in or outside of your organization, or a user that does not have AltiumLive.

As part of the invite process:

  • A user that is already part of your Workspace Team will have the project shared with them (Read-only access), they will be added to the Mechanical Engineers role, and they will receive an invitation email with which to gain access to the project within the Workspace.
  • A user that already has an AltiumLive account (irrespective of whether they are in or outside of your organization) will be added to the Workspace Team, the project will be shared with them (Read-only access), they will be added to the Mechanical Engineers role, and they will receive an invitation email with which to gain access to the project within the Workspace.
  • A non-AltiumLive user will receive an invitation email with which to gain access to the project within the Workspace. However, they will first need to sign up/register for an AltiumLive account before they are added to the Workspace Team. Once they have signed up to AltiumLive, they are subsequently added to the Workspace Team, the project will be shared with them (Read-only access), and they will be added to the Mechanical Engineers role.
The Mechanical Engineers role is a default role included with a Workspace. If it has been removed, it will be created again as part of the sharing process.
All Administrators for the Workspace will receive a notification email that the Mechanical Engineer (presenting their email address) was invited and added to the Workspace. A non-AltiumLive Mechanical Engineer, upon signing up, will be treated by AltiumLive as if they were their own personal organization. They will not be added to your organization.
Once a project has been shared with a Mechanical Engineer, the ability to share again is removed from the MCAD CoDesigner panel. If the Mechanical Engineer (user accessing the project and who is a member of the Mechanical Engineers role) is removed from project sharing, then the ability to share from the panel will be available again.

The Collaborative Design Process

The new CoDesign project can be started in either the ECAD or the MCAD design domain.

Starting the new Design in Altium Designer

In Altium Designer, the CoDesign project must be a managed project. It is not necessary to start with a managed project though, if the project has been created as a local project it is automatically converted when you first attempt to Push.

Create the Project

Create a new managed project in Altium Designer.

Add a PCB to the Project

Regardless of where the project is first created, a PCB must be added to the project in Altium Designer.

Define the PCB Layer Stack

The Layer Stack, or Z-plane properties of the CoDesign board, are defined in Altium Designer's Layer Stack Manager.

Push the Board to the MCAD Designer

Assuming that the X-Y shape of the board is being defined in the MCAD software, the board can now be Pushed.

The MCAD designer can now Pull the design into their MCAD software.

Starting the new Design in your MCAD Software

You can also start the design process in your MCAD software, via the Altium CoDesigner panel. The process is the same in all of the supported MCAD environments.

  1. Click the New Board button in the Altium CoDesigner panel (also referred to as a tab in some MCAD tools). If you are not currently signed in to Altium Concord Pro the Sign in dialog will appear, sign in and click OK to continue.
  2. The Create New Server Project dialog will open, as shown above. In the dialog, enter a suitable Name and optional Description for the project, and click OK. The Windows Save As dialog will open.
  3. A default board assembly is now being created in the MCAD software, which you need to save in a suitable location. Enter a name, select a location to store the assembly, and click Save in the Windows Save As dialog. The MCAD workspace will display the new, default board shape. As part of this step an Altium Designer project is also created in Altium Concord Pro.
  4. The new board shape information does not exist in Altium Concord Pro yet. To add it, click the Push button on the Altium CoDesigner panel. A message window will appear on the Altium CoDesigner panel, this message will be displayed in the ECAD software.
  5. Enter a brief description in the message window and click the Post button. A message dialog will appear while the changes made to the board shape are being saved to Altium Concord Pro. When that process is complete your Push message will appear in the Altium CoDesigner panel.
  • When you click the Push button you are saving a list of push-able changes into Altium Concord Pro, not the complete board file. A board file must also be created in Altium Designer, any pending MCAD changes can then be Pulled into Altium Designer and applied to it. Refer to the Add a PCB to the Project section to learn how to create the board file in Altium Designer.
  • You can continue to edit the board shape in your MCAD software but it can not be considered functional until the board thickness has been defined in Altium Designer. The board thickness is determined by the defining the Layer Stack in Altium Designer. This should be done before placing 3D Models and mounting holes in the MCAD software, because a change to the board thickness can affect clearances between 3D Models and the board assembly.
  • The working copy of the MCAD design is a standard mechanical design file, stored in the default format of your MCAD software. The MCAD software remains aware that the assembly is part of a CoDesign, and will automatically check the synchronization status whenever the assembly is opened, and update the Altium CoDesign panel to display the message history and details of any pending changes.

Opening an Existing Project

When the design file already exists in your design space (either ECAD or MCAD), to continue working on an existing board design simply re-open your working copy of the project and board file (Altium Designer), or Assembly (MCAD). If there are any updates pending the CoDesigner panel will display a warning that New changes have been detected! 

If the mechanical assembly already exists, reopen it to continue working on the design.If the mechanical assembly already exists, reopen it to continue working on the design.

Opening an Existing Project for the First Time

If the project and the board have already been created in Altium Designer but not yet opened in your MCAD software, the project is Pulled from Altium Concord Pro. To do this:

  • Open your MCAD software.
  • Display the Altium CoDesigner panel. Because there is no assembly currently open, the panel will display the New Board Assembly and Pull Board from Server buttons.
  • Click the Pull Board From Server button. If you are not currently signed in to Altium Concord Pro the Sign In dialog will appear, sign in to continue.
  • The Select Project dialog will open, select the required project and click OK.

  • An MCAD assembly file is created from the change data present in Altium Concord Pro, choose a suitable location and enter a filename in the Windows Save As dialog.
  • The board assembly will display in the MCAD workspace, ready to be worked on. Save the MCAD design changes in the MCAD assembly file.
  • Whenever required, design changes can be passed to the ECAD environment by clicking the Push button in the Altium CoDesigner panel.

Both the ECAD and MCAD design tools save more data than is shared through the CoDesign interface, which is why both environments save their own design file.

Passing Design Changes Between ECAD and MCAD

At any point in the design process, changes can be transferred between the ECAD and MCAD tools by clicking the Push button in the corresponding panel.

Changes are pushed and pulled between the ECAD and MCAD tools.  Changes are pushed and pulled between the ECAD and MCAD tools.

  • When the Push button is clicked, an editing window appears at the top of the source editor's panel. Enter a message about the design change then click Post.
  • When Post is clicked:
    • The working copy of the modified PCB file is automatically saved, if it is currently unsaved.
    • The changes are written to a tool-neutral snapshot file, stored in Altium Concord Pro.
    • The Posted message is automatically displayed in the message thread of the source editor's panel, as shown in the image above on the left.
    • The target editor's panel will display a message that there is a change pending the next time they open their working copy of the design file, as shown in the image above on the right.

Working with the Change List

When the View Changes button is clicked, each change that needs to be made to the working file to sychronize it with the tool-neutral snapshot on Altium Concord Pro, is listed, as shown below.

  • Each difference detected between the current design and the snapshot stored in Altium Concord Pro is detailed as a Change in the Change List.
  • A Change does not have to be accepted. If a change is ignored it will appear in the Change List again, the next time an update is performed in that direction. Be aware that if you choose to ignore a change, for example moving a mounting hole, and you then perform a Push of your design changes, the ignored change may be overwritten since in your version the mounting hole still has the old location. The MCAD designer can avoid loosing their change by not accepting your mounting hole move.
  • A single design change, such as changing the location of a component, can become multiple changes in the Change List. When a PCB component is moved there are MCAD changes to the location of: the component, the shapes that component makes on the Component Overlay, and the shapes that component makes in the top and bottom copper layers. Related changes should all be applied together.
  • The list may include changes that cannot be applied in the target environment. In this situation the change will be displayed but the checkbox will be unavailable, indicating that this difference cannot be resolved.
  • Where possible, the selected change is highlighted in the workspace when you click on it in the Change List.

The Change List can include changes that cannot be performed in the target environment. In this situation the change will be displayed but the checkbox will be unavailable, indicating that this difference cannot be resolved.

Highlighting A Change

In Altium Designer and some of the MCAD environments, certain types of changes can be highlighted in the workspace. For example, when you select a change to a component in the Change List in Altium Designer or SOLIDWORKS, the component is highlighted in purple and displayed in the current state, then moved to the changed state.

Click on a change to highlight the before and after states of that change.Click on a change to highlight the before and after states of that change.

Object and Shape Support

When the design data is transferred between the ECAD and MCAD environments the design objects must be translated from an object-kind supported in the source editor to an object-kind supported in the target editor.

The table below summarizes the current level of ECAD-MCAD CoDesign support for each of the available MCAD tools. These capabilities continue to be developed, additional feature support will be added over time, where possible.

Current ECAD-MCAD feature support:

Feature

SOLIDWORKS

Inventor

PTC Creo

Select Project

yes

yes

yes

Show Project details

yes

yes

yes

Search for Project

yes

yes

yes

Pull existing project

yes

yes

yes

Create new project

yes

yes

yes

Synchronize board outline

yes

yes

yes

Synchronize cutouts

yes

yes

yes

Synchronize electrical components

yes

yes

yes

Decal support

yes

yes

yes

True copper

yes

yes

yes (limited)

Holes support (holes in board, not assembly)

yes

yes

yes

Move holes with components

optional

yes

no

Hole patterns

feature level

no

feature level

Flip component

yes

no

no

Sync Locked components

optional

no

no

Search component in MCAD

yes

yes

yes

Synchronize mechanical parts

yes

yes

yes

Spline for cutouts and board shape

yes

no

yes

Multiple sketch extrude cutouts in one feature

yes

no

no

Cutouts in the Board sketch

yes

yes

no

Cutouts patterns

Board sketch level

no

yes (feature level)

Variants

no

no

no

Synchronize mechanical parts from root assembly

no

no

no

Windchill integration

no

no

no

Support of assemblies as Mechanical parts

yes

no

yes

Rigid-flex support no no no
If you find an issue, select the text/image and pressCtrl + Enterto send us your feedback.
注記

利用できる機能は、Altium 製品のアクセスレベルによって異なります。Altium Designer ソフトウェア サブスクリプション の様々なレベルに含まれる機能と、Altium 365 プラットフォーム で提供されるアプリケーションを通じて提供される機能を比較してください。

ソフトウェアの機能が見つからない場合は、Altium の営業担当者に連絡して 詳細を確認してください。

Content