While placing generic 3D models is a recommended way of using 3D Body objects as this provides an accurate and detailed component representation on the PCB and gives more accurate 3D collision testing in the PCB editor, a 3D Body object also can be used for placing extruded, spherical, and cylindrical 3D Body shapes. There are three styles of simple 3D Body objects that can be placed:
| Extruded |
In the X-Y plane (top view), the extruded object is defined interactively, in the same way that other polygonal objects are defined in the PCB editor. The object is then extruded up (or down) in the Z plane, based on the Overall Height and Standoff Height properties defined in the 3D Body mode of the Properties panel, and the Body Projection option. You can also apply a Texture File, such as a logo, to the surface of an Extruded 3D Body object. |
| Cylindrical |
The properties of this shape are defined in the 3D Body mode of the Properties panel. |
| Spherical |
The properties of this shape are defined in the 3D Body mode of the Properties panel. |
The
Properties panel in
3D Body mode provides an efficient way of editing properties, such as the color, of multiple 3D Body objects. Select the objects in either 2D or 3D Layout Mode, then press
F11 (or click the
Panels button down the bottom right of the design space) to display the
Properties panel in
3D Body mode.
Extruded, Spherical, or Cylindrical 3D Body Object Placement
Direct Placement
Extruded, spherical, and cylindrical 3D Body objects are available for placement in both the PCB and PCB footprint editors by:
-
Choosing the Place » Extruded 3D Body command from the main menus.
-
Locating and using the Extruded 3D Body command (
 ) on the Active Bar.
In some situations, it is easier to place a 3D Body in 2D Layout Mode, in other situations it is easier to place one in 3D Layout Mode. At any time, the 2 and 3 shortcut keys can be used to switch back and forth between the two layout modes.
To place an extruded, spherical, or cylindrical 3D Body object:
-
After launching the command, the cursor will change to a crosshair and you will be in the default placement mode, placing an Extruded 3D Body object.
-
Press Tab to pause placement and display the Properties panel in 3D Body mode. The pause button overlay (
 ) will appear in the design space, indicating that you can access the fields of the Properties panel.
-
In the Properties panel, enter a name for the 3D Body in the Identifier field. This is optional; the Identifier can help when there are multiple 3D Bodies being placed and also can be used to target this 3D Body in a design rule if required.
-
Select the required Board Side; typically this is set to
Top. In the PCB library editor, the footprint is built for the top side of the board; it can be flipped to the bottom during the PCB design process if required.
-
Select the mechanical Layer on which the 3D Body is to be placed. Component-type mechanical layers should be paired with a second mechanical layer so that if the component is flipped from the top side of the board to the bottom side, its mechanical detail, such as the 3D Body, will move to the paired mechanical layer. Mechanical layers are paired in the Layers and Colors tab of the View Configuration panel. Refer to the panel page for more information.
-
Select the 3D Model Type from the available shapes: Extruded, Cylinder or Sphere.
-
Each shape must have a defined size before it can be placed. If the chosen shape is:
-
Extruded – then define the Overall Height.
-
Cylinder – define the Height and Radius.
-
Sphere – define the Radius.
-
In the Display region of the panel, click the Color button to set the color and adjust the Opacity as required.
-
Once editing is complete, click the pause button overlay to return to the design space.
-
If the shape is a Cylinder or Sphere:
-
The cursor will be moving in the design space with a rectangular shape attached; click to place the 3D Body.
-
Right-click or press Esc to terminate 3D Body object placement.
-
If the shape is Extruded, the cursor will present, ready to define the polygonal base shape of the extruded 3D Body:
-
Click to define the first vertex.
-
Move the cursor ready to place the second vertex. The default behavior is to place two edges with each click, with a user-defined corner shape between them. Refer to the Extruded 3D Body Placement Modes section below to learn more.
-
Continue to move the mouse and click to place further vertices.
-
After placing the final vertex, right-click or press Esc to close and complete placement of the 3D Body. There is no need to manually close the 3D Body as the software will automatically complete the shape by connecting the start point to the final point placed.
Extruded 3D Body Placement Modes
While placing an extruded 3D Body there are five available corner modes, four of which also have corner direction sub-modes. During placement:
-
Press Shift+Spacebar to cycle through the five available corner modes.
-
Press Spacebar to toggle between the two corner direction sub-modes.
-
When in either of the arc corner modes, hold the
 or
or  keys to shrink or grow the arc. Hold the Shift key as you press to accelerate arc resizing.
-
Press the 1 shortcut key to toggle between placing
![]() two edges per click, or
two edges per click, or ![]() one edge per click. In the second mode, the dashed edge is referred to as the look-ahead segment.
one edge per click. In the second mode, the dashed edge is referred to as the look-ahead segment.
-
Press the Backspace key to remove the last vertex.
Press Shift+F1 during placement to display a list of available in-command shortcuts.
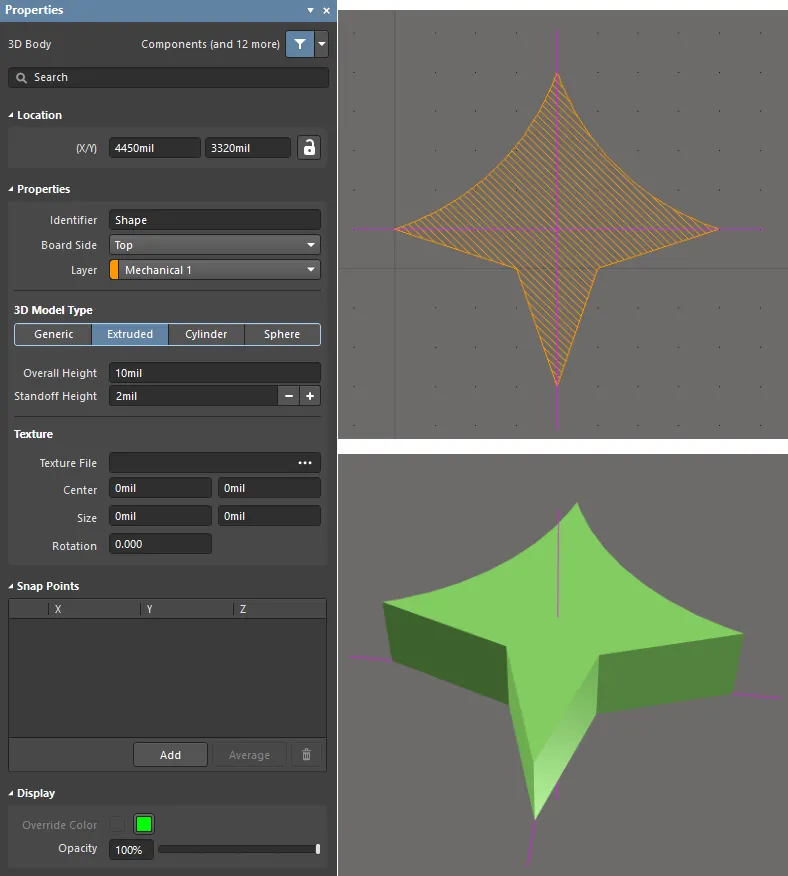
An extruded 3D Body object; note the reference point shown in the 2D and 3D views.
Creating from Closed Shapes
To accelerate the process of building up the component shape out of 3D Bodies, the software can create a series of extruded 3D Body objects based on closed shapes detected in the footprint. This feature can be helpful if the component has an unusual shape, which is already reflected in the shapes defined in the footprint's component overlay. You can also add additional objects into the footprint on mechanical layers, which you can then use to create additional 3D Body objects from, for example, to create the pins.
The images below show a TO-92 transistor footprint. From this, the outline drawn on the Top Overlay layer is used to define the transistor body on the chosen 3D Body layer pair (referred to as the Registration Layer in the dialog). There have also been three small squares created on a mechanical layer (each square made from four lines), which are used to define the component pins on the chosen 3D Body layer pair – the settings are shown in the dialog image below.


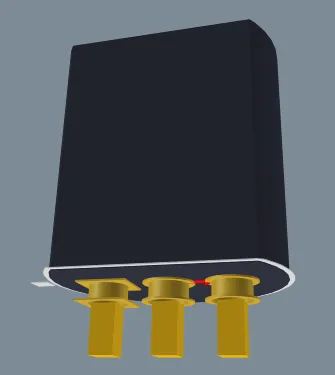
Existing objects in the footprint can be used to create new 3D Body objects.
To create 3D Body objects from shapes in the footprint run the Tools » Manage 3D Bodies for Current Component command, the Component Body Manager dialog will open. Use it to see which 3D bodies are currently being used in the component, and which are not. Bodies can be added to and/or removed from, the component as required. Bodies can be of three distinct types:
-
A purposefully placed 3D Body (referred to as a Component Body in its description).
-
A rectangular shape automatically created by the software from a bounding rectangle.
-
An enclosed polygonal shape automatically created by the software from design primitives.
You can also modify other properties for a body, such as heights, body projection, registration layer, and color and opacity. Note that the Body State column shows four shapes are going to be used to create 3D Body objects.
Once the 3D bodies for the component have been defined as required, clicking the Close button will effect the changes.

The software can create 3D Body objects based on the shape of existing objects.
Notes about using this dialog:
-
The detection algorithm will offer either: a rectangular shape created from the bounding rectangle, or a polygonal shape that follows the outline of the shape formed by the outline of the primitives (traced along the centerline of tracks/arcs, if their endpoints are coincident).
-
To create a 3D Body from an existing object, click the blue text in the Body State column.
-
The Overall Height defaults to the Height defined in the Properties panel for the footprint.
-
For a component pin that passes down through the board, set the Body Projection to Bottom Side.
-
The 3D Body objects are created when you click the Close button in the dialog. If the display is already set to 3D mode you might need to: refresh it (End shortcut), switch to 2D then back to 3D, or toggle the Show 3D Bodies option Off and On in the View Options tab of the View Configurations panel to see the new objects.
-
To edit 3D Bodies of all components in the active PCB footprint library currently opened in the PCB footprint editor, choose the Tools » Manage 3D Bodies for Library command from the main menus.
-
To edit 3D Bodies in the PCB editor using this dialog, you can access it by selecting the Tools » Manage 3D Bodies for Components on Board command from the main menus or by right-clicking a component and selecting Component Actions » Manage 3D Bodies from the context menu.
-
When the dialog is accessed using the Tools » Manage 3D Bodies for Components on Board command (in the PCB editor) or the Tools » Manage 3D Bodies for Library command (PCB footprint editor), the Components region will be available at the top of the dialog. This region lists each component footprint in the active library (in the actual design, this would be a list of all components on the board). For each entry, designator (available on design side only), footprint name, height, and source library information is displayed.
Also, an extra Batch Update tab will be available. This tab provides a facility for quickly adding 3D body objects to all or selected components, en masse. You can define search criteria for detecting and creating 3D bodies, and for defining 3D body properties. After defining all options for the batch process as required, click the Execute Batch Update button. The search will proceed for each component included in the process and, where a 3D body shape is detected and created, that body will be added to the component using the defined property criteria. In this mode, changes are applied upon execution of the batch update.
-
The dialog allows you to manage the 3D bodies for the component, all from a single location - negating the need to pop open the Properties panel for each 3D Body.
Options and Controls of the Component Body Manager Dialog

The Component Body Manager dialog (back) and the Component Body Manager for Component dialog (front)
Components
The top region of the dialog lists each component footprint in the active library (in the actual design, this would be a list of all components on the board). For each entry, designator (available on design side only), footprint name, height, and source library information is displayed.
Interactive Tab
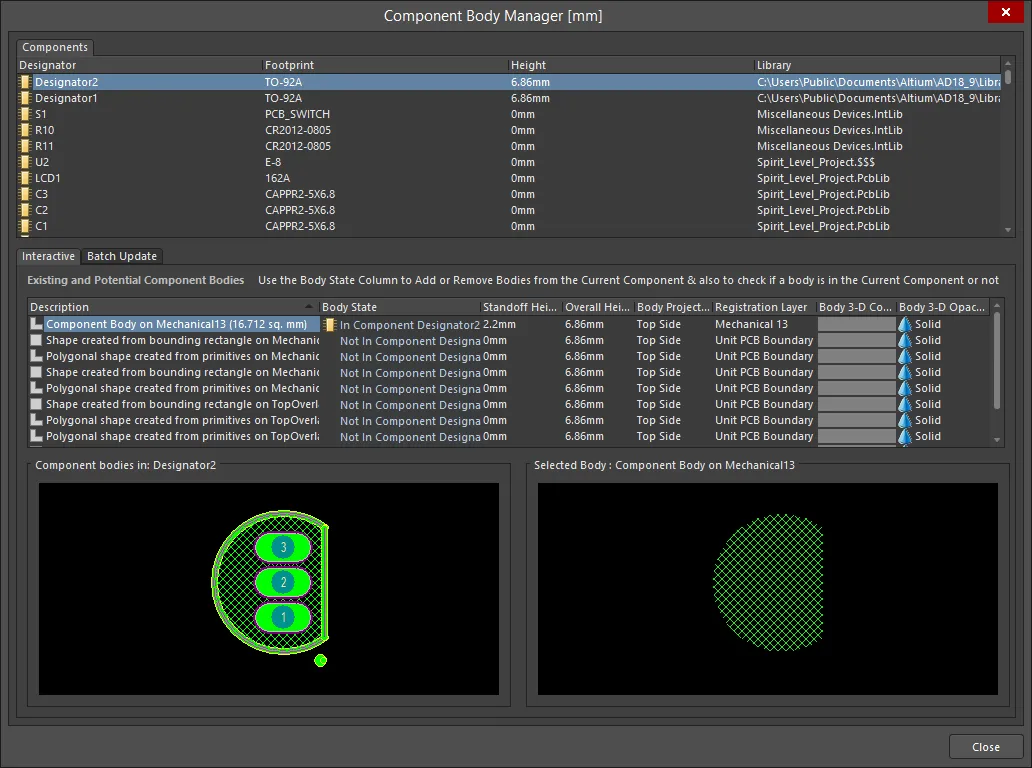
The Interactive tab of the Component Body Manager dialog
The Component Body Manager version of the dialog features two tabs: the Interactive tab and the Batch Update tab. The Interactive tab allows you to easily view information about the selected component, including previews of the component bodies and selected body.
Existing and Potential Component Bodies
-
Existing and Potential Component Bodies - this region lists all existing component bodies (3D Bodies) that are being used or could potentially be used for the component. Each component body is listed in terms of the following:
-
Description - a description of how the body has been created. This could be a purposefully placed 3D Body (referred to as a Component Body in its description), a rectangular shape created from a bounding rectangle, or an enclosed polygonal shape created from design primitives. Each body's description (whether placed or automatically created) will also include the mechanical layer on which it resides (or on which the object(s) it was created from resides), and its area size. Rectangular and polygonal bodies are distinguished by the
 and
and  icons respectively.
-
Body State - reflects whether the body is being used in the component (In Component <ComponentDesignator>) or not (Not In Component <ComponentDesignator>). Click the entry to toggle the state as required.
-
Standoff Height - the distance from the board surface to the underside of the Extruded Body. Use a negative value for Extruded Bodies that must pass down through the PCB.
-
Overall Height - the distance from the board surface to the topside of the Extruded Body.
-
Body Projection - the side of the board from which the 3D Body will project. Use the field's drop-down to choose either Top Side or Bottom Side (project up, or project down). This setting is automatically changed if the 3D Body object is flipped to the other side of the board as part of a component flip.
-
Registration Layer - the mechanical layer on which the 3D Body exists. Use the field's drop-down to choose from all currently enabled mechanical layers. If the chosen mechanical layer is paired, then when the body is flipped to the other side of the board as part of its component, it will also be moved to the paired mechanical layer.
-
Body 3D Color - the current color used for the 3D Body. Click the color swatch to access the standard Choose Color dialog to assign a different color as required.
-
Body 3D Opacity - the current level of transparency for the 3D Body. Use the field's drop-down to choose from Solid (completely opaque), Hide (rendering the body invisible), 25% Opacity, 50% Opacity, and 75% Opacity.
-
Component bodies in: <ComponentDesignator> - shows the component's 2D footprint along with overlayed 3D Bodies whose Body State is currently set to In Component <ComponentDesignator>. The preview is dynamic which changes as bodies are included or excluded.
-
Selected Body - shows the currently selected body in the list above. The title area for the window also reflects the body's description.
Batch Update Tab
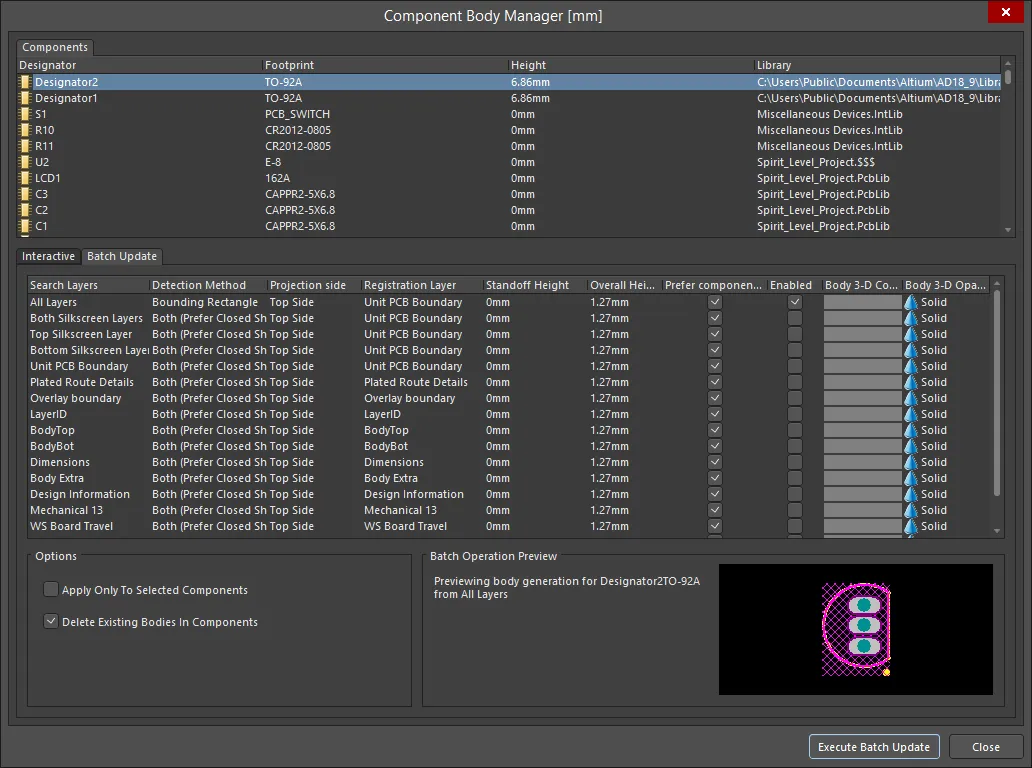
The Batch Update tab of the Component Body Manager dialog
The Batch Update tab provides a facility for quickly adding 3D body objects to all or selected footprints in a library, or all or selected placed footprints in a design.
Grid Area
Use this region to define search criteria for detecting and creating 3D bodies and for defining 3D body properties, such as Projection side (also referred to as Body Projection), Registration Layer, Standoff Height, Overall Height and 3D Body Color.
Each entry in the list provides a different scope in terms of the layers that will be searched when detecting and creating possible 3D body shapes. Each search is individually enabled using the Enabled column option. Multiple searches can be enabled, however, keep in mind that a 3D body will be added for each successful search. Typically, you would enable a search on one particular layer - or layer set - depending on where you typically place the primitives or component outline information for a footprint. By default, a search of All Layers will be performed.
The Detection Method field allows you to control how each 3D body shape is defined:
-
Bounding Rectangle - use the bounding rectangle of the footprint.
-
Closed Shapes - use polygonal closed shape created from component footprint primitives.
-
Both (Prefer Closed Shapes) - detect either a bounding rectangle or a polygonal closed shape based on the footprint's primitives. If both are detected, use the polygonal closed shape.
The Prefer component height if not 0 option column allows you to control whether or not the height attribute defined for a component footprint is used as the Overall Height for the 3D body. With this option enabled, for each component with a defined height attribute greater than zero, that height will be set as the added 3D body's Overall Height and its Standoff Height will be set to zero.
The Body 3-D Color specifies the color with which to render the 3D body. Click on the color to change it in the Choose Color dialog.
Options
-
Apply Only To Selected Components - enable this option if you want to apply the 3D body criteria to only a selected group of footprints. Ensure that those components are selected in the top region of the dialog (use standard Ctrl+Click and Shift+Click features to multi-select). If this option is disabled, the batch add process will be applied to all footprints in the library (or all components on the board).
-
Delete Existing Bodies In Components - enable this option to remove any currently defined 3D bodies for the footprints targeted by the batch process. Use the preview window at the bottom-right of the tab to get an idea of how the added 3D body will look based on the currently selected component footprint and currently selected (and enabled) search entry. After defining all options for the batch process as required, click the Execute Batch Update button. The search will proceed for each footprint included in the process and, where a 3D body shape is detected and created, that body will be added to the footprint using the defined property criteria.
Batch Operation Preview
Use to preview the defined 3D bodies in different layers.
Additional Control
-
Execute Batch Update - click to proceed with the update for each footprint included in the process and, where a 3D body shape is detected and created, that body will be added to the footprint using the defined property criteria.
Creating from Selected Primitives
As well as interactively placing a 3D Body, they can also be created from a set of existing track, arc, and solid region objects that define a closed shape. This is an excellent choice when the model is simple. To define a 3D Body from an existing closed shape:
-
Select all primitives that form the closed shape.
-
Click Tools » Convert » Create 3D Body From selected primitives.
The 3D Body will be created from the closed boundary formed by the primitives on the Top Layer, regardless of the layer on which the selected tracks are located. This means you can define the shape on a mechanical layer. Note that the original selected primitives will still exist after the region has been created and will remain selected. The 3D Body's boundary follows the centerline of the bounding track objects and it is not selected.
As the Create 3D Body From selected primitives algorithm uses the centerline of the selected objects, it requires that the end and start locations of touching objects are exactly co-incident (at the same X, Y location). If this is not the case, a Confirm dialog will appear, giving the location where the algorithm failed and also providing the opportunity to instruct the algorithm to attempt to define the 3D Body from the edges of the objects instead. As long as the selected objects overlap slightly, this option should create a 3D Body with the edge of the 3D Body tracing the outer edge of the selected objects.
Graphical Editing
The graphical method of editing allows you to select a placed 3D body object directly in the design space and change its size, shape, or location graphically.
Note that sphere and cylinder 3D body types can only be moved in the design space. They cannot be modified graphically with respect to their size or shape.
For an extruded 3D body, click once on the object to select it, which puts it into edit mode. The outer shape of the 3D body object is defined by a series of edges: where each edge is represented by an end vertex at each end, shown as a solid white square (A in the image below); and a center vertex in the middle, shown as a hollow white square (B in the image below). Each end vertex represents the location where two edges meet.

Standard polygonal shape editing techniques are available for editing the shape.
When editing a polygonal object, there are three editing modes available, Slide/Miter, Incurvate (arc) and Move. The current mode can be changed while dragging a vertex or an edge by pressing Shift+Spacebar to cycle through the 3 modes.
-
Slide/Miter – click and hold on an edge or a center vertex to slide that edge; click and hold on an end vertex to miter the corner.
-
Incurvate – click and hold on an edge or a center vertex to incurvate that edge; click and hold on an end vertex to incurvate (arc miter) the corner.
-
Move – click and hold on an edge or a center vertex to break that edge into two edges; click and hold on an end vertex to freely move that corner.
Feedback about where the cursor is on the board and which editing mode is currently active can be viewed on the Status bar and in the Heads-Up display.
During editing, you can also:
-
Ctrl+click and hold anywhere along an edge away from editing handles to insert a new vertex.
-
To remove a vertex, click and hold on the vertex then press the Delete key.
-
Click anywhere on the 3D body away from editing handles then drag to reposition it. While dragging, the 3D body can be rotated or mirrored:
-
Press the Spacebar to rotate the 3D body counterclockwise or Shift+Spacebar for clockwise rotation. The Rotation Step size is defined on the PCB Editor – General page of the Preferences dialog.
-
Press the X or Y keys to mirror the 3D body along the X-axis or Y-axis.
The Extruded and Cylinder 3D Body shapes cannot be rotated around all three axes. For example, an Extruded object can only be rotated around the Z-axis (looking down into the object), and a Cylindrical object can be rotated around the Y and Z axes. If an object needs to be rotated around another axis, it can be converted to a STEP object - see the Converting to STEP section below.
Converting to STEP
A selected Extruded/Cylindrical/Spherical 3D Body object to a STEP model. The STEP model is automatically embedded in the design file. To convert a free 3D Body object, select it in the design space then right-click and choose the Convert To STEP command from the context menu. The command will not be available if there is no object selected, or if there is more than one object selected. Once an object has been converted to STEP, it can no longer be re-sized in the design space.
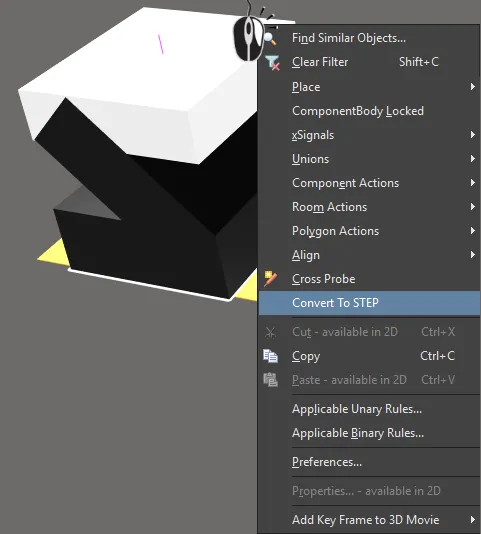
Convert an extruded shape to STEP if you need to rotate it around the X or Y axes.
Reference Point of an Extruded, Spherical, or Cylindrical 3D Body object
An extruded, spherical, or cylindrical 3D Body object has a reference point or origin.
-
For a cylinder and sphere, the reference is the center point of the object's circular shape on the X-Y plane.
-
For an extruded object, the reference is set to the location X-length/2, Y-length/2 when viewed from above.
-
It is the position of this reference point in the design space that is shown in the X/Y Location in the Properties panel.

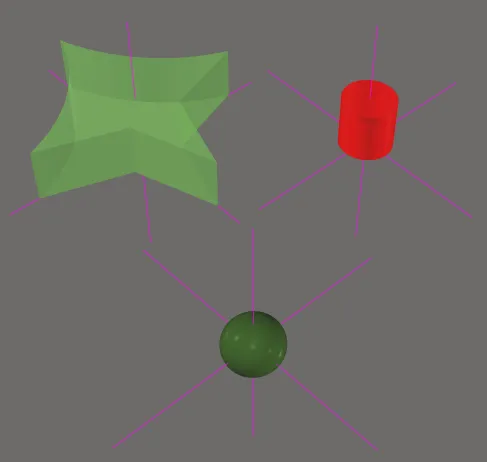
Extruded, spherical and cylindrical 3D Body objects have a reference point, as shown in the images. Note that the reference point lines are not long so they may not appear outside the object.
Including a Texture on an Extruded 3D Body
Extruded objects also can include an image overlayed on the uppermost surface - facilitating greater realism of your board when viewed in 3D. When a Texture File is added, it is automatically stretched to fit to cover the entire upper surface of the 3D body, as shown in the image below. Note that the texture file is linked to the Library or Board file.
Supported Texture File formats include: *.bmp; *.dds; *.dib; *.hdr; *.jpg; *.pfm; *.png; *.ppm; and *.tga.

A texture or logo can be added to an extruded 3D Body object.
This can be adjusted by altering the Center location, Size and Rotation settings in the 3D Body mode of the Properties panel.
You can also modify the position of a texture object associated with a chosen extruded 3D model by choosing the Tools » 3D Body Placement » Move Texture Location command from the main menus when the editor is configured in 3D Layout Mode. After launching the command, the cursor will change to blue cones (signifying 3D selection mode) and you will be prompted to select an extruded 3D Body that has a texture associated. Position the cursor over the required 3D Body then click or press Enter. Click or press Enter a second time to 'pick up' the texture by its nearest corner. Move the texture to the required position then click or press Enter to effect placement. The standard additional actions for object movement (Spacebar/Shift+Spacebar to rotate, X or Y to mirror, arrow keys to nudge the texture) can be performed during movement while the texture is still floating on the cursor.
Alternatively, you can move the texture in a selected extruded 3D Body using the mouse to click-and-drag.