Parent page: Working with Panels

The Multi-board Assembly editor's View Configuration panel.
Summary
The View Configuration panel is used to configure the color and workspace visibility options in the Multi-board Assembly editor. It is also used to control the display of the section view, and the section panels.
Panel Access
When a Multi-board assembly document is active, the panel can be accessed in the following ways:
- Click View » Panels » View Configuration.
- Click the
 button at the bottom-right of the workspace and select the View Configuration option.
- Use the L shortcut key.
Content and Use
The panel content is divided into three sections:
- Display Options - options to enable and configure the projection of the Multi-board assembly.
- Section View - options to enable and configure the section view feature, and control the display of the section panels.
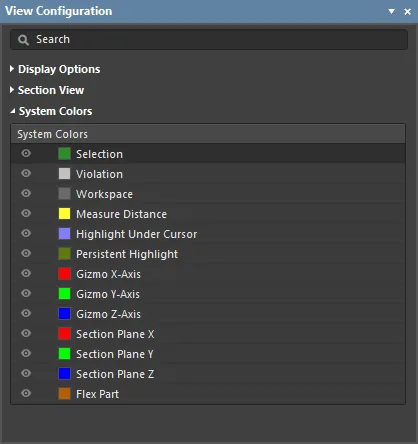
- System Colors - options to configure the visibility and color of layers.
In the Multi-board Assembly editor, each workspace axis, and its corresponding plane, is assigned a color:
- Red - X axis, viewing into the Y-Z plane. You can think of this as the front or rear view.
- Green - Y axis, viewing into the X-Z plane. You can think of this as the left or right view.
- Blue - Z axis, viewing into the X-Y plane. You can think of this as the top or bottom view.
Display Options

Projection – determine the projection of the view. Choose from:
- Orthographic - choose this option to see the exact position of objects and text on the Multi-board Assembly without being obscured by surrounding objects.
- Perspective - choose this option for a more realistic view of the Multi-board Assembly.
Section View

A Section View is a view that can be used to reveal detail within an assembly, that might normally not be visible. This is achieved by defining a plane where a section of the assembly is cut. The Multi-board Assembly editor supports defining a section plane along each of the 3 axes, allowing the section definition to be in 1, 2, or 3 directions.
- Section View has three display modes:
- Edit - enable to have sectioning applied and to make planes visible and editable.
- On - enable to have sectioning applied and planes hidden.
- Off - enable to hide panels and to give a clearer view of the Multi-board Assembly.
- Invert Cutout - enable to define the section location of the cut in each plane. Each plane includes a small arrow control, click, hold, and drag on the area to change the location of that section plane. Alternatively, click and hold anywhere on the panel and move it.
- Section Plane Controls - these controls are used to enable sectioning in each plane, and to toggle on which side of that plane the assembly's content is to be removed.
| Plane |
Enable Plane |
Change Plane Direction |
|
X Plane
|

View » Toggle Section Plane X
1 shortcut key
|

View » Flip Section Plane X
Ctrl+1 shortcut
|
|
Y Plane
|

View » Toggle Section Plane Y
2 shortcut key
|

View » Flip Section Plane Y
Ctrl+2 shortcut
|
|
Z Plane
|

View » Toggle Section Plane Z
3 shortcut key
|

View » Flip Section Plane Z
Ctrl+3 shortcut
|
The color of each section plane is configured in the System Colors section of this panel.
System Colors
Setting the Color
Each layer includes a small color button, click this to display the color selector, as shown below.
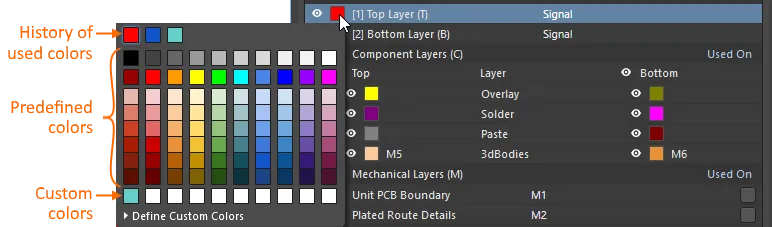
The panel includes:
- A history row, showing (up to) the last 10 color choices that were made.
- A grid of 10 x 8 predefined color buttons, click a button to select that color.
- A Custom Color row of up to 10 custom colors.
Custom colors can be defined, to do this:
- Click Define Custom Colors to expand the color palette to also display the Custom Color Palette.
- Use the horizontal slider in the center of the Custom Color Palette to select a base color, then click anywhere on the palette to brighten or darken that color.
- Alternatively, enter the Hex or RGB values into the appropriate fields in the Custom Color Palette.
- Click the Apply button to add the new color to the Custom Color row, and apply that color to the layer being edited.
Displaying or Hiding a Workspace Feature
Certain workspace features (such as Selection), can be displayed or hidden. Click the eye icon (  ) to toggle the visibility off and on.
