Parent page: Getting Familiar with the Altium Design Environment
The starting point for every design created in Altium NEXUS is a project. An Altium NEXUS project is a set of design documents whose output defines a specific implementation.
In a nutshell, Project Management is focused on securely storing and tracking changes throughout the design process, and ultimately, channeling the resulting design through to the creation of a physical item – such as an assembled PCB to be used in the final product. To meet these needs, Altium NEXUS provides a range of project management approaches that offer increasing levels of sophistication and capabilities, yet simplify the process from a designer's perspective. These range from local file-based storage and management, to local/remote Version Control System (VCS) storage approaches, and through to its advanced and recommended form where the management of design data is centered on the capabilities of a Workspace.
A connected Workspace and its internal VCS service hosts and manages Altium NEXUS projects, and also provides simplified VCS operations, inherent design collaboration capabilities, advanced design data sharing, history tracking, Lifecycle management, and much more. Projects that are integrated with a Workspace are accessed directly from Altium NEXUS, such as from the Projects panel, or from the Workspace itself through its browser-based interface.
Thanks to the intelligence built into the services provided by a Workspace, tasks such as VCS operations are simplified and automated, and additional design collaboration features such as user access control (sharing), commenting and history are available directly from within Altium NEXUS. The end result is a robust and secure project storage format and location that can become the central point for collaborative project design.
For a Workspace project, the following actions are supported:
- Creating a Project – directly, by making an existing local project available in the Workspace, or by cloning an existing Workspace project.
- Opening a Project – to be able to work on it.
- Viewing Project History – browsing a progressive timeline of major events relating to the project – its creation, commits, releases, clones and MCAD exchanges – with various actions supported where applicable.
- Commenting a Project – placing tagged notes on a document that are stored in the Workspace and available to all uses that have access to that project document.
- Sharing a Project – changing the access permissions for a project so that users that need to see and work with it have the ability to do so.
- 'Soft' Deleting a Project – removing an entire project to the Workspace Trash location, which has the options to permanently delete the project or restore it to its previous location.
Types of Projects
Altium NEXUS supports a number of different kinds of projects. Below is a brief description of each.
PCB Project
In a Printed Circuit Board (PCB) project, the electronic circuit is captured as a schematic, which is built up from libraries of component symbols that are placed and wired together.
The design is then transferred to the PCB editor where each component is instantiated as a footprint (pattern) and the circuit wiring becomes point-to-point connection lines. A shape for the final PCB is defined, along with the physical layers the board will include. Design rules specify the layout requirements, such as routing widths and clearance. The components are positioned within the board shape, and the connection lines are then replaced by routing, either manually or automatically.
When the design is complete, standard format output files are generated which can be used to fabricate the blank board, configure an assembly machine, and so on.
Projects that are stored and managed in a Workspace are shown with an indicative icon, such as

for a PCB project.
Multi-board Project 
In a Multi-board project, the logical design is captured using a schematic document that connects together sub-project modules, which in turn represent existing PCB projects. The Multi-board schematic data is then transferred to a Multi-board assembly document where the physical board assemblies, as defined by the sub-projects, are positioned together and within an added enclosure.
A Multi-board project (*.PrjMbd) effectively defines the electrical and physical connectivity between existing PCB design projects through the application of a logical schematic document (*.MbsDoc) and synchronized assembly document (*.MbaDoc).
► Read more about Multi-board Projects.
Integrated Library 
An Integrated Library is created in a library package project (*.LibPkg), where schematic symbols are created in a Schematic Library (*.SchLib), and reference links defined to matching models in other domains. Referenced models can include PCB footprints, circuit simulation models, signal integrity models, and three-dimensional mechanical models.
Files that contain the models (PCBLibs, etc) are added to the Integrated Library Package (*.LibPkg), or search paths are defined to identify their location. The source schematic symbol libraries and required models are then compiled into a single file (*.IntLib), referred to as an Integrated Library.
A better and far more advanced solution to managing design component data is where Components are hosted in and sourced from an Altium Workspace. An Altium Workspace provides secure high-integrity storage for component data, with the added benefits of lifecycle management and up to date supply chain information.
► Read more about Component Management with a Connected Workspace.
► Read more about Working with Integrated Libraries.
Script Project 
A Script (*.pas) contains a set of instructions (automated commands) that are interpreted when it is executed in Altium NEXUS. The scripts are written and debugged in the same editor environment.
There are two types of Scripts – script units and script forms. A script Unit can use the X2 Application Programming Interface (API) to modify or manipulate design objects on a design document. A script Form hosts controls as a user interface and harnesses the X2 API to provide script dialogs that act on active design documents.
Script Units, Forms and Data Models are contained in a Script project (*.PrjScr).
► Read more about Automating Design Tasks with Scripting.
Projects Panel
The Projects panel displays all projects that are currently open and their constituent documents and structure.

The Projects panel
The behavior of the
Projects panel can be configured using the options on the
System – Projects panel page of the
Preferences dialog. These options can also be accessed using the

control at the top of the panel.
When connected to a Workspace, the Workspace icon ( /
/ ) is shown next to the uppermost entry of this Workspace. When the local working copy of a project is opened but the Workspace where the project resides is not connected, a grayed-out Workspace icon (
 /
/ ) will appear, and the project icon will change (e.g. it appears as
  for a PCB project).
A Workspace project can also be shared with you without inviting you to the team of the Workspace where this project resides. A project that has been opened from shared access is indicated by an associated Shared with me label with the icon next to it.
Local projects are listed under the entry of the project group (
*.DsnWrk) – either the default one (Project Group 1.DsnWrk), or one you have created or opened.
To access the context menu regarding your currently connected Workspace, right-click on your Workspace name or click the  control at its far right. These commands include:
- Open Project – opens the Open Project dialog.
- Create Project – opens the Create Project dialog.
- Show in Explorer – opens the Explorer panel.
- Show in Web Browser – opens the Projects page of the Workspace's browser interface in your default Web Browser.
- Sign out – signs you out of the Workspace.
You must be connected to a Workspace to access these commands. When signed out of a Workspace, right-click the Workspace you want to connect to, and click the Sign In command.
To open the
Web Viewer of a Workspace project listed in the
Projects panel, right-click its entry and select the
Show in Web Browser command. To show the project in the
Explorer panel, select the
Show in Explorer command.
Project Documents Tree
When you open an existing project or create a new one, its entry will appear in the Projects panel. Any existing documents that are part of a project (and any new ones that have been added) will appear under sub-folders according to their purpose and/or type. For example, the following common folders and content document types can appear under a project:
- Source Documents – core design documents such as schematics, PCBs, etc.
- Settings – provides various files used within the project, including Output Job Files, Harness Definitions Files, and Annotation Documents, among other pertinent files.
- Libraries – local source library documents. Documents are further sub-divided based on library type (e.g., schematic libraries, PCB libraries, etc.).
- Documentation – additional documents that have been added to the project, of a type that is known by Altium NEXUS (e.g., text, PDF, etc.).
- Other Documents – additional documents that have been added to the project, of a type that is not known by Altium NEXUS. These can be opened by Altium NEXUS if the owner application is known by Windows (eg, Word documents, Excel spreadsheets, etc).
- Generated – documents generated as output. Documents are further sub-divided based on type (e.g., BOM documents, text documents, etc.). As project output is generated, the corresponding sub-folders in the main tree will be created and become populated.
- Components – this folder lists each component (grouped by the first letter in the designator by default), and the number of components in each group. Validate the project if this folder does not appear (Project » Validate).
- Nets – this folder lists each net used in the project. Validate the project if this folder does not appear (Project » Validate).
Documents that are stored in the project folder or a sub-folder of the project folder are associated in the project file using relative referencing. Documents that are stored in a different folder path are associated in the project file using absolute referencing. These documents include a small arrow in the bottom corner to indicate that they are linked to the project, as shown by the

file in the image above.
Notes on working in the documents tree:
- Any documents that are independent of a project will appear as Free Documents and will appear under corresponding sub-folders. By right-clicking on a free document and choosing the Add to Project <ActiveProjectName> command from the context menu, you can add a currently open free document to the active project. Alternatively, you can drag and drop it onto the required project name, in the Projects panel.
- Along with allowing multiple documents to be open for editing, the environment also supports multiple projects being open at the same time. These could be related or unrelated projects.
- Documents in the Projects panel are automatically arranged in logical groups or 'folders', such as Source Documents (Schematic, PCB, etc.), Settings documents (Harness, Outjob, etc.,) and, in the case of a hierarchical design, top-level schematic documents. The documents within each folder group are displayed by default in the order they were added but can be dragged and dropped to a new order position within the group.
- In the case of a new hierarchical design, the parent-child relationship between documents will be displayed in the panel. Note that the connectivity relationships cannot be defined by dragging and dropping schematic documents since the inter-sheet connections and design hierarchy are in fact defined by Sheet Symbols and Port definitions.
- Right-click a project document sub-folder, whether expanded or closed, to access additional document management commands, such as opening, closing, or saving all documents within the focused project document sub-folder.
- Documents can be transferred between projects in the panel by clicking and dragging. The document does not have to be dragged into the correct sub-folder; it will be placed correctly within the project structure automatically.
- The keyboard shortcuts Up Arrow, Home, End, and Down Arrow can be used to display the previous, first, last, and next entry in the panel, respectively. Use the Right Arrow and Left Arrow keys to expand and collapse a top-level entry or its sub-folder, respectively.
Active Versus Focused
In the Projects panel's main tree, the active project is highlighted. When there are no documents open in the design editor window, a project is made active by selecting it from a list of all currently open (loaded) projects in the panel. As soon as a project document is opened (in an editor/viewer), the parent project of that document automatically becomes the active project. The active document in the design editor window will also be highlighted in the panel.
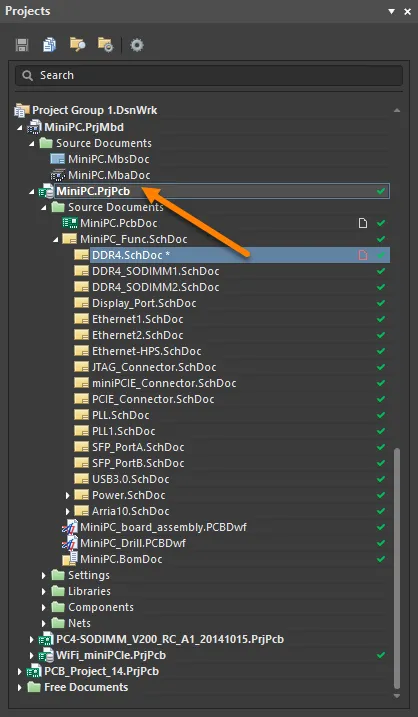
The highlighting of an open active document and its active parent project.
If no project documents are open in the design editor window, opening an additional project will automatically make it the active project in the panel.
The ability to search for a particular document is made possible with the Search function featured near the top of the panel. You may enter keywords to narrow down a search, or to find a particular document.
With numerous documents open in the design editor window, changing the active document using the editor's document tabs will cause the Projects panel to update accordingly, i.e. to reflect both the active document and the active project (if the document made active does not reside in the same project as the previously active document). Conversely, clicking on the entry for a document that is already open (and that belongs to a non-active project) will make the parent project of that document the active project.
Only one project and document may be active at any given time, however, the panel allows you to focus and perform actions on any project or document. Right-clicking on the entry for a non-active project or a non-active document will bring up an associated menu with commands targeting the focused project or focused document, respectively.
In the case of focusing a document, the document will only become focused if it is closed, otherwise, it will become the active document and its parent project will become the active project. For example, in the image below, the active project is MiniPC.PrjPcb and the active document DDR4.SchDoc. The focused document is Ethernet-HPS.SchDoc (distinguished in the panel by a dotted outline box).
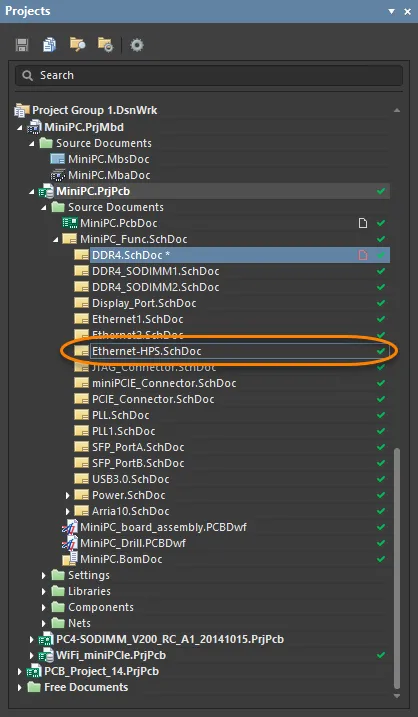
An opened active document (blue) and a selected focused document indicated by the dotted outline.
Project Options
An existing or newly created Project is associated with a range of Option settings that are specific to that project. These are stored in the project file (*.PrjPcb, for example) and will vary depending on the type of project. Note that Server Parameters are stored with the project in its Altium Workspace.
The option settings are configured in the Project Options dialog, which can be accessed from Project » Project Options on the main menu, or by right-clicking on the project name in the Projects panel and then selecting Project Options from the context menu. For the project focused in the Projects panel, the dialog can be accessed by clicking the  control at the top of the panel.
Other project settings that are defined in other dialogs and then stored in the project file include:
- Schematic annotation settings.
- Output settings such as; reports, print, Gerber, and so on. Note that these are the output settings accessed via the schematic or PCB editor menus, rather than the output settings defined in an OutJob document.
Project Saving
When you perform a change on an open project's structure or options, it becomes modified. A modified project is distinguished by an asterisk next to its entry and the  status icon in the Projects panel. To save the changes of a project document file, right-click the project entry in the Projects panel and select the Save command. For the focused project in the panel, it can be saved by clicking the
  control at the top of the panel.
For a Workspace project, the Save command will save the changes locally, i.e. only your local working copy of the project document file will be saved. To make the changes available in the connected Workspace, the projects must be saved to this Workspace. Save the selected files by right-clicking on a project and selecting Save to Server or by selecting the Save to Server link next to the project file.

Clicking the link and selecting the command opens the Save to Server dialog in which you can select the documents to be saved to the Workspace. After clicking OK, the documents are saved to the Workspace and the Save to Server link disappears from the Projects panel.
Working Copy to Workspace Project Sync Resolution
The application of fully managed, version-controlled PCB projects relies on tight synchronization between the project's local working folder contents and the Workspace's versioned storage. If this relationship is disrupted by changes made outside of the normal processes, the managed project structure can become corrupted.
Possible changes that break the local-remote storage synchronization include manual actions such as renaming, moving, or copying/cloning a working project folder. These issues are detected and addressed through a choice dialog that highlights a recommended action based on the situation. In general, its options are to resynchronize the folder project as the current managed project or to remove the project's relationship with the server (make the project unmanaged).
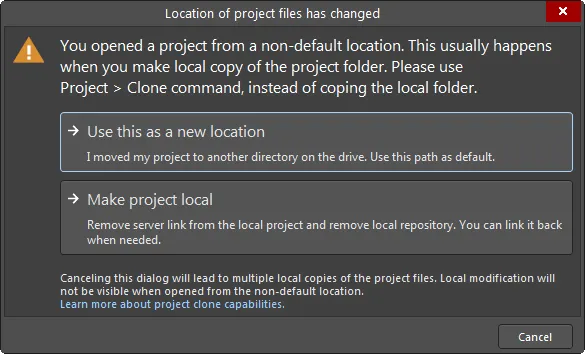
Options to get you back into sync if you have manually changed the location of your local working copy of a project.
Other more complex synchronization disruptions may be caused by changes in the server identity, such as when the server itself has been renamed or moved when a local project file has been overwritten with one that contains different server identity parameters, or the project's target repository has changed. Such issues create a disparity between the server and the local project repositories and are reported by warning dialogs or dialogs that provide a resolution choice.
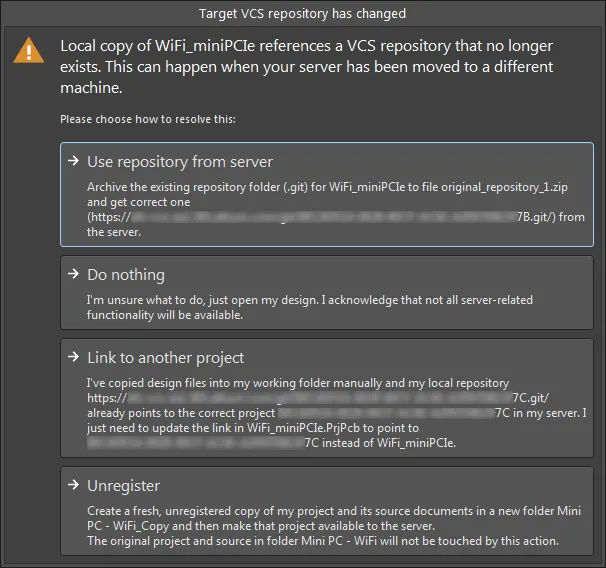
Options to get you back on track if the repository targeted by the local working copy of your design project has changed.
Project Groups
In Altium NEXUS, you can open and edit multiple projects, and if desired, save the collective set of projects as a Project Group ( *.DsnWrk). In the Projects panel, the entry of the current Project Group – either the default one (Project Group 1.DsnWrk), or one you have created or opened – is shown with the  icon.
icon.
This can be of particular advantage when the set of projects are related or linked, such as a product design that is composed of multiple PCBs. Creating a Project Group that includes all the relevant projects allows you to open, manipulate, and save multiple projects as a single entity.
Notes on using project groups:
- The current Project Group is listed along with open projects in the Projects panel – either the default one (
Project Group 1.DsnWrk), or one you have created or opened.
- To save the currently opened set of projects as a group select File » Save Project Group As from the main menu.
- To open an existing group, select File » Open Project Group from the main menu, or right-click in the panel and select Open Project Group from the context menu. Use the same access for the Save Project Group command.
- To close a Project Group, select Window » Close All from the main menus.
- To close all documents in a Project Group, select Window » Close Documents from the main menus.
- To create a new Project Group, select File » New » Design Project Group from the main menu – this will load the default (blank) Project Group (
Project Group 1.DsnWrk). The same method can be used to close the current Project Group file.
- Only one Project Group can be open at a time, so when opening a different Project Group the current group will close. You will be prompted to save any unsaved documents, projects or changes to the current group first.
- To add another project to a Project Group, open or create a project and then save the current Project Group. Alternatively, right-click in the panel and select the Add Existing Project option.

A set of related local projects as a Project Group
Soft Delete
Flexible functionality is available for removing managed design items such as Projects, Components and Released data directly from within Altium NEXUS, from the Explorer panel. Operating as a 'soft delete', the removal process provides increased options and information as you proceed, including relevant links to source items for review purposes. In the Workspace, deleted items are moved to a dedicated Trash location, where they can be retrieved (Restore) or completely removed (Permanently Delete) from the Trash page of the Workspace's browser interface.
For a Project, only the owner or an administrator can permanently delete or restore from the Trash.
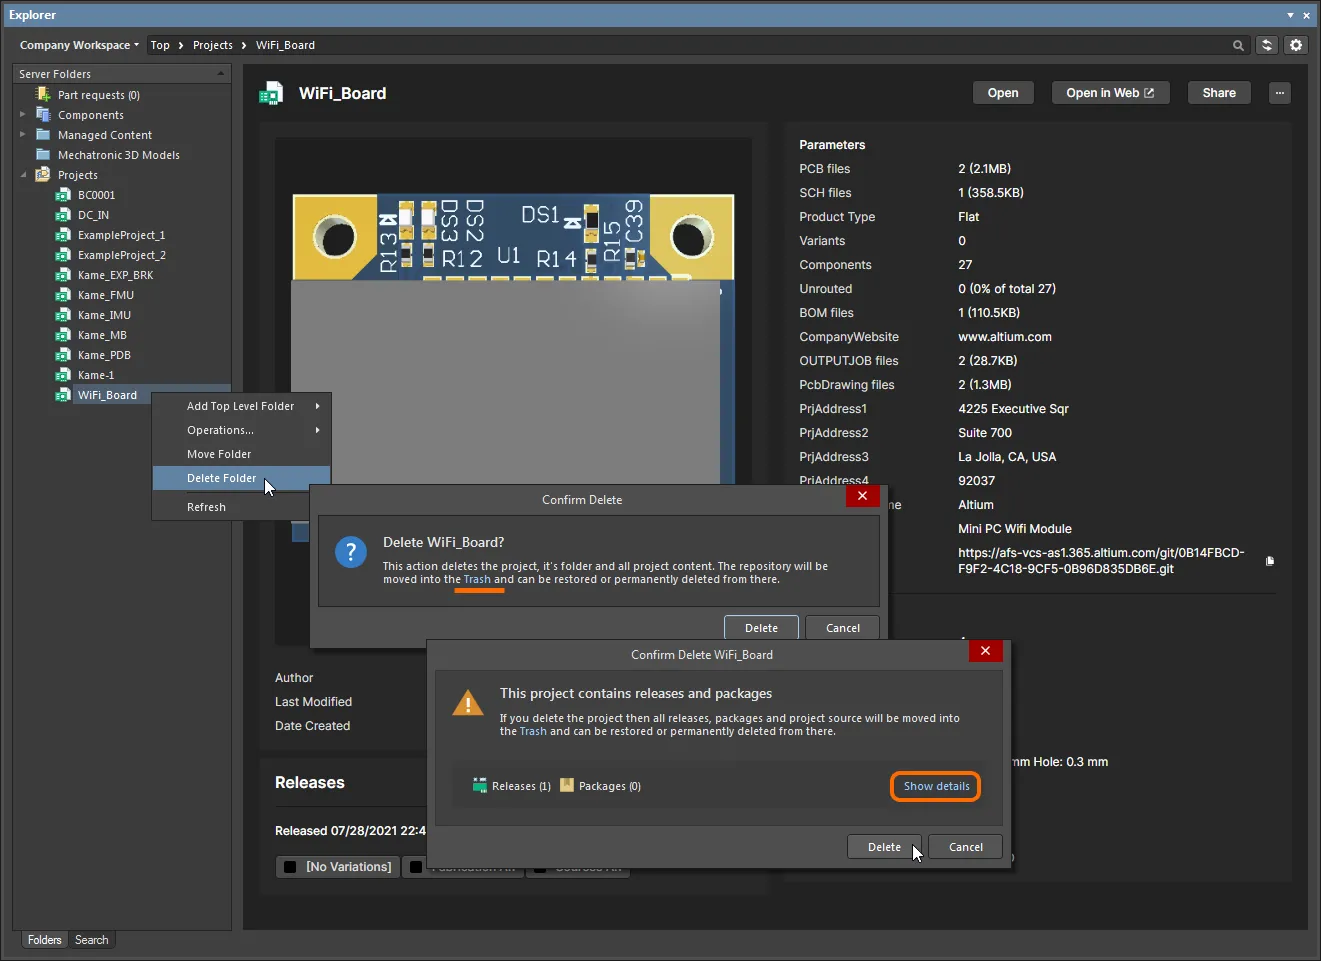
Soft delete in action. Here, a project is being deleted, along with its related release (if manufacturing packages had been created from any releases, those would also be deleted).