고속 회로, 고밀도 보드, 다중 저전압 공급 레일을 특징으로 하는 최신 디지털 설계에서는 설계의 DC 전원 공급 네트워크에 대한 요구 사항으로 인해 설계에 대한 분석적 접근 방식이 필요합니다. 전원 공급 네트워크의 DC 분석 또는 DC 전력 무결성(PI-DC) 결과는 전압 소스에서 부하까지의 경로에 적절한 Copper가 제공되었는지, 즉 보드의 평면, 트랙 및 비아가 보드에 있는 장치의 전력 소비 요구 사항을 충족하기에 충분한 크기(및 특성)인지 확인하는 것을 목표로 합니다.
다행히도 전기적 및 물리적 특성을 기반으로 보드 설계의 DC 성능을 분석하는 DC 전력 무결성(PI-DC) 시뮬레이션 툴을 사용하면 PCB의 전력 공급 네트워크 평가에서 추측을 배제할 수 있습니다. 이러한 도구는 Altium Designer에서 사용할 수 있으며, 이 도구는 Power Analyzer by Keysight 입니다.
다운로드 가능한 Altium Extension 기능으로 제공되는 전력 분석기는 Altium Designer와 직접 통합되어 현재 PCB 프로젝트의 PI-DC 시뮬레이션 및 분석을 가능하게 합니다. Power Analyzer는 Altium Designer 내에서 작동하므로 수동 데이터 가져오기/내보내기 요구 사항, 데이터 변환 또는 별도의 애플리케이션을 실행할 필요 없이 회로도 또는 PCB 편집기에서 Power Analyzer를 시작하고 원하는 테스트 파라미터를 설정한 다음 시뮬레이션을 실행하면 됩니다. 결과는 주로 회로 기판 Copper 레이아웃의 2D/3D 모델링을 통해 제공되므로 결과를 빠르게 평가하고 PCB 레이아웃 설계에 대한 탐색적 '만약의 경우' 테스트를 수행할 수 있습니다.
확장 Power Analyzer by Keysight Extension 기능은 Altium Designer 22.10 이상에서 사용할 수 있도록 지원됩니다.
전력 분석기 설치
Altium Designer에서 전력 분석을 수행하기 위한 설정에는 두 단계가 있습니다:
-
Keysight의 전력 분석기 확장 프로그램을 설치합니다;
-
유효한 Keysight 전력 분석기 라이선스를 추가합니다.
그러나 새로운 전력망 분석(  또는
또는  )을 수행하려면 유효한 Keysight 전력 분석기 라이선스도 할당해야 합니다. 라이센스가 할당되지 않은 경우, 이 버튼 중 하나를 클릭하면 Analyze Your Power Nets 대화 상자가 열리며 여기서 14일 무료 평가판을 요청할 수 있습니다.
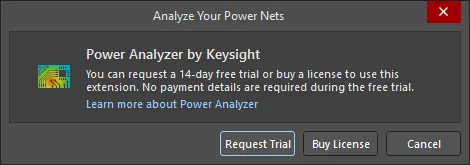
Keysight Power Analyzer 확장 프로그램 설치
Extension 기능은 소프트웨어 오른쪽 상단에 있는 사용자 구성 메뉴를 통해 설치 및 관리할 수 있습니다.
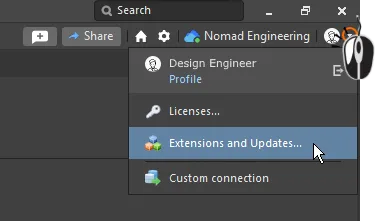 Extension 기능은 구성 메뉴를 통해 관리됩니다.
확장 프로그램의 제목은 Power Analyzer by Keysight 이라는 제목으로 제공되며 Available 탭에서 사용할 수 있습니다 Extensions and Updates 보기 탭에서 사용할 수 있습니다.
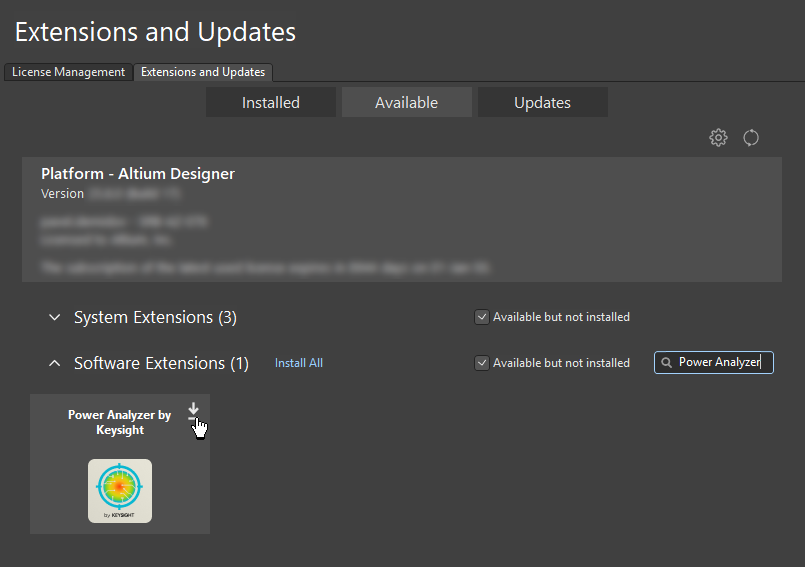
확장 및 업데이트의 구입한 탭에서 Keysight 전력 분석기 확장 프로그램을 설치할 수 있습니다.
클릭하여 확장 프로그램을 다운로드하고 설치하면 Keysight Software End-User License Agreement 이 열립니다. 를 클릭하면 Accept 을 클릭하면 EULA 이용 약관에 동의하는 것으로 간주되며 동의하면 설치가 계속됩니다. 를 클릭하면 Close 을 클릭하면 EULA 이용 약관에 동의하지 않음을 나타내며 설치 프로세스가 중단됩니다.
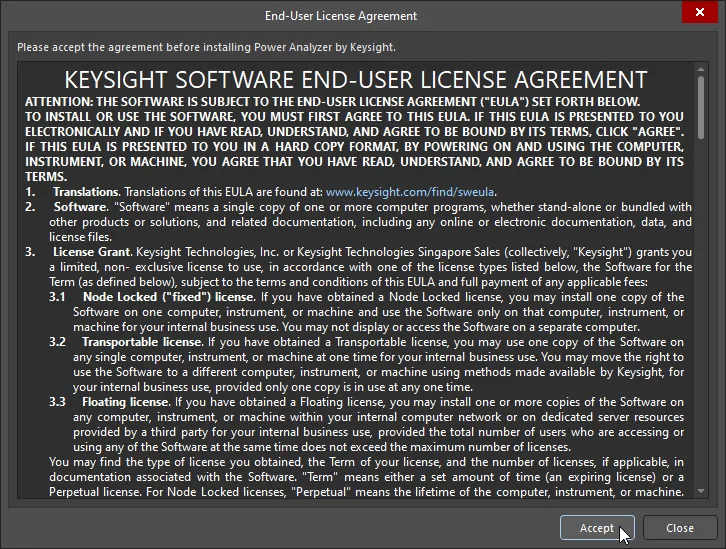
확장 프로그램을 설치한 후 소프트웨어를 다시 시작합니다.
Keysight의 전력 분석기 라이선스
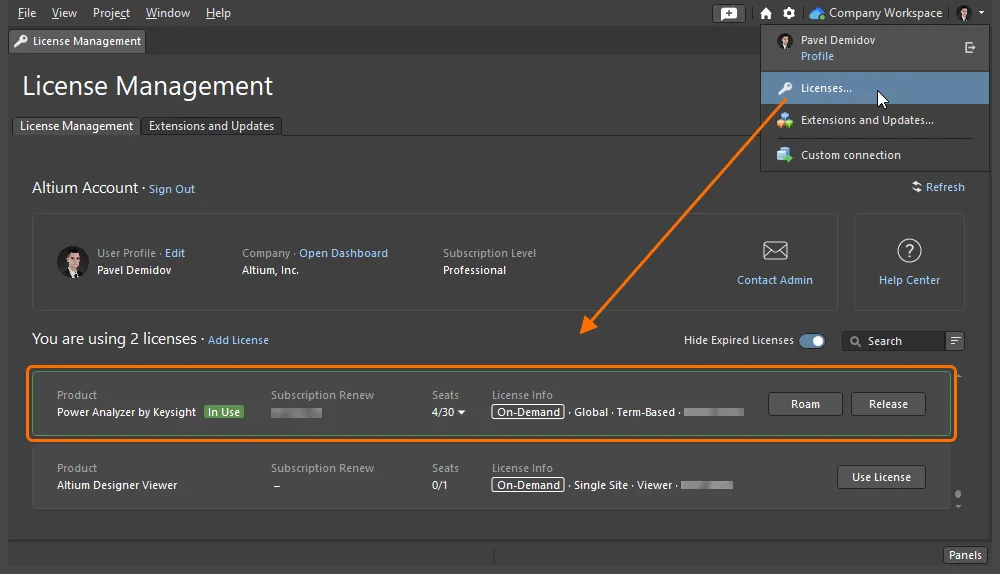
전력 분석기를 사용하려면 라이센스가 필요합니다. 확장 프로그램을 설치한 후 Power Analyzer by Keysight 확장 프로그램을 설치한 후 Altium Designer 내의 License Management 보기(디자인 공간의 오른쪽 상단에 있는  컨트롤을 클릭하고 메뉴에서 Licenses 명령을 선택합니다.) 사용 가능한 라이선스 목록을 스캔하고 Power Analyzer by Keysight 라이선스 항목을 찾아 Use License 버튼을 클릭하여 해당 라이선스를 활성화합니다.
전력 분석기 시작하기
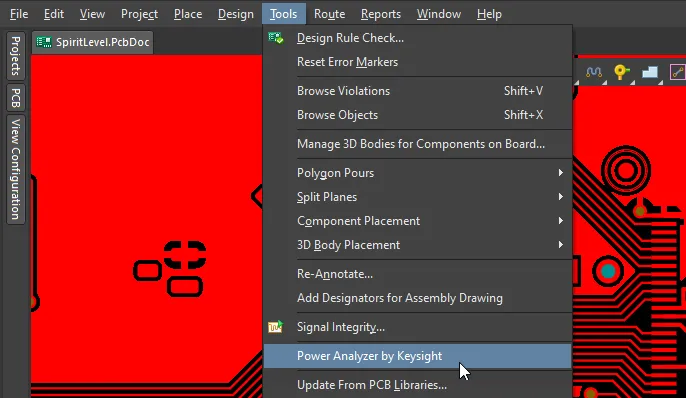
전력 분석기 작업을 시작하려면 프로젝트의 PCB 문서 또는 회로도 중 하나를 열고 메인 메뉴에서 Tools » Power Analyzer by Keysight 을 선택합니다.
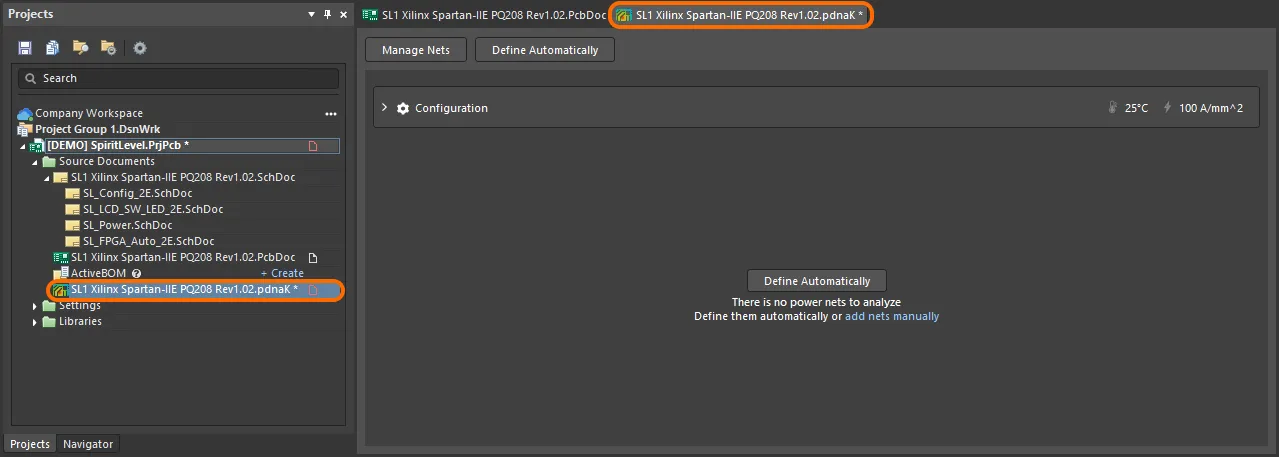
Power Analyzer Keysight 문서(.pdnaK) )이 열리고 프로젝트의 Source Documents 영역( 프로젝트의 Projects 패널)에 아래와 같이 추가됩니다.
Power Analyzer는 회로도 편집기 또는 PCB 편집기 메뉴에서 실행할 수 있습니다. 그러나 Power Analyzer는 PCB 구조를 시뮬레이션하므로 회로도에 대한 모든 설계 변경 사항은 분석기 문서에서 감지되기 전에 PCB에 동기화해야 합니다(*.pdnaK). 설계 변경이 감지되지 않으면 분석기 문서를 저장하고 닫았다가 다시 엽니다.
Example Project used on this Page
이 페이지의 이미지는 Altium Designer 설치의 일부로 포함된 표준 버전인 SpiritLevel-SL1 예제 보드 설계의 수정된 버전을 사용하여 촬영되었습니다(\Public Documents\Altium\Altium Designer\Examples\SpiritLevel-SL1). 프로젝트에 다음과 같은 변경 사항이 적용되었습니다:
-
컴포넌트
J1에 매개변수 Component Type값 Source
-
컴포넌트
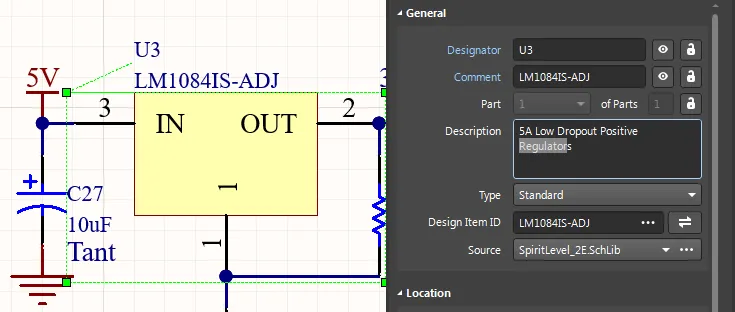
U3, 추가 매개변수 Component Type, 값 VRM
-
컴포넌트
U4, 추가 매개변수 Component Type, 값 VRM
-
컴포넌트
LCD1, 추가 매개변수 Current Consumption, 값 0.018
-
컴포넌트
LED9, 추가 매개변수 Current Consumption값 0.005
-
컴포넌트
U1, 추가 매개변수 Current Consumption, 값 1.65, 추가 매개변수 Power Consumption, 값 0.75
-
컴포넌트
U2, 추가 매개변수 Current Consumption값 0.005
-
컴포넌트
U5, 추가 매개변수 Current Consumption, 값 0.1, 추가 매개변수 Power Consumption, 값 0.1
-
컴포넌트
U6, 추가 매개변수 Current Consumption값 0.005
-
컴포넌트
Y1, 추가 매개변수 Current Consumption값 0.012
-
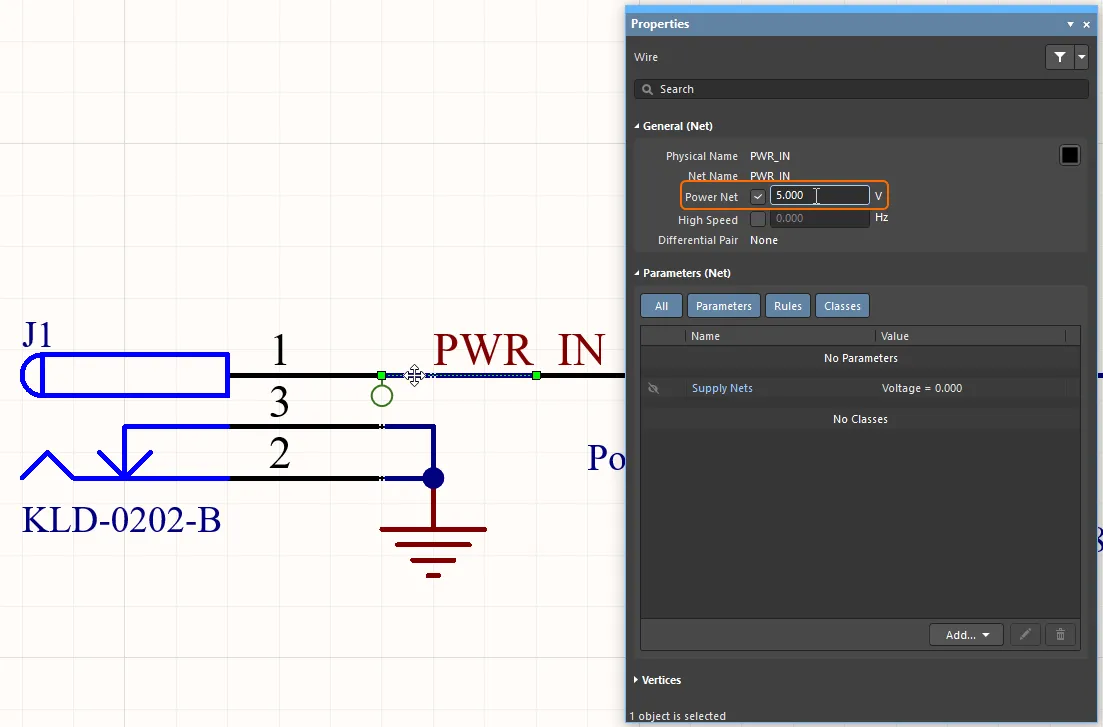
SL_Power.SchDoc, PWR_IN net, set Power Net 속성을 값 5V로 설정합니다( 이 속성을 활성화하는 방법에 대한 자세한 내용은이 섹션을 참조하세요 )
-
그물
1V8 의 이름도 VCCINT (그물에는 여러 가지 이름이 있음), 그물 3V3 도 명명되었습니다 VCCO. 에 대한 참조 VCCINT 과 VCCO 에 대한 참조는 설계를 단순화하기 위해 제거되었고, 네트의 이름은 1V8 과 3V3.
이 수정된 예제 프로젝트에는 Keysight에서 미리 만든 전력 분석기 문서(SL1 Xilinx Spartan-IIE PQ208 Rev1.02.pdnaK))도 포함되어 있어 이 설계에 대한 전력 분석을 실행하여 이 기능이 실제로 작동하는지 확인할 수 있습니다.
분석 준비
전력 분석기는 보드의 물리적 특성을 알아야 합니다. 여기에는 표면/내부 레이어의 최대 전류 밀도, 최소 및 최대 비아 직경, Copper 유형, 작동 온도 등이 포함됩니다. 이러한 속성은 분석기 문서의 Configuration 영역에 정의되어 있습니다.
구성(Configuration) 옵션
-
최대 전류 밀도와 최대 비아 전류 값은 Copper 형상에 따라 달라지므로 모든 네트에서 동일합니다.
-
설정은 Max Current Density for Surface / Internal Layers 설정은 PCB의 해당 레이어에 허용되는 값을 지정합니다.
-
비아의 최대 전류는 프로젝트에 사용된 최소 및 최대 홀 크기에 대해 지정됩니다. 홀 직경 값은 Min Via Diameter 및 Max Via Diameter 필드에 정의되며, 해당 홀 크기에 대해 Max Current 필드에 정의됩니다.
-
소프트웨어는 시뮬레이션 프로세스 중에 PCB 레이아웃을 메시로 나눕니다. 기본적으로 동적 메시 크기가 사용됩니다. 확인란을 활성화하면 Simulation Mesh Size 체크박스를 활성화하면 필요한 메시 크기를 정의할 수 있습니다.
-
기본 설정은 히트맵 결과에서 그라운드 망을 제외하는 것입니다. 그라운드 망을 포함하려면 Skip Ground 확인란을 비활성화한 다음 상단의 Network / Net 드롭다운에서 Power Analysis by Keysight 패널 상단의 드롭다운에서 GND 망을 선택하여 히트맵 결과를 탐색합니다. 히트맵은 신호 레이어에서 다각형 구조를 지원하지만, 파워 플레인 레이어의 동작은 시뮬레이션할 수 없다는 점에 유의하세요.
-
필드 Copper Type 필드는 사용된 Copper 유형과 관련 파라미터 및 온도 파라미터를 지정합니다.
-
값은 Work Temperature 는 도체의 저항을 결정하는 데 사용되며 Temperature Compensation 는 열전도율과 관련된 재료 자체의 기준입니다. 재료마다 열전도율 계수가 다르므로 부하에 따라 재료의 가열에 영향을 미칩니다. 이 가열은 재료의 내부 저항에 영향을 미치고, 이는 다시 전압 강하에 영향을 미칩니다.
-
전압 강하 Via Plating Thickness 에 표시되는 Global PCB Parameters 영역이 정의됩니다 Properties 패널 - 자세히 알아보기에서 확인할 수 있습니다.
필요에 따라 기본값에서 디자인에 맞게 변경할 수 있습니다.

최대 전류 밀도 및 최대 비아 전류뿐만 아니라, 정의된 각 전력망에 대해 허용 전압 강하 값도 지정해야 합니다. 각 네트에 대해 DC Drop Limit 를 설정하여 각 네트에 대해 사전 정의된 백분율을 선택하거나 Custom 값을 입력합니다.

전력 분석기에서 Auto-Define Settings 는 전력 분석기가 설계에서 전력망을 자동으로 정의하려고 할 때 사용됩니다. 이를 위해서는 전압 레귤레이터, 커넥터 및 직렬(Series) 컴포넌트와 같은 회로 요소를 식별하는 방법을 알아야 합니다. 컴포넌트 designator 접두사와 같은 단서를 사용할 뿐만 아니라, 특정 컴포넌트에 매개 변수를 추가하여 자동 감지 프로세스를 향상시킬 수도 있습니다. 자세한 내용은 자동 인식 요구 사항 섹션을 참조하세요.
시뮬레이션을 위한 전력망 추가하기
시뮬레이션을 위한 전력망을 추가하려면 왼쪽 상단의  버튼을 클릭하여 Manage Nets 대화 상자를 엽니다. 필수 확인란을 활성화하고 Power Net Name 확인란을 활성화하고 해당 Reference Net. 회로도 설계에 전원 포트 개체가 없는 네트의 경우 해당 네트는 Power Net Name 목록에 표시되지 않습니다. Show Custom Nets 을 클릭하여 설계에 모든 네트를 포함합니다. 필요한 경우 여러 개의 전원망을 활성화할 수 있습니다. 전원망 간의 계층 관계는 전원망이 완전히 구성되면 자동으로 해결됩니다.
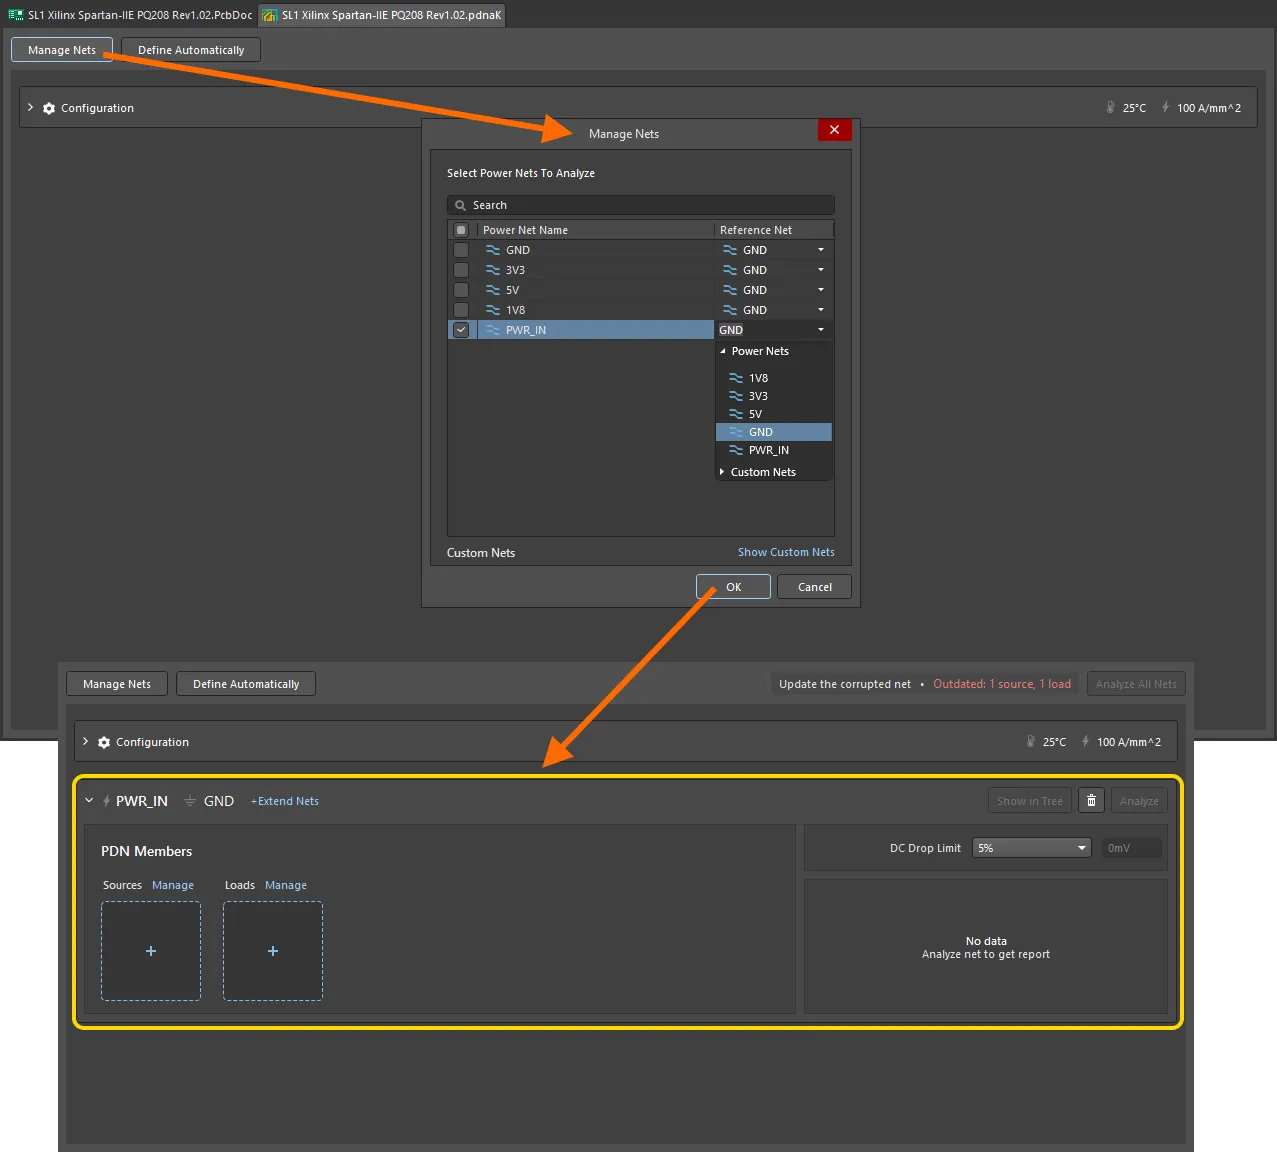
각 파워넷에는 전원이 필요하며, 이러한 전원은 다음에 구성됩니다.

버튼을 클릭하면 소프트웨어가 자동으로 프로젝트의 토폴로지를 인식하여 파워넷을 생성하도록 할 수도 있습니다
Auto-Define Settings 영역의
Configuration 섹션(
*.pdnaK).
전원 추가하기
전원을 추가하려면 분석기 문서에서 + (또는 연결된 관리 컨트롤)을 클릭합니다 Sources 섹션을 클릭합니다. 회로에 전원이 두 개 이상 포함된 경우 관리를 클릭하고 나머지 컴포넌트를 선택합니다.
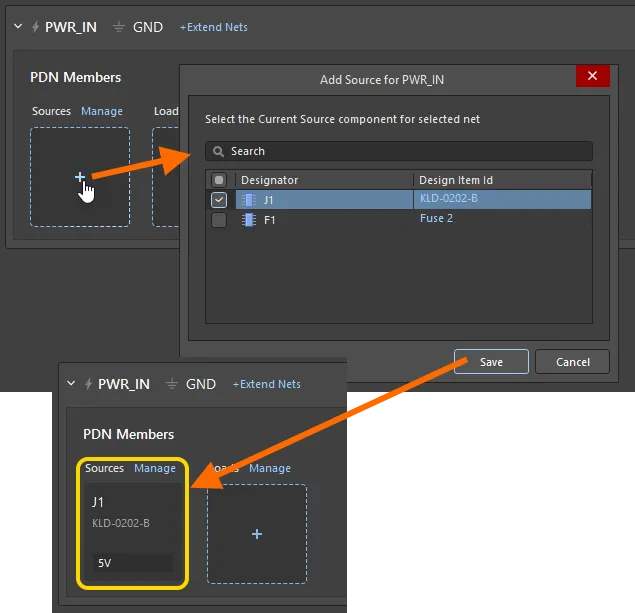
컴포넌트를 소스로 사용하려면, 선택한 Power Net에 연결되어야 하지만, 선택한 Reference Net에 연결된 모든 컴포넌트를 통해 Reference Net에 연결할 수 있습니다.
Component Card
소스 또는 부하로 포함된 각 컴포넌트는 Power Analyzer 문서에서 Component Card로 표시됩니다.
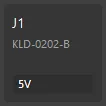
-
Component Card 위로
![]() 마우스를가져가면 Edit 및 Delete 버튼을 표시합니다.
마우스를가져가면 Edit 및 Delete 버튼을 표시합니다.
-
Component Card를 두 번 클릭하여 해당 컴포넌트의 Properties 대화 상자를 엽니다.
-
Design Item ID
![]() 값을 클릭하여 회로도에서 해당 컴포넌트로 교차 프로브합니다. 교차 프로브 줌 레벨은 교차 프로브의 Highlight Methods 섹션에 정의되어 있습니다 System - Navigation 페이지의 Preferences 대화 상자의 섹션에 정의됩니다.
값을 클릭하여 회로도에서 해당 컴포넌트로 교차 프로브합니다. 교차 프로브 줌 레벨은 교차 프로브의 Highlight Methods 섹션에 정의되어 있습니다 System - Navigation 페이지의 Preferences 대화 상자의 섹션에 정의됩니다.
-
해당 컴포넌트의 기본 분석 값
![]() 을 카드에서 직접편집합니다 (또는 컴포넌트를 편집하여 모든 속성에 액세스).
을 카드에서 직접편집합니다 (또는 컴포넌트를 편집하여 모든 속성에 액세스).
네트 확장
보드의 전원망은 퓨즈 또는 저항과 같은 수동 소자를 통과할 수 있으며, 해당 컴포넌트의 반대편에 다른 전원망이 있을 수 있습니다. 이 상황에서는 다음을 권장합니다 extend the net 중간 컴포넌트와 그 두 번째 네트를 메인 네트의 일부로 포함하는 것이 좋습니다. 이러한 목적으로 Extend Nets 함수가 이 용도로 사용됩니다.
네트를 확장하려면 네트 이름 옆에 있는 +네트 확장(Extend Nets) 아이콘을 클릭하여 Extensions Manager 대화 상자를 엽니다. 를 클릭하여 + 을 클릭하여 대상 네트를 확장합니다. 전력 분석기에는 Single 확장 컴포넌트를 통해 연결할 수 있는 네트만 표시됩니다. 네트를 선택하면 Add 망을 선택하면 관련 컴포넌트가 자동으로 추가됩니다 Extensions Manager 대화 상자에 관련 컴포넌트가 자동으로 추가되며, 원하는 경우 변경할 수 있습니다.
 파워 네트는 시리즈 컴포넌트를 통해 확장할 수 있습니다.
그런 다음 아래 이미지와 같이 + 기호를 클릭하여 계속 확장할 수 있습니다. 완료되면 저장을 클릭합니다 Extensions Manager 대화상자를 클릭합니다.
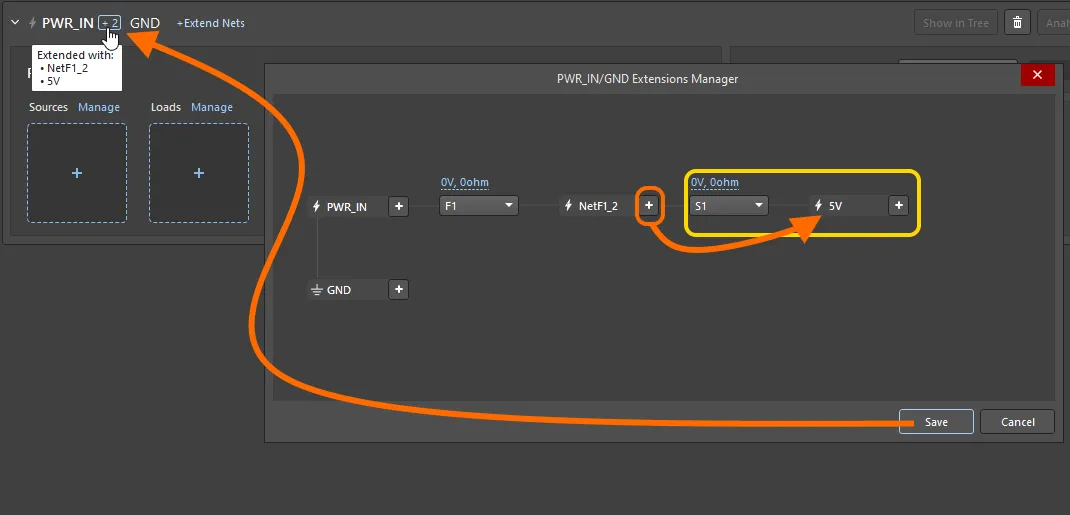 시리즈 컴포넌트와 네트를 계속 추가합니다.
네트 확장 시 참고 사항
-
각 직렬(Series) 컴포넌트에 대해 전압 강하, 저항 및 최대 허용 전류를 설정할 수 있으며, 이는 분석 중에 고려됩니다(이미지 표시![]() ).
).
-
잘못된 네트워크를 정의한 경우 해당 이름 위로 마우스를 가져간 후 표시되는 삭제 아이콘을 클릭하여 삭제할 수 있습니다.
-
확장 망이 저장되면 확장 망에 연결된 컴포넌트가 부하와 함께 목록에 표시되며, 이를 추가할 수 있습니다.
-
파워 네트 이름 옆에는 추가된 확장 네트 개수가 표시되며, 이 숫자 위로 커서를 가져가면 위 이미지와 같이 확장 네트의 이름이 표시됩니다.
-
확장 넷의 병렬 컴포넌트에 대한 시뮬레이션 지원은 PABK 확장 V1.0.6에 추가되었으며, 사용자 인터페이스 지원은 PABK 확장 V1.0.9에 추가되었습니다. 병렬 컴포넌트를 정의하려면 네트를 선택하고 Extensions Manager 대화 상자 팝업에서 그물을 선택한 다음 아래 이미지와 같이 모든 병렬 컴포넌트를 활성화합니다. 이미지 위로 마우스를 가져가면 네트 확장이 완료되면 대화 상자가 표시됩니다.
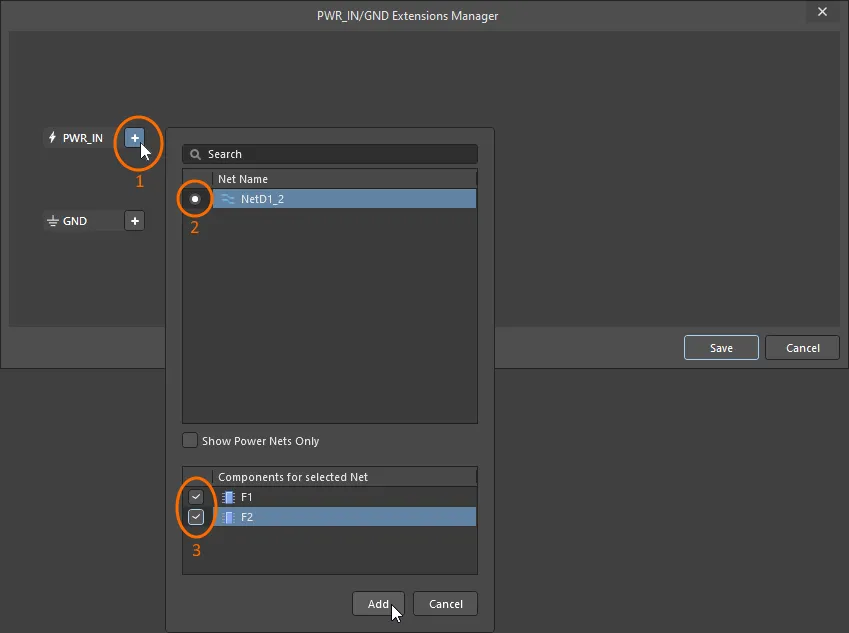 네트에서 모든 병렬 컴포넌트를 선택합니다.
Load 지정하기
Load 컴포넌트를 추가하려면 + (또는 연결된 관리 컨트롤)을 클릭한 다음 Loads 섹션을 클릭한 다음 원하는 컴포넌트를 선택합니다. 컴포넌트가 메인 또는 확장 넷에 연결되면 대화 상자에 나열됩니다.
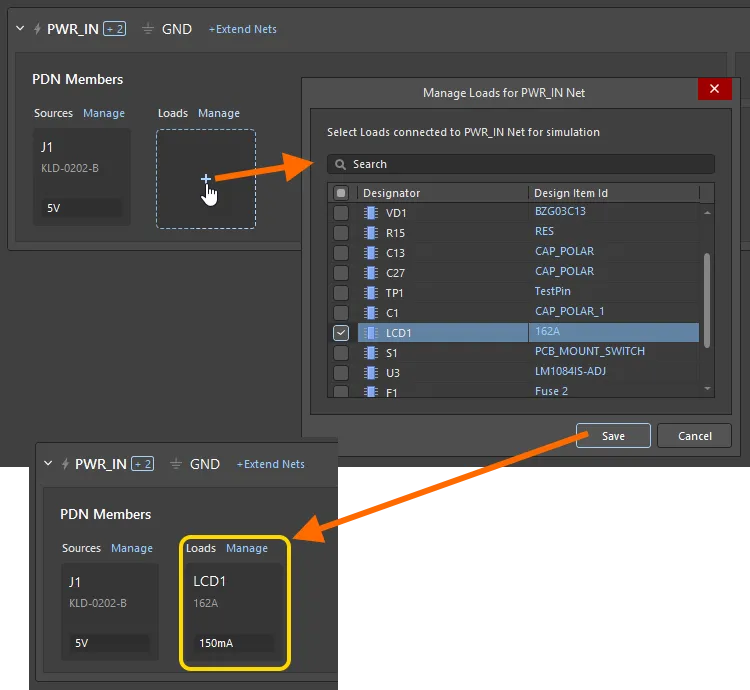
컴포넌트를 추가한 후 해당 Component Card에서 직접 사용량을 지정하거나  버튼을 클릭하여 / Load Properties 대화 상자를 열 수 있습니다.
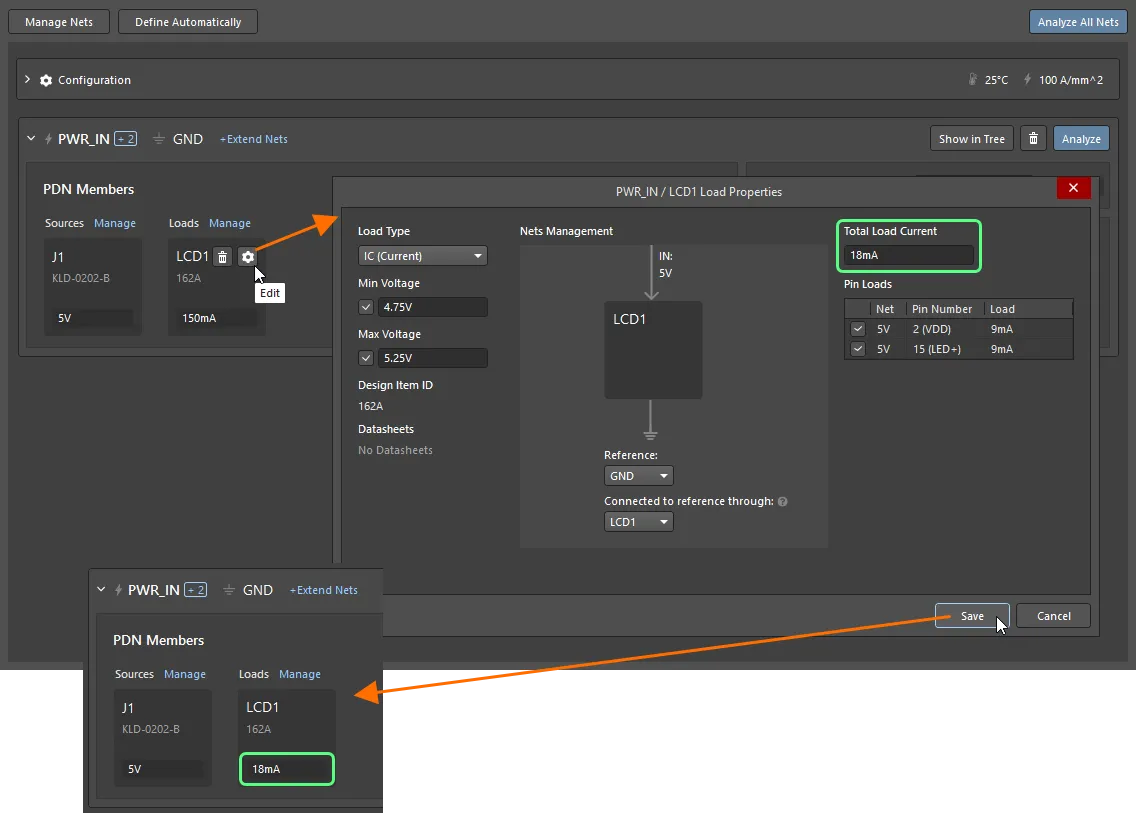
Load 구성 시 참고 사항
-
Load 프로퍼티를 정의합니다 Load Type, Total Load Current및 Min 및 Max Voltage.
-
공급망 IN 이 올바르게 구성되었는지, 그리고 Reference 및 Connected to reference through 옵션을 확인합니다.
-
부하 전류는 식별된 모든 전원 핀 간에 자동으로 동일하게 공유되므로 필요한 경우 이 값을 수정하세요.
-
유형의 부하를 구성할 때 IC (Current) 유형의 부하를 구성할 때 다른 직렬(Series) 컴포넌트를 통해 소스와 연결되는 부하 컴포넌트의 모든 핀을 볼 수 있으며 필요한 핀을 선택할 수 있습니다.
언제 Manage Loads (또는 Add Sources) 대화 상자가 열리면 Design Item Id 열이 표시됩니다. 이 열의 항목을 클릭하면 회로도에서 해당 컴포넌트로 교차 프로브되므로 올바른 컴포넌트를 선택했는지 쉽게 확인할 수 있습니다.
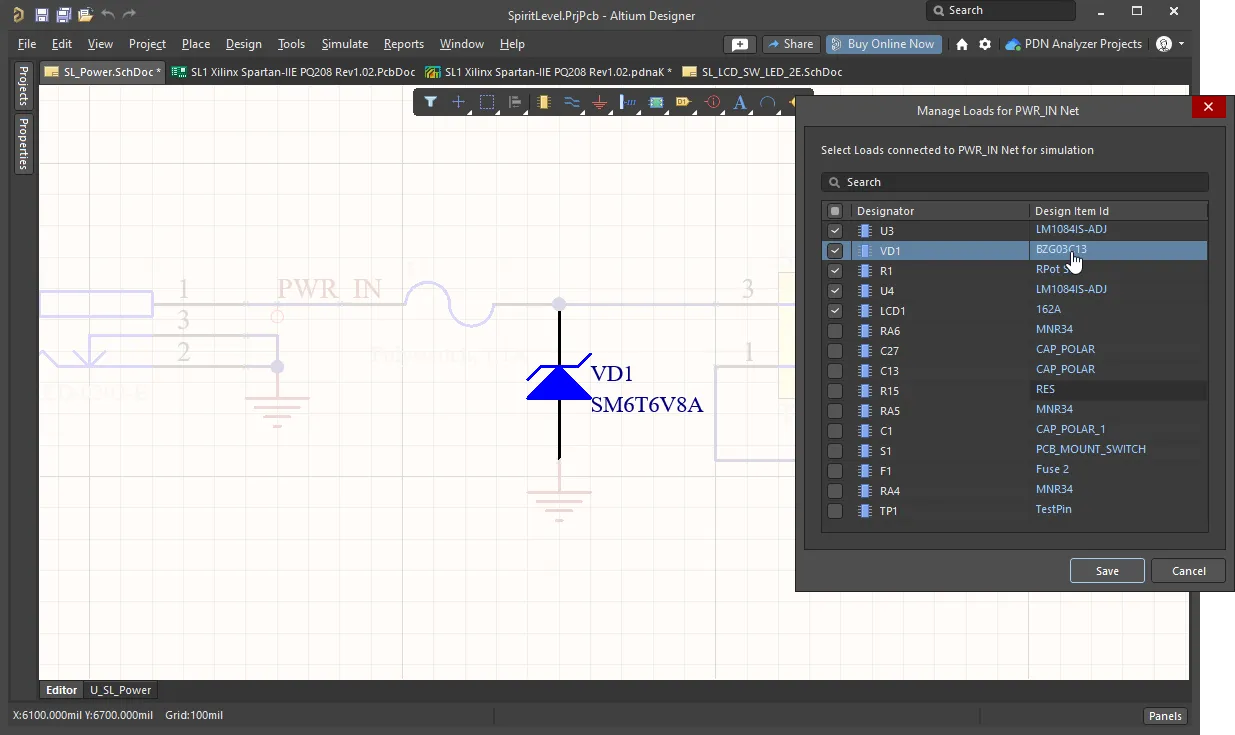
교차 프로브 줌 레벨은 회로도의 Highlight Methods 섹션에 정의되어 있습니다 System - Navigation 페이지의 Preferences 대화 상자의 섹션에 정의됩니다.
VRM 지정하기
VRM(Voltage Regulator Module) 컴포넌트를 정의하려면 먼저 해당 컴포넌트를 부하로 추가합니다. 그런 다음 컴포넌트 Load Properties 대화상자(  버튼 클릭)를 열어 구성합니다.
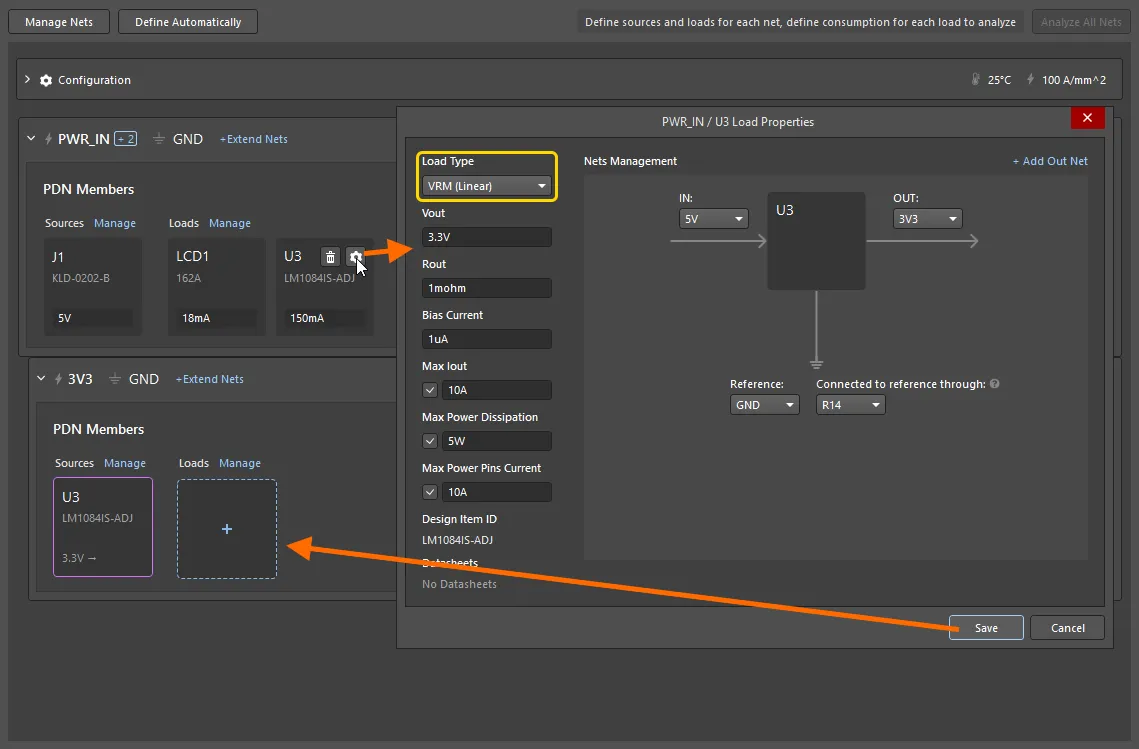 부하가 VRM으로 구성되면 해당 부하가 지정된 전원망의 소스로도 표시됩니다 OUT net.
VRM 구성 시, 참고 사항
-
지정 Load Type 을 원하는 유형의 VRM으로 지정합니다.
-
필드에 출력 전압을 지정합니다 Vout 필드에 다른 레귤레이터 속성과 함께 출력 전압을 지정합니다.
-
필드에서 IN 및 OUT 네트를 설정합니다 Nets Management 영역에서 구성합니다.
-
VRM이 레퍼런스 넷에 직접 연결하지 않거나 다른 레퍼런스를 사용하는 경우에는 Reference 및 Connected to reference through 옵션을 설정합니다.
-
위 그림과 같이 해당 VRM을 소스로 사용하여 계층 구조에 하위 전원 네트워크가 자동으로 생성됩니다.
-
VRM에 출력 네트워크가 두 개 이상 있는 경우, +망 추가 링크를 사용하여 필요한 모든 네트워크를 추가하고 Load Properties 대화상자에서 필요한 모든 네트를 추가하고 표시되는 해당 필드에 출력 전류를 지정합니다.
구성된 전력망
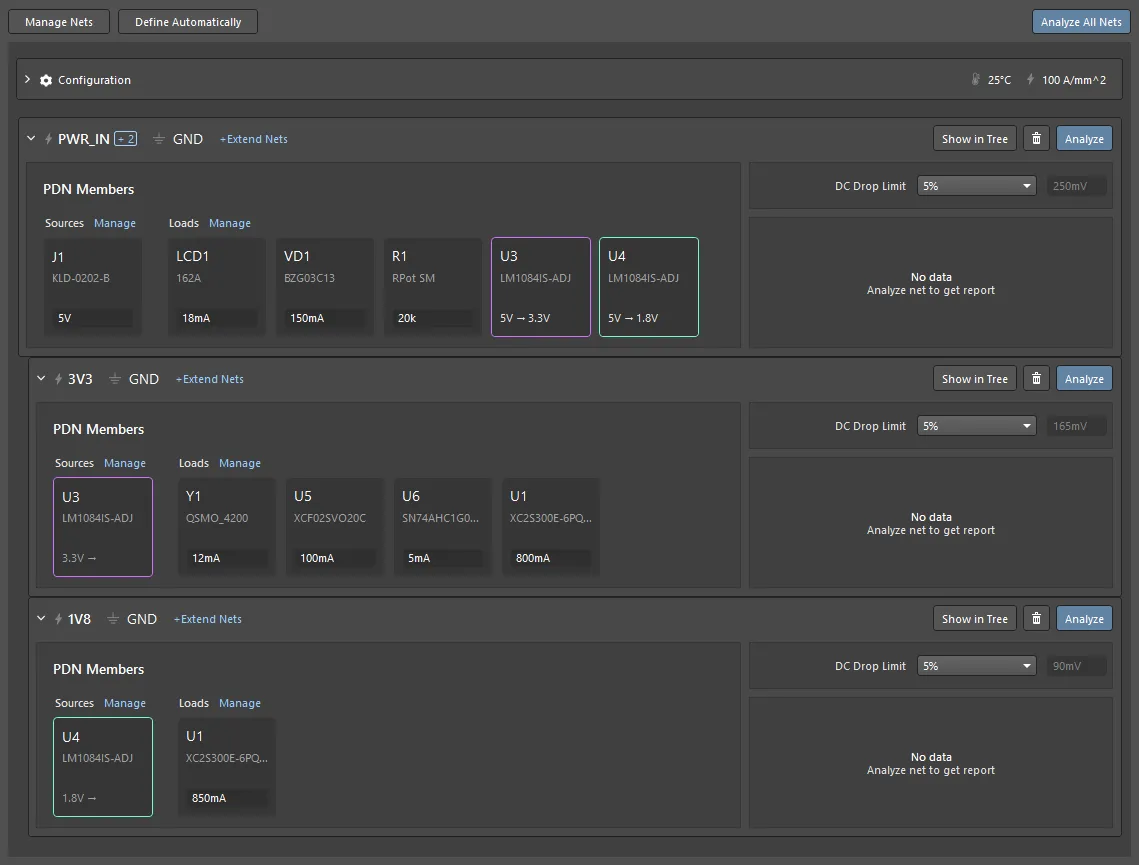
구성된 각 전력망은 별도의 접을 수 있는 정의로 *.pdnaK 문서에 별도의 접을 수 있는 정의로 표시되며, 구성된 PWR_IN 넷은 아래 그림과 같이 두 개의 하위 파워 넷과 함께 표시됩니다, 3V3 과 1V8는 자식 네트 상태를 나타내기 위해 약간 들여쓰기되어 있습니다.
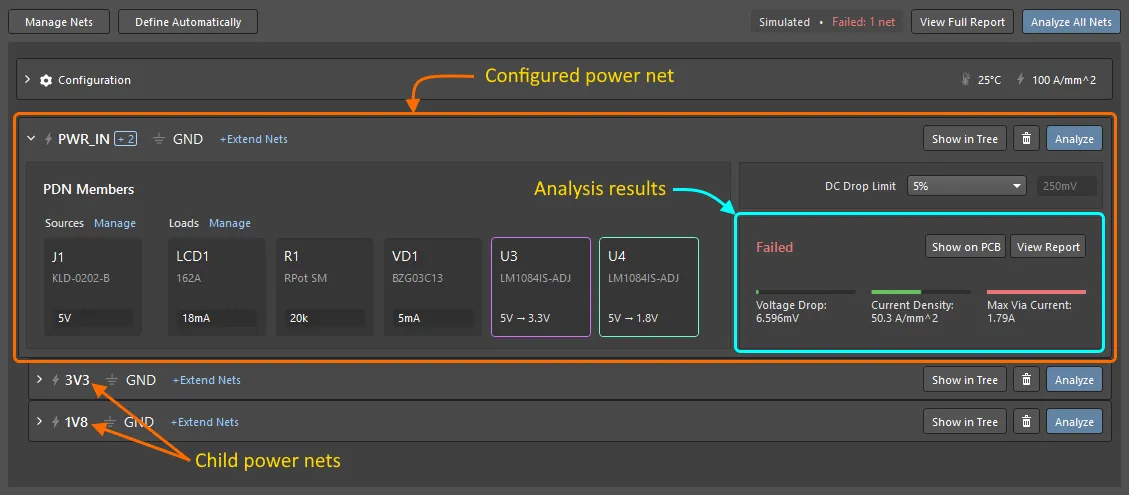
파워넷 정의 이해
-
각 파워넷은 별도의 접을 수 있는 Power Net Definition로 표시됩니다.
-
파워넷 정의의 배너에 포함됩니다:
-
파워넷 이름 
-
참조 네트 
-
그물이 확장된 경우 추가 그물( )의 수를 표시하는 표시기입니다. 커서를 가리키면 하위 네트의 이름이 표시됩니다.
-
A  버튼을 클릭하면 전체 파워 네트 계층 구조의 맥락에서 이 네트 내 컴포넌트의 연결 구조가 표시됩니다.
-
A  버튼을 클릭하면 모든 하위 네트워크와 함께 분석 프로세스에서 이 네트워크를 삭제할 수 있습니다.
-
An  버튼을 클릭하면 모든 하위 네트워크와 함께 이 네트워크를 분석할 수 있습니다.
-
네트워크의 각 컴포넌트는 Component Card로 표시됩니다.
-
그물을 분석하고 나면 Voltage Drop, Current Density 및 Max Via Current 결과가 위 이미지와 같이 전력망 정의에 표시됩니다.
-
각 게이지에는 지정된 한계를 기준으로 시뮬레이션된 값이 표시됩니다. 값이 한도 내에 있는 경우 눈금 선은 녹색입니다. 한계에 가까우면 선은 노란색, 한계를 초과하면 선은 빨간색입니다.
-
버튼을 클릭하여
 버튼을 클릭하면 PCB 편집기로 보기가 전환되어 PCB의 이 그물 안에 있는 Copper가 표시됩니다. PCB 편집기에서 Power Analyzer by Keysight 패널을 사용하여 분석 프로세스를 제어합니다.
-
버튼을 클릭하면
 버튼을 클릭하여 해당 전력망에 대한 상세 보고서를 생성하고 엽니다. 보고서 내에서
  버튼을 사용하여 HTML 사본을 저장합니다.
파워넷 트리 보기
연결된  버튼을 클릭하면 구성된 파워넷(및 VRM을 통해 정의된 모든 하위 네트워크)을 트리 형태로 볼 수 있습니다. 전체 구조가 표시되고 특정 파워넷과 관련 컴포넌트가 그에 따라 강조 표시됩니다.
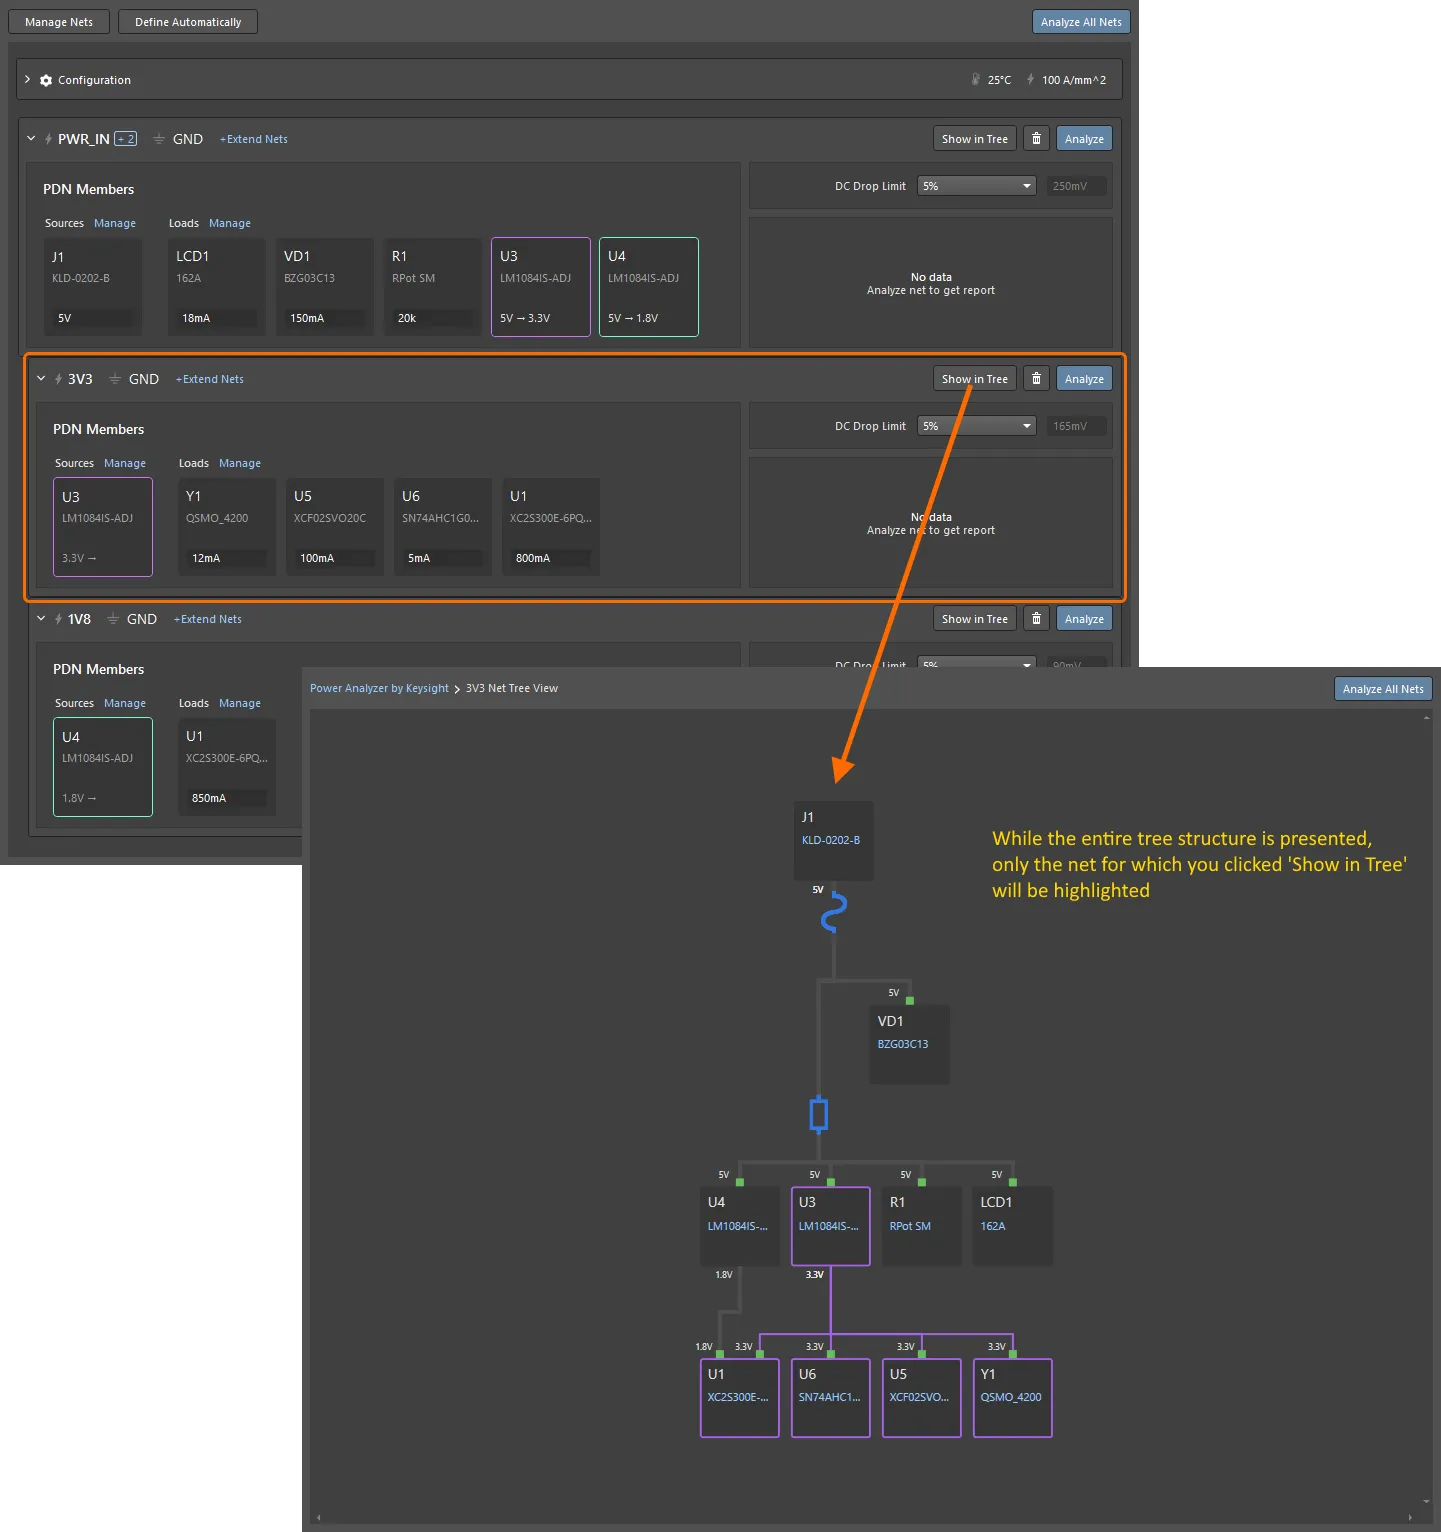
트리 보기를 사용하면 전체 전력 네트워크가 필요에 따라 정의되어 분석할 준비가 되었는지 빠르게 평가할 수 있습니다. 기본 창으로 돌아가려면 왼쪽 상단의 Power Analyzer by Keysight 문서의 왼쪽 상단 모서리에 있는 .pdnaK 문서를 클릭합니다.
분석 실행
구성이 완료되면 연결된  버튼을 클릭하여 특정 네트워크에 대한 분석을 실행할 수 있습니다. 분석 결과의 요약은 아래와 같이 전력망 정의에 표시됩니다. PCB 내에서 결과를 보려면 연결된
  버튼을 클릭합니다.
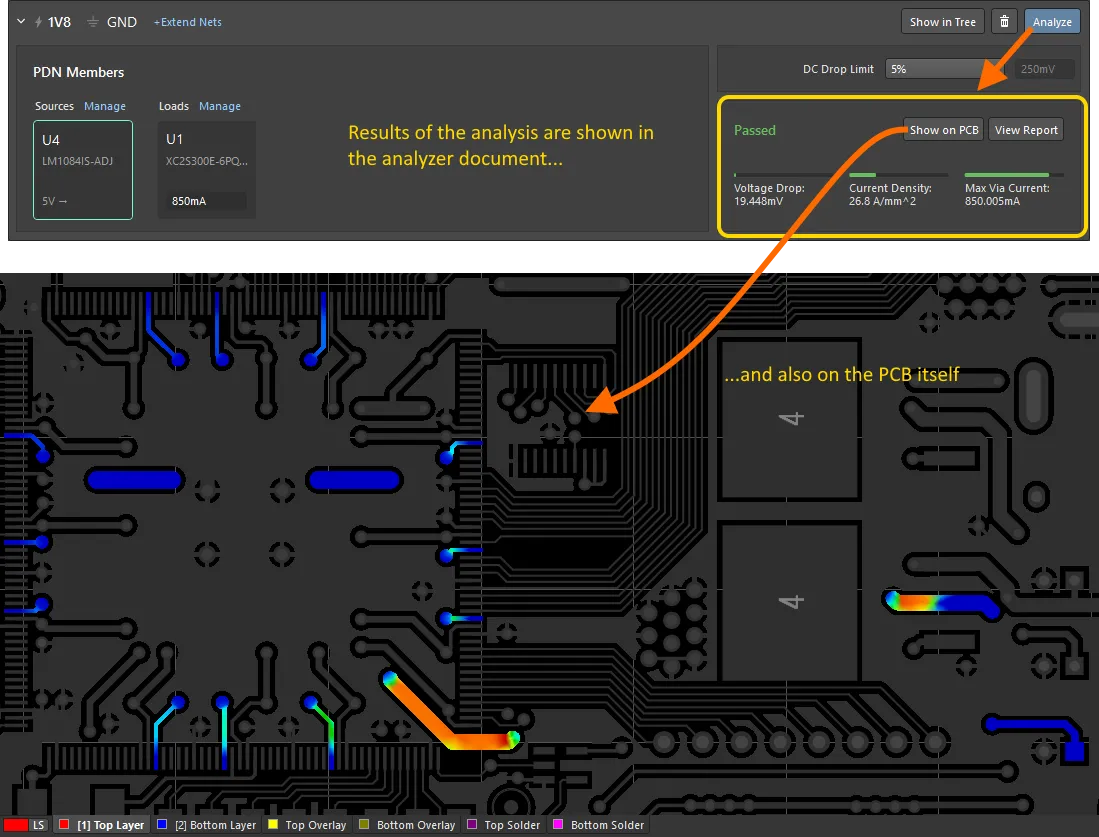
구성된 모든 네트를 한 번에 분석하려면

버튼(분석기 문서 오른쪽 상단에 있음)을 클릭합니다. 트리 구조에서 최상위 전력망을 분석하도록 선택하면 모든 하위망(VRM 컴포넌트를 통해 생성된)도 분석됩니다. 모든 네트워크가 분석된 경우, 상단에 있는
Network/Net 패널 상단의
Power Analyzer by Keysight 패널 상단의 드롭다운을 사용하여 현재 강조 표시된 네트를 선택할 수 있습니다.
레이어 관리
시뮬레이션의 레이어 전환은 PCB 에디터 창 하단의 레이어 탭을 통해 PCB로 작업할 때와 동일한 방식으로 수행할 수 있습니다. 또한 현재 레이어에 집중하려면 Shift+S 단축키를 사용하여 Single 레이어 모드 가시성 옵션을 순환할 수도 있습니다.
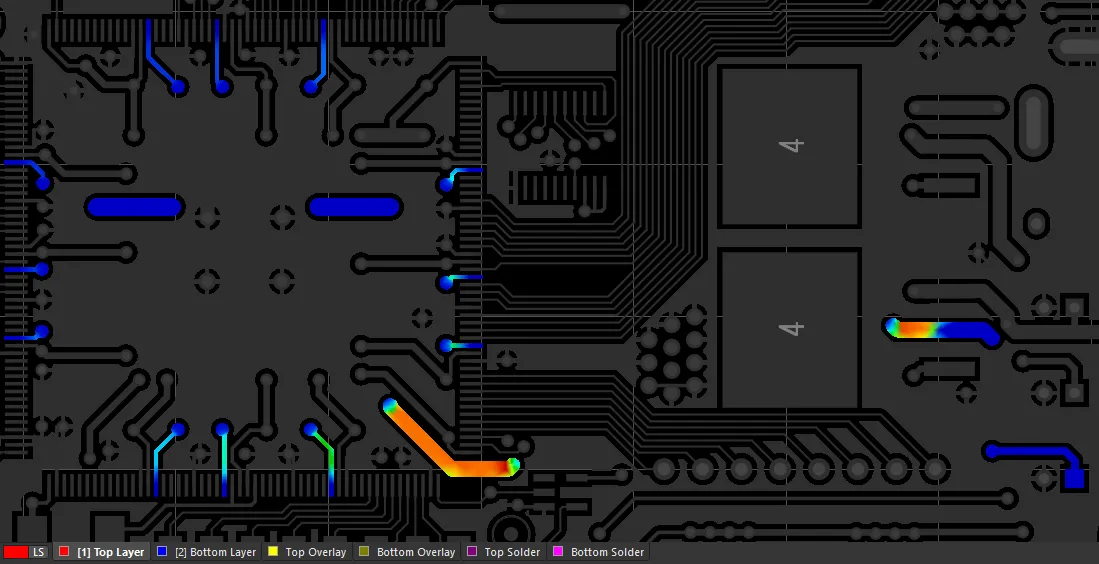 PCB 레이어 탭을 사용하여 분석 결과 표시를 빠르게 전환할 수 있습니다. 여기에는 최상위 레이어에 대한 결과가 표시되어 있습니다. 이미지 위로 마우스를 가져가면 하단 레이어에 대한 결과를 볼 수 있습니다.
Keysight 패널별 전력 분석기
PCB 편집기에서 분석 프로세스 및 결과는 Power Analyzer by Keysight 패널을 통해 제어됩니다. 패널은 전력 분석이 완료된 후 사용 가능한 패널 목록에 추가됩니다( Panels 버튼을 통해) 전력 분석이 수행된 후 사용 가능한 패널 목록에 추가되고  버튼을 클릭하면 패널이 사용 가능한 패널 목록에 추가됩니다.
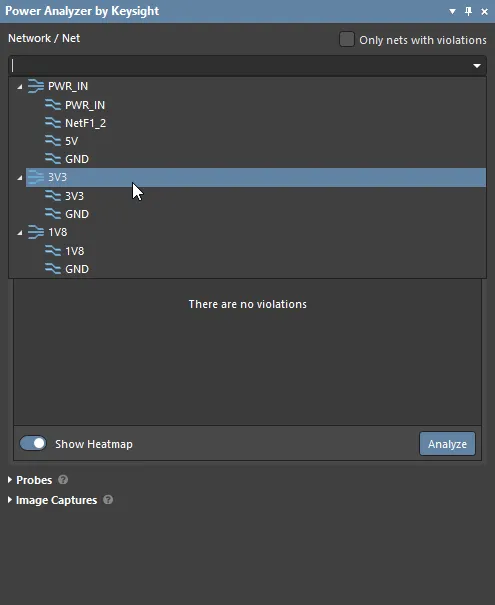
네트워크/넷
-
Network / Net - 그래픽 작업 영역에서 히트맵으로 표시할 네트워크(
 ) 또는 네트워크(
 )를 선택하는 데 사용됩니다.
-
Only nets with violations - 이 옵션이 켜져 있으면(기본값) 현재 위반 사항이 있는 네트워크만 드롭다운에서 사용할 수 있습니다. 모든 파워넷을 나열하려면 이 옵션을 선택 취소합니다.
-
표준 PCB 편집기 기법을 사용하여 작업 공간을 이동하고 확대/축소하여 시뮬레이션 결과를 살펴볼 수 있습니다.
선택기 아래에는 Network / Net 선택기 아래에는 패널에 두 개의 탭이 있습니다, General 과 Heatmap. 이 탭의 옵션은 현재 드롭다운에서 선택한 넷에 적용됩니다 Network / Net 드롭다운에 적용됩니다.
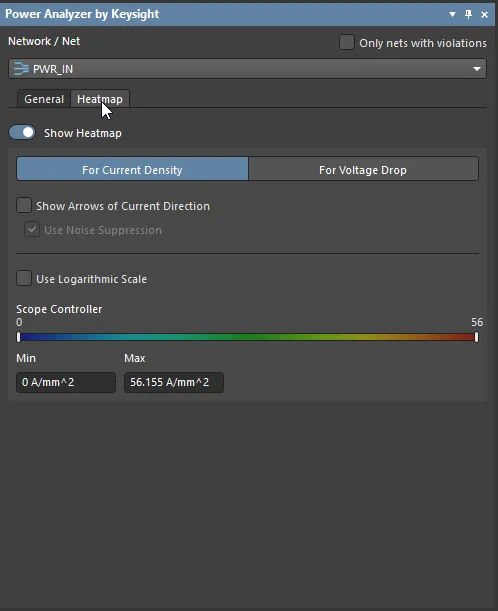 표시할 네트워크를 선택한 다음 해당 네트워크에 대한 일반 또는 히트맵 옵션을 구성합니다.
히트맵
탭의 Heatmap 탭은 Power Analyzer by Keysight 패널의 탭은 전류 밀도 또는 전압 강하 중 어떤 데이터를 히트맵으로 표시할지, 전류 밀도 또는 전압 강하에 색상을 적용할지 제어하는 데 사용됩니다.
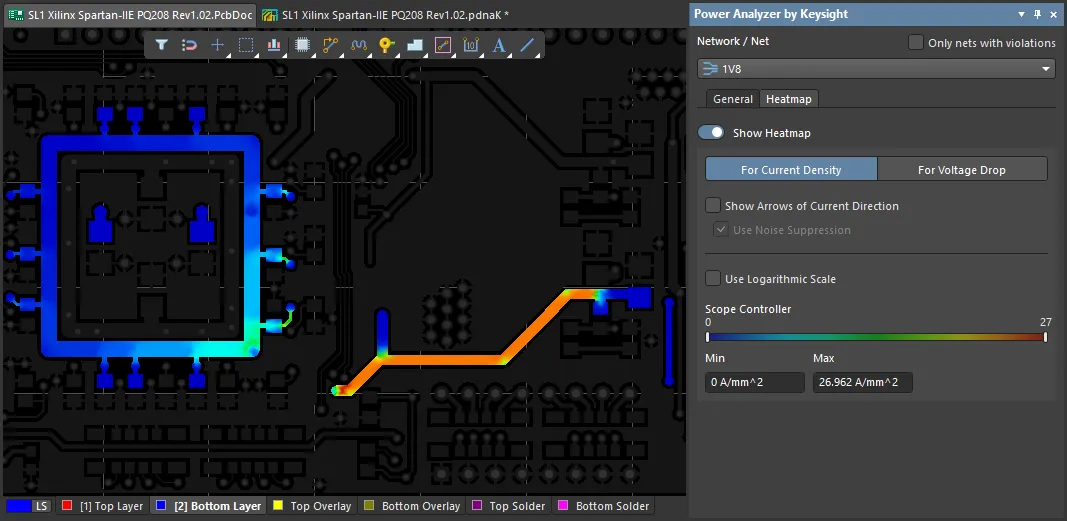 패널의 Heatmap 탭을 사용하여 Power Analyzer by Keysight 패널의 탭을 사용하여 PCB에 표시되는 시뮬레이션 결과를 변경합니다. 여기에는 전류 밀도 결과가 표시됩니다. 이미지 위로 커서를 가져가면 전압 강하 결과를 볼 수 있습니다.
각 모드에 대한 옵션은 아래에 설명되어 있습니다.
전류 밀도에 대한 히트맵
-
그물망의 모든 위치에서 전류 밀도를 반영하여 전체 그물에 색상이 표시되며, 전류 밀도가 높을수록 색상이 더 뜨겁습니다(빨간색).
-
Show Heatmap - 이 컨트롤을 사용하여 히트맵을 빠르게 제거하고 PCB의 표준 디스플레이를 복원할 수 있습니다.
-
Show Arrows of Current Direction - 이 옵션을 활성화하면 그물 전체에 전류 흐름의 방향을 나타내는 작은 화살표가 표시됩니다.
-
Use Noise Suppression - 계산된 전류가 0에 가까워지면 전류 방향 화살표는 실제로는 전류가 흐르지 않는 영역에 전류가 흐르고 있는 것처럼 보이게 합니다. 이 옵션을 활성화하면 오해의 소지가 있는 가벼운 전류 값을 제외할 수 있습니다.
-
Scope Controller - 강도 또는 열을 표시하기 위해 그물에 색상을 적용하는 방법은 Scope Controller. 값으로 제어됩니다 Max 값은 기본적으로 해당 네트에서 계산된 최대 전류 밀도(이미지 표시
![]() )로 설정되며, 기본값은 Min 기본값은 0 A/mm2입니다. 이 눈금은 현재 최소 및 최대 설정, 선택한 눈금 유형에 따라 결정되는 눈금 및 단위를 반영하여 PCB 아래에 컬러 막대로 표시됩니다. 그리고 Min 및 Max 값은 슬라이더를 클릭하고 드래그하여 조정하거나 새 값을 Min 또는 Max 필드에 새 값을 입력합니다. 아래 계산된 값 Min 은 파란색으로 표시되고, 위의 값 Max 값은 빨간색으로 표시됩니다.
)로 설정되며, 기본값은 Min 기본값은 0 A/mm2입니다. 이 눈금은 현재 최소 및 최대 설정, 선택한 눈금 유형에 따라 결정되는 눈금 및 단위를 반영하여 PCB 아래에 컬러 막대로 표시됩니다. 그리고 Min 및 Max 값은 슬라이더를 클릭하고 드래그하여 조정하거나 새 값을 Min 또는 Max 필드에 새 값을 입력합니다. 아래 계산된 값 Min 은 파란색으로 표시되고, 위의 값 Max 값은 빨간색으로 표시됩니다.
-
Use Logarithmic Scale - 이 옵션을 활성화하면 눈금을 선형에서 대수로 전환할 수 있습니다. 로그 눈금은 색상 눈금의 끝으로 갈수록 높은 값을 hot 더 높은 값을 집중시키는 효과가 있습니다. 예를 들어, 로그 눈금을 활성화하여 더 높은 전류를 전달하는 라우팅 구간을 빠르게 찾은 다음 선형 눈금으로 전환하여 해당 라우팅 구간 내의 전류 밀도 확산을 조사할 수 있습니다.
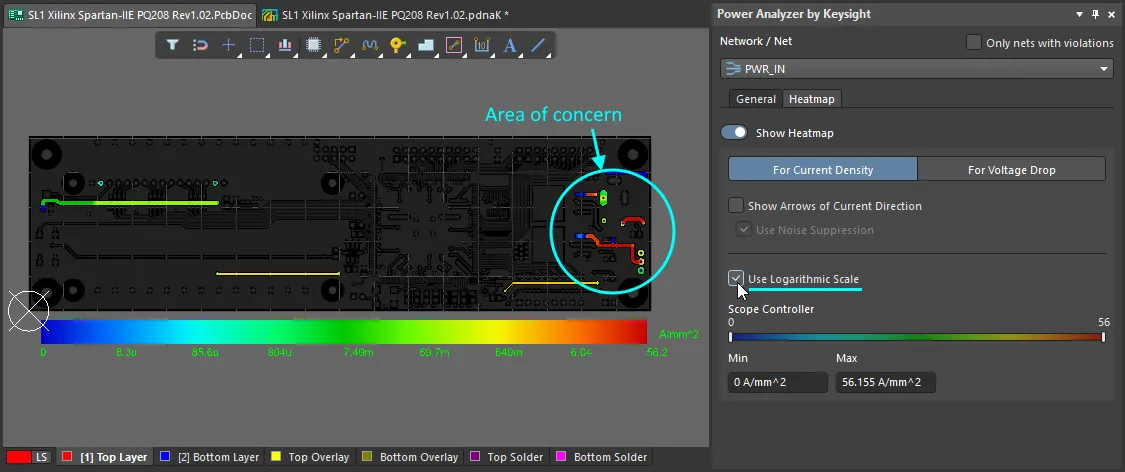 로그 전류 밀도 히트맵은 우려되는 영역을 표시하며, 커서를 이미지 위로 가져가면 선형 눈금을 사용하여 해당 영역이 표시됩니다.
전압 강하 히트맵
-
전체 네트워크의 색상은 네트워크의 모든 위치에서 전압 강하를 반영하며, 전압이 높을수록 색상이 더 뜨겁습니다(빨간색). 이 방식을 사용하면 색상이 차가울수록 전압이 낮아지고 전압 강하가 커집니다.
-
Show Heatmap - 이 컨트롤을 사용하여 히트맵을 빠르게 제거하고 PCB의 표준 디스플레이를 복원할 수 있습니다.
-
Show Arrows of Current Direction - 를 활성화하면 그물 전체에 전류 흐름 방향을 나타내는 작은 화살표가 표시됩니다.
-
Use Noise Suppression - 계산된 전류가 0에 가까워지면 전류 방향 화살표는 실제로는 전류가 흐르지 않는 영역에 전류가 흐르고 있는 것처럼 보이게 합니다. 이 옵션을 활성화하면 오해의 소지가 있는 이러한 가벼운 전류 값을 제외할 수 있습니다.
-
Scope Controller - 강도 또는 열을 표시하기 위해 그물에 색상을 적용하는 방법은 Scope Controller. 값으로 제어됩니다 Max 값은 기본값이 해당 네트의 지정된 최대 전압 바로 밑으로 설정되어 있으며, 기본값은 Min 값은
Max - calculated voltage drop(이미지 표시![]() )입니다. 이 눈금은 절대값 또는 백분율로 표시되는 전압 강하, 현재 최소 및 최대 설정, 단위를 반영하여 PCB 아래에 컬러 막대로 표시됩니다. 그리고 Min 및 Max 값은 슬라이더 핸들을 클릭하고 드래그하여 조정하거나 Min 또는 Max 필드에 새 값을 입력합니다. 아래 계산된 값 Min 은 파란색으로 표시되고, 위의 값 Max 값은 빨간색으로 표시됩니다.
)입니다. 이 눈금은 절대값 또는 백분율로 표시되는 전압 강하, 현재 최소 및 최대 설정, 단위를 반영하여 PCB 아래에 컬러 막대로 표시됩니다. 그리고 Min 및 Max 값은 슬라이더 핸들을 클릭하고 드래그하여 조정하거나 Min 또는 Max 필드에 새 값을 입력합니다. 아래 계산된 값 Min 은 파란색으로 표시되고, 위의 값 Max 값은 빨간색으로 표시됩니다.
-
Scale Type - 전압 강하 스케일은 볼트(
 버튼 클릭) 또는 백분율(
  버튼 클릭).
-
Enable Visual Slider for Voltage Contour - 활성화하면 전압이 지정된 전압 등고선 포인트와 같은 위치를 히트맵에 표시하여 해당 위치를 쉽게 식별할 수 있습니다. 컨투어 포인트 값은 슬라이더를 드래그하거나 아래 필드에 값을 입력하여 조정할 수 있습니다 Voltage Contour Points 필드에 값을 입력합니다. 해당 아이콘을 클릭하여 추가 포인트를 추가하고 기존 포인트를 제거할 수 있습니다.
 컨투어 포인트는 보드에서 전압이 해당 값에 해당하는 위치를 빠르게 식별하도록 구성할 수 있습니다.
위반 감지
시뮬레이션에서 Voltage Drop, Current Density 또는 Max Via Current 위반을 감지하면 Violations 섹션에 나열됩니다 Power Analyzer by Keysight 패널에 표시됩니다. 패널에서 위반 사항을 클릭하면 해당 오류가 발생한 PCB의 특정 위치로 교차 조사할 수 있습니다. 위반 설명을 모두 읽을 수 없는 경우 위반 설명 섹션 위에 커서를 올리면 모든 세부 정보가 표시된 툴팁이 표시됩니다.
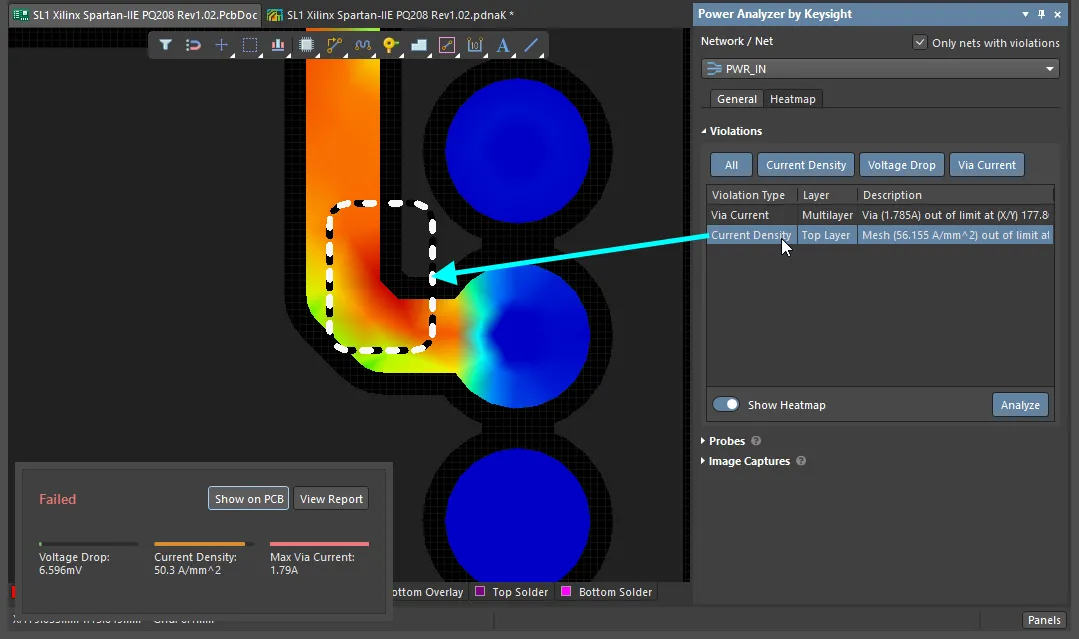 위반 사항은 자동으로 위반 사항의 Violations 섹션에 자동으로 자세히 표시됩니다 Power Analyzer by Keysight 패널에 자동으로 자세히 표시됩니다. 이미지 위로 커서를 가져가면 현재 위반 사항을 표시합니다.
클릭하는 위반 유형에 따라 히트맵 모드(전류 밀도 또는 전압 강하)가 자동으로 선택된다는 점에 유의하세요.
프로브하기 (Probe)
프로브 섹션의 Power Analyzer by Keysight 패널의 프로브 섹션은 PCB에 직접 측정 프로브를 배치하는 데 사용됩니다. 프로브는 전류 밀도 또는 전압 강하를 측정할 수 있으며, 측정 유형은 보드의 현재 히트맵 모드에 따라 결정됩니다.
프로브는 다음 중 하나가 될 수 있습니다:
-
프로브 사이트에서 절대값을 측정하는 Single 프로브 또는
-
차이 프로브 - 두 프로브 사이트 간의 차이를 측정합니다.
두 가지 유형의 프로브는 모두 프로브의  버튼을 클릭하여 배치합니다 Probes 영역에 있는 버튼을 클릭하여 배치합니다. Single 프로브를 배치하려면 필요한 위치를 클릭한 다음 마우스 오른쪽 버튼을 클릭(또는 Esc). 차이 프로브를 배치하려면 한 번 클릭하여 첫 번째 프로브 사이트를 정의한 다음 두 번 클릭하여 두 번째 프로브 사이트를 정의합니다. 프로브가 정의되면 측정 결과가 패널에 표시됩니다.
프로브를 배치할 때는 PCB 편집기에서 다른 디자인 개체를 배치할 때와 동일한 스냅 기능이 적용됩니다. 통합 커서 스냅 시스템에 대한 자세한 내용은 커서 스냅 시스템으로 작업하기 페이지를 참조하십시오.
버튼을 클릭하여  버튼을 클릭하여 마지막으로 클릭한 프로브 위치에 PCB 이미지를 생성합니다. 이미지가 패널의 Image Captures 패널의 영역에 표시되며 Probe 배지로 식별됩니다. 스크린샷 위로 커서를 가져가면 프로브 세부 정보가 표시됩니다(이미지 표시
![]() ).
).
 프로브는 전압 또는 전류를 절대값 또는 두 위치 간의 차이로 측정할 수 있습니다. 커서를 이미지 위로 가져가면 현재 프로브가 표시됩니다.
디자인이 어떤 식으로든 변경되면 기존 프로브를 지우고( ) 새 프로브를 배치해야 합니다.
이미지 캡처하기
패널의 이미지 캡처 기능은 Power Analyzer by Keysight 패널의 이미지 캡처 기능을 사용하여 선택한 네트의 디자인별 스크린샷을 캡처한 다음 보고서에 포함할 수 있습니다.
보드의 특정 영역을 촬영하려면 먼저 캡처에 포함하려는 요소가 보이도록 기본 디자인 공간에서 보드의 보기를 정렬합니다. 준비가 되면 보드의  버튼을 클릭하여 패널의 Image Captures 영역의 버튼을 클릭하여 스크린샷을 캡처합니다. 보드 보기를 계속 변경할 수 있으며 Add 이미지를 더 추가할 수 있습니다. 이미지를 삭제하려면 이미지 위로 커서를 가져가서
  버튼을 표시한 다음 한 번 클릭하여 삭제합니다.
이미지 캡처는 프로젝트와 함께 유지되지 않습니다. 이미지를 저장하려면 분석 보고서를 생성합니다.

분석 보고서 생성하기
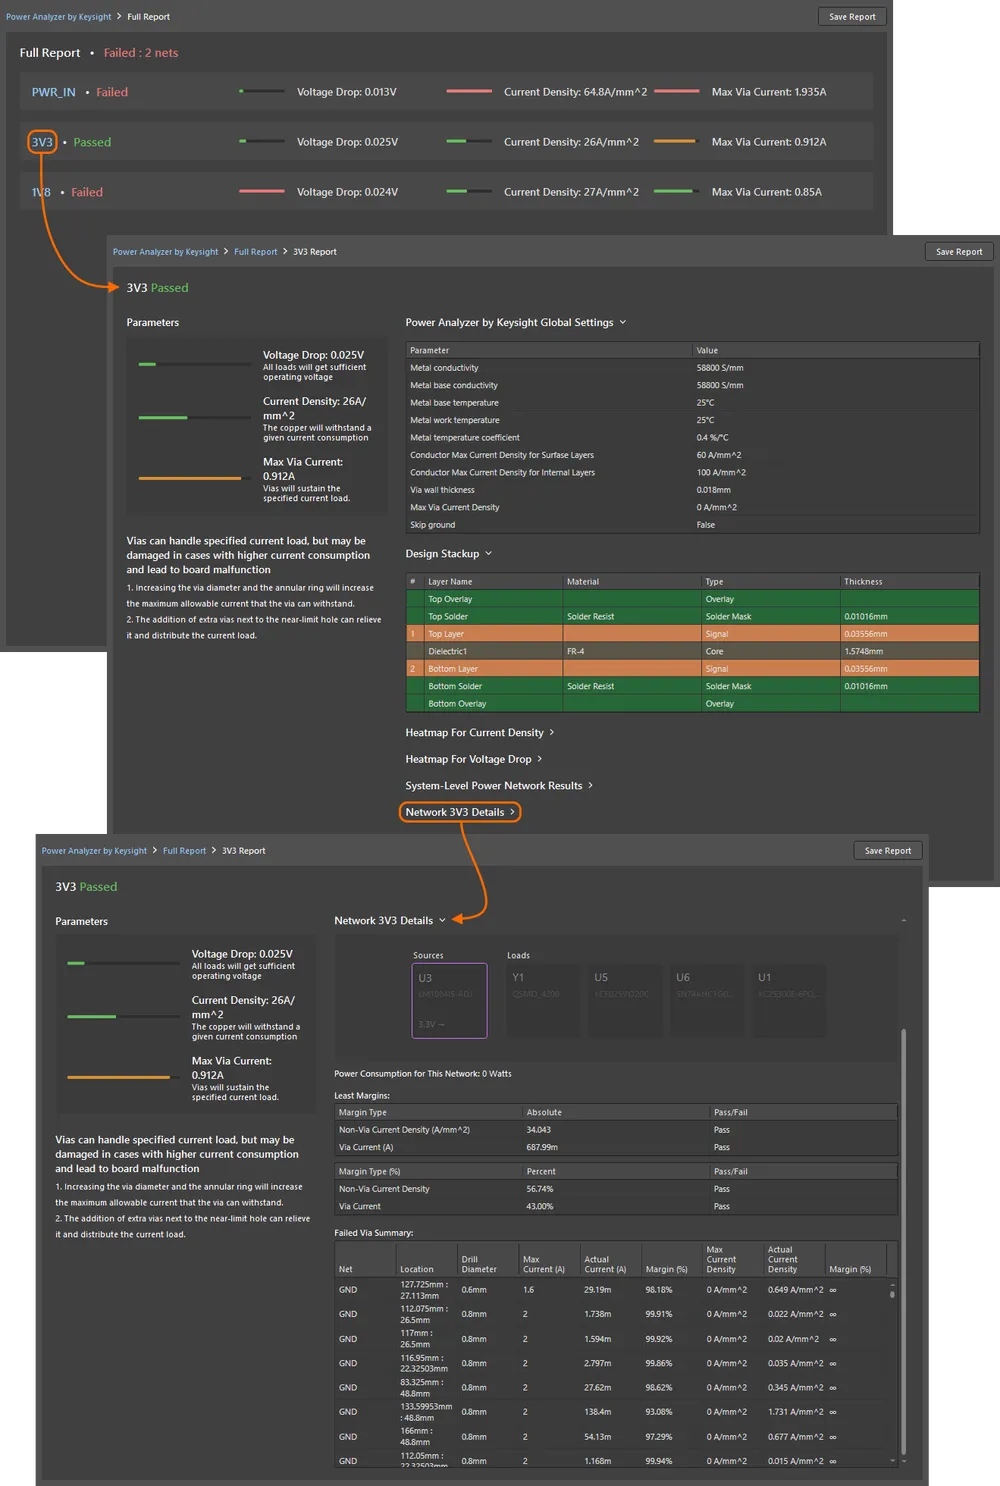
전체 분석 보고서를 생성하려면 분석기 문서 상단의  버튼을 클릭합니다. 전체 보고서에는 아래 이미지와 같이 네트워크의 각 전력망에 대한 섹션이 포함됩니다.
보고서 내에서 파워넷을 클릭하면 해당 파워넷에 대한 자세한 보고서를 확인할 수 있습니다:
-
글로벌 구성 설정
-
보드의 레이어 스택업
-
각 신호 레이어에 대한 전류 밀도 히트맵
-
각 신호 레이어에 대한 전압 강하 히트맵
-
선택한 네트워크를 강조 표시한 전력망 트리 뷰입니다.
-
다음을 포함한 선택한 네트워크에 대한 분석 세부 정보 전력 소비량, 마진 및 합격/불합격 결과 세부 정보, 해당 네트워크에 있는 모든 비아의 성능에 대한 자세한 요약, 모든 사용자 정의 화면 캡처.
-
버튼을 클릭하여
 버튼을 클릭하여 보고서를 HTML 형식으로 저장합니다. 이후의 Save Report Settings 대화 상자를 사용하여 보고서에 포함할 네트워크 및 특정 데이터를 구성합니다.
-
보고서는 프로젝트 폴더의 하위 폴더인
\PowerAnalyzerByKeysight_Output\HTMLReport\ [PDNA]__.
-
보고서의 모든 이미지는 프로젝트 폴더의
\Images 하위 폴더에 저장됩니다.
-
분석 중에 여러 로그 파일도 생성되며, 이 로그 파일도 프로젝트 폴더의 하위 폴더인
\PowerAnalyzerByKeysight_Output\\.
자동 인식 요구 사항
Keysight의 전력 분석기는 수동으로 전력망을 추가하는 것 외에도 소스 및 부하를 포함한 전력망을 자동으로 인식하고 추가하는 기능을 갖추고 있어 전력 구조를 정의하는 데 걸리는 시간을 줄여줍니다.
자동 정의 설정하기
자동 인식을 시작하기 전에 먼저 프로젝트에 맞게 알고리즘의 파라미터를 구성해야 합니다. 이러한 파라미터는 프로젝트의 Auto-Define Settings 섹션에서 Configuration 섹션에서 구성할 수 있습니다(Keysight 전력 분석기 문서 창).

이러한 자동 정의 기준에 해당하지 않는 컴포넌트는 일반 부하로 취급됩니다. 또한 개별 회로도 컴포넌트에 명명된 파라미터를 추가하여 전력 시스템에서 해당 컴포넌트의 유형과 속성을 정의할 수 있습니다. 이러한 매개변수는 컴포넌트를 생성할 때 컴포넌트의 일부로 지정하거나 나중에 회로도에 추가할 수 있습니다.
컴포넌트 파라미터
올바른 인식을 위해 모든 전력 관련 컴포넌트는 다음 기준을 준수해야 합니다:
-
소스 컴포넌트를 자동으로 감지하려면, 컴포넌트에 값이 Component Type파라미터가 있어야 하며, 값은
Source.

-
매개 변수를 찾을 수 없는 경우 검색은 에 정의된 Default Connectors Designators에 정의된 Auto-Define Settings 영역에 정의된 Configuration 섹션(*.pdnaK). 확장된 네트워크의 일부로 참조되지 않는 한 전원 연결이 있는 커넥터만 정의된다는 점에 유의하세요.
-
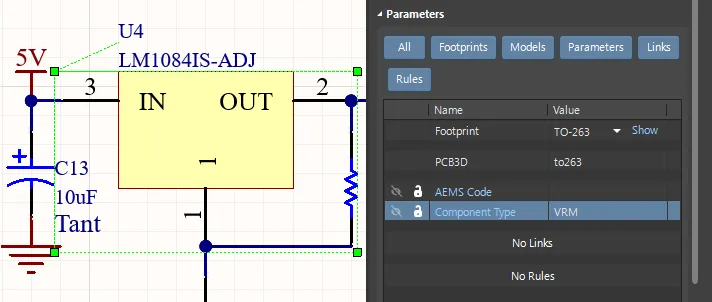
Voltage Regulator Module(VRM):
-
선형 레귤레이터에는 파라미터 이름이 Component Type값과 함께
VRM.
-
SMPS 유형 VRM 레귤레이터의 경우, 파라미터의 Component Type 매개 변수의 값은
SMPS.
-
VRM에 센싱 기능이 포함된 경우, 파라미터의 Component Type 매개 변수의 값은
Sense.
-
매개 변수가 정의되지 않은 경우 검색은 정의된 VRM Keywords 에 정의된 Auto-Define Settings 영역에 정의된 Configuration 섹션에 정의된 키워드를 기반으로 검색됩니다. 기본적으로 이러한 키워드는
PWR, REG, Regulator, Voltage, Switch.

-
컴포넌트(Load) 소비 값은 이름 지정된 매개 변수 Current Consumption. 값에 사용되는 소수점 구분 기호에 주의하세요. 시스템 기본 설정에 따라 . 또는 , 일 수 있습니다.
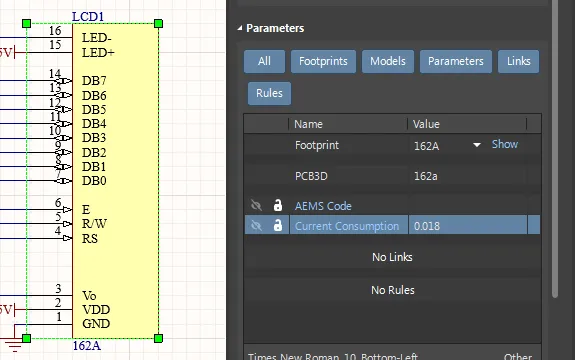
컴포넌트에 전류 소비량 매개변수가 있는 경우 지정된 값은 동일한 회로에 연결된 모든 핀으로 나뉩니다.
파라미터 동기화
모든 파라미터는 PCB와 회로도 간에 동기화되어야 합니다. 이는 PCB에서 컴포넌트를 선택하고 전력 분석 매개변수가 전력 분석 매개변수가 있는지를 확인하여 확인할 수 있습니다 Parameters 탭에서 확인할 수 있습니다 Properties 패널에서 확인할 수 있습니다.
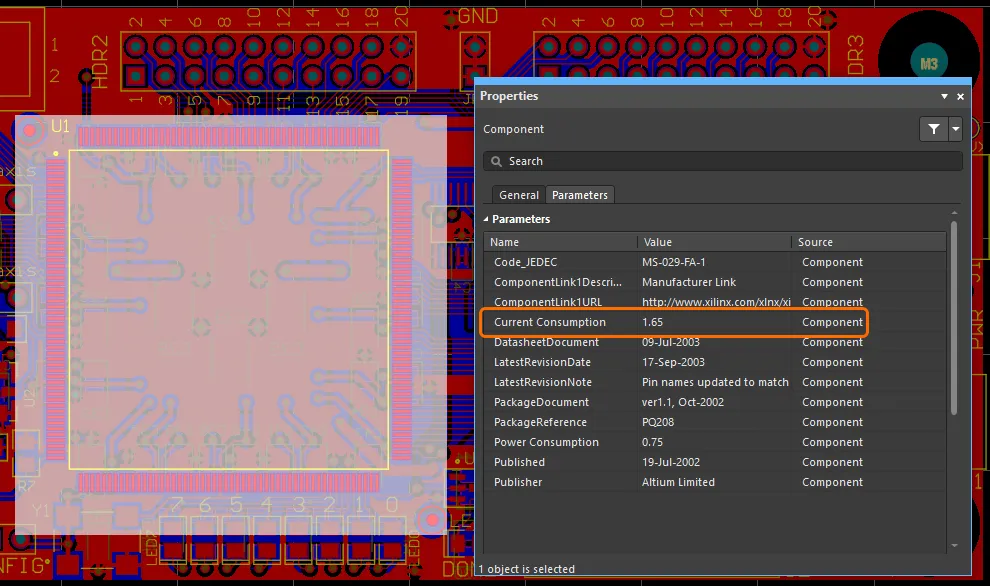
설계를 위해서..

-
전력망의 전압 값을 정의하는 다른 방법은 전력망에 정의된 Power Net 속성을 구성하는 것입니다 Properties 패널에 정의된 속성을 구성하는 것입니다.
프로퍼티를 활성화하려면 먼저 파라미터 세트 지시어(Place » Directives » Parameter Set)를 설정합니다(아래 이미지 위에 커서를 올리면 이 과정을 보여주는 이미지가 표시됩니다). 크기, 색상 및 레이블은 사용자가 정의할 수 있으며, 이 지시어가 있으면 해당 네트의 Power Net 속성을 활성화하는 것은 지시어의 존재 여부입니다. 지시문 (Directives)이 추가되면 해당 네트에서 와이어를 선택하고 Power Net 속성을 활성화하고 아래와 같이 네트 Voltage을 설정합니다.
-
직렬(Series) 컴포넌트는 저항기, 인덕터 및 사용자 정의 직렬(Series) 컴포넌트의 정의된 지정자를 준수해야 합니다( Auto-Define Settings 영역에 정의된 대로 Configuration 섹션에 정의된 대로).

-
VRM은 최소 두 개의 전원망에 연결해야 합니다.
전력 분석기 명령
다음 명령은 Power Analyzer 에디터의 메인 메뉴에서 사용할 수 있습니다.
명령
|
요약 및 사용
|
Tools » Define Automatically
|
현재 설정에 따라 프로젝트의 토폴로지를 자동으로 인식하려고 시도합니다 Auto-Define Settings 영역의 Configuration 섹션의 현재 설정(*.pdnaK). 이 명령은 에디터 왼쪽 상단의 Define Automatically 버튼을 클릭하여 액세스할 수도 있습니다. |
File » Load from File
|
저장된 Keysight별 전력 분석기 문서(*.pdnaK)를 전력 분석기 편집기로 Load합니다. |
Edit » Manage Nets
|
대화 상자를 열고 Manage Nets 대화 상자를 열고 분석할 전력망을 선택합니다. 네트를 선택하면 해당 네트가 분석기 문서에 추가됩니다(*.pdnaK). 그물을 선택 취소하면 모든 하위 전력망과 함께 문서에서 그물이 제거됩니다. 이 명령은 편집기 왼쪽 상단의 Manage Nets 버튼을 클릭하여 액세스할 수도 있습니다. 네트 관리에 대해 자세히 알아보세요. |
File » Save
|
현재 전력 분석기 구성을 Keysight별 전력 분석기 문서에 저장합니다(*.pdnaK) |
File » Save As
|
현재 전력 분석기 구성을 Keysight별 전력 분석기 문서에 저장(*.pdnaK)에 새 사용자 정의 이름으로 저장합니다. |
Tools » Measurement Units » mil
|
영국식(밀) 측정 단위를 사용하도록 전력 분석기를 구성합니다. |
Tools » Measurement Units » mm
|
미터법(mm) 측정 단위를 사용하도록 전력 분석기를 구성합니다. |
전력 분석기 제한 사항
이 단계에서는 Keysight의 전력 분석기가 지원되지 않습니다:
-
음의 전압.(Negative voltages)
-
임베디드 컴포넌트(내부 레이어에 배치된 컴포넌트).
임베디드 컴포넌트가 포함된 PCB 설계에 대해 자세히 알아보세요.