연결된 워크스페이스의 각 항목은 일련의 리비전으로 구성되며, 데이터가 수정되어 커밋/업로드/해제될 때마다 새로운 데이터를 수용하기 위해 새 리비전이 사용됩니다. 따라서 리비전은 항목이 변경될 때 진행 상황을 반영합니다. 또는 반대로 말하면, 항목이 나타내는 데이터 엔티티가 변경되면 이를 반영하기 위해 리비전이 증가해야 합니다.
항목의 개정 시에는 해당 개정의 현재 상태, 즉 '수명'의 어느 단계에 도달했는지 반영하는 것도 중요합니다. 이 상태를 아이템 리비전의 Lifecycle 이라고 합니다.
라이프사이클을 통해 회사는 비즈니스 관점에서, 그리고 회사 정책과 관행에 따라 아이템을 관리할 수 있습니다. 이 라이프사이클 정보를 통해 이미 출시된 디자인 '빌딩 블록'의 재사용을 고려하는 디자이너부터 기판 제작 및 조립을 위해 데이터가 필요한 공급망까지, 워크스페이스에서 아이템을 사용해야 하는 사람들은 아이템의 개정판이 '수명' 중 어느 단계에 도달했는지, 따라서 안전하게 사용할 수 있는지 한눈에 파악할 수 있습니다.
라이프사이클 모델링
조직마다 디자인 항목의 라이프사이클를 모델링하거나 라벨을 붙이는 방식은 조금씩 다를 수 있지만, 모두 비슷한 주제를 따릅니다. 예를 들어, 제품의 일반적인 라이프사이클는 디자인 아이디어로 시작하여 프로토타입이 된 다음 생산에 들어간 다음 어느 시점에서 구식이 되어 더 이상 만들거나 판매하지 않는 것과 같은 형태가 될 것입니다.
디자인의 모든 구성 요소에 라이프사이클 State 정보를 사용하면 새로운 상태가 디자인 내에서 가장 낮은 상태의 구성 요소보다 낮거나 같은 경우에만 디자인을 더 높은 상태로 승격할 수 있습니다. 예를 들어 디자인이 프로덕션으로 이동할 준비가 되었다면 디자인 내의 모든 구성 요소도 프로덕션 상태인 경우에만 승격할 수 있어야 합니다. 즉, 아직 In Prototype (또는 New From Design)인 구성 요소를 In Production 로 승격해야 디자인 전체가 해당 단계로 승격될 수 있습니다.
대부분의 경우 디자인 항목의 수정은 다양한 라이프사이클 State를 통해 선형적으로 진행되지만 이 경로가 유일한 경로라고 가정해서는 안 됩니다. 예를 들어, 일부 항목 수정은 프로토타입 단계에 도달하기도 전에 중단될 수도 있습니다. 연결된 워크스페이스에서 항목의 리비전이 이동할 수 있는 허용 가능한 상태는 라이프사이클 정의에 포함된 Transition 표에 정의되어 있습니다.
연결된 워크스페이스는 Simple 또는 Advanced 의 두 가지 수준의 라이프사이클 관리를 지원합니다. 이는 기본적으로 관리 스타일을 결정하고, 그 다음에 라이프사이클 정의 자체가 구축됩니다. 단순 관리 스타일에 기반한 라이프사이클 정의의 경우 상태 및 상태 전환만 포함됩니다. 고급 관리 스타일에 기반한 라이프사이클 정의의 경우 상태를 정의된 단계로 더 클러스터링할 수 있습니다.
단순 및 고급 라이프사이클 관리 스타일 모두 동일한 States (항목의 리비전이 수명 동안 존재할 수 있는 여러 지점) 및 Transitions (항목의 리비전이 이러한 상태 간에 이동하는 방식)을 지원합니다.
States, 단계 및 전환
Related page: 상세 아이템 보기에 액세스하기
항목 리비전의 라이프사이클에 있는 각 지점을 State(예: In Production)라고 합니다. 항목의 리비전이 상태를 변경하면 Transition 이라고 하며, 이는 다른 상태로만 변경될 수 있습니다.
고급 관리 스타일에 따른 라이프사이클 정의는 Stages 으로 클러스터링되는 상태를 지원합니다. 스테이지를 사용하면 항목의 리비전이 개발 중 어디에 있는지 식별하는 레이블을 만들 수 있습니다. 예를 들어 Design 에 있거나 Prototype 에 있거나 Production 에 있을 수 있습니다.

상태가 세 단계로 클러스터링된 라이프사이클 정의의 예입니다.
아래 이미지는 3단계 리비전 명명 체계를 사용하는 항목에 대한 자세한 Item 보기의 스니펫을 보여줍니다: Model, Prototype, Revision 입니다. 각 모델은 별도의 블록으로 표시됩니다. 모델 내에서 각 프로토타입은 하위 블록입니다. 각 프로토타입 아래에는 해당 모델/프로토타입의 리비전이 있고, 각 리비전 안에는 해당 리비전이 존재했던 여러 상태가 있습니다.
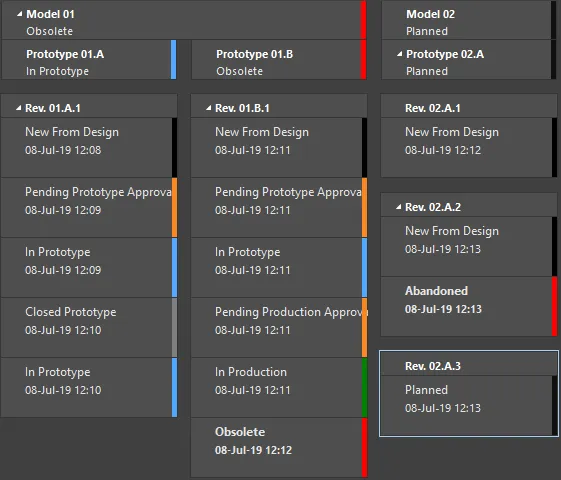
항목의 다양한 리비전에 대한 라이프사이클 State 예시입니다.
고급 스타일의 라이프사이클 정의의 단계는 사용된 리비전 명명 체계의 리비전 레벨에 연결하여 항목의 라이프사이클 표현에 수평적 차원을 만들어 항목의 리비전과 맞물리게 할 수도 있습니다. 자세한 내용은
리비전 명명 체계의 레벨에 단계 연결하기 섹션을 참조하세요.
기본 라이프사이클 정의
연결된 워크스페이스는 8가지 기본 라이프사이클 정의를 제공합니다. 이러한 기본 정의는 '있는 그대로' 사용하거나 회사(또는 개인)의 요구 사항에 맞게 수정할 수 있습니다. 필요에 따라 새로운 사용자 지정 정의를 추가하고 구성할 수도 있습니다.
기본 라이프사이클 정의는 다음과 같습니다:
-
Component Lifecycle
-
Design Lifecycle
-
Extension Lifecycle
-
Generic Lifecycle
-
Sample - Basic Lifecycle
-
Sample - Simple Lifecycle
-
Sample - Simple Lifecycle With Approvals
-
Sample - Structured Lifecycle With Approvals
적용되는 라이프사이클 정의는 항목을 만들 때 개별 항목 수준에서 선택됩니다. 따라서 항목마다 다른 라이프사이클 정의가 할당될 수 있습니다.
정의된 라이프사이클 정의가 워크스페이스의 항목에서 사용 중이면 해당 정의는 삭제할 수 없습니다. 하지만 이름 변경, 상태 속성(색상, 전환, 적용 가능성, 가시성) 수정, 정의에 새 상태 추가, 사용하지 않는 상태 제거, 수정본 레벨에 단계 연결(해당하는 경우) 등 어느 정도는 정의를 수정할 수 있습니다. 일단 항목이 만들어지고 해당 항목의 계획된 개정판에 대한 초기 릴리스가 이루어지면 해당 항목의 라이프사이클 정의를 다른 것으로 변경할 수 없습니다.
전용 승인 상태 및 전환이 포함된 라이프사이클 정의를 사용하면 해당 권한이 항목 수정이 디자인에서 프로토타입으로 또는 프로토타입에서 프로덕션으로 이동할 수 있는지 여부에 대한 최종 결정권을 효과적으로 행사할 수 있습니다(예: 디자인에서 프로토타입으로 또는 프로토타입에서 프로덕션으로).
라이프사이클 정의 관리
Altium Designer 내에서 라이프사이클 정의는 Edit Lifecycle Definitions 대화 상자에서 보고 관리할 수 있습니다. 현재 로그인되어 있는 연결된 워크스페이스에 대해 이 대화 상자에 액세스하려면 다음과 같이 하세요:
-
Preferences 대화 상자의 Data Management – Servers 페이지를 엽니다.
-
활성 서버 항목의 맨 오른쪽에 있는 Properties 컨트롤을 클릭합니다.
-
관련 메뉴에서 Lifecycles 명령을 선택합니다.
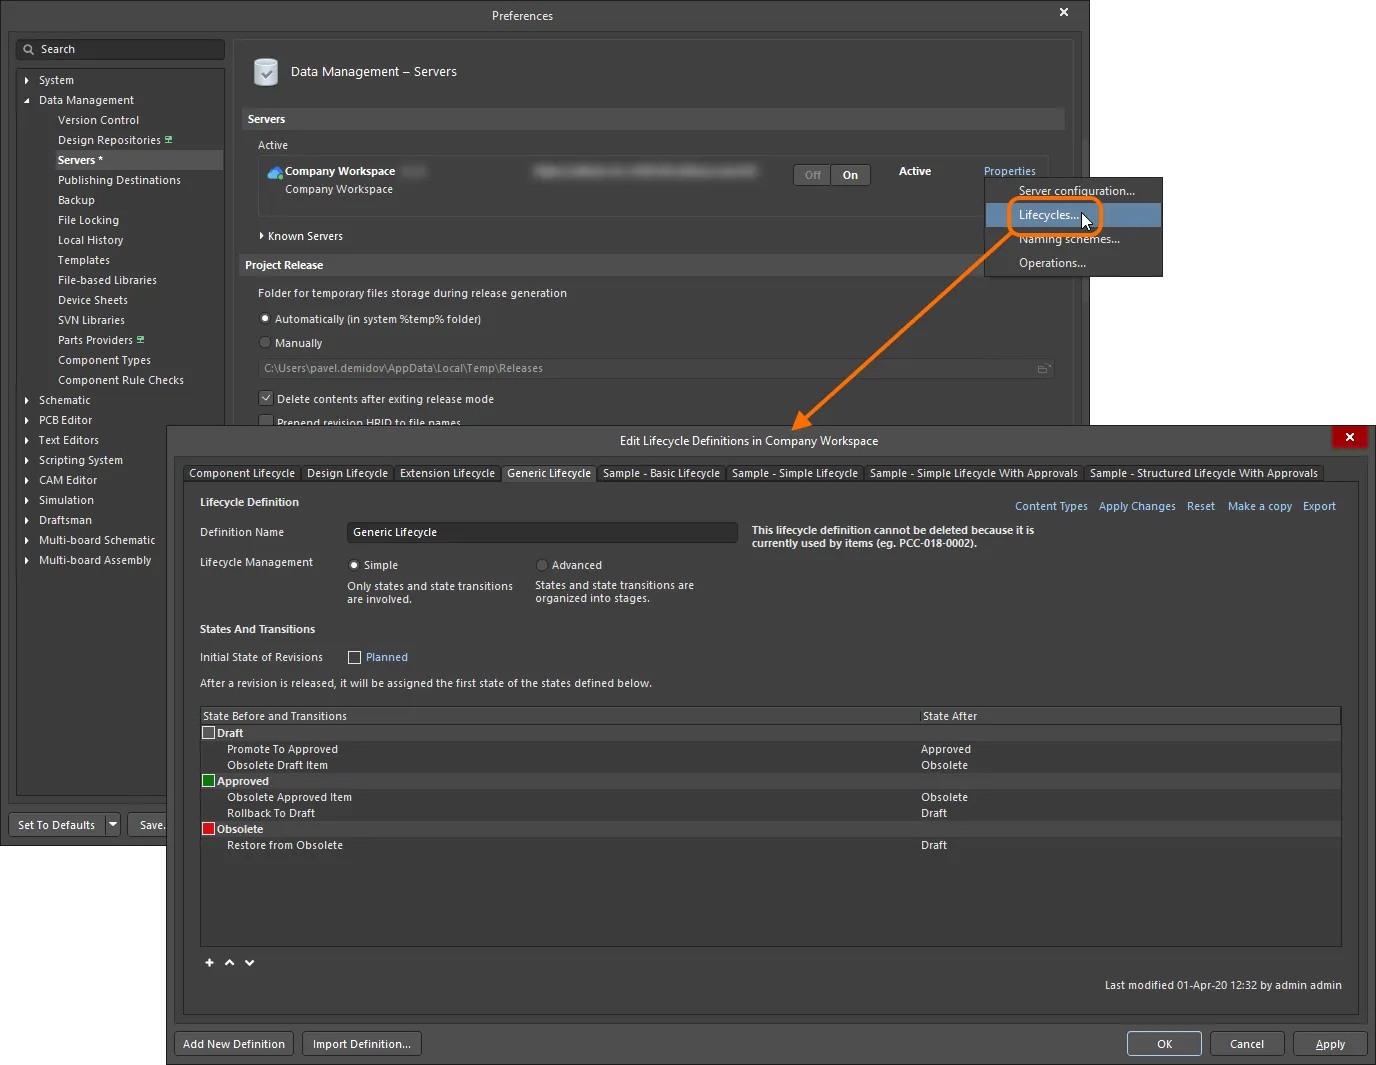
연결된 활성 워크스페이스에 대한 라이프사이클 정의는 Altium Designer에서 Edit Lifecycle Definitions 대화 상자를 통해 생성 및 편집할 수 있습니다.
브라우저 기반 라이프사이클 관리
연결된 워크스페이스는 브라우저 인터페이스를 통해 수명주기 정의를 정의하고 관리할 수 있는 기능을 제공하며, Altium Designer를 통해 이 작업을 수행할 수 있는 기능을 보완합니다. 또한 각 수명주기는 그래픽 방식으로 구축되어 관련된 상태와 전환에 대한 가시성을 높여주며, 관련된 흐름을 한 눈에 보여줍니다.
워크스페이스의 브라우저 인터페이스를 통해 라이프사이클 정의를 정의하고 관리하는 것은 매우 시각적인 작업입니다. 정의는 상태 및 상태 전환( Advanced 스타일의 관리를 사용하는 경우 단계)을 나타내는 다양한 그래픽 개체를 사용하여 흐름 다이어그램처럼 구축됩니다.
자세한 내용은 Lifecycle Management (알티움 365 워크스페이스, 엔터프라이즈 서버 워크스페이스)를 참조하세요.
새 정의 추가
새 라이프사이클 정의를 만들려면 Edit Lifecycle Definitions 대화 상자 하단에 있는  버튼을 클릭합니다. 대화 상자에 구성할 준비가 된 새 탭이 나타납니다.
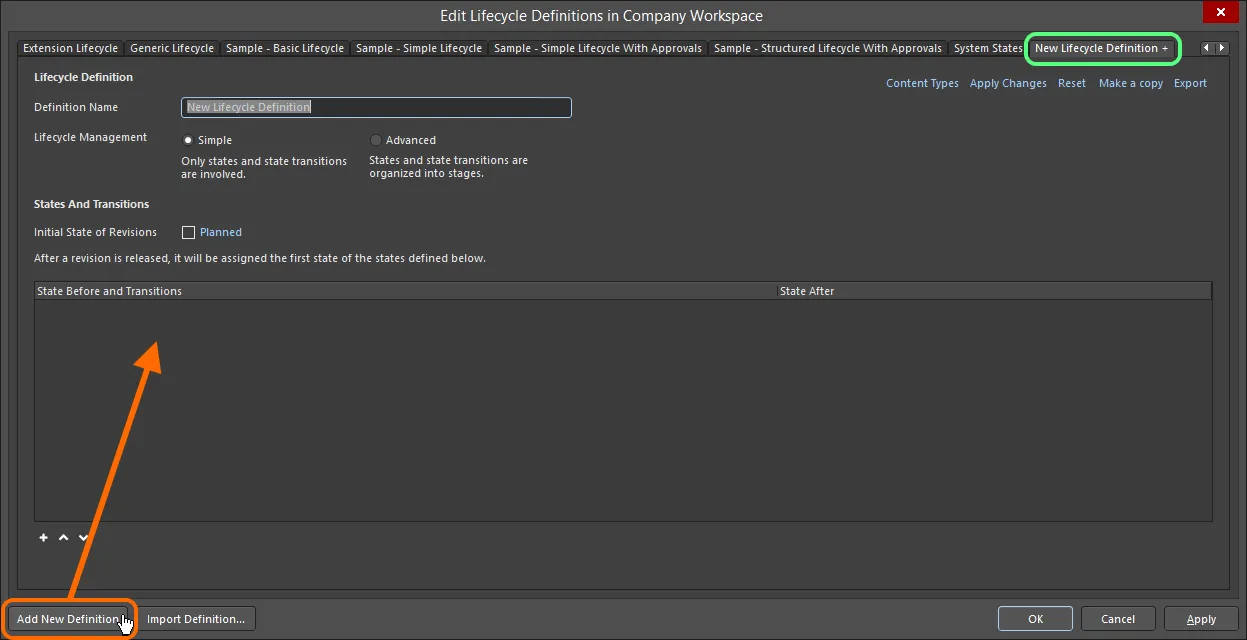
나만의 사용자 지정 라이프사이클 정의를 만듭니다.
새로 추가된 라이프사이클 정의는 탭에서 '+' 접미사로 구분됩니다. 이는 정의가 아직 구성 중이며 워크스페이스에서 사용할 수 있는 라이프사이클 정의 집합에 아직 '저장'되지 않았음을 나타냅니다.
정의 구성하기
라이프사이클 정의의 탭에서 사용할 수 있는 컨트롤을 사용하여 필요에 따라 해당 정의를 구성합니다.
정의된 라이프사이클 정의가 작업 영역의 항목에서 사용 중이면 해당 정의는 삭제할 수 없습니다. 하지만 정의 이름 변경, 상태 속성(색상, 전환, 적용 가능성, 가시성) 수정, 정의에 새 상태 추가, 사용하지 않는 상태 제거, 수정본 레벨에 단계 연결(해당되는 경우) 등 어느 정도는 정의를 수정할 수 있습니다.
먼저 Definition Name 필드에 정의의 의미 있는 이름을 입력합니다. 탭에 입력한 이름이 동적으로 반영됩니다.
Lifecycle Management 컨트롤을 사용하여 라이프사이클 관리 스타일( Simple 또는 Advanced)을 선택합니다. 단순 스타일은 States 및 State Transitions 만 관련되어 있음을 의미합니다. 고급 스타일에서는 상태가 클러스터링되는 Stages 을 정의할 수 있습니다.

라이프사이클 정의의 이름과 스타일을 지정합니다.
초기 상태
Initial State of Revisions 필드를 사용하여 항목 리비전의 시작 상태, 즉 릴리즈된 데이터가 없는 리비전의 상태, 즉 '릴리즈 전 상태'를 결정합니다. 기본적으로 이 상태의 이름은 Planned 입니다. 변경하려면 링크를 클릭하고 State Properties 대화 상자를 사용하여 이름과 설명, 텍스트 및 배경색을 결정합니다.
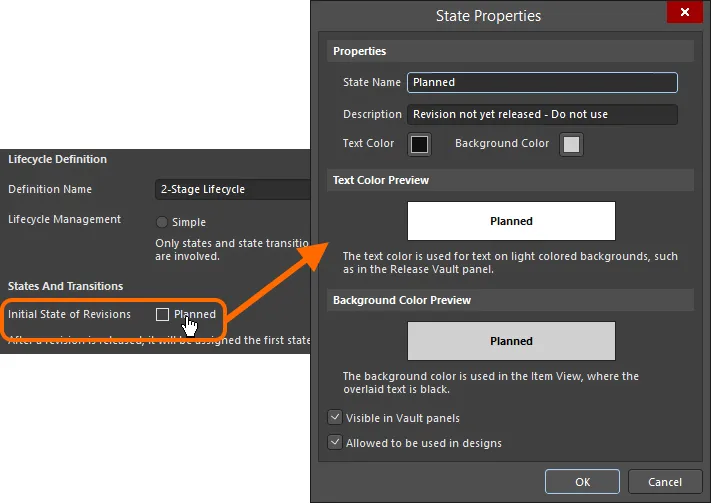
수정본에 대한 초기 상태를 구성합니다.
Stage (단계)
Advanced 스타일의 라이프사이클 관리를 선택하면 필요한 단계를 추가하고 정의하기 위한 컨트롤을 사용할 수 있습니다. 기본적으로 Design - 이라는 단일 단계가 제공되며, 두 단계를 추가로 추가할 수 있습니다. 단계를 추가하려면 Add Stage 링크를 클릭합니다.
필요에 따라 각 단계의 이름을 해당 Stage Name 필드에 직접 입력하여 입력합니다.

필요에 따라 단계를 추가하면 상태를 클러스터링하고 보다 풍부하고 구조화된 라이프사이클 정의를 만드는 데 사용됩니다.
단계를 제거하려면 해당
Stage Name 필드 오른쪽에 있는

컨트롤을 클릭합니다.
State (상태)
다음 단계는 라이프사이클 정의에 필요한 상태를 추가하는 것입니다. 단순한 관리 스타일에 기반한 라이프사이클 정의의 경우, 이는 단순한 목록이 될 것입니다. 고급 관리 스타일의 경우에는 정의된 다양한 단계에 상태를 추가해야 합니다.
새 상태를 추가하려면 상태 목록 아래의  컨트롤을 클릭합니다. 표시되는 State Properties 대화 상자를 사용하여 이름, 설명 및 색상 속성을 기준으로 해당 상태를 정의합니다.
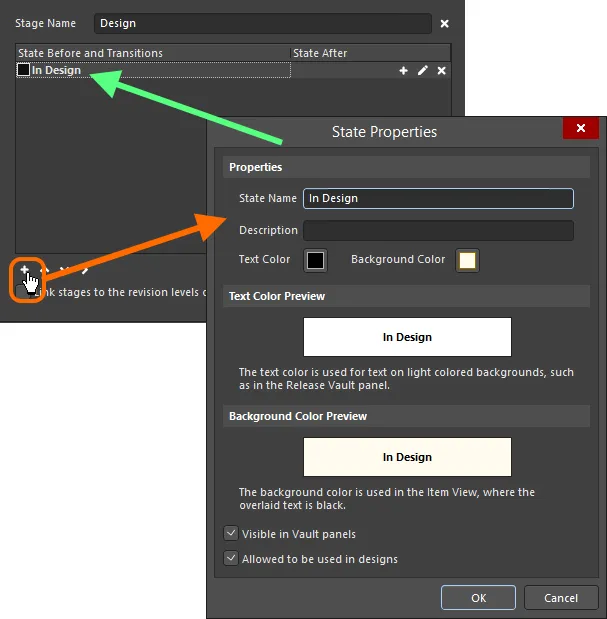
라이프사이클 정의에 상태 추가하기.
속성
-
State Name - 스테이트의 이름을 지정합니다.
-
Description - 주에 대한 설명을 입력합니다.
-
Text Color - 색상 상자를 클릭하여 Choose Color 대화 상자를 연 다음 원하는 텍스트 색상을 선택합니다.
-
Background Color - 색상 상자를 클릭하여 Choose Color 대화 상자를 연 다음 원하는 배경색을 선택합니다.
텍스트 색상 미리보기
텍스트 색상의 미리 보기를 표시합니다.
배경 색상 미리 보기
배경 색의 미리 보기를 표시합니다.
-
Visible in Vault panels - 이 옵션을 활성화하면 상위 라이프사이클 정의를 사용하는 항목의 수정본이 이 라이프사이클 State로 설정되어 있을 때 탐색기 패널에 표시됩니다. 이 옵션을 비활성화하면 리비전이 두 위치에서 모두 숨겨집니다. 그러나 탐색기 패널에서 Show Hidden Revisions 컨트롤을 활성화하여 숨겨진 수정본을 표시(이 옵션 무시)할 수 있습니다.
-
Allowed to be used in designs - 이 옵션을 활성화하면 이 상태의 항목 리비전은 디자인에서 사용할 수 있습니다. Applicable 로 간주됩니다. 이 옵션을 비활성화하면 이 상태의 항목 수정본은 유효하게 사용할 수 없으며 Inapplicable (또는 Not-applicable)로 간주됩니다. 컴포넌트 모드의 Properties panel 및 아이템 관리자 대화 상자에 해당 플래그가 표시됩니다. 프로젝트 컴파일러가 이러한 경우를 찾도록 구성할 수도 있습니다.
리비전 상태가 Inapplicable (Not-applicable)로 설정된 컴포넌트는 컴포넌트 패널에 표시되지 않는다는 점에 유의하세요.
새 상태가 목록 하단에 추가됩니다. 주를 클릭하여 선택한 다음  및
및  컨트롤(주 목록 아래)을 사용하여 목록에서 필요한 위치로 이동합니다.
고급 스타일의 라이프사이클 정의에 대한 상태를 정의할 때 상태 목록 아래에 있는 추가 컨트롤을 사용하여 단계 간에 상태를 이동할 수 있습니다. 스테이지의 위치에 따라 필요에 따라 스테이지를 오른쪽( ) 또는 왼쪽(
 )으로 밀어 넣습니다.
스테이트의 속성을 편집하려면 클릭하여 선택한 다음 맨 오른쪽에 있는

컨트롤을 클릭합니다. 선택한 상태를 삭제하려면

컨트롤을 사용합니다.

2단계 라이프사이클 정의에 정의된 상태 예시.
Transition (전환)
마지막 단계는 서로 다른 상태 사이의 경로인 State Transitions 을 정의하는 것입니다. 클릭하여 상태를 선택한 다음 맨 오른쪽에 있는  컨트롤을 클릭하여 새 상태 전환을 추가합니다. 표시되는 State Transition Properties 대화 상자를 사용하여 이름, 대상(다음) 상태, 메뉴 텍스트 및 권한 측면에서 전환을 정의합니다.
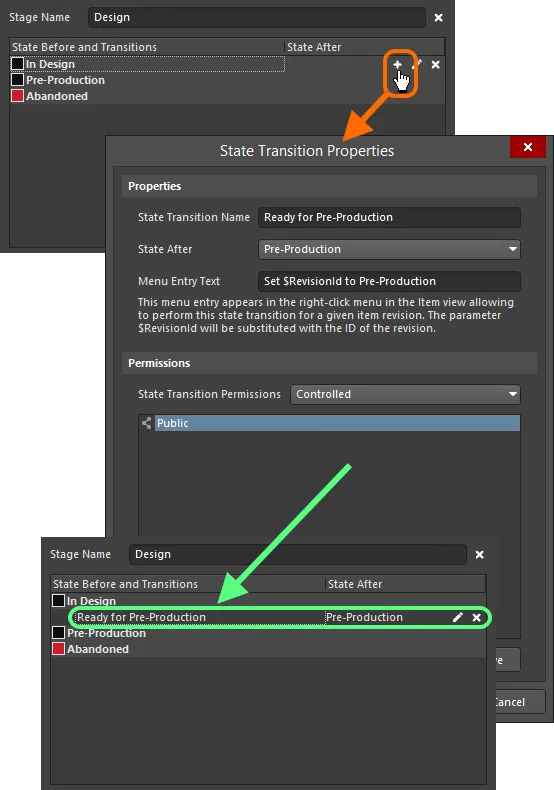
상태 전환 추가하기.
상태 전환 속성 대화 상자의 옵션 및 제어
프로퍼티
-
State Transition Name - 상태 전환의 이름을 입력합니다.
-
State After - 드롭다운을 사용하여 추가 중인 상태 전환 다음에 오는 상태를 선택합니다.
-
Menu Entry Text - 항목 보기의 오른쪽 클릭 메뉴에 표시되는 텍스트는 지정된 항목 리비전에 대해 이 상태 전환을 수행할 수 있는 텍스트입니다. $RevisionId 매개변수는 리비전의 ID로 대체됩니다.
상태 전환 권한
드롭다운을 사용하여 상태 전환에 대한 권한을 설정하는 방법을 선택합니다:
-
Controlled - 기본 서버 권한에 따라 권한을 제한하려면 이 옵션을 선택합니다.
-
Using Approvals - 이 특정 상태 전환에 대해 선택된 권한을 허용하려면 이 옵션을 선택합니다. 아래 표에서 Add 버튼을 사용하여 추가할 수 있습니다.
추가 제어
-
Add - 드롭다운을 사용하여 다음 옵션 중에서 선택합니다:
-
Add Approval Group - 를 선택하여 승인 그룹을 추가합니다. 새 그룹의 이름은 기본적으로 New Approval Group 입니다. 아래에 정의된 Edit Approval Group Name 명령을 사용하여 이름을 수정할 수 있습니다.
-
Add Role - Search for Role 대화 상자를 사용하여 그룹을 추가하려면 선택합니다.
-
Add User - Search for Users 대화 상자를 사용하여 사용자를 추가하려면 선택합니다.
-
Edit Approval Group Name - 새로 추가된 승인 그룹의 이름을 입력할 수 있는 대화 상자를 열려면 선택합니다.
-
Move Up - 현재 선택된 항목을 한 위치 위로 이동하려면 클릭합니다.
-
Move Down - 현재 선택된 항목을 한 위치 아래로 이동하려면 클릭합니다.
-
Remove - 현재 선택된 그룹 또는 사용자를 제거하려면 클릭합니다.
Add 명령은 State Transitions Permissions 에서 Using Approvals 을 선택한 경우에만 사용할 수 있습니다.
-
Remove - 현재 선택된 그룹 또는 사용자를 제거하려면 클릭합니다.
Menu Entry Text 을 정의해야 합니다. 이 텍스트는 항목 수정본을 마우스 오른쪽 버튼으로 클릭하여 새 상태로 전환할 때
Item 보기(또는
탐색기 패널의 Lifecycle 화면 보기 탭)에 표시됩니다.
메뉴 텍스트를 입력할 때는 $RevisionId 항목을 리비전 ID의 자리 표시자로 사용합니다. 예를 들어, 특정 워크스페이스 항목의 리비전 01.A.1 을 고려할 때 메뉴 텍스트 Promote $RevisionId to In Production 을 입력하면 메뉴에 Promote 01.A.1 to In Production 항목이 표시됩니다.
새 전환이 목록 하단에 추가됩니다. 전환을 클릭하여 선택한 다음 상태 목록 아래의  및
및  컨트롤을 사용하여 목록에서 필요한 위치로 전환을 이동합니다.
전환의 다음 상태가 다른 단계에 있는 경우 이를 표시하기 위해 대상 상태의 색상으로 표시 화살표가 표시됩니다.

2단계 라이프사이클 정의에 걸쳐 완전히 정의된 상태 및 상태 전환의 예입니다. 화살표는 단계 간 전환을 나타내는 데 사용됩니다.
전환의 속성을 편집하려면 클릭하여 선택한 다음 맨 오른쪽에 있는

컨트롤을 클릭합니다. 선택한 전환을 삭제하려면

컨트롤을 사용합니다.
단순 라이프사이클 정의에서 정의된 모든 상태 및 전환을 완전히 제거하거나 고급 라이프사이클 정의에서 특정 단계의 모든 상태 및 전환을 제거하려면 해당 오른쪽 클릭 상황에 맞는 메뉴에서 사용할 수 있는 Clear 명령을 사용합니다.
기본 라이프사이클 State 및 전환 예시
다음 표에는 기본 Sample - Structured Lifecycle With Approvals 라이프사이클 정의에 사용되는 상태 및 상태 전환 목록이 나와 있습니다.
...다.......
현재 상태
|
가능한 전환
|
다음 상태
|
댓글
|
Planned
|
릴리스 수행
|
New From Design
|
릴리즈되지 않은 모든 새 항목 리비전은 Planned 상태에서 시작됩니다. 이 상태의 항목 리비전은 라이프사이클 State를 수동으로 변경할 수 없으며, 릴리즈만 가능하며 자동으로 New from Design 로 전환됩니다.
|
New from Design
|
프로토타입 준비 설정
|
Pending Prototype Approval
|
이 아이템 수정본이 출시되었음을 나타냅니다. New from Design
|
프로토타입 제작 준비가 완료되면 Pending Prototype Approval 으로 전환할 수 있습니다.
|
|
디자인 포기
|
Abandoned
|
이 단계에서 아이템 수정이 필요하지 않다고 판단되면 Abandoned
|
|
Pending Prototype Approval
|
프로토타입 승인
|
In Prototype
|
항목 수정이 프로토타입용으로 승인될 준비가 되었습니다. 승인에 성공하면 수정본이 In Prototype 상태로 전환됩니다.
|
|
프로토타입에 대한 비승인
|
New From Design
|
항목 수정이 프로토타입 승인에 실패하면 New from Design 으로 다시 전환됩니다.
|
Abandoned
|
디자인 복구
|
New from Design
|
중단된 아이템 리비전은 복구하여 New from Design 으로 복원할 수 있습니다
|
|
In Prototype
|
프로덕션 준비 완료
|
Pending Production Approval
|
아이템 리비전은 In Prototype 이며, 일반적으로 첫 번째 실제 프로토타입을 조립할 준비가 된 상태입니다. 프로토타입 테스트를 통과하면 Pending Production Approval 으로 전환할 수 있습니다.
|
|
디자인으로 롤백
|
New from Design
|
항목 수정이 테스트에 실패하면 New from Design 으로 다시 전환해야 합니
|
|
|
비공개 프로토타입
|
Closed Prototype
|
아이템 리비전을 더 이상 개발할 수 없는 경우(디자인 변경이 필요하여 새 리비전이 필요한 경우) Closed Prototype 으로 전환합니다
|
|
Pending Production Approval
|
프로덕션 승인
|
In Production
|
항목 수정이 생산 승인을 받을 준비가 되었습니다. 승인에 성공하면 수정본이 In Production 상태로 전환됩니다.
|
|
프로덕션용 비승인
|
In Prototype
|
항목 리비전을 프로덕션에 릴리스할 수 없는 경우 In Prototype 으로 다시 전환할 수 있습니다
|
|
Closed Prototype
|
프로토타입 복구
|
In Prototype
|
Closed Prototype 은 더 이상 개발할 수 없는 것으로 간주됩니다. 계속 개발할 수 있는 경우 In Prototype 으로 전환할 수 있습니다.
|
In Production
|
프로토타입으로 롤백
|
In Prototype
|
아이템 리비전이 생산 중이지만 생산할 수 없는 사유가 있는 경우 In Prototype 으로 다시 전환할 수 있습니다.
|
|
사용 중단
|
Deprecated
|
현재 개정판에서 아이템 제작을 중단하려는 경우(보드에 사용되는 부품을 구입하기 어려워지는 경우 등) Deprecated 로 전환합니다.
|
|
사용되지 않는 생산 아이템
|
Obsolete
|
현재 생산 중인 아이템 리비전이 더 이상 제작할 수 없는 경우, 즉시 Obsoleted 으로 변경할 수 있습니다
|
|
Deprecated
|
사용되지 않는 사용 중단 항목
|
Obsolete
|
Deprecated 은 일반적으로 기존 재고로 생산을 계속할 수 있지만 해당 아이템 리비전의 새 구성 요소를 주문해서는 안 된다는 의미입니다. 이 변경 사항이 적용되어 해당 재고를 더 이상 구할 수 없는 경우 해당 리비전은 사용되지 않는 것으로 설정할 수 있습니다.
|
|
사용되지 않는 항목 재활성화
|
In Production
|
Deprecated 항목을 In Production 으로 복원합니다
|
|
Obsolete
|
폐기된 아이템 재활성화
|
In Production
|
Obsolete 항목을 In Production 으로 복원합니다
|
|
|
사용되지 않는 항목 사용 중단
|
Deprecated
|
Obsolete 항목을 Deprecated 으로 복원합니다
|
|
라이프사이클 State 간 전환 제어
연결된 워크스페이스는 해당 워크스페이스에서 항목 리비전의 특정 상태 전환(상위 항목에 사용된 라이프사이클 정의에 따라 리비전을 한 상태에서 다른 상태로 전환하는 작업)을 할 수 있는 사람을 결정할 수 있는 뛰어난 유연성을 제공합니다. 표준(관리자가 아닌) 사용자가 특정 라이프사이클 State 간에 즉시 전환하는 것을 금지하는 동시에 워크스페이스 관리자 이상의 사용자에게 권한을 개방할 수 있습니다. 워크스페이스에 대한 글로벌 운영 권한의 일부인 글로벌 수준과 개별 상태 전환 수준에서 권한을 지정할 수 있습니다. 후자는 전역 수준에서 이러한 설정과 함께 작동하며, 더 중요한 전환에 대한 권한을 미세 조정할 수 있습니다(예: 항목 수정본을 Ready for Production 으로 설정).
또는 표준 사용자가 특정 상태 전환에 대한 승인을 요청하도록 할 수도 있습니다. 그러면 이러한 Approval Requests 은 하나 이상의 Approval Groups 의 멤버로 지정된 사람들에게 전송되고, 보고, 조치를 취하게 됩니다.
다양한 수준의 권한 제어를 통해 조직에서 선호하는 접근 방식을 준수하는 라이프사이클 State 전환 전략을 정의할 수 있습니다.
권한은 두 가지 수준에서 정의할 수 있습니다:
글로벌 상태 전환 권한
글로벌 상태 전환 권한은 작업 권한 편집 대화 상자를 사용하여 Altium Designer 내에서 정의하고 관리합니다. 이 대화 상자에 대한 접근은 Preferences 대화 상자의 Data Management – Servers 페이지에서 이루어집니다. 권한을 찾아보거나 수정하려는 연결된 워크스페이스의 경우 오른쪽에 있는 Properties 컨트롤을 클릭하고 관련 메뉴에서 Operations 명령을 선택합니다.
여기서 중요한 워크스페이스 작업 항목은 Move revision between lifecycle states 입니다.
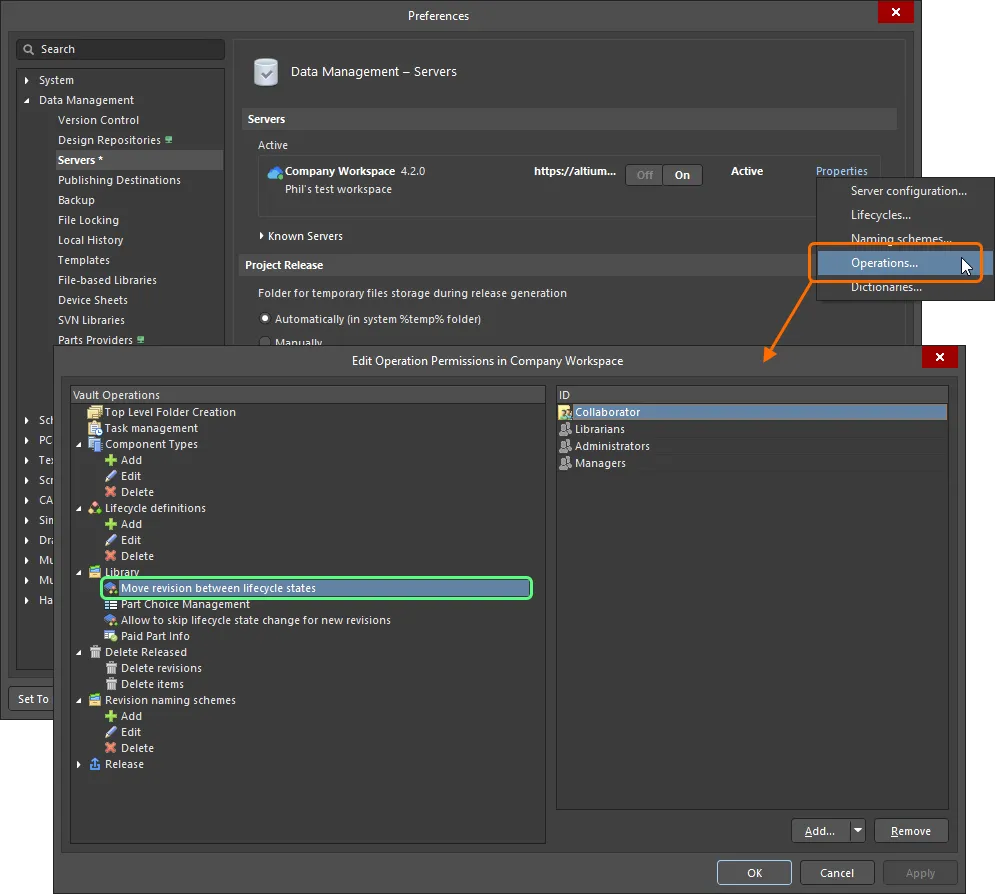
라이프사이클 State 전환을 수행할 수 있는 사람을 글로벌 수준에서 액세스하고 구성할 수 있습니다.
새로 연결된 워크스페이스의 경우 이 작업에 대한 기본 권한 설정은 다음과 같습니다:
-
Administrator (관리자)
-
Collaborator (공동 작업자)
-
Librarians (사서)
-
Managers (관리자")
대부분의 경우 이러한 기본 권한 설정으로 충분하며 예외적인 경우에만 수정할 필요가 있습니다.
필요에 따라 추가 권한을 정의합니다( Add 버튼 클릭). 이 글로벌 수준에서 상태 전환 권한은 다음 엔터티에 할당할 수 있습니다:
-
 관리자(자체적으로 정의된 그룹).
-
 공동 작업자(항목/수정본에 대한 수정 권한이 있는 사용자).
-
 소유자(릴리즈된 데이터의 경우 초기 항목을 만든 사람).
-
 특정 사용자 정의 그룹.
-
 특정 사용자.
로컬 상태 전환 권한
특정 상태 전환에 대한 권한은 연결된 상태 전환 속성 대화 상자에서 정의되며, 현재 Edit Lifecycle Definitions 대화 상자에서 구성 중인 라이프사이클 정의의 해당 States and Transitions 영역에서 액세스할 수 있습니다.
전환의 속성을 편집하려면 전환을 클릭하여 선택한 다음 맨 오른쪽에 있는  컨트롤을 클릭합니다.

편집 중인 상태 전환에 대한 권한을 정의하기 위한 컨트롤에 액세스합니다.
State Transition Permissions 필드를 사용하여 전환에 사용할 권한 제어 유형을 선택합니다. 두 가지 옵션이 제공됩니다:
-
Controlled - 이 유형을 사용하면 한 명 이상의 사용자 및/또는 그룹을 지정하여 이 전환을 수행할 수 있는 사용자를 정확하게 구체화할 수 있습니다. 이 유형의 로컬 권한 제어는 글로벌 수준에서 설정된 권한과 함께 사용됩니다( 권한이 적용되는 방법 참조). 아래 영역의 컨트롤을 사용하여 허용되는 엔터티를 적절히 정의하세요. 기본적으로 Anyone 엔티티가 추가되어 이 로컬 수준의 모든 사용자가 전환을 수행할 수 있도록 허용됩니다.
특정 사용자 및/또는 그룹을 설정하려면 먼저 Anyone 엔터티를 선택한 다음 제거합니다. 그런 다음 Add 버튼과 연결된 메뉴에서 필요에 따라 사용자 또는 그룹을 추가할 수 있습니다. Search for Users 또는 Search for Role 을 사용하여 각각 필요한 사용자 또는 그룹을 찾습니다.
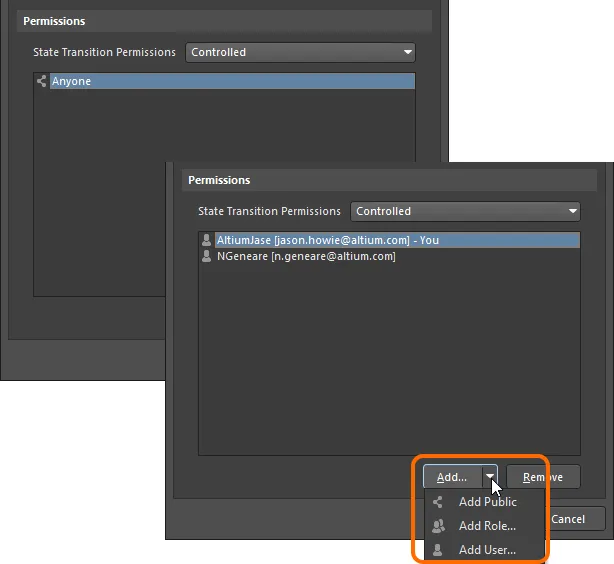
Controlled 권한을 사용하면 모든 사람의 액세스 권한에서 지정된 사용자/그룹만 액세스하도록 전환할 수 있습니다.
-
Using Approvals - 이 유형을 사용하면 모든 표준 사용자가 이 상태 전환을 요청할 수 있습니다. 요청은 정의된 승인 그룹에 추가된 한 명 이상의 사용자(개별적으로 또는 그룹을 통해)가 처리합니다. 이러한 그룹의 모든 구성원은 전환 요청을 승인하거나 거부할 수 있습니다. 또한 여러 개의 승인 그룹을 정의하고 순서를 지정할 수도 있습니다. 이를 통해 여러 단계의 승인이 가능합니다.
아래 영역의 컨트롤을 사용하여 그에 따라 승인 그룹을 정의하세요. 기본적으로 하나의 비어 있는 승인 그룹이 준비된 상태로 추가됩니다( New Approval Group). Add 버튼과 연결된 메뉴(또는 영역의 오른쪽 클릭 메뉴)에서 Edit Approval Group Name 명령을 사용하여 필요에 따라 이름을 변경할 수 있습니다.
Add 버튼과 연결된 메뉴(또는 지역의 오른쪽 클릭 메뉴)에서 필요에 따라 사용자 또는 그룹을 선택한 승인 그룹에 추가할 수 있습니다. 이후의 Search For Users 대화상자 또는 Search For Role 대화상자를 사용하여 각각 필요한 사용자 또는 그룹을 찾습니다. 메뉴에서 Move Up 및 Move Down 명령을 사용하여 여러 승인 그룹을 주문할 수 있습니다. 승인은 위에서 아래로 진행됩니다.
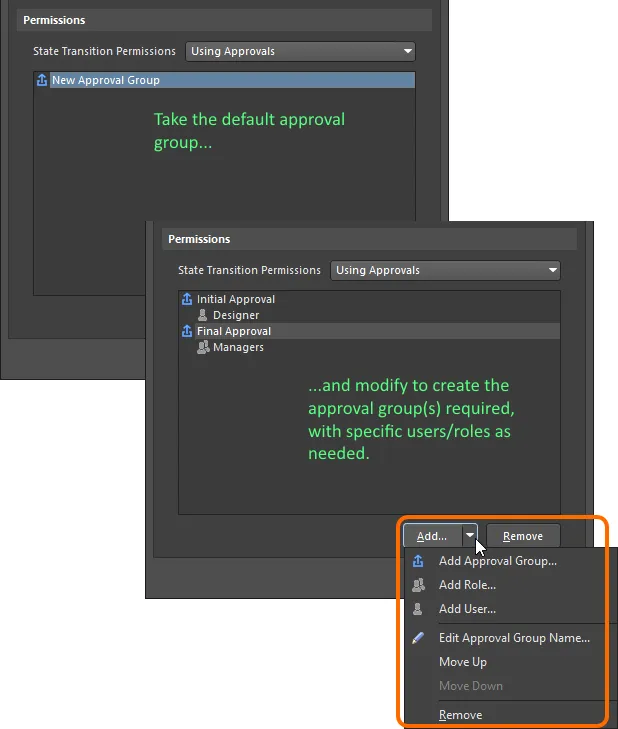
Using Approvals 을 사용하면 관리자가 아닌 모든 사용자가 전환을 요청해야 하며, 하나 이상의 정의된 승인 그룹에 속한 사용자가 이를 수행합니다.
권한이 적용되는 방법
권한이 적용되는 방식은 상태 전환 수준에서 선택하고 구성한 권한 제어 유형에 따라 달라집니다:
-
Controlled Permissions - 사용자가 상태 전환을 수행할 수 있으려면 다음 조건을 충족해야 합니다:
-
글로벌 수준에서
Move revision between lifecycle states ( 작업 권한 편집 대화 상자에 정의됨)에 대한 권한이 있어야 합니다.
-
이 특정 상태 전환에 대한 로컬 수준의 권한이 있어야 합니다.
-
또한 라이프사이클 State가 전환되는 항목 리비전의 공동 작업자여야 합니다(즉, 편집 권한이 있어야 합니다).
이 세 가지 조건 중 하나라도 충족되지 않으면 사용자는 특정 전환을 수행할 수 없습니다.
관리자가 아닌 사용자의 경우 기본 권한 설정(전역 수준에서는Collaborator, 로컬 상태 전환 수준에서는 Anyone )을 사용하면 필요한 항목 수정에 대해 사용자를 공동 작업자로 설정하기만 하면 모든 조건을 충족할 수 있습니다. 그런 다음 주요 전환의 경우 로컬 상태 전환 수준에서 권한을 강화하여 모든 공동 작업자만 전환을 수행할 수 있도록 할 수 있습니다.
-
Using Approvals - 관리자가 아닌 모든 사용자는 승인 시스템을 사용하여 상태 전환을 수행하기 위한 요청을 보내야 합니다. 승인 시스템에서는 사용자가 글로벌 수준에서 상태 전환을 수행할 수 있는 권한이 필요하지 않으며, 사용자가 항목 리비전의 공동 작업자이어야 할 필요도 없습니다.
사용자가 항목 리비전에 대한 공동 작업자일 필요는 없지만, 반드시 공유해야 하며 그렇지 않으면 워크스페이스에서 볼 수 없습니다.
워크스페이스 관리자는 로컬로 정의된 상태 전환 권한에 관계없이 항상 다른 상태 간에 항목 수정본을 전환할 수 있습니다.
리비전 명명 체계의 레벨에 단계 연결하기
리비전 및 라이프사이클 State는 Item 보기의 해당 오른쪽 클릭 메뉴 또는 탐색기 패널의 Lifecycle 측면 보기 탭에서 증분할 수 있습니다. 새 리비전 설정과 라이프사이클 승격은 서로 다른 이유로 수행되는 완전히 별개의 작업이지만(디자인 변경이 있을 때 새 리비전, 해당 항목 리비전의 향상된 사용성을 반영하기 위한 새 라이프사이클 State), 서로 연관되어 있습니다.
고급 관리 스타일에 기반한 라이프사이클 정의의 경우 정의된 단계를 사용된 리비전 명명 체계의 리비전 레벨에 연결할 수 있습니다. Edit Lifecycle Definitions 대화 상자의 하단에 있는 옵션을 사용하여 이 작업을 수행합니다.

단계를 리비전 레벨에 연결하는 옵션입니다.
이렇게 하면 라이프사이클 단계와 리비전 수준 간에 관계가 만들어집니다. 즉, 항목 리비전의 라이프사이클가 증가하여 한 단계의 상태에서 다른 단계의 상태로 이동하면 오른쪽 클릭 메뉴에서 사용 가능한 리비전 수정 유형 명령도 변경된다는 뜻입니다.
기본 라이프사이클 정의 Sample - Structured Lifecycle With Approvals 와 3단계 리비전 명명 체계( Revision, Prototype, Model)를 예로 들어 보겠습니다. 항목 리비전이 첫 번째 단계인 New From Design 상태인 경우 오른쪽 클릭 메뉴의 리비전 유형 옵션에는 새 리비전 설정, 새 프로토타입 또는 새 모델이 포함됩니다.
그런 다음 라이프사이클이 현재 In Prototype 상태가 될 때까지 증가하면 두 번째 단계로 이동한 것입니다. 마우스 오른쪽 버튼으로 클릭하면 이제 사용 가능한 리비전 유형 옵션에 새 프로토타입 설정 또는 새 모델이 포함되며, 새 리비전을 시작하는 옵션은 없습니다. 디자인이 프로토타입으로 진행된 경우 디자인 변경이 필요한 경우 새 프로토타입이 필요하거나 변경 범위에 따라 새 모델이 필요할 수 있습니다.
아이템 리비전이 In Production 상태에 도달하면 세 번째 단계에서는 예상대로 새 모델을 설정하는 리비전 유형 옵션만 사용할 수 있습니다.
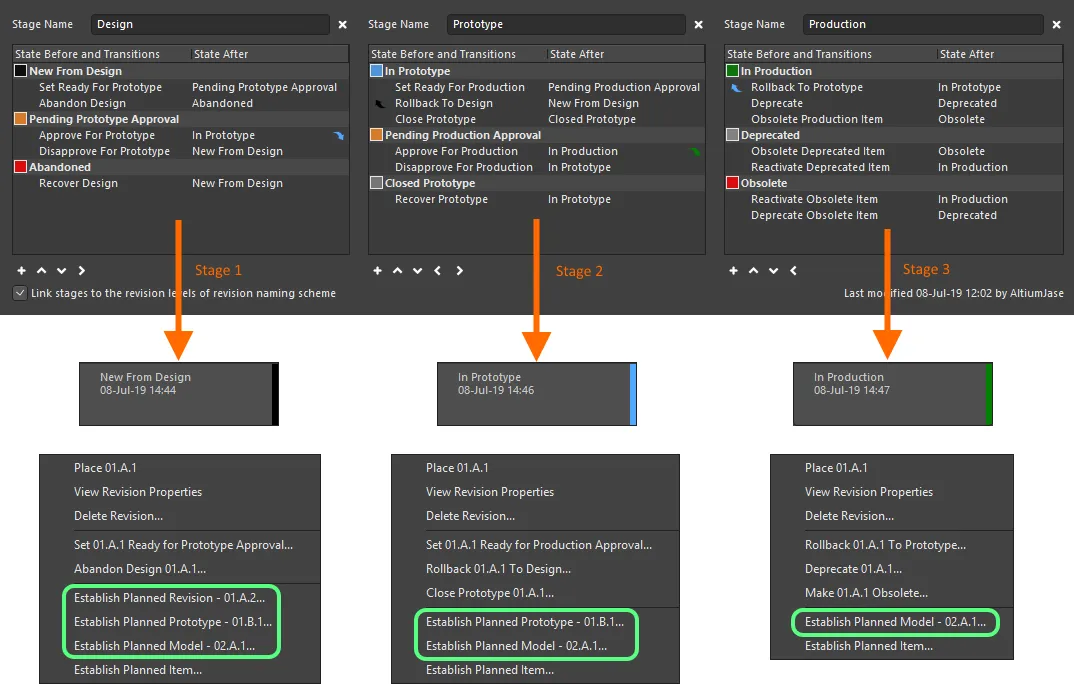
연결되면 항목 수정본의 라이프사이클 State가 정의된 여러 단계를 거치면서 진행됨에 따라 수정본 유형 명령이 변경됩니다.
정의 저장하기
새 라이프사이클 정의가 추가되었든 기존 라이프사이클 정의가 어떤 식으로든 수정되었든 해당 라이프사이클 정의는 반드시 저장해야 합니다. 실제 '저장' 컨트롤은 없지만 이 작업을 수행하는 데 사용할 수 있는 컨트롤이 있습니다:
-
'+' 접미사로 구분되는 새 라이프사이클 정의의 경우 Add Definition 컨트롤(정의 탭의 오른쪽 상단에 있는)을 사용하거나 대화 상자의 기본
 버튼을 클릭합니다.
-
'*' 접미사로 구분되는 기존 라이프사이클 정의를 수정하려면 Apply Changes 컨트롤(정의 탭의 오른쪽 상단에 있는)을 사용하거나 대화 상자의 기본
 버튼을 클릭합니다.
두 경우 모두 접미사가 제거되고 새(또는 수정된) 정의가 워크스페이스에서 사용할 수 있는 라이프사이클 정의 집합의 일부로 제공됩니다.
대화 상자의 기본

버튼을 사용하면 대화 상자를 열어 놓은 상태에서 일괄적으로 '저장'할 수 있습니다.
OK 버튼을 클릭하기 전에 라이프사이클 정의가 실제로 추가되었는지 또는 변경 사항이 적용되었는지 확인하세요. 정의를 '저장'하지 않고 그렇게 하면 대화 상자가 닫히고 변경 사항이 손실됩니다. 또한 라이프사이클 정의에 대해 첫 번째 상태만 정의된 것이 아니라 여러 상태가 정의된 경우에는 이러한 상태를 효과적으로 연결하기 위한 전환을 정의해야 하며, 그렇지 않으면 변경 사항을 적용할 수 없습니다. 오류 대화 상자에 '연결할 수 없는' 상태가 나열되어 이 상황을 표시합니다.
Edit Lifecycle Definitions 대화 상자를 다시 열면 정의 컬렉션이 이름별로 왼쪽에서 오른쪽으로 알파벳 오름차순으로 정렬되어 표시됩니다.
누가 언제 무엇을 변경했는지 등 명확하고 투명한 감사 추적을 용이하게 하기 위해 라이프사이클 정의가 마지막으로 수정된 날짜에 대한 세부 정보가 탭의 오른쪽 하단에 제공됩니다.
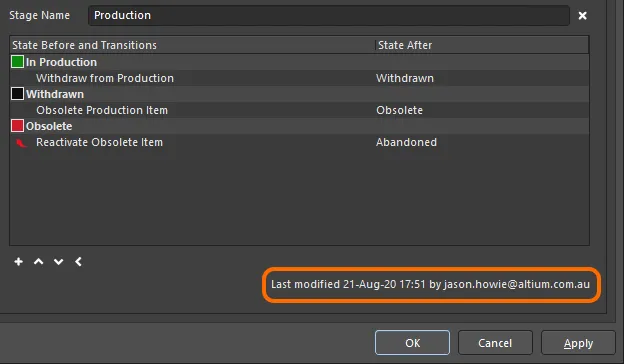
라이프사이클 정의가 마지막으로 수정된 시기와 수정한 사람을 식별할 수 있습니다.
활성 정의에 변경 사항을 적용하기 전에 언제든지 해당 정의 탭의 오른쪽 상단에 있는 Reset 컨트롤을 클릭하여 해당 변경 사항을 전체적으로 '되돌릴' 수 있습니다.
정의 이름 바꾸기
이 기능은 워크스페이스에 대한 관리 권한이 있는 사용자만 사용할 수 있습니다.
기존에 사용된 라이프사이클 정의의 이름을 바꾸려면 다음과 같이 하세요:
-
연결된 활성 워크스페이스의 Edit Lifecycle Definitions 대화 상자에 액세스합니다.
-
이름을 변경해야 하는 정의의 탭을 클릭합니다.
-
Definition Name 필드에서 이름을 수정합니다.
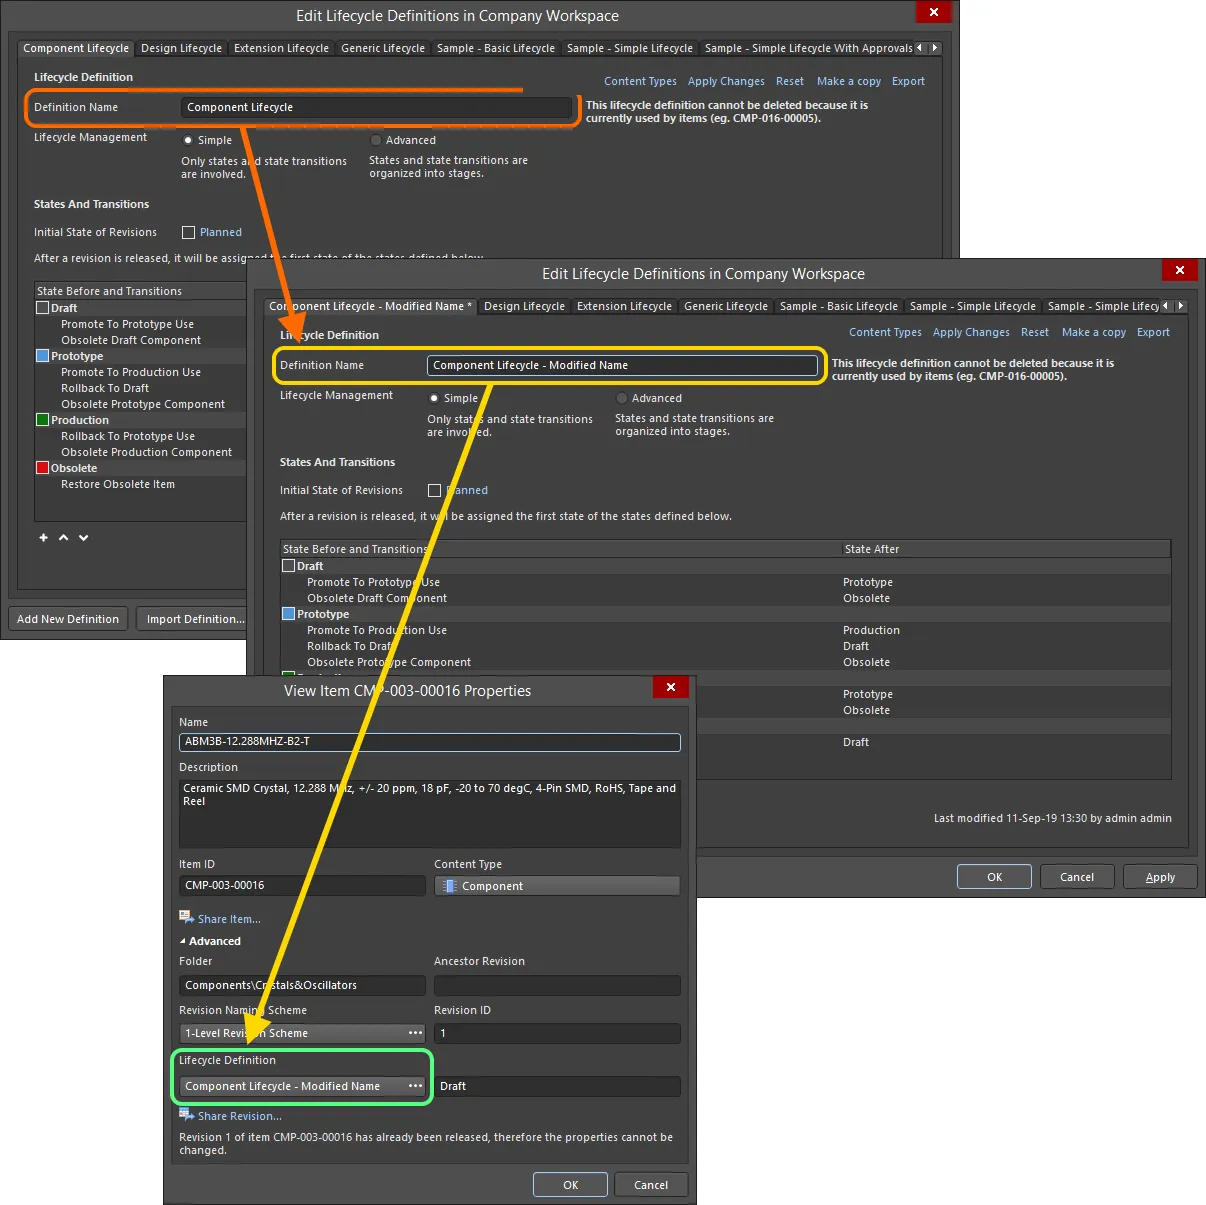
라이프사이클 정의의 이름을 변경하고 이미 해당 정의를 사용하고 있는 항목의 속성 변경을 확인하는 예제입니다.
정의 복사하기
새 라이프사이클 정의를 처음부터 만들 필요는 없습니다. Edit Lifecycle Definitions 대화 상자에서 기존 정의를 빠르게 복사할 수 있습니다. 이렇게 하려면 다음과 같이 하세요:
-
복사할 필수 라이프사이클 정의를 활성 정의로 설정합니다.
-
해당 정의 탭의 오른쪽 상단에 있는 복사본 만들기 컨트롤을 클릭합니다.
-
정의의 정확한 사본이 만들어지고 초기 기본 이름이
New Lifecycle Definition 인 새 정의가 만들어집니다. 필요에 따라 이름을 바꿉니다.
-
Add Definition 컨트롤(또는 기본
 버튼)을 클릭하면 새 정의를 효과적으로 저장할 수 있습니다.
정의 삭제하기
기존 라이프사이클 정의를 삭제하려면 해당 정의를 선택하여 Edit Lifecycle Definitions 대화 상자에서 활성 정의로 만든 다음 정의 탭의 오른쪽 상단에 있는 Delete 컨트롤을 클릭합니다.
현재 워크스페이스의 항목에서 사용 중인 라이프사이클 정의는 삭제할 수 없습니다.
라이프사이클 정의의 영구 삭제는 대화 상자의 기본  버튼을 클릭하거나 OK)을 클릭하면 적용됩니다. 그 전에 대화 상자 하단의
  버튼을 클릭하여 삭제 작업을 취소할 수 있습니다.

라이프사이클 정의 삭제 작업은 취소할 수 있습니다.
정의 내보내기 및 가져오기
사용자 정의 라이프사이클 정의는 해당 정의가 정의된 연결된 워크스페이스에서만 사용할 수 있습니다. Edit Lifecycle Definitions 대화상자에는 내보내기 및 가져오기 기능이 있어 워크스페이스 간에 정의를 이식할 수 있습니다.
라이프사이클 정의는 라이프사이클 정의 파일(*.definition)에 저장됩니다.
라이프사이클 정의를 내보내려면 해당 탭의 오른쪽 상단에 있는 Export 컨트롤을 클릭합니다. 이어지는 라이프사이클 정의 저장 대화 상자를 사용하여 파일을 저장할 위치와 이름을 결정합니다.
라이프사이클 정의를 가져오려면 Edit Lifecycle Definitions 대화 상자의 하단에 있는  버튼을 클릭합니다. Open Lifecycle Definition 대화 상자를 사용하여 필요한 라이프사이클 정의 파일을 찾아서 엽니다. 라이프사이클 정의가 워크스페이스에서 사용할 수 있는 기존 라이프사이클 정의 목록에 추가됩니다.
가져온 라이프사이클 정의는 '+' 접미사가 붙은 새 정의로 나타납니다. 이 이름은 파일 자체의 이름이 아니라 정의 파일 내에 정의된 이름입니다.
Add Definition 컨트롤 또는 대화 상자의 기본

버튼을 클릭하여 '저장'되었는지 확인합니다.
일부 사전 정의된 예제 라이프사이클 정의 파일은 기본 Altium Designer 설치의 \Program Files\Altium\AD\System\EDMSTemplates 폴더에서 사용할 수 있습니다.
라이프사이클 정의 사용 제어하기
각 정의를 정의할 때 특정 라이프사이클 정의를 사용할 수 있는 항목 유형을 글로벌 수준에서 정의하고 활성화할 수 있습니다. 이 기능을 활성화하면 특정 항목 유형에 대한 라이프사이클 정의를 선택할 때 허용된 정의만 사용할 수 있습니다. 이렇게 하면 특정 유형의 항목이 필요한 라이프사이클 정의만 사용하도록 하는 추가적인 수준의 제어가 가능합니다.
제어는 Content Types 대화 상자 내에서 수행됩니다. 액세스 권한을 구성하려는 특정 정의의 탭을 클릭한 다음 정의 탭의 오른쪽 상단에 있는 Content Types 링크를 클릭합니다.

Content Types 대화 상자 액세스 - 구성 중인 라이프사이클 정의를 사용할 수 있는 콘텐츠 유형을 결정하기 위한 명령 중심입니다.
Content Types 대화 상자에는 연결된 활성 워크스페이스에서 사용자 또는 시스템에 의해 생성할 수 있는 지원되는 모든 콘텐츠 유형이 나열됩니다. 목록 위의 옵션( Control Lifecycle Definition per Content Type )은 해당 특정 정의에 대한 기능의 활성화(사용 설정) 또는 비활성화(사용 안 함) 여부를 전역적으로 제어할 수 있습니다. 이 옵션을 활성화한 다음, 해당 정의를 사용하려는 각 콘텐츠 유형에 대해 연결된 Use 옵션을 활성화하세요.
워크스페이스 프로젝트를 만들 수 있으려면 하나 이상의 라이프사이클 정의에서 Project 콘텐츠 유형에 대해 Use 옵션을 활성화해야 합니다.
-
지원되는 콘텐츠 유형에 대해 자세히 알아보려면 항목으로 작업하기 페이지를 참조하세요. Content Types 대화 상자에 나열되어 있지만 여기에 설명되어 있지 않은 다른 콘텐츠 유형은 소프트웨어 내에서 작동하지 않습니다.
-
동일한 대화 상자의 화신은 특정 리비전 명명 체계의 사용을 제어하는 데 사용됩니다. 자세한 내용은 리비전 명명 체계 사용 제어하기를 참조하세요.
고급 및 단순 라이프사이클 관리 모드 전환하기
기존 라이프사이클 정의를 Advanced 스타일의 라이프사이클 관리(상태, 상태 전환 및 단계) 사용에서 Simple 스타일의 관리(상태 및 상태 전환만)로 전환할 수 있습니다. Simple 옵션을 사용 설정하면 Confirm Merge States 대화 상자가 나타납니다. 이 대화 상자에서 다음과 같이 스위치 처리 방법을 결정합니다:
-
Yes - 1, 2, 3단계에 걸쳐 정의된 모든 상태(및 상태 전환)가 하나의 평평한 상태 목록으로 병합됩니다.
-
No - 2단계 및 3단계에 정의된 모든 상태(및 상태 전환)가 삭제됩니다. 1단계(가장 왼쪽 단계)의 상태(및 상태 전환)만 단일 평면 상태 목록에 유지됩니다.
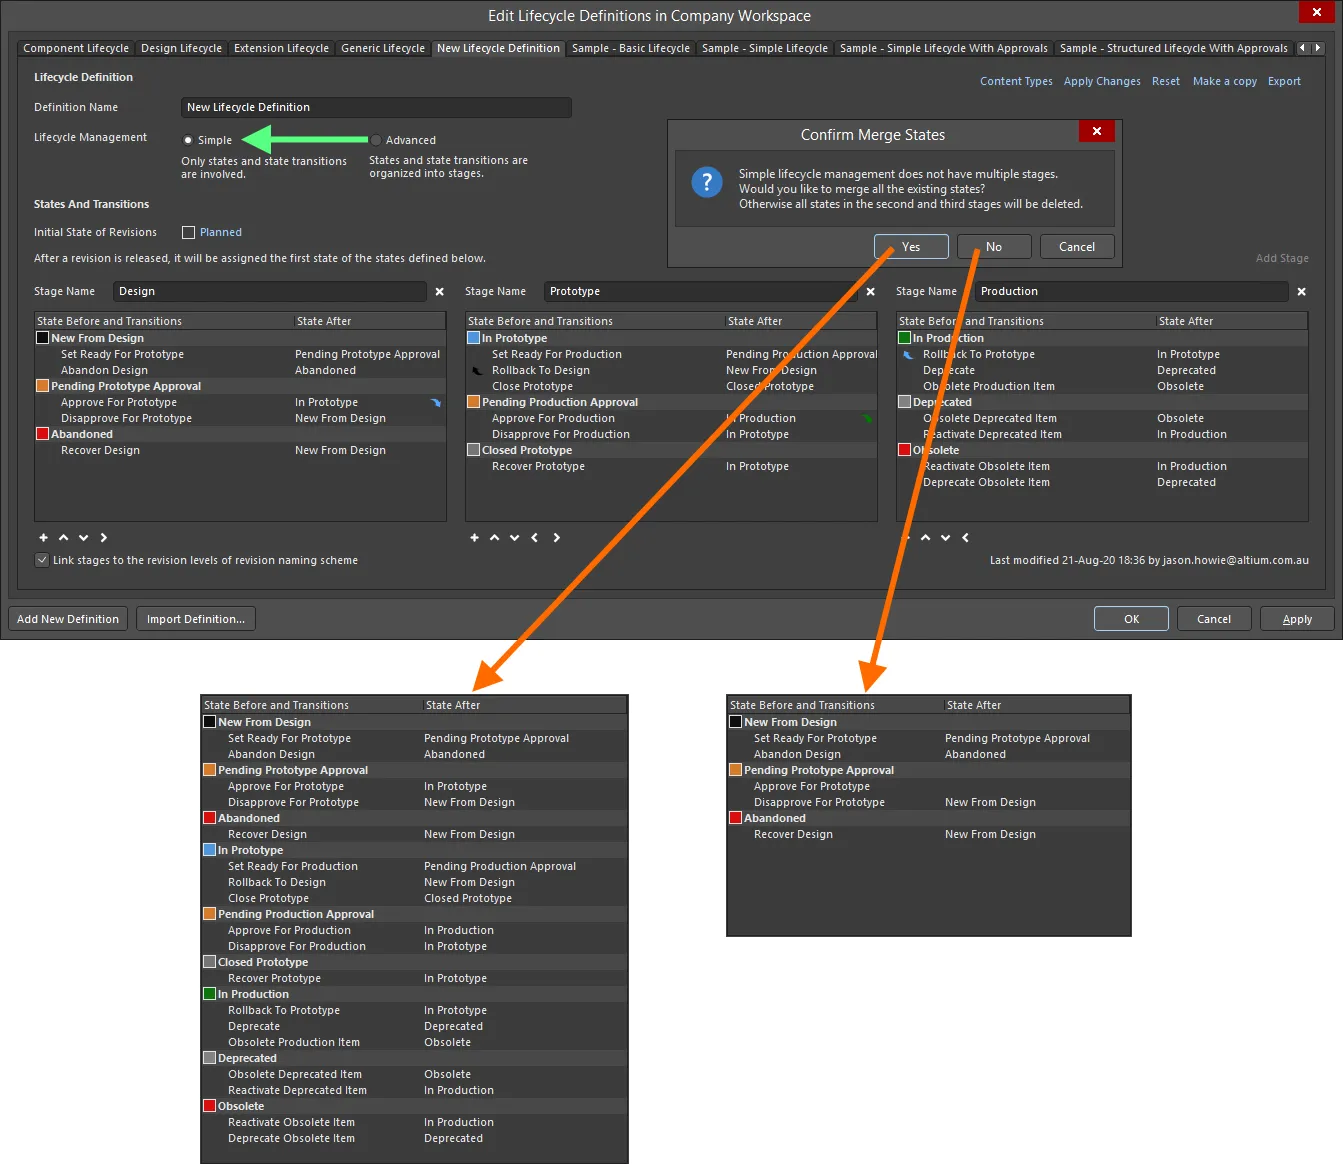
라이프사이클 관리 스타일을 Advanced 에서 Simple 으로 전환하여 다른 단계의 상태(및 상태 전환)가 처리되는 방식을 제어할 수 있습니다.
상태 전환 승인 요청
다음 섹션에서는 워크스페이스의 관리자가 아닌 사용자가 특정 상태 전환을 수행할 수 있도록 승인 시스템을 사용하는 다양한 측면에 대해 자세히 살펴봅니다.
요청 만들기(승인 요청)
상태 전환에 대한 승인 요청은 Altium Designer 내에서 필요한 항목 수정에 대한 Lifecycle 측면 보기( 탐색기 패널의) 또는 자세한 보기의 그래픽 라이프사이클 영역( Item )에서 수행합니다. 리비전의 라이프사이클을 마우스 오른쪽 버튼으로 클릭하고 전환을 요청하는 명령을 선택합니다. Confirm 대화 상자가 나타나면 요청을 하는 이유에 대한 메모를 입력할 수 있으며, 이는 승인 그룹 멤버들이 요청을 최종적으로 승인할지 여부를 심의하는 데 도움이 될 수 있습니다! Yes 을 클릭하여 요청을 생성합니다.
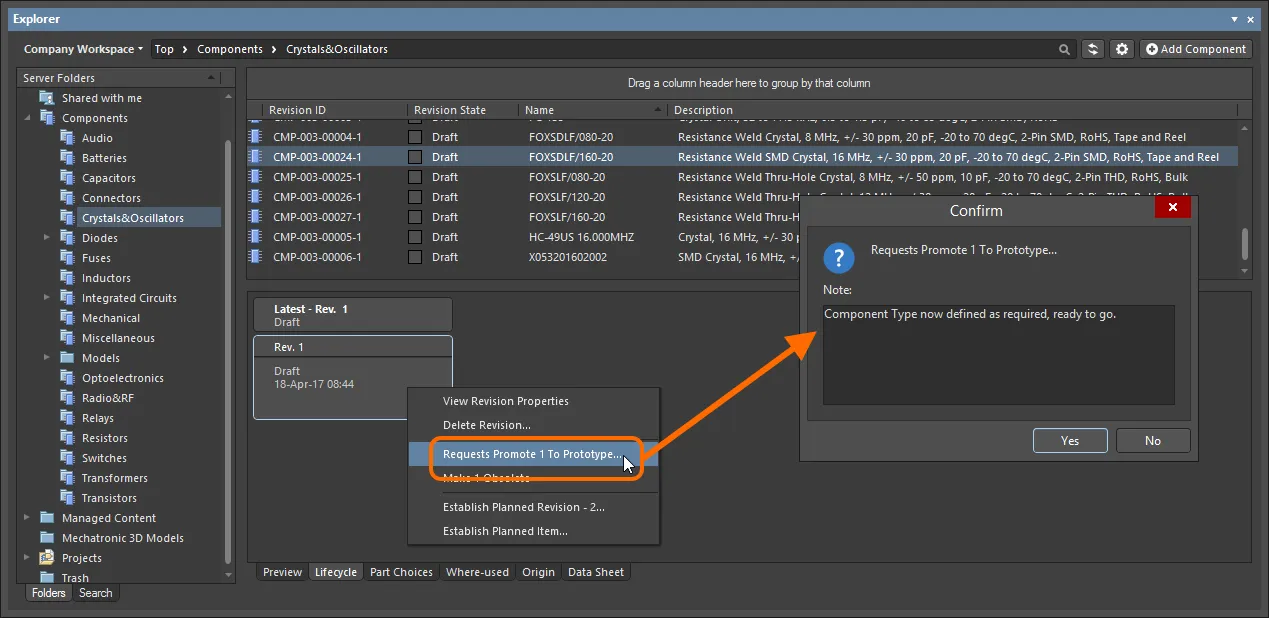
상태 전환을 요청하고 요청 사유를 입증할 수 있는 유용한 메모를 추가하세요.
상태가 생성되면 해당 상태 전환에 해당하는 승인 그룹의 구성원에게 이메일 알림이 전송됩니다(이메일 알림 기능이 사용 설정되어 있는 경우).
이메일 알림 기능의 구성은 워크스페이스 관리자가 워크스페이스의 브라우저 인터페이스의 이메일 알림 페이지(Admin – Settings – Email Notifications)에서 수행합니다.
승인 요청 보기
상태 전환 요청의 작성자(Requester)와 해당 상태 전환에 대해 해당 승인 그룹에 정의된 사용자(Approver) 모두에게 보류 중인 요청은 전용 Approval Requests 폴더를 사용하여 Explorer 패널을 통해 표시됩니다.
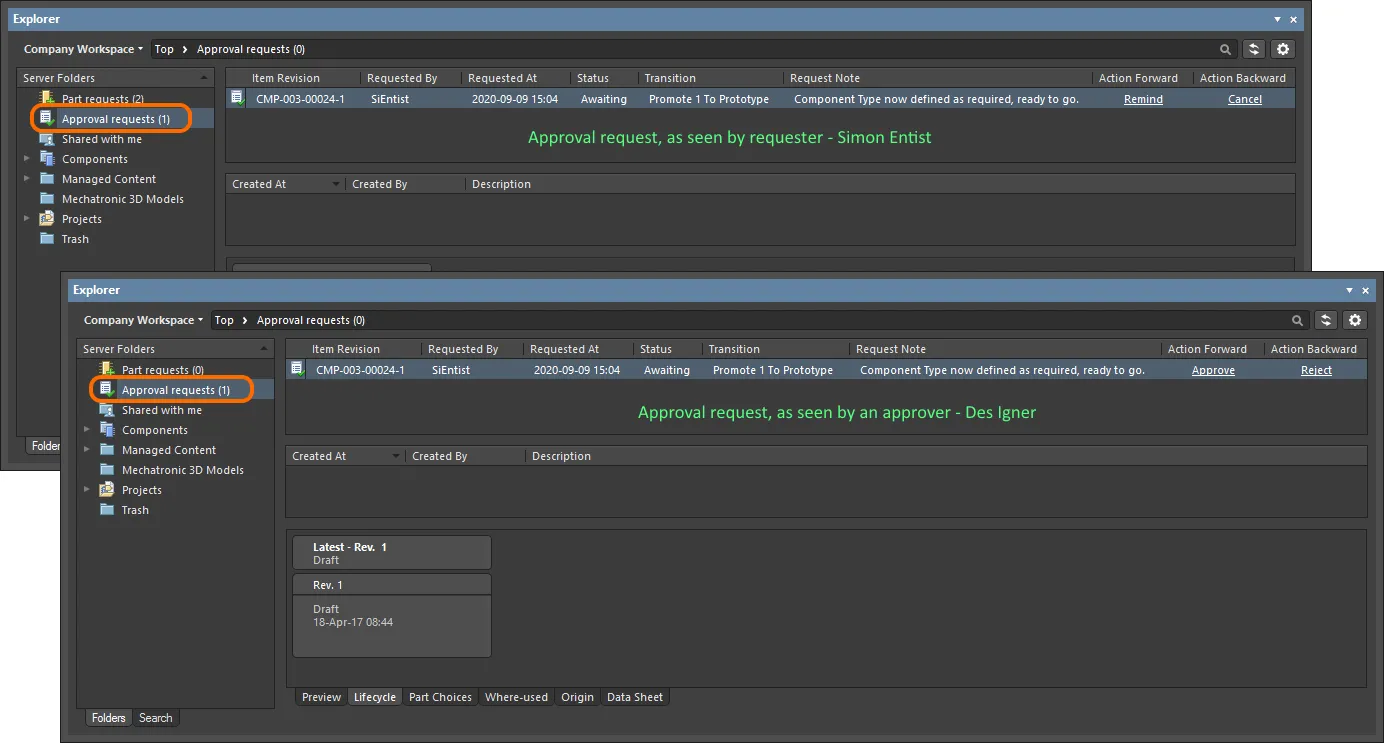
요청자(Simon Entist)와 특정 상태 전환에 대해 정의된 (초기) 승인 그룹의 구성원 중 한 명(Des Igner)이 본 Approval Requests 폴더의 승인 요청 예시.
Approval Requests 폴더 이름 옆의 숫자는 보류 중인 요청의 수를 나타냅니다.

메뉴에서
Show Approved Requests 옵션이 활성화된 경우 이 숫자는 총(보류 중 + 승인됨)을 반영합니다.
각 승인 요청에 대해 다음 정보가 표시됩니다:
-
Item Revision - 요청이 이루어진 구체적인 항목 수정 사항.
-
Requested By - 요청의 발신자(요청자). 여기 항목은 사용자의 사용자 이름을 사용합니다.
-
Requested At - 요청이 생성된 날짜와 시간입니다.
-
Status - 요청의 현재 상태입니다. 다음 상태 중 하나일 수 있습니다:
-
Awaiting - 요청이 현재 한 명 이상의 승인자의 조치를 기다리는 중입니다.
-
Approved - 요청이 승인되었습니다. 이 상태는 해당 전환에 대해 정의된 모든 승인 그룹이 완전히 승인한 경우에만 입력된다는 점에 유의하세요.
-
Transition - 이 항목 수정에 대해 요청되는 특정 상태 전환을 나타냅니다.
-
Request Note - 요청이 이루어진 시점에 요청자가 추가한 모든 메모.
-
Action Forward - 여기에 제시된 컨트롤은 보류 중인 요청(상태가
Awaiting)에만 적용됩니다. 컨트롤은 다음과 같이 두 당사자를 위해 서로 다릅니다:
-
Requester - 요청을 만든 사용자는 Remind.
-
Approvers - 승인 그룹에 속한 사용자는 요청을 Approve 보낼 수 있습니다.
-
Action Backward - 여기에 제시된 컨트롤은 보류 중인 요청(상태가
Awaiting)에만 적용됩니다. 컨트롤은 다음과 같이 두 당사자에 따라 다릅니다:
-
Requester - 요청을 만든 사용자는 Cancel.
-
Approvers - 승인 그룹에 속한 사용자는 요청을 Reject 보낼 수 있습니다.
승인 요청에 대한 작업 기반 명령은 항목 수정본의 라이프사이클에 대한 오른쪽 클릭 메뉴( Lifecycle 측면 보기 내)에서도 사용할 수 있습니다.
페이지의 중앙 섹션은 승인 정보를 표시하는 데 사용되며, 자세한 내용은
승인 정보 스트림 섹션을 참조하세요.
요청 처리하기
이전 섹션에서 간략하게 설명한 대로 요청자와 승인자 모두 취할 수 있는 조치가 있습니다. 다음 접을 수 있는 섹션에서는 이러한 각 조치를 자세히 살펴봅니다:
알림
요청자가 승인을 기다렸지만 아직 승인을 받지 못한 경우 이 조치를 취할 수 있습니다. 이는 누군가를 넛지하거나 포럼 게시물에 부딪히는 것과 유사하며, 다시 말해 해당 승인 그룹에 속한 사람들에게 조치를 취해야 한다는 것을 상기시키는 정중한 방법입니다(어느 쪽이든). 승인 요청과 연결된 Remind 컨트롤을 클릭합니다. Confirm 대화 상자가 나타나면 여기에 승인 요청의 긴급성 수준을 높일 수 있는 메모를 입력할 수 있습니다! 알림을 적용하려면 Yes 을 클릭합니다. 이메일 알림 기능이 사용 설정된 경우 해당 상태 전환에 대한 해당 승인 그룹의 구성원에게 이메일 알림이 전송됩니다.
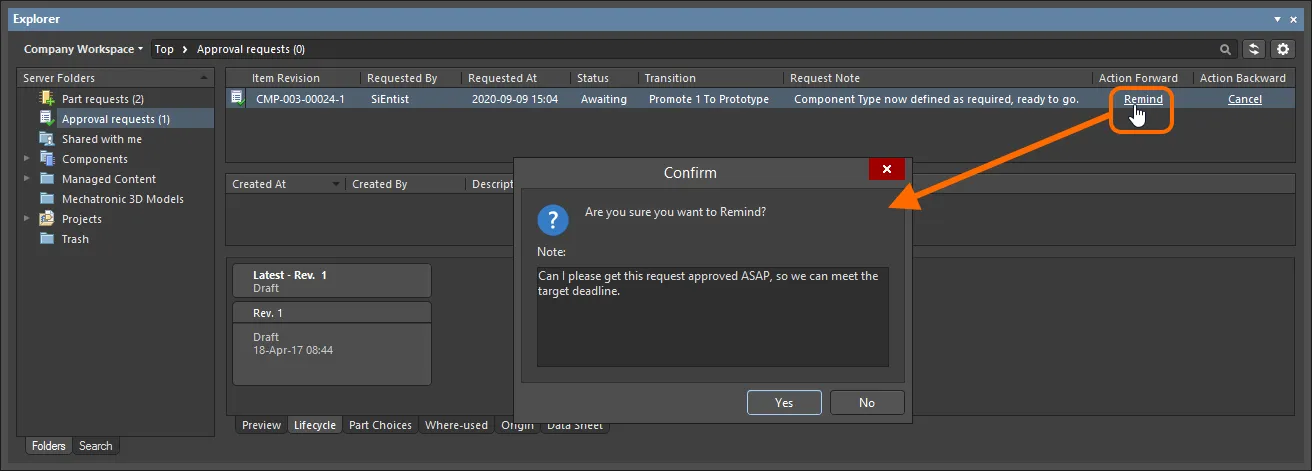
Remind 작업의 사용 예
승인
이 작업은 해당 승인 그룹의 구성원이 해당 요청을 승인하기 위해 수행할 수 있습니다. 승인 요청과 연결된 Approve 컨트롤을 클릭합니다. Confirm 대화 상자가 나타나면 필요한 경우 메모를 입력할 수 있습니다. 이메일 알림 기능이 사용 설정되어 있는 경우 Yes 을 클릭하여 승인을 적용하면 해당 상태 전환 요청자에게 이메일 알림이 전송됩니다.
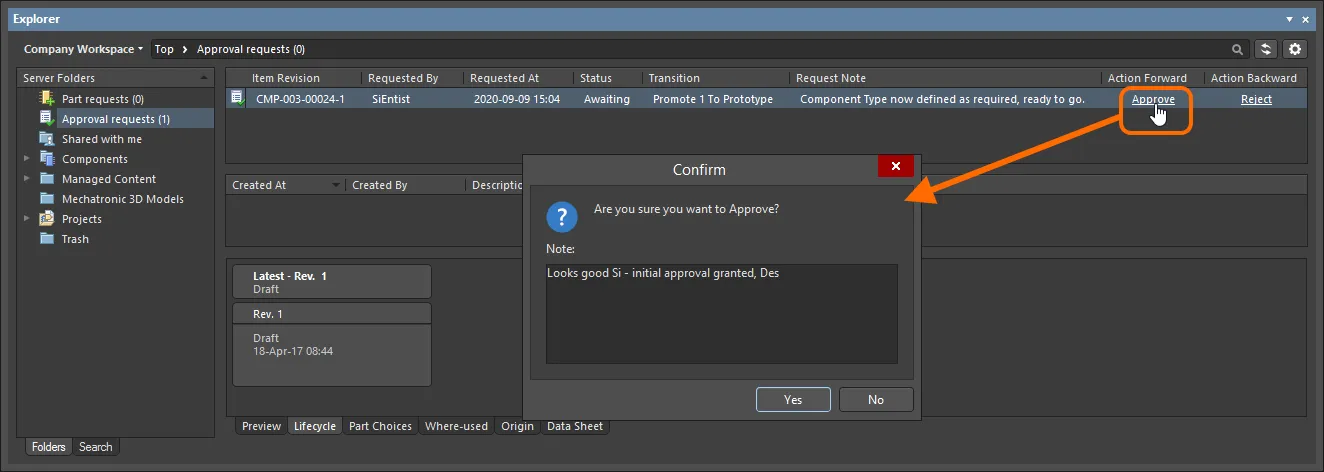
Approve 작업의 사용 예
승인 그룹이 하나만 있는 경우 요청을 승인하면 자동으로 상태 전환이 이루어집니다. 승인 그룹이 여러 개 있는 경우 요청은 다음 그룹의 구성원의 승인을 기다립니다. 첫 번째 승인 그룹의 승인자가 다음 승인 그룹의 구성원인 경우 두 번째 그룹에 대한 승인도 자동으로 이루어집니다.
거부
이 작업은 승인 그룹의 구성원이 해당 요청을 거부하기 위해 수행할 수 있습니다. 승인 요청과 연결된 Reject 컨트롤을 클릭합니다. Confirm 대화 상자가 나타나며, 필요한 경우 요청이 거부된 이유를 나타내는 메모를 입력할 수 있습니다. Yes 을 클릭하여 거부를 적용하면 승인 요청이 삭제되고 해당 상태 전환 요청자에게 이메일 알림이 전송됩니다(이메일 알림 기능이 사용 설정된 경우).
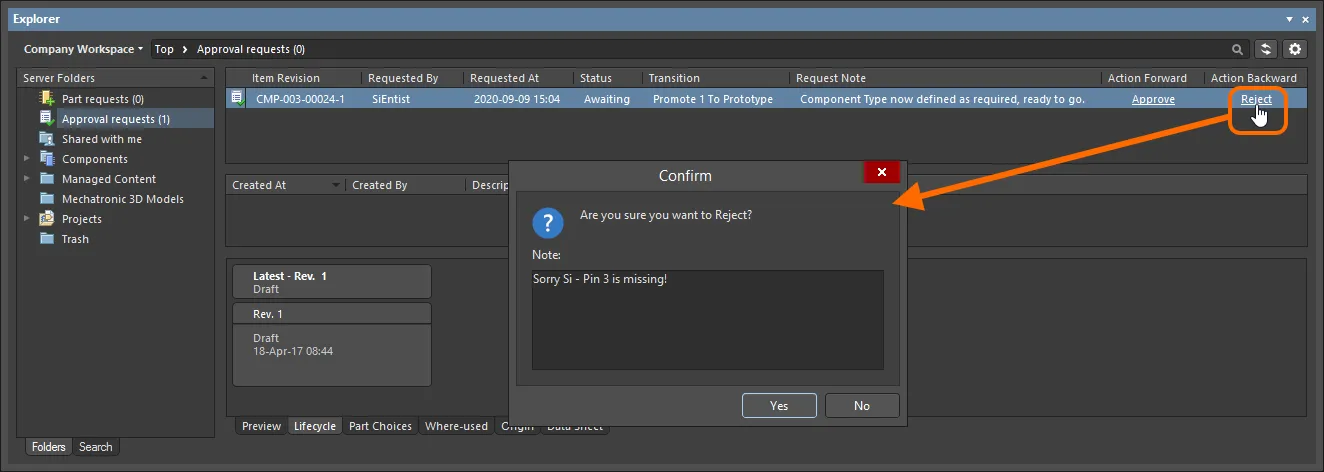
Reject 작업의 사용 예
취소
요청자가 승인을 기다렸으나 이후 요청을 취소하기로 결정한 경우 이 조치를 취할 수 있습니다. 예를 들어, 필요한 라이프사이클 State로 전환할 필요가 없는 다른 문제가 발견된 경우 이런 일이 발생할 수 있습니다. 승인 요청과 연결된 Cancel 컨트롤을 클릭합니다. 필요한 경우 메모를 입력할 수 있는 Confirm 대화 상자가 나타납니다. Yes 을 클릭하여 취소를 적용하면 승인 요청이 삭제됩니다.
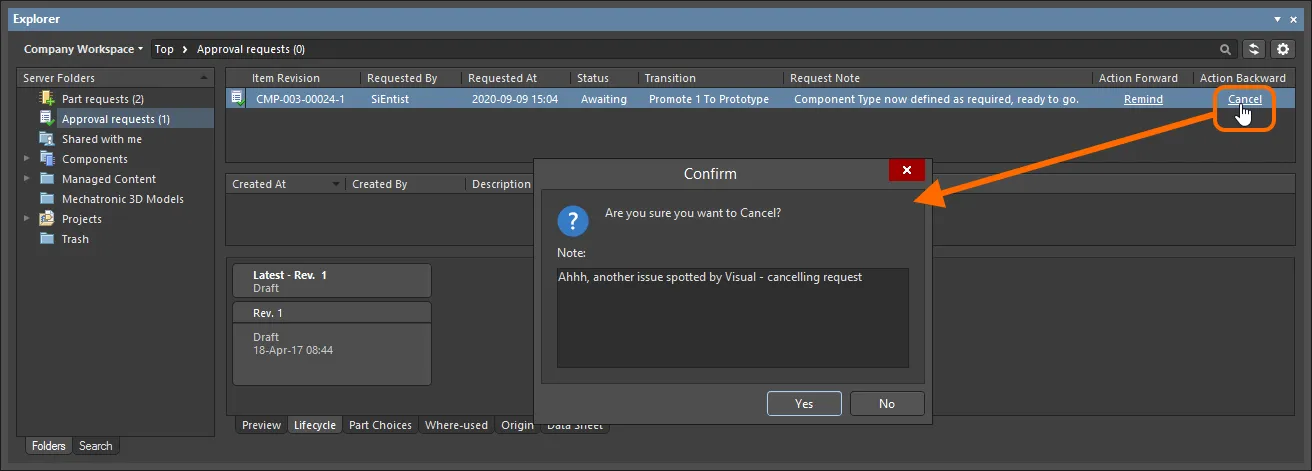
Cancel 작업의 사용 예
승인 정보 스트림
요청이 승인되면 해당 승인 요청을 탐색할 때 페이지의 중앙 영역에서 알림을 받을 수 있습니다. 이 정보는 다음 요소로 구성됩니다:
-
Created At - 승인 요청이 승인된 날짜와 시간.
-
Created By - 요청을 승인한 관련 승인 그룹의 구성원입니다. 여기에 입력하는 항목은 사용자의 사용자 이름입니다.
-
Description - 승인 시점에 승인자가 포함시킨 메모와 함께 자동 생성된 메시지로 구성된 항목입니다. 설명의 자동 생성 부분은 승인 유형에 따라 다릅니다:
-
Final approval (유일한 또는 마지막 승인 그룹의 구성원으로부터) -
task approved and completed.
-
Intermediate approval (마지막 승인 그룹이 아닌 승인 그룹의 구성원으로부터) -
task approved and assigned to next approval group ApprovalGroupName>.
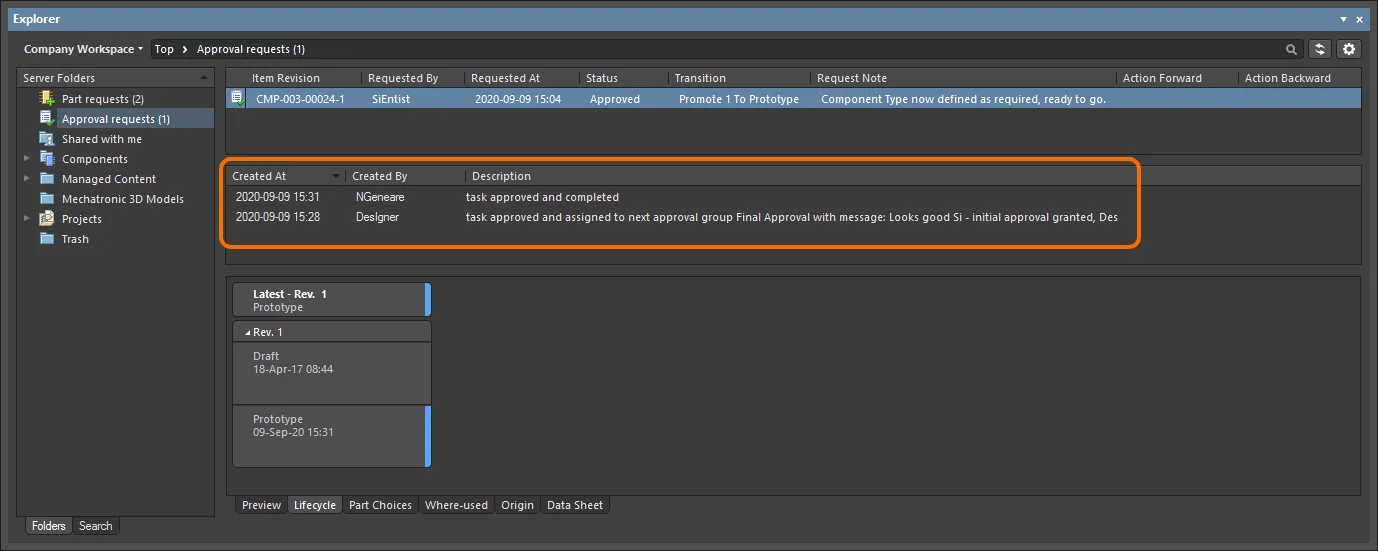
요청자가 본 특정 항목 수정에 대한 승인 흐름의 예입니다. 이 경우 두 단계의 승인(서로 다른 두 승인 그룹의 구성원으로부터 승인 받기)을 거쳐야 했습니다.
이러한 승인 정보는 상태가 Approved 이거나 Awaiting 인 승인 요청에 대해서만 사용할 수 있으며, 여러 관련 승인 그룹 중 첫 번째 승인 그룹에서 승인을 받았습니다.
다음 사용자가 이 정보를 볼 수 있습니다:
-
상태 전환 요청자.
-
요청에 대한 최종 승인을 내리는 사용자. 따라서 여러 승인 그룹이 관련된 경우 최종 승인 그룹의 구성원(최종 승인을 내리는 사람)만 이 정보를 볼 수 있습니다. 중간 승인을 하는 승인 그룹의 구성원에게는 이 스트림이 표시되지 않습니다.
항목 수정본 공개 여부 및 적용 범위 제어하기
라이프사이클 정의에 대한 각 개별 상태를 구성할 때, 해당 라이프사이클 정의를 사용하고 해당 상태로 들어가는 항목 수정본의 가시성과 적용 가능성을 제어하는 추가 상태 속성을 정의할 수 있습니다. 적용 가능성 측면에서 프로젝트 위반 보고서를 구성하여 리비전이 적용 불가능한 상태에 있는 디자인에서 사용 중인 모든 워크스페이스 항목을 감지하고 플래그를 지정하여 릴리스 전에 문제를 포착하고 방지할 수도 있습니다.
특정 상태의 항목 리비전이 표시되거나 적용 가능한지 여부를 결정하는 컨트롤은 상태 속성 대화 상자에서 사용할 수 있습니다. Edit Lifecycle Definitions 대화 상자에서 상위 라이프사이클 정의 내에서 상태의 항목을 두 번 클릭하거나 해당 항목을 선택하고 나타나는 편집 아이콘( )을 클릭하여 필요한 상태에 대한 이 대화 상자에 액세스할 수 있습니다.

상태 수준에서 정의된 속성을 사용하여 해당 상태에 들어가는 항목 수정본의 표시 여부 및/또는 적용 가능성을 제어합니다.
두 가지 옵션이 있습니다:
-
Visible in Vault panels - 이 옵션을 활성화하면 상위 라이프사이클 정의를 사용하는 항목의 수정본이 이 라이프사이클 State로 설정되어 있을 때 탐색기 패널에 표시됩니다. 이 옵션을 비활성화하면 리비전이 숨겨집니다. 숨겨진 수정본은 Show Hidden Revisions 컨트롤을 활성화하여 Explorer 패널 내에서 이 옵션을 재정의하여 표시할 수 있습니다(숨겨진 수정본 표시하기 참조).
-
Allowed to be used in designs - 이 옵션을 활성화하면 이 상태의 항목 리비전은 디자인에 사용할 수 있습니다. Applicable 로 간주됩니다. 이 옵션을 비활성화하면 이 상태의 항목 리비전은 유효하게 사용할 수 없으며 Inapplicable (또는 적용 불가)로 간주됩니다. Properties 패널과 항목 관리자 대화상자에서 해당 상태로 플래그가 지정됩니다( 적용 불가능한 리비전 플래그 지정하기 참조). 프로젝트 컴파일러가 이러한 상황을 포착하도록 구성할 수도 있습니다( 컴파일 시 적용 불가능한 리비전 상태 감지하기 참조).
컴포넌트 패널에는 디자인에 사용할 수 있는 컴포넌트의 모든 최신 버전이 표시되며, 해당 컴포넌트가
Visible in Vault 패널 옵션이 비활성화된 상태인 경우에도 표시됩니다.
LifeCycle 필터를 사용하여 특정 상태(또는 여러 상태)에 있는 컴포넌트를 검색할 수 있습니다.
숨겨진 리비전 표시
Visible in Vault panels 속성이 비활성화된 라이프사이클 State에 있는 항목 리비전의 경우, 해당 리비전은 기본적으로 탐색기 패널에 표시되지 않습니다. 또한 해당 항목의 최신 리비전인 경우에는 해당 항목의 전체 항목이 보이지 않게 됩니다. 상태 수준에서 정의되는 이 표시 여부 상태는 Explorer 패널에서 탐색할 때 모든 항목에 대해 전역적으로 재정의할 수 있습니다. 현재 보이지 않는 모든 항목 리비전을 표시하려면 패널의 Items 영역 오른쪽 상단에 있는  컨트롤을 클릭한 다음 관련 메뉴에서 Show Hidden Revisions 옵션을 활성화합니다.
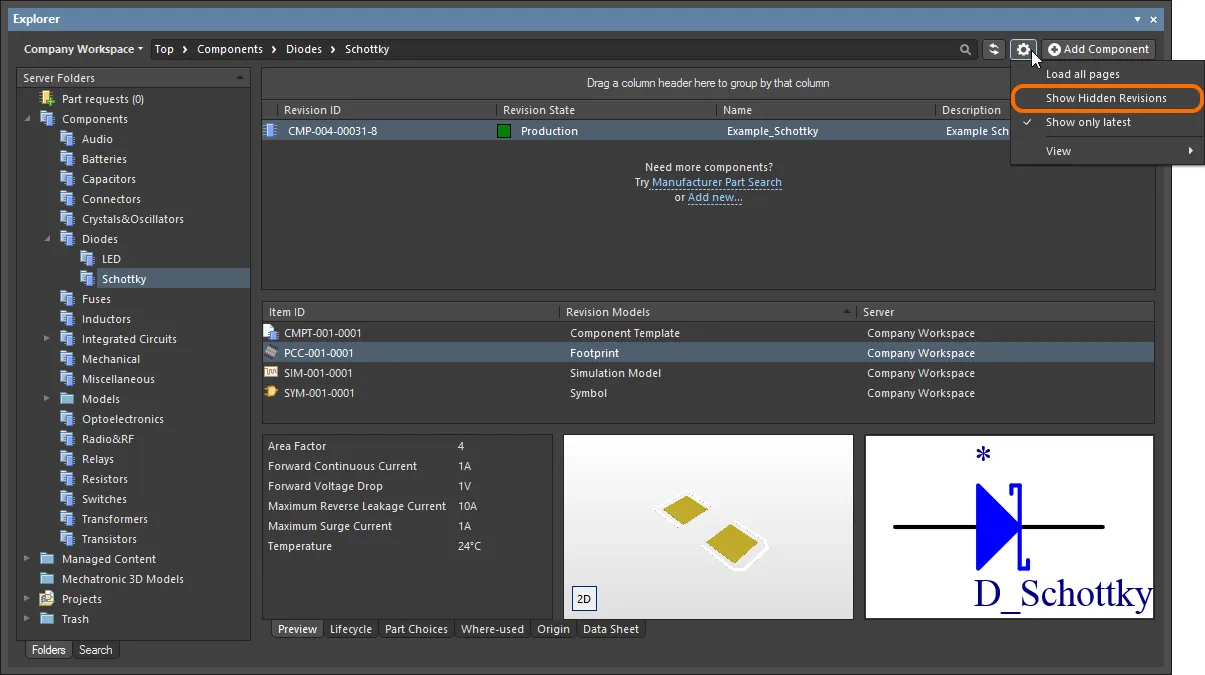
Explorer 패널에서 콘텐츠를 탐색하는 동안 숨겨진 항목 수정본 표시하기. 이미지 위로 마우스를 가져가면 결과를 확인할 수 있습니다.
적용할 수 없는 수정본에 플래그 지정
일반적으로 숨김(Visible in Vault panels 옵션 비활성화)으로 설정된 라이프사이클 State도 적용할 수 없게 됩니다(Allowed to be used in designs 옵션도 비활성화). 예를 들어 현재 Depracated 또는 Obsolete 상태인 컴포넌트의 리비전은 최신 디자인 스핀에 포함되지 않습니다! 예를 들어 컴포넌트를 볼 수 없으면 배치할 수 없듯이, 이러한 상태에 들어간 항목의 리비전을 숨기는 것은 한 가지 문제입니다. 하지만 이미 디자인에서 이러한 아이템 리비전의 인스턴스를 사용하고 있거나 탐색하는 동안 숨겨진 리비전이 표시되어 실수로 적용할 수 없는 컴포넌트의 리비전을 배치했을 수도 있습니다!
걱정하지 마세요. 컴파일 시 적용 불가능한 상태인 컴포넌트 항목 리비전을 잡는 것 외에도(다음 섹션 참조), 디자인 소프트웨어에서 직접 항목 리비전(컴포넌트 및 관리 시트)의 적용 가능 여부를 수동으로 조사할 수 있습니다. 이는 항목의 속성을 탐색할 때 Properties 패널을 사용하거나 Item Manager 을 통해 수행할 수 있습니다.
-
Properties panel - 이 패널을 사용하여 컴포넌트 또는 관리되는 도식 시트의 리비전 인스턴스의 속성을 탐색할 때 리비전 상태 항목의 오른쪽에 표시가 표시됩니다. 리비전이 적용 불가능한 상태(설계에 사용할 수 없음)인 경우 항목에 Not applicable 이 표시됩니다. 리비전이 적용 가능한 상태(설계에 사용 가능)인 경우 항목에는 리비전이 최신 버전(Up to date)이거나 그렇지 않은 버전(Out of date)이 표시됩니다.
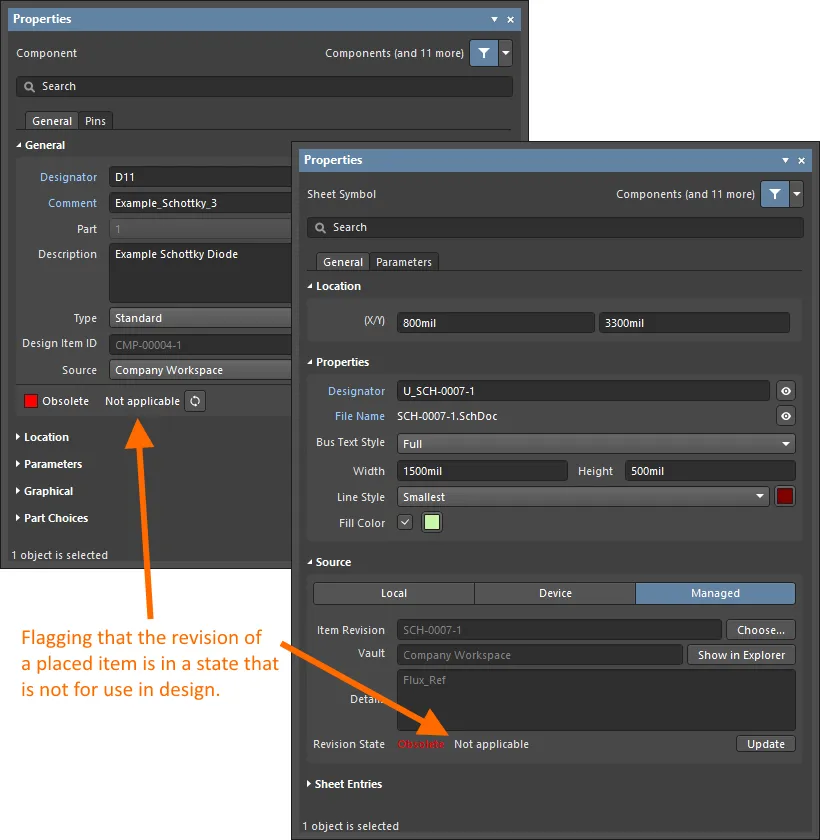
컴포넌트 및 관리되는 도식 시트의 개정판의 배치된 인스턴스에 대해 속성 수준에서 적용 불가능을 반영합니다.
-
Item Manager - 항목 관리자 대화 상자 (Tools » Item Manager)의 Revision Status 필드에 표시가 나타납니다. 리비전이 적용 불가능한 상태(설계에 사용할 수 없음)인 경우 항목에 Not applicable 이 표시됩니다. 리비전이 적용 가능한 상태(디자인에 사용 가능)인 경우 항목에 리비전이 최신 버전(Up to date)이거나 그렇지 않은 버전(Out of date)이 표시됩니다.
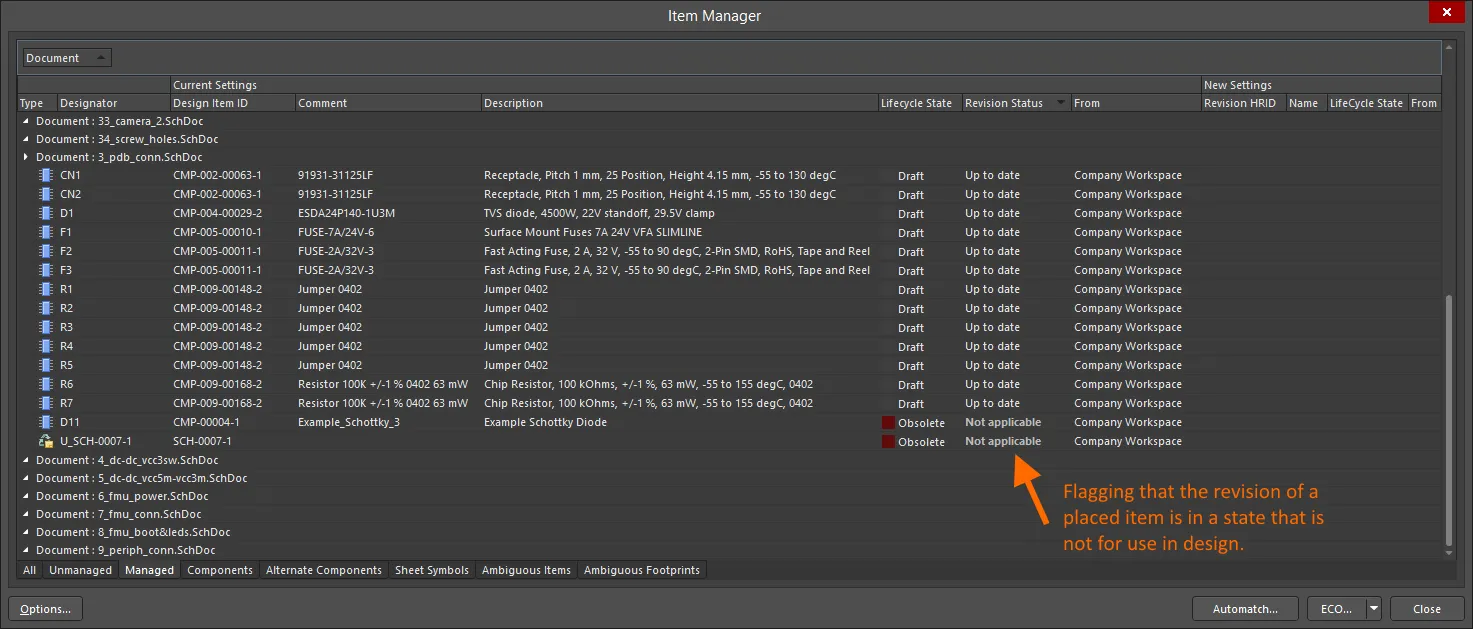
컴포넌트 및 관리되는 도식 시트의 배치된 개정판 인스턴스에 대해 Item Manager 대화 상자를 통해 적용 불가능을 반영합니다.
-
Properties 패널 또는 Item Manager 대화 상자에서 제공되는 컨트롤을 사용하여 해당 상태의 아이템( is )의 이후 버전을 선택하거나, 이것이 불가능한 경우(일반적으로 해당 아이템은 디자인용이 아닌 경우) 다른 아이템의 해당 버전을 선택하면 됩니다.
-
구성 요소 항목 리비전의 라이프사이클 State를 변경할 때(자세히 알아보기) Altium Designer는 참조된 하위 항목 리비전(템플릿 및 참조 모델)이 적용 가능한 상태인지 확인하여 해당 작업을 수행합니다. 그렇지 않으면 상태 전환 상태는 하위 항목 리비전이 적용 불가능한 상태임을 나타냅니다.
프로젝트 검증에서 적용 불가능한 수정 버전 상태 감지하기
컴포넌트 항목 리비전의 배치된 인스턴스의 경우 프로젝트 유효성 검사의 일부로 해당 리비전 상태의 적용 가능성을 확인할 수 있습니다. 이 검사의 핵심은 컴포넌트 리비전에 적용 불가능한 상태 위반 유형이 있다는 것이며, 이는 컴포넌트와 관련된 위반 카테고리의 일부입니다. Project Options 대화 상자의 오류 보고 탭에서 이 검사에 대한 보고 모드를 구성하세요.
이 위반 유형에 대한 기본값은
Report Mode 입니다
(  ).
). 디자인 요구 사항에 맞게 수정하세요.
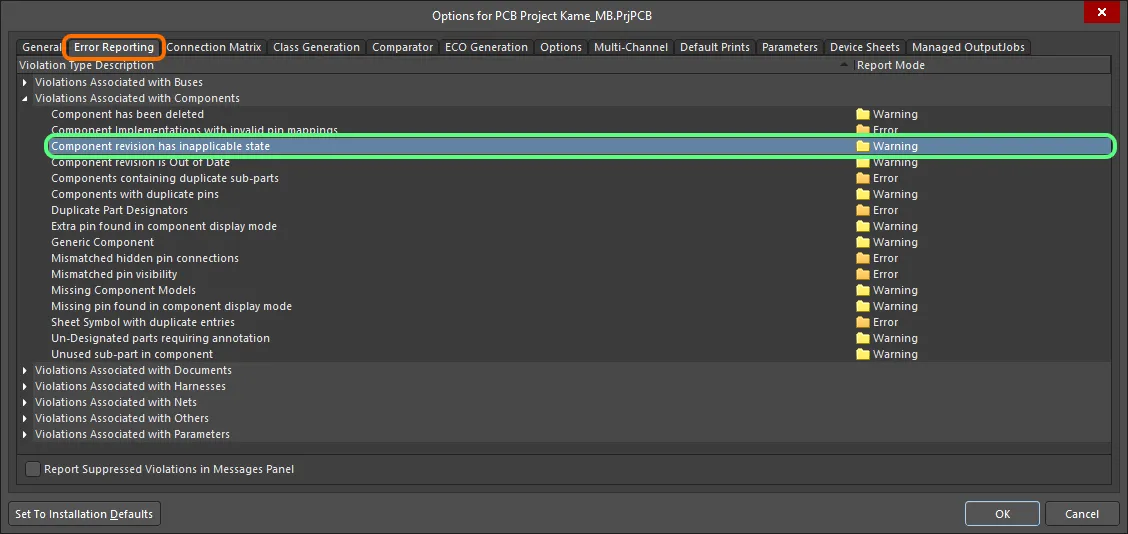
프로젝트 유효성 검사에는 적용할 수 없는 리비전 상태의 컴포넌트와 관련된 위반 사항이 있는지 확인하는 작업이 포함됩니다. 배치된 컴포넌트 항목 리비전의 라이프사이클 State가 설계 목적으로 허용되지 않는 것으로 지정된 경우 위반이 발생합니다.
컴파일러 오류 및 경고가 회로도에 표시되도록 활성화된 경우( Preferences 대화 상자의 회로도 - 컴파일러 페이지에서 활성화됨) 문제가 있는 객체는 그 아래에 색상이 지정된 물결무늬가 표시됩니다. 알림은 Messages 패널에도 다음 형식으로 표시됩니다:
Component : Component revision has inapplicable state,
어디에:
-
Designator 는 컴포넌트 인스턴스의 Designator 입니다.
-
Comment 는 컴포넌트 인스턴스의 Comment 입니다.

위반 예시(영향에 대해 치명적인 오류로 설정됨).
주의해야 할 사항
-
배치된 구성 요소가 배치된 연결된 워크스페이스와의 연결이 끊어지는 경우(예: 해당 워크스페이스의 연결이 끊어지거나 사용자가 워크스페이스에서 로그아웃되는 경우)
Component revision has inapplicable state 확인을 위반하게 됩니다. 이는 Messages 패널에 Component : Can't perform revision status validation: Failed to connect to server 이라는 형식의 항목과 함께 반영됩니다.
-
디자인 릴리스 프로세스 중에 디자인 내에서 잘못 사용되고 있는 컴포넌트를 포착할 수도 있습니다. Component State Checking 을 전체 릴리스 유효성 검사 체계에 추가하고 구성하기만 하면 됩니다. 자세한 내용은 컴포넌트 상태 유효성 검사하기를 참조하세요.