Defining the Substacks for Your PCB in Standard Rigid-Flex Mode in Altium Designer
Created: October 10, 2023 | Updated: October 10, 2023
There are two rigid-flex design modes available in Altium's PCB design software. The original, or standard mode, referred to as Rigid-Flex, supports simple rigid-flex designs. If your design has more complex rigid-flex requirements, such as overlapping flex regions, then you need the Advanced Rigid-Flex mode (also known as rigid-flex 2.0). The mode is chosen in Tools menu in the Layer Stack Manager.

The fundamental difference between the modes is that in the original mode, the board shape is split into separate board regions by placing a Split Line, and that Split Line remains as an object defining where one board region ends and another begins. In the Advanced mode each board region is placed separately, or if a larger region is Sliced it becomes two separate region objects. In the Advanced mode, the edges of adjacent board regions define where those two regions meet, not the presence of a Split Line. Because of this difference, there is no Split Line object when the board is in the Advanced Rigid-Flex mode.
► Learn more about Designing a Rigid-Flex PCB
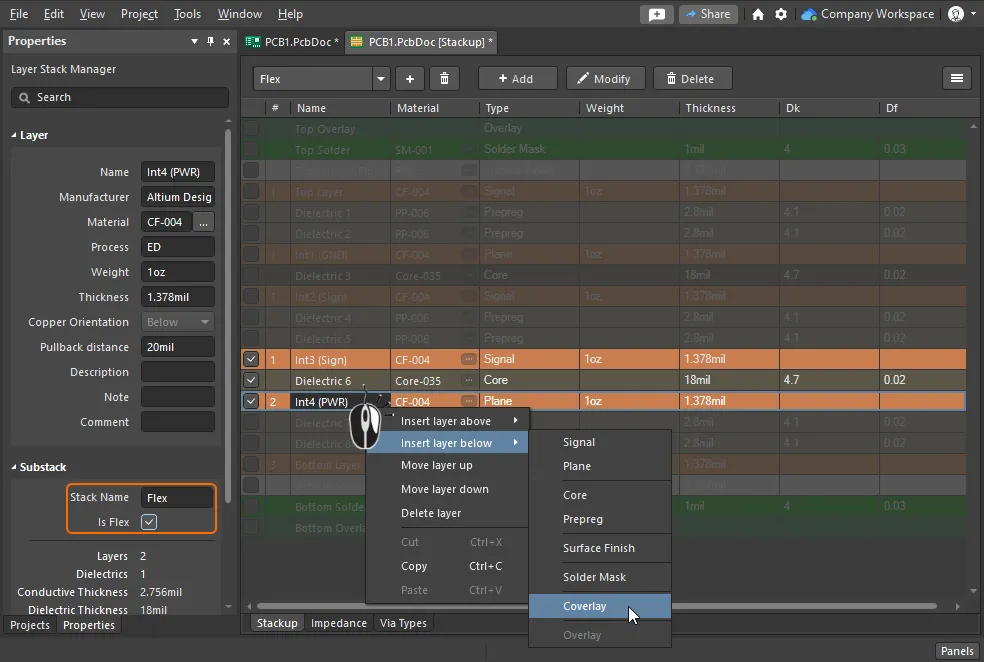
When the standard rigid-flex mode is selected in the Layer Stack Manager, the Substack Selector will appear in the display (as shown below), as well as buttons to add a new substack and delete the current substack.

The first step is to configure the layers required in the rigid-flex design.
Creating a new Flex substack:
-
Configure the layers required across the entire rigid-flex board, and Name the stack in the Properties panel. Learn more about working in the Layer Stack Manager.
-
Click the
 button to add a new substack, as shown above.
-
Check or clear the Checkbox for each layer so that only layers required in this flex substack are enabled.
-
Enable the Is Flex checkbox and Name the substack in the Properties panel.
-
To add additional layers, such as a Coverlay, right-click on the layer in the main editing window and select the required command from the context menu.

Enable/disable the layer checkboxes to configure the layers required in the flex substack, then add any additional layers needed in this substack.
만약 문제가 있으시다면, 텍스트/이미지를 선택하신 상태에서 Ctrl + Enter를 누르셔서 저희에게 피드백을 보내주세요.

 button to add a new substack, as shown above.


