제작 보드에서 부품이 차지하는 면적은 부품 풋프린트에 의해 정의됩니다. 일반적인 풋프린트에는 Pad와 컴포넌트 오버레이가 포함되며, 필요한 기타 기계적 세부 사항도 포함될 수 있습니다. 아래 풋프린트 예시에서는 대부분의 컴포넌트 윤곽이 (노란색) 오버레이가 아닌 기계 레이어(녹색 선)에 정의되어 있는데, 이는 이 컴포넌트가 보드의 컷아웃에 걸리도록 장착되기 때문입니다.

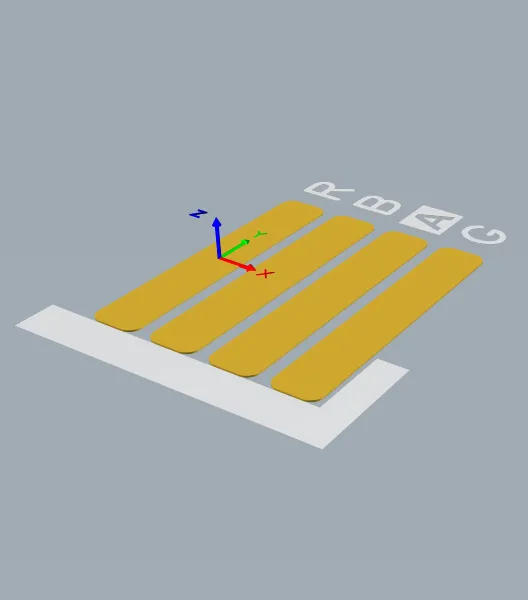
풋프린트는 컴포넌트가 차지하는 공간을 정의하고 컴포넌트 핀/Pad에서 보드의 라우팅까지 연결되는 지점을 제공합니다.
해당 풋프린트에 장착된 컴포넌트는 3D Body 개체를 사용하여 모델링할 수 있습니다. 3D Body 객체는 아래 이미지와 같이 일반 MCAD 형식 모델을 가져올 수 있는 컨테이너로 사용됩니다.
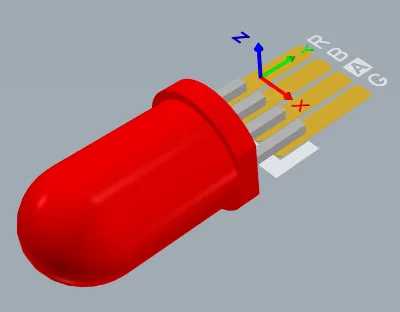
적합한 MCAD 모델을 3D Body 개체로 임포트할 수 있습니다.
Manufacturer Part Search 패널과 같이 기성품 PCB 부품을 제공하는 풍부한 리소스가 있더라도 커리어의 어느 시점에서 사용자 지정 PCB 부품을 생성해야 할 가능성이 높습니다. PCB 컴포넌트 풋프린트는 PCB Editor에서 사용할 수 있는 것과 동일한 기본 개체 세트를 사용하여 PCB 풋프린트 Editor에서 생성됩니다. 풋프린트 외에도 회사 로고, 제작 정의 및 보드 설계 시 필요한 기타 개체를 PCB 컴포넌트로 저장할 수 있습니다.
새 PCB 풋프린트 생성
풋프린트는 연결된 워크스페이스에서 직접 생성할 수 있습니다. 이렇게 하려면
-
메인 메뉴에서 File » New » Library 을 선택한 다음 열리는 New Library 대화 상자가 열리면 Create Library Content » Footprint 를 선택합니다 Workspace 영역을 선택합니다.
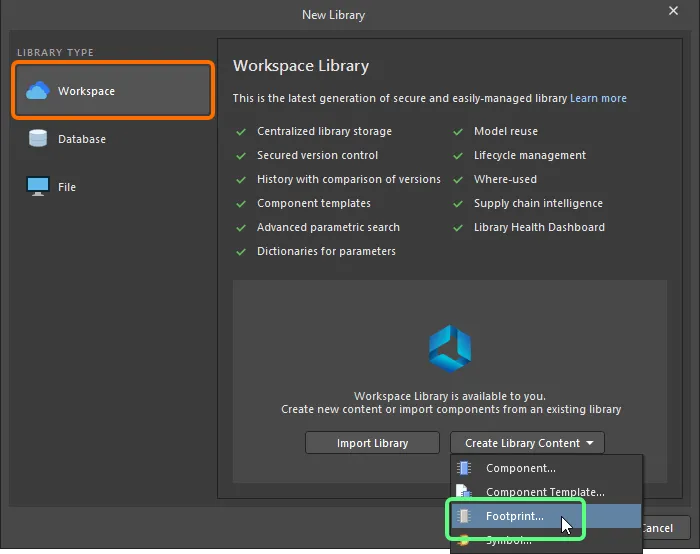
새 워크스페이스 풋프린트를 만들려면 New Library 대화상자
-
대화 상자가 열리면 Create New Item 대화 상자가 열리면 필요한 정보를 입력하고 Open for editing after creation 옵션이 활성화되어 있는지 확인하고 OK. 워크스페이스 풋프린트가 생성되고 임시 PCB 풋프린트 Editor가 열리면서 .PcbLib 문서가 활성 문서로 표시됩니다. 이 문서의 이름은 항목-수정본 형식에 따라 지정됩니다: - .PcbLib
PCC-001-0001-1.PcbLib). 이 문서를 사용하여 아래 설명된 대로 풋프린트를 정의합니다.
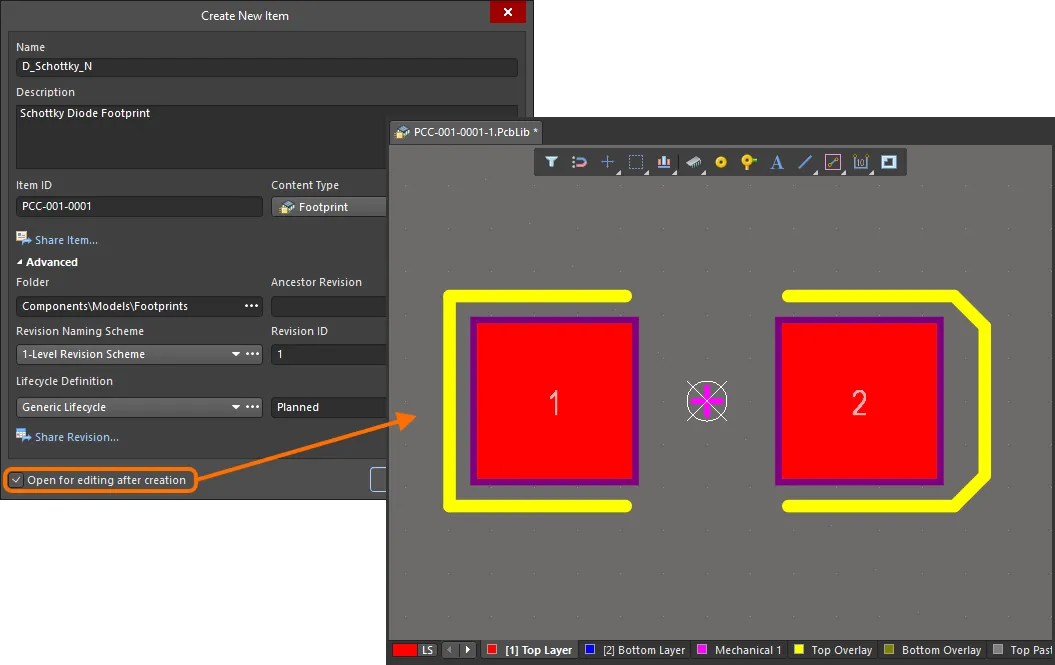
작업 공간 풋프린트의 초기 수정본 편집 예시 - 임시 PCB 풋프린트 Editor는 풋프린트를 정의할 수 있는 문서를 제공합니다.
-
풋프린트가 필요에 따라 정의되면 풋프린트 오른쪽에 있는 Save to Server 패널의 풋프린트 항목 오른쪽에 있는 Projects 패널의 오른쪽 컨트롤을 사용하여 작업 공간에 저장합니다. 그러면 Edit Revision 대화 상자가 나타나면 이름, 설명을 변경하고 필요에 따라 릴리즈 노트를 추가할 수 있습니다. 저장 후 문서와 Editor가 닫힙니다.
저장된 워크스페이스 풋프린트는 컴포넌트 Editor의 싱글 컴포넌트 편집 모드 또는 일괄 컴포넌트 편집 모드에서 컴포넌트를 정의할 때 사용할 수 있습니다.
작업 공간 풋프린트는 다음을 사용하여 찾아볼 수 있습니다 Components 패널을 사용하여 탐색할 수 있습니다. 패널 상단의  버튼을 클릭하고 모델 표시를 활성화한 다음 Models를 선택한 다음 Footprints 카테고리를 선택합니다.

워크스페이스 풋프린트를 편집하려면 해당 항목을 마우스 오른쪽 버튼으로 클릭하고 Components 패널에서 해당 항목을 마우스 오른쪽 버튼으로 클릭하고 Edit 명령을 선택합니다. 다시 한 번 임시 Editor가 열리고 편집할 수 있는 풋프린트가 열립니다. 필요에 따라 변경한 다음 문서를 워크스페이스 풋프린트의 다음 수정본에 저장합니다.
또한
싱글 컴포넌트 편집 모드 또는
일괄 컴포넌트 편집 모드에서 컴포넌트 Editor에서 해당 워크스페이스 컴포넌트 편집의 일부로 워크스페이스 컴포넌트가 사용 중인 워크스페이스 풋프린트를 바로 업데이트할 수도 있습니다.
Updating Related Component
심볼, 풋프린트 모델, 시뮬레이션 모델 등 워크스페이스 도메인 모델을 변경할 때 해당 변경 사항을 모델의 새 버전에 저장하는 순간 해당 모델을 사용하는 모든 워크스페이스 컴포넌트는 이전 버전을 사용하는 사실상 최신 버전이 됩니다. 대부분의 경우, 사용 가능한 최신 버전을 사용하도록 각 모델 링크를 업데이트하여 해당 워크스페이스 컴포넌트를 다시 저장해야 할 것입니다. 이 프로세스를 간소화하기 위해 작업 공간은 Altium Designer와 함께 직접 편집 기능을 통해 해당 모델을 수정한 후 작업 공간 모델을 다시 저장하는 시점에 관련 컴포넌트를 업데이트할 수 있는 기능을 제공합니다.
상위 컴포넌트에 대한 이 업데이트를 수행하는 옵션은 수정된 모델을 저장할 때 나타나는 Create Revision 수정한 워크스페이스 풋프린트를 대상 워크스페이스에 다시 저장할 때 표시되는 대화 상자에서 찾을 수 있습니다. 이 옵션 - Update items related to - 은 기본적으로 활성화되어 있습니다.

다시 저장되는 워크스페이스 풋프린트를 참조하는 관련 워크스페이스 컴포넌트를 업데이트하는 옵션에 액세스합니다.
현재 버전의 워크스페이스 풋프린트를 사용하여 모든 관련 컴포넌트를 유지하려면 이 옵션을 비활성화하세요. 그러면 워크스페이스 모델 자체만 저장됩니다.
작업 영역에서 OK 을 클릭하면 Create Revision 대화 상자를 클릭하면 수정된 풋프린트가 워크스페이스에 다시 저장되고 관련 임시 Editor가 닫힙니다. 해당 워크스페이스 풋프린트를 참조하는 모든 워크스페이스 컴포넌트는 새 리비전을 자동으로 사용하도록 다시 저장됩니다(각 컴포넌트의 다음 리비전이 자동으로 생성되고 저장이 수행됨).
-
디자이너의 관점에서 보면, 작업 공간 컴포넌트는 모든 디자인 도메인에서 해당 컴포넌트를 표현하는 데 필요한 모든 정보를 싱글 엔티티 내에서 수집합니다. 따라서 모든 도메인 모델과 파라메트릭 정보가 저장되는 '버킷'이라는 점에서 컨테이너로 생각할 수 있습니다. 다양한 도메인에서의 표현 측면에서 보면, 워크스페이스 컴포넌트는 워크스페이스 도메인 모델 자체를 포함하지 않고 이러한 모델에 대한 링크만 포함합니다. 이러한 링크는 컴포넌트를 정의할 때 지정됩니다.
-
PCB 풋프린트는 기존의 이전 세대 컴포넌트 라이브러리(SchLib, PcbLib, IntLib, DbLib, SVNDbLib)를 가져오는 과정에서 워크스페이스에서 생성할 수도 있습니다. 이 프로세스에 대한 인터페이스인 Library Importer - 는 처음에 선택한 라이브러리를 가져와서 워크스페이스로 가져오는 직관적인 흐름을 제공합니다. 라이브러리 임포터에 대해 자세히 알아보세요.
-
컴포넌트 Editor의 싱글 컴포넌트 편집 모드에서 워크스페이스 컴포넌트를 정의할 때 새 워크스페이스 풋프린트를 생성할 수도 있습니다.
-
풋프린트는 File Based PCB 풋프린트 라이브러리의 일부로 생성할 수도 있습니다.
PCB 풋프린트 정의하기
풋프린트는 PCB 에디터에서 사용할 수 있는 동일한 도구 및 설계 객체 세트를 사용하여 보드의 최종 면에 관계없이 항상 상단에 제작됩니다. 부품 배치 중에 풋프린트를 기판의 반대쪽으로 뒤집으면 표면 실장 Pad 및 솔더 마스크 정의와 같은 레이어별 특성이 적절한 하단 레이어로 자동으로 전송됩니다.
디자인 개체는 모든 레이어에 배치할 수 있지만, 일반적으로 윤곽선은 상단 오버레이(실크스크린) 레이어에 생성되고 Pad는 멀티 레이어(스루홀 부품 핀용) 또는 상단 신호 레이어(표면 실장 부품 핀용)에 생성됩니다. PCB에 풋프린트를 배치하면 풋프린트를 구성하는 모든 개체가 정의된 레이어에 할당됩니다.
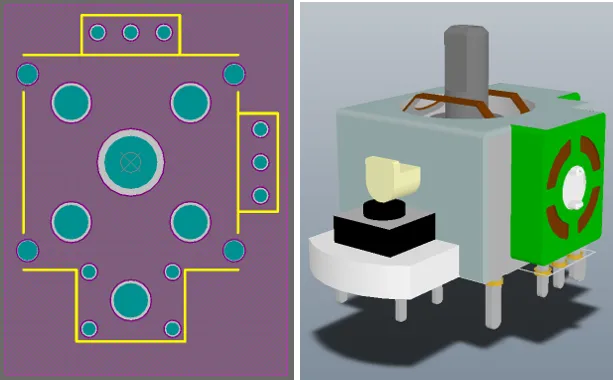
조이스틱 컴포넌트 풋프린트의 2D 및 3D 뷰. 3D 이미지는 컴포넌트에 대해 임포트된 STEP 모델을 보여줍니다. Pad와 컴포넌트 오버레이는 STEP 모델 아래에서 볼 수 있습니다.
이 페이지에 표시된 풋프린트는 필요한 절차를 설명하기 위한 것으로 치수가 정확하지 않습니다. 새 풋프린트의 사양은 항상 제조업체의 데이터시트와 비교하여 확인하세요.
컴포넌트 풋프린트를 수동으로 생성하는 일반적인 순서는 다음과 같습니다:
-
디자인 공간 준비: 스냅 옵션 정의, 그리드 및 가이드 구성 - 자세히 알아보기.
-
풋프린트는 PCB 풋프린트 에디터의 중앙에 있는 설계 공간 기준점을 중심으로 작성해야 합니다. 이 기준점은 실제로 설계 공간의 상대적 원점이며, 배치 및 이동 작업에서 커서가 부품 풋프린트를 선택하는 지점입니다(현재( Object Snap Options 에 따라 PCB Editor – General 페이지의 Preferences 대화 상자의 현재 페이지에 따라 다름). 바로 가기 키를 사용하여 J, R 단축키를 사용하여 기준점으로 바로 이동합니다. 풋프린트 작성을 시작하기 전에 참조 지점으로 이동하는 것을 잊은 경우 참조 Pad를 풋프린트로 가져올 수 있습니다 Edit » Set Reference 하위 메뉴 명령을 사용하면 됩니다:
-
Pin 1 - 컴포넌트 기준점을 컴포넌트 풋프린트의 핀 1로 설정합니다.
-
Center - 컴포넌트 기준점을 컴포넌트 풋프린트의 중앙으로 설정합니다.
-
Location - 컴포넌트 기준점을 사용자 정의 위치로 설정합니다.
선택한 지점은 0,0 으로 설정되며, 이 지점이 새로운 상대 원점이 되고 모든 프리미티브의 위치가 이 지점을 기준으로 업데이트됩니다.
-
Pad (Place » Pad)를 컴포넌트 요구 사항에 따라 배치합니다. Pad 배치 명령을 실행한 후 첫 번째 Pad를 배치하기 전에 Tab 키를 눌러 Properties 패널을 열어 Pad를 포함한 모든 Pad 속성을 정의합니다 Designator, Size and Shape, Layer및 Hole Size (스루홀 Pad의 경우). Designator는 이후 Pad 배치에 따라 자동으로 증가합니다. 표면 마운트 Pad의 경우 Layer 를 Top Layer. 스루홀 Pad의 경우, Designator를 Layer 를 Multi-Layer.
일부 발자국에는 불규칙한 모양의 Pad가 필요합니다. 이 작업은 사용자 지정 모양의 Pad 개체를 사용하여 수행할 수 있습니다. 자세히 알아보려면
Pad Stack 사용자 지정하기 페이지를 참조하세요.
-
새 컴포넌트 풋프린트를 생성할 때 가장 중요한 절차 중 하나는 컴포넌트를 PCB에 납땜하는 데 사용할 Pad를 배치하는 것입니다. Pad는 실제 디바이스의 핀과 일치하는 정확한 위치에 배치해야 합니다.
-
Pad를 지정할 때는 Altium Designer가 회로도 기호의 핀 번호에서 매핑할 때 사용하는 속성이므로 Pad를 지정할 때도 약간의 주의를 기울여야 합니다.
-
Pad를 정확하게 배치하려면 작업 전용 그리드를 설정하는 것이 좋습니다. 단축키를 사용하여 Ctrl+G 단축키를 사용하여 직교 그리드 Editor 대화 상자를 열고 키와 Q 키를 사용하여 그리드를 영국식 눈금에서 미터법으로 전환합니다.
-
마우스로 이동하는 동안 Pad를 정확하게 배치하려면 키보드 화살표 키를 사용하여 현재 그리드 단위로 커서를 이동합니다. 또한 Shift 을 길게 누르면 그리드의 10배 단위로 이동합니다. 현재 X, Y 위치는 상태 표시줄과 헤드업 디스플레이에도 표시됩니다. 헤드업 디스플레이에는 마지막 클릭 위치에서 현재 커서 위치까지의 위치 및 델타가 모두 표시됩니다. 단축키를 사용하여 Shift+H 단축키를 사용하여 헤드업 디스플레이를 켜고 끕니다. 또는 두 번 클릭하여 배치된 Pad를 편집하고 필요한 X 및 Y 위치를 Properties 패널에 입력합니다.
-
디자인 공간에서 두 점 사이의 거리를 확인하려면 Reports » Measure Distance (단축키 Ctrl+M). 상태 표시줄의 지시를 따릅니다.
-
솔더 마스크 및 페이스트 마스크와 같은 Pad별 속성은 Pad 치수 및 해당 마스크 디자인 규칙에 따라 자동으로 계산됩니다. 각 Pad에 대해 마스크 설정을 수동으로 정의할 수 있지만, 이렇게 하면 나중에 보드 디자인 프로세스 중에 이러한 설정을 수정하기가 어렵습니다. 일반적으로 이 작업은 설계 규칙으로 Pad를 타겟팅할 수 없는 경우에만 수행됩니다. 규칙은 보드 설계 중에 PCB Editor에서 정의됩니다.
-
Track, 호 및 기타 기본 개체를 사용하여 상단 오버레이 레이어의 PCB 실크스크린에 표시되는 컴포넌트 윤곽을 정의합니다. 배치 중에 컴포넌트가 보드 하단으로 뒤집히면 오버레이가 자동으로 하단 오버레이 레이어로 전송됩니다.
-
기계식 레이어에 Track 및 기타 기본 개체를 배치하여 배치 코트야드 같은 추가적인 기계적 디테일을 정의할 수 있습니다. 메카니컬 레이어는 범용 레이어입니다. 이러한 레이어의 기능을 할당하고 해당 레이어의 풋프린트 전체에 걸쳐 일관되게 사용해야 합니다.
-
3D Body 오브젝트를 배치하여 PCB에 장착할 물리적 컴포넌트의 3차원 모양을 정의합니다.
-
Designator 및 Comment 문자열은 PCB 디자인 공간에 배치하는 동안 풋프린트의 오버레이 레이어에 자동으로 추가됩니다. 추가 Designator 및 Comment 문자열을 포함하려면 .Designator 및 .Comment 특수 문자열을 배치하여 추가할 수 있습니다.
Designator 및 Comment 문자열을 배치할 때는 PCB 에디터에서 레이어 쌍을 정의해야 합니다. 이렇게 하면 스트링이 부품이 장착된 보드의 측면에 묶이고 부품을 뒤집으면 보드의 반대편으로 뒤집혀야 합니다. 자세한 내용은 아래의
특수 레이어별 요구 사항 처리 섹션을 참조하세요.
-
풋프린트의 속성(예: 이름 및 설명)을 정의합니다 Footprint 탭의 Properties 패널의 Library Options 모드(디자인 공간에 선택된 오브젝트가 없을 때 활성화되며, 메인 메뉴의 Tools » Footprint Properties 명령을 사용하여 액세스할 수 있습니다.) 패널의 탭에서 사용할 수 있는 옵션 및 컨트롤에 대해 자세히 알아보려면 아래 섹션을 참조하세요 Footprint 탭에서 사용할 수 있는 옵션과 제어 기능에 대해 자세히 알아보려면 아래 섹션을 참조하세요.
-
모든 풋프린트에서 표준화된 Pad/비아 정의를 위해 Pad/비아 라이브러리(*.PvLib)를 Pad/비아 배치에 사용할 수 있습니다( 자세히 알아보기).
-
PCB 풋프린트 에디터는 풋프린트 생성 프로세스를 빠르게 진행할 수 있는 마법사도 제공합니다:
-
는 IPC Compliant Footprint Wizard – 는 IPC 표준 7351의 리비전 B를 완벽하게 준수하는 PCB 풋프린트를 생성합니다 Generic Requirements for Surface Mount Design and Land Pattern Standard - 자세히 알아보기.
-
The IPC Compliant Footprints Batch Generator –File Based PCB 풋프린트 라이브러리로 작업할 때는 IPC Compliant Footprints Batch Generator 을 사용하여 여러 밀도 수준에서 여러 풋프린트를 빠르게 생성할 수 있습니다 - 자세히 알아보세요.
-
를 사용하면 Footprint Wizard - 를 사용하면 다양한 패키지 유형 중에서 선택하고 적절한 정보를 입력하면 컴포넌트 풋프린트를 빌드할 수 있습니다 - 자세히 알아보기.
디자인 공간 준비하기
기본값은 점을 사용하여 그리드를 표시하는 것입니다. 원하는 경우 그리드를 선으로 표시할 수 있습니다. 이 설정은 Grid Editor 대화 상자에서 설정할 수 있으며 Properties 버튼을 클릭하여 액세스하는 대화 상자에서 설정할 수 있습니다 Properties 패널의 버튼을 클릭하여 액세스할 수 있습니다. 또는 Ctrl+G 단축키를 눌러 대화 상자를 열 수도 있습니다.
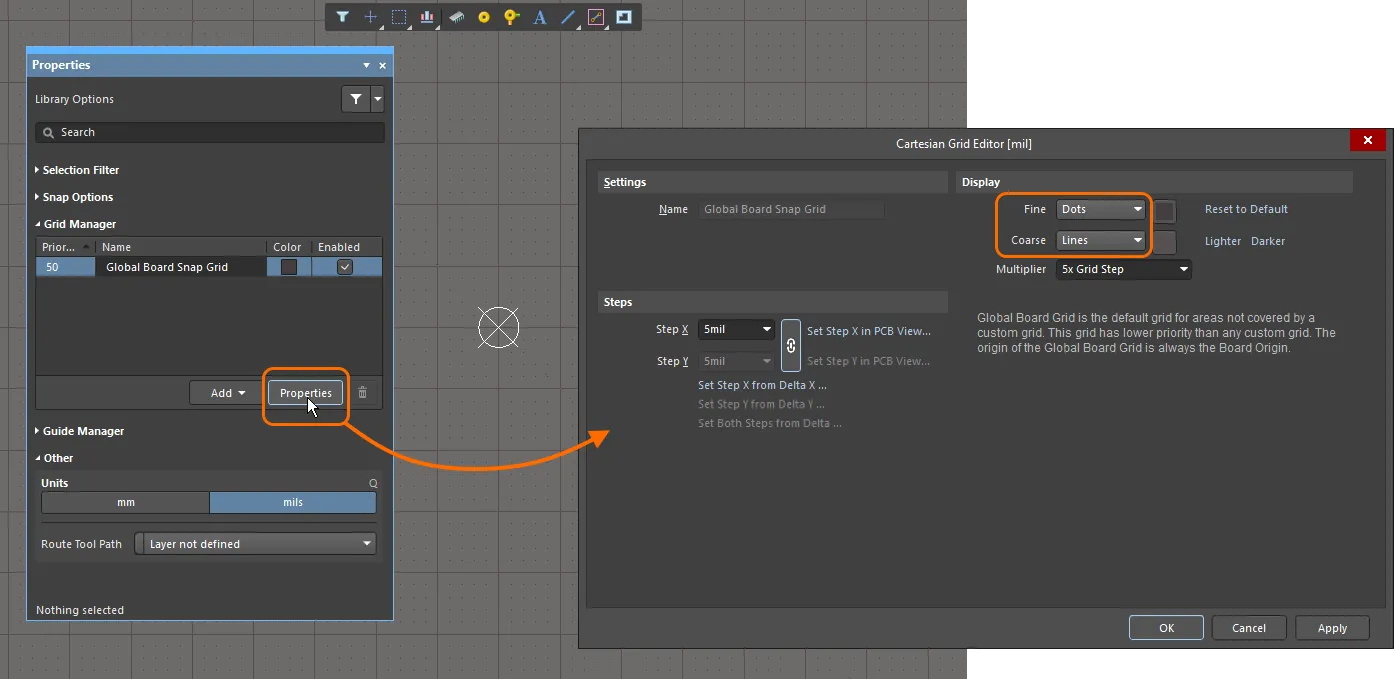
이미지에서 세밀한 격자는 점으로 표시되고 거친 격자는 선으로 표시됩니다.
속성 패널
PCB 풋프린트 Editor에서 풋프린트를 편집할 때 디자인 공간에 현재 선택된 디자인 개체가 없으면 Properties 패널에는 Library Options.
다음 접을 수 있는 섹션에는 패널의 탭에서 사용할 수 있는 옵션 및 컨트롤에 대한 정보가 포함되어 있습니다 General 탭에서 사용할 수 있는 옵션 및 컨트롤에 대한 정보가 포함되어 있습니다:
Selection Filter
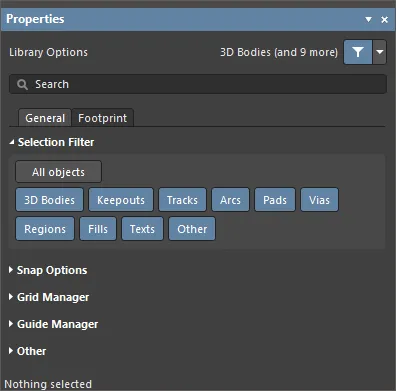
패널의 이 섹션에 있는 옵션에 따라 디자인 공간에서 선택할 수 있는 PCB 풋프린트 개체가 결정됩니다.
-
All Objects 버튼 - 모든 유형의 개체를 선택할 수 있도록 개체 필터링 제거를 선택합니다.
-
Object 버튼 - 각 개체 버튼을 토글하여 해당 개체 유형을 선택할 수 있는 기능을 활성화/비활성화합니다.
Snap Options
-
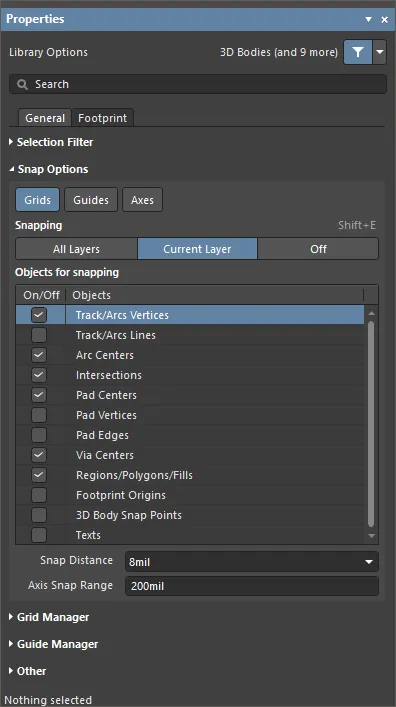
Grids - 커서를 활성 디자인 공간 그리드에 스냅할지 여부를 전환하는 데 사용됩니다. 이 옵션을 활성화하면 커서가 가장 가까운 스냅 격자 위치로 당겨지거나 스냅됩니다. 활성 스냅 그리드는 상태 표시줄과 PCB Editor 헤즈업 디스플레이(Shift+H 단축키를 사용하여 켜고 끌 수 있습니다.)
-
Guides - 커서를 수동으로 배치된 선형 스냅 가이드 또는 점 스냅 가이드에 스냅할지 여부를 전환하는 데 사용됩니다. 스냅 가이드는 스냅 그리드보다 우선합니다.
-
Axes - 스냅을 위해 활성화된 오브젝트에 커서를 축 방향으로 정렬할지(X 또는 Y 방향) 여부를 전환하는 데 사용됩니다. 스냅 그리드 Axis Snap Range 는 X 또는 Y 축 정렬이 수행되는 거리를 정의합니다. 현재 커서 위치에서 축 정렬된 개체 스냅 지점(핫스팟)까지 정렬이 이루어지면 동적 정렬 가이드 라인이 표시됩니다.
-
Snapping - 직접 선택하거나 Shift+E 단축키를 사용하여 개체에 스냅할지 여부를 선택합니다:
-
All Layers - 이 옵션을 활성화하면 커서가 보이는 레이어의 모든 전기 개체에 스냅할 수 있습니다.
-
Current Layer - 이 옵션을 활성화하면 커서가 현재 선택된 레이어에 있는 개체만 인식하고 스냅할 수 있습니다.
-
Off - 핫스팟에 스냅을 해제하려면 이 옵션을 활성화합니다.
-
Objects for snapping
-
On/Off - 를 체크하여 원하는 개체에 대해 스냅을 활성화합니다.
-
Objects - 사용 가능한 개체 목록을 표시합니다.
-
Snap Distance - 커서가 활성화된 개체 스냅 지점으로부터 이 거리 내에 있으면(활성 레이어에 대해 스냅이 활성화되어 있으면) 커서가 해당 지점에 스냅됩니다.
-
Axis Snap Range - 커서가 축 방향으로 정렬되어 있고 활성화된 개체 스냅 지점으로부터 이 거리 내에 있을 때( Axes 버튼이 활성화된 경우) 정렬이 완료되었음을 나타내는 동적 가이드 라인이 표시됩니다.
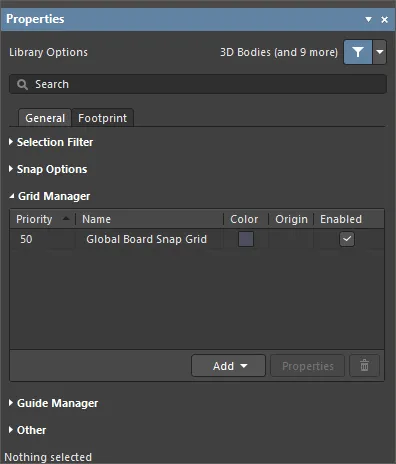
Grid Manager
-
Grid Manager - 보드의 기본 스냅 그리드뿐만 아니라 로컬 사용자 지정 그리드를 정의하고 관리할 수 있습니다.
-
Priority - 디자인 공간에서 우선 순위는 그리기 순서에 따라 구분됩니다. 우선순위가 가장 높은 그리드(우선순위
1)이 다른 모든 그리드보다 앞에 그려지고, 그 다음 우선 순위가 높은 그리드( 2등의 우선순위를 가진 그리드(기본값 Global Board Snap Grid까지는 다른 모든 사용자 지정 그리드 뒤에 그려집니다.
-
Name - 는 그리드 이름을 표시합니다.
-
Color - 클릭하여 관련 그리드의 색상을 설정/변경하는 드롭다운을 엽니다.
-
Enabled - 체크하면 연결된 그리드가 활성화됩니다.
-
Add
-
Add Cartesian Grid - 을 클릭하여 데카르트 격자를 추가합니다.
-
Add Polar Grid - 클릭하여 극좌표 격자를 추가합니다. 폴라 그리드를 사용하면 직사각형이 아닌 피처와 보드를 더 쉽게 디자인할 수 있습니다.
-
Properties - 클릭하여 해당 그리드 Editor 대화상자(직교 그리드 Editor 또는 극좌표 그리드 Editor)를 열어 선택한 그리드의 속성을 수정합니다.
-
 - 현재 선택된 그리드를 삭제하려면 클릭합니다.
Guide Manager
-
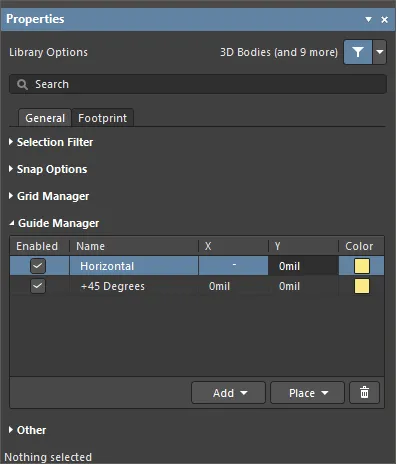
Guide Manager - 보드에 대한 다양한 수동 스냅 가이드와 스냅 포인트를 정의하고 관리할 수 있습니다.
-
Add - 을 클릭하여 새 스냅 가이드 또는 스냅 포인트를 추가합니다. 관련 메뉴에서 필요한 가이드 유형에 해당하는 명령을 선택하면 새 가이드/포인트의 항목이 그리드에 추가됩니다. 다음 가이드 유형을 사용할 수 있습니다:
-
Add Horizontal Guide - 이 명령을 사용하여 디자인 공간에서 원하는 Y 좌표 위치에 가로 안내선을 추가합니다.
-
Add Vertical Guide - 이 명령을 사용하여 디자인 공간에서 원하는 X 좌표 위치에 수직 안내선을 추가합니다.
-
Add +45 Guide - 이 명령을 사용하여 디자인 공간에서 원하는 X,Y 좌표 위치를 통과하는 45도(y=x) 안내선을 추가하여 디자인 공간에서 원하는 X,Y 좌표 위치를 통과합니다.
-
Add -45 Guide - 이 명령을 사용하여 -45도(y=-x) 안내선을 추가하여 디자인 공간에서 원하는 X,Y 좌표 위치를 통과합니다.
-
Add Snap Point - 포인트 스냅 안내선을 추가하려면 이 명령을 사용합니다. 기본 스냅 격자의 범위 내에서 수동으로 표시하는 핫스팟입니다. 개체를 배치하거나 이동하는 등의 대화형 프로세스 중에 개체의 핫스팟이 포인트 스냅 가이드에 근접하면 해당 개체의 핫스팟이 포인트 스냅 가이드에 '스냅'됩니다.
-
Place - 를 클릭하여 가이드를 배치합니다. 드롭다운에서 가이드 유형을 선택합니다:
-
Place Horizontal Guide - 이 명령을 사용하여 디자인 공간에서 원하는 Y 좌표 위치에 수평 안내선을 배치합니다.
-
Place Vertical Guide - 이 명령을 사용하여 디자인 공간에서 원하는 X 좌표 위치에 수직 안내선을 배치합니다.
-
Place +45 Guide - 이 명령을 사용하여 디자인 공간에서 원하는 X,Y 좌표 위치를 통과하는 45도(y=x) 안내선을 디자인 공간에서 원하는 X,Y 좌표 위치를 통과하는 위치에 배치합니다.
-
Place -45 Guide - 이 명령을 사용하여 디자인 공간에 -45도 (y=-x) 안내선을 디자인 공간에서 원하는 X,Y 좌표 위치를 통과하도록 배치합니다.
-
Place Snap Point - 포인트 스냅 안내선을 배치하려면 이 명령을 사용합니다. 기본 스냅 격자의 범위 내에서 수동으로 표시하는 핫스팟입니다. 개체를 배치하거나 이동하는 등의 대화형 프로세스 중에 개체의 핫스팟이 포인트 스냅 가이드에 근접하면 해당 개체의 핫스팟이 포인트 스냅 가이드에 '스냅'됩니다.
-
 - 현재 선택된 가이드를 삭제하려면 클릭합니다.
Other
-
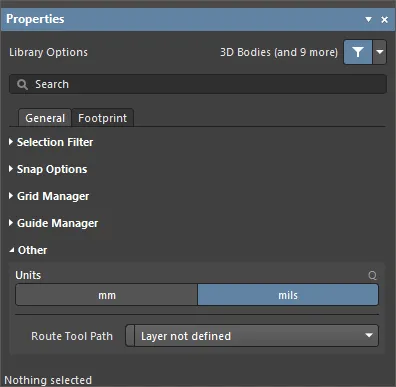
Units - 를 사용하여 현재 PCB 풋프린트 문서의 기본 측정 단위를 선택합니다. 기본 단위는 화면이나 보고서에 거리 관련 정보를 표시하는 데 사용됩니다. 거리 관련 정보를 지정할 때 단위의 접미사(mm 또는 mil)를 입력하지 않으면 항상 기본 단위가 사용됩니다.
-
Route Tool Path - 드롭다운을 사용하여 보드의 경로 도구 경로를 정의할 기계 레이어(현재 디자인에서 사용하도록 활성화된 모든 레이어 중에서)를 선택합니다.
다음 접을 수 있는 섹션에는 패널의 옵션 및 컨트롤에 대한 정보가 포함되어 있습니다 Footprint 탭에서 사용할 수 있는 옵션 및 컨트롤에 대한 정보가 포함되어 있습니다:
풋프린트 속성을 정의하는 기능은 Footprint 탭을 사용하여 풋프린트 속성을 정의하는 기능은 Properties 패널의 탭을 사용하여 풋프린트 속성을 정의하는 기능은 고급 설정 대화 상자에서 PCB.FootprintParameters 옵션이 활성화되어 있을 때 사용할 수 있습니다. 이 옵션이 비활성화되어 있으면 풋프린트 속성은 PCB Library Footprint 대화 상자( )를 선택하거나 주 메뉴에서 Tools » Footprint Properties 명령을 선택하여 액세스하거나 기본 메뉴에서 풋프린트 항목( Footprints 영역에서 풋프린트 항목을 선택하고 PCB Library 패널의 영역에서 풋프린트 항목을 선택하고 Edit 단추를 클릭하거나, 패널 영역의 Footprints 영역의 PCB Library 패널 영역에서 발자국 항목을 두 번 클릭합니다.
디자인 개체를 선택하면 패널에 해당 개체 유형에 맞는 옵션이 표시됩니다. 다음 표에는 PCB 풋프린트 디자인 공간 내에 배치할 수 있는 오브젝트 유형이 나열되어 있으며 링크를 클릭하면 해당 오브젝트의 속성 페이지에 액세스할 수 있습니다.
솔더 및 페이스트 마스크 확장
PCB 풋프린트 에디터에서 솔더 및/또는 페이스트 마스크가 올바르게 정의되었는지 확인하려면 View Configuation Panel을 열고 각 마스크 레이어에 대해 표시 옵션( ) 옵션을 활성화합니다.
상단 솔더 마스크 레이어의 색상에서 각 Pad 가장자리 주위에 나타나는 링은 다중 레이어 Pad 아래에서 확장량만큼 튀어나온 솔더 마스크 모양의 가장자리를 나타냅니다 multi-layer 는 레이어 그리기 순서에서 맨 위에 그려집니다. 는 Layer Drawing Order 는 PCB Editor - 디스플레이 페이지의 Preferences 대화 상자).
아래 이미지는 각 Pad 가장자리 주위에 보라색(상단 솔더 마스크 레이어의 색상) 테두리가 있는 PCB 풋프린트를 보여줍니다.

레이어를 빠르게 이동하려면 싱글 레이어 모드(Shift+S)와 함께 싱글 레이어 모드( Ctrl+Shift+Wheel roll.
기본적으로 마스크 레이어에 생성되는 모양은 Pad 모양이며, 풋프린트가 배치되는 PCB에 설정된 Solder Mask Expansion 및 Paste Mask Expansion디자인 규칙에 지정된 양만큼 확장 또는 축소됩니다. 경우에 따라 확장 디자인 규칙을 재정의하고 마스크 확장을 Pad 속성으로 지정하거나, 미리 정의된 표준 마스크 모양 세트에서 선택하거나, 사용자 지정 모양을 만들어야 할 수도 있습니다. 이러한 경우 선택한 Pad에 대해 Paste/납땜 마스크를 구성할 수 있습니다 Properties 패널 - 자세히 알아보기. 또는 필요한 마스크 레이어에 적절한 기본 요소(영역, Track 등)를 배치할 수 있습니다.
파라미터 지원
Altium Designer의 개체에 적용되는 파라미터는 PCB 설계에 추가 정보를 추가할 수 있는 강력하고 유연한 수단을 제공합니다. 상위 개체의 속성으로 적용되는 파라미터는 프로젝트, 문서, 템플릿 및 설계 문서 내의 개별 개체를 포함하여 다양한 수준에서 적용될 수 있습니다.
PCB 공간에서 사용할 수 있는 매개변수는 쿼리, 디자인 규칙, 스크립트 및 배리언트를 필터링하는 데 사용할 수 있으며, 배치된 풋프린트에서 사용자 지정 문자열을 호출하기 위해 PCB 컴포넌트 풋프린트에 적용할 수 있습니다.
엔지니어링 변경 주문(ECO)을 통한 파라미터
PCB 파라미터 기능은 ECO 메커니즘과 PCB 문서에 포함된 기능을 기반으로 하며, 이를 통해 사용자 정의 컴포넌트 파라미터를 PCB 공간에 전송하고 유지할 수 있습니다. 이는 단방향 전송이며 전달된 파라미터는 PCB 도메인에서 읽기 전용입니다.
파라미터 전송은 회로도에서 PCB로 ECO를 생성하고 Design » Update PCB Document 메뉴 명령으로 ECO를 생성합니다.

ECO가 실행되면( Execute Changes 버튼 사용)을 실행하면 새로운 사용자 정의 회로도 컴포넌트 파라미터가 PCB 설계의 해당 풋프린트 레퍼런스로 전송됩니다.
파라미터의 감지 및 PCB로의 마이그레이션은 프로젝트의 옵션 설정에 따라 결정됩니다(Project » Project Options). 대화 상자에서 Project Options 대화 상자에서 차이 감지 및 수정 동작을 설정합니다 Differences Associated with Parameters 섹션의 Comparator 탭과 Modifications Associated with Parameters 탭의 ECO Generation 탭의 섹션에서 설정합니다.
PCB Editor에서 전송된 파라미터를 보려면 컴포넌트를 두 번 클릭하여 패널을 열고 Properties 패널을 연 다음 Parameters 탭을 선택합니다. 탭에는 선택한 컴포넌트 풋프린트에 할당된 현재 사용자 파라미터가 나열됩니다. 선택한 컴포넌트 풋프린트에 대한 파라미터도 Components 패널에서도 사용할 수 있습니다.
정보 참조 링크
PCB 도메인은 회로도에서 미리 정의된 ComponentLink 파라미터를 자동으로 받아들입니다. 이는 일반적으로 특정 파일 또는 인터넷 위치(일반적으로 제조업체 웹 사이트 또는 데이터시트 URL)에 대한 데이터 참조 링크를 설정하는 매개변수 쌍(설명 및 링크 URL)으로 정의됩니다.
회로도와 PCB 설계 공간 모두에서 링크는 컴포넌트 위로 마우스를 가져가면 오른쪽 클릭 컨텍스트 메뉴에서 액세스할 수 있습니다( References 하위 메뉴 옵션 아래). 전문화된 매개변수는 Properties 패널에 추가되며, PCB 공간으로 이동하면 컴포넌트 풋프린트 파라미터로 표시됩니다.

소스 풋프린트의 파라미터
PCB로 전달된 파라미터는 부품 풋프린트를 통해 추가 보드 생산 또는 기능 정보를 제공하는 데 사용할 수 있습니다. 소스 라이브러리 수준에서 풋프린트에 특수 파라미터 문자열을 추가하면 사용자 지정 문자열이 대상 기계 레이어 또는 오버레이에서 해석됩니다.
사용자 정의 파라미터를 나타내는 특수 문자열은 소스 컴포넌트 풋프린트에 특수 문자열 버튼과 드롭다운( )을 사용하여 추가할 수 있습니다 Properties 패널의

아래 라이브러리 풋프린트에서 특수 문자열( .Designator 이 Mechanical 2 레이어에 배치되어 있습니다.
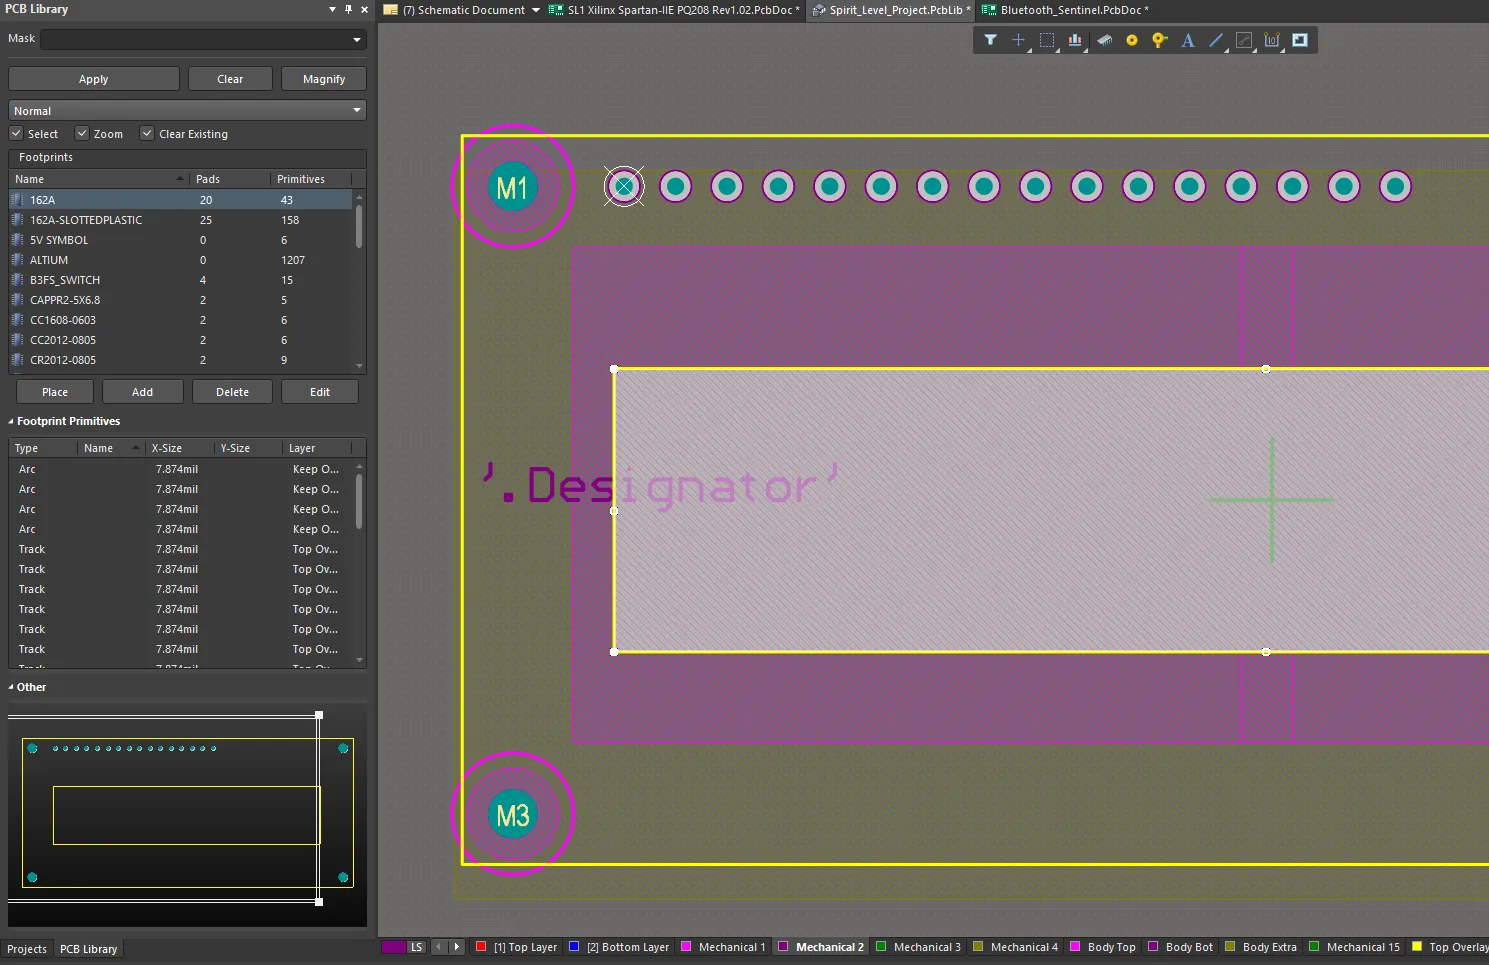
사용자 파라미터를 나타내는 특수 문자열을 컴포넌트 풋프린트에 추가할 수 있습니다.
해당 사용자 지정 파라미터가 회로도 컴포넌트에도 적용되고 파라미터 데이터가 PCB로 전송되면 해석된 풋프린트 문자열이 보드 뷰와 생성된 출력 파일에 모두 표시됩니다. 이 경우 특수 파라미터 문자열에는 어셈블리를 돕기 위한 사용자 지정 컴포넌트 부품 식별자가 포함됩니다.
사용자 파라미터를 특수 문자열로 컴포넌트 풋프린트에 적용하면 스위치 및 커넥터의 기능 레이블을 비롯한 다양한 기타 맞춤형 PCB 요구 사항을 충족할 수 있으며, '기능' 파라미터 문자열은 해당 컴포넌트 유형의 풋프린트에 대한 상단 오버레이에 배치될 수 있습니다.
보드 레이아웃에서 특수 문자열의 해석된 값을 보려면, 보드 레이아웃의 Special Strings 옵션 아래 Additional Options 영역의 View Options 탭의 View Configuration 패널에서 옵션을 활성화합니다. 특수 문자열은 항상 생성된 출력 파일에서 변환됩니다.
Schematic Editor에서 원하는 경우 Schematic Editor의 Display Names of Special Strings that have No Value Defined 옵션을 활성화합니다 Schematic – Graphical Editing 페이지의 Preferences 대화 상자에서 옵션을 활성화합니다.
파라미터 쿼리(Query)
PCB 도메인의 파라미터 문자열은 Altium Designer 쿼리 언어를 통해서도 액세스할 수 있으므로 유사 개체 찾기 기능을 비롯한 개체 필터링 기능에 사용할 수 있습니다.
유사한 객체 선택을 수행하려면 컴포넌트를 마우스 오른쪽 버튼으로 클릭한 다음 컨텍스트 메뉴에서 Find Similar Objects 을 선택하여 컨텍스트 메뉴에서 Find Similar Objects 대화 상자를 엽니다.

유사한 개체 찾기 대화상자에는 필요에 따라 필터링 옵션을 선택할 수 있는 Parameters 섹션에서 필요에 따라 필터링 옵션을 선택할 수 있습니다.

패널은 PCB Filter 패널은 매개변수별 쿼리 단어를 필터 기준으로 적용할 수 있으며, PCB 매개변수를 기반으로 디자인 규칙을 만드는 데 사용할 수 있습니다.
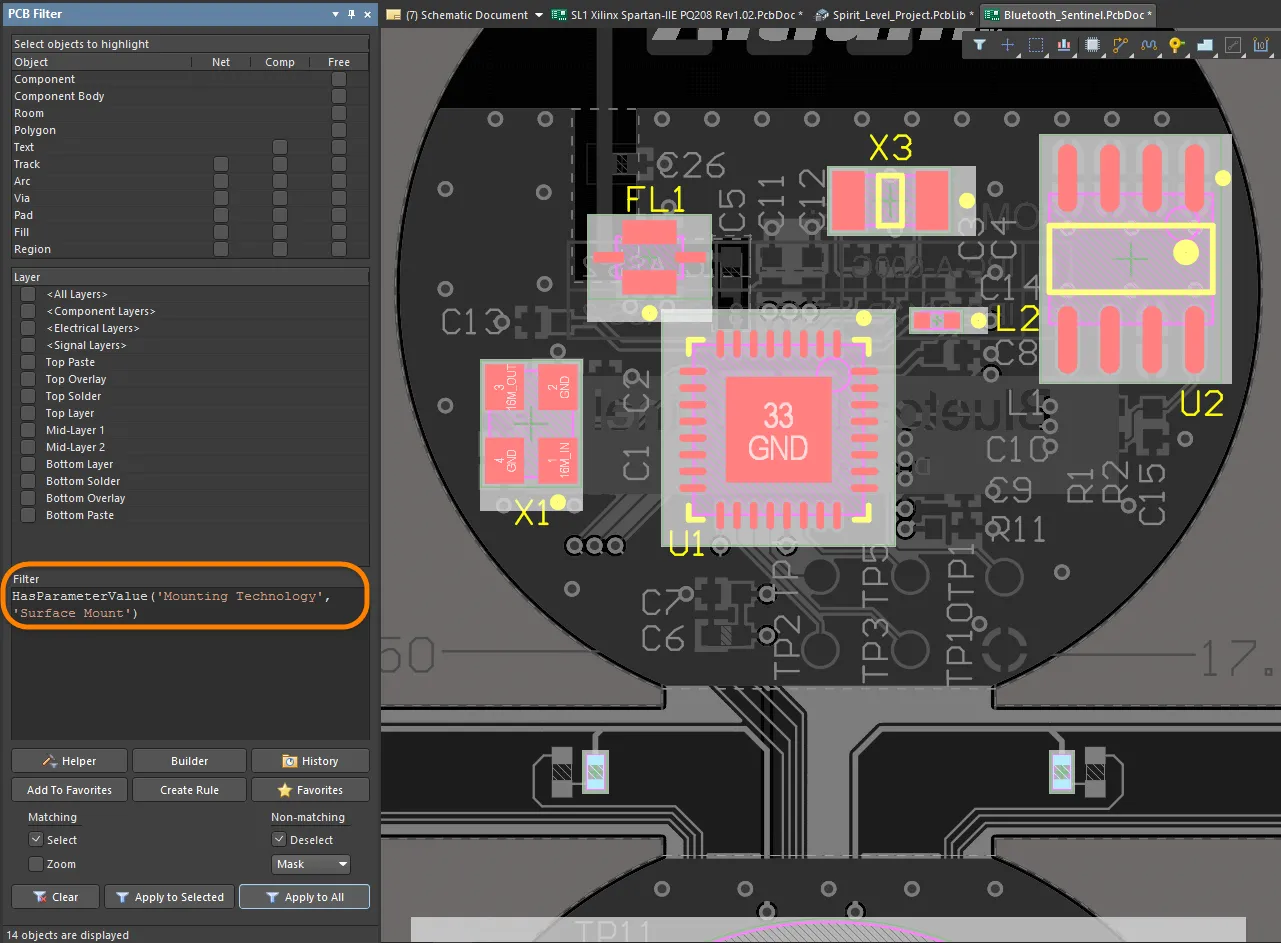
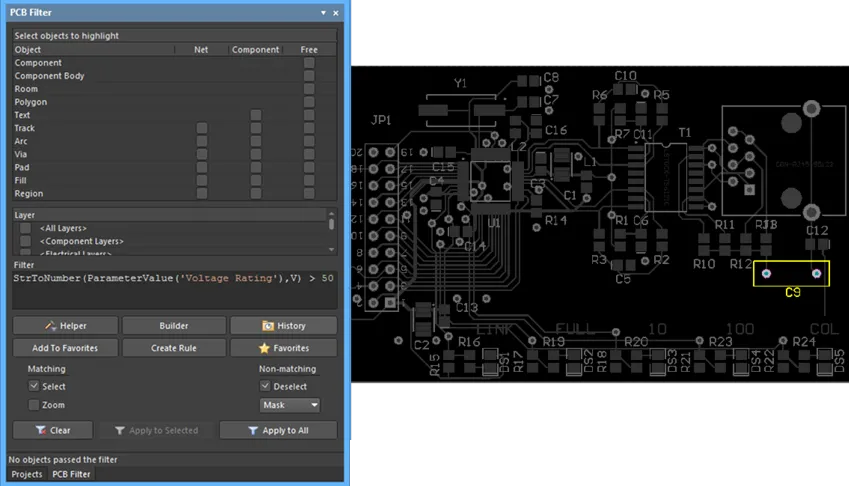
문자열 값을 숫자로 변환하는 특정 함수 단어(예: StrToNumber)를 포함하여 여러 쿼리 단어를 PCB 풋프린트 매개변수 작업에 사용할 수 있습니다. 문자열 값 변환은 단위 인식(V, mA, mV, kOhm 등)이 가능하며 파라미터 값 문자열의 수치 처리를 통해 쿼리 결과를 결정할 수 있습니다.
쿼리에서 지정할 수 있는 지원되는 단위 유형은 다음과 같습니다:
-
% - 퍼센트
-
A - 현재
-
C - 온도
-
dB - 데시벨
-
F - 커패시턴스
-
G - 컨덕턴스
-
H - 인덕턴스
-
Hz - 주파수
-
Kg - 질량
-
m - 길이
-
Ohm - 저항
-
Q - 충전
-
s - 시간
-
V - 전압
-
W - 전력
-
Z - 임피던스

PCB 부품 풋프린트 매개변수 작업을 위해 몇 가지 매개변수 쿼리 단어를 사용할 수 있습니다.
위의 Query Helper 대화 상자의 예는 각 컴포넌트의 전압 정격 파라미터를 처리하여(문자열에서 숫자로의 변환( StrToNumber(Unit Value, Unit Type))를 처리하여 해당 값이 50V보다 큰지 확인합니다. 패널에 적용하면 PCB Filter 패널에 적용하면 예제 보드 레이아웃은 싱글 고전압 컴포넌트를 노출합니다, C1 (전압 정격 값이 3kV인 싱글 고전압 컴포넌트가 노출됩니다.)
과학적 E 표기법도 지원되므로 예를 들어 1nF 이상의 커패시터 값을 필터링하는 쿼리는 다음과 유사합니다:
StrToNumber(ParameterValue('CapacitanceValue'), F) > 1e-9
또는, 숫자 변환 함수를 반환된 ParameterValue와 and 와 비교 값 모두에 숫자 변환 함수를 사용할 수 있습니다:
StrToNumber(ParameterValue('CapacitanceValue'), F) > StrToNumber('1nF', F)
규칙(Rule) 및 스크립트(Script)
PCB 파라미터 쿼리는 Altium Designer 스크립트 및 디자인 규칙에도 적용할 수 있습니다. 후자는 컴포넌트 배치 또는 레이어 할당을 평가하기 위해 풋프린트 파라미터를 감지하는 등의 레이아웃 유효성 검사를 수행할 수 있습니다. 위의 대화 상자에 나열된 함수는 Query Helper 대화 상자에 나열된 기능은 스크립팅 언어에서 사용할 수 있습니다.
아래 예는 커패시터 전압 정격 쿼리(위의 필터 쿼리 참조)를 컴포넌트 배치 규칙에 적용한 것으로, 실행 시 고전압으로 감지된 컴포넌트의 특정 간격 값을 확인합니다(>50V) 장치로 감지된 컴포넌트의 특정 간극 값을 확인합니다.

회로도 공간에서 전송된 특정 풋프린트 파라미터로 정의된 설계 규칙은 사용자 지정 레이아웃 조건을 감지하는 데 사용할 수 있습니다.
마찬가지로 맞춤형 PCB 파라미터를 사용하여 부품 레이어 호환성을 확인할 수 있습니다(예: 부품이 웨이브 솔더링을 지원하지 않아서 하단 레이어 배치가 불가능한 경우). 여기서는 사용자 지정 'WaveSoldering' 파라미터(Yes/No)를 처리하는 오브젝트 매칭 쿼리가 허용된 레이어 규칙에 적용될 수 있습니다.

이후 (배치) 규칙은 해당 컴포넌트 파라미터의 값을 확인하고 컴포넌트가 바텀 레이어 배치와 호환되지 않는 경우 위반을 생성합니다.
Variant
Design Variant(Design Variant)에 포함된 PCB로 전송된 파라미터는 변형 선택으로 처리됩니다.
실제로 PCB 공간에서 변형된 컴포넌트 매개변수는 쿼리 문자열에 의해 동적으로 감지되거나, 예를 들어 특수 문자열을 통해 보드 레이어에 표시됩니다.
사용자 정의 풋프린트 파라미터
이 기능은 고급 설정 대화 상자에서 PCB.FootprintParameters 옵션이 활성화된 경우에 사용할 수 있습니다.
풋프린트에 대한 사용자 정의 매개 변수는 Altium Designer에서 지원됩니다. 설치 공간의 Parameters 영역의 Footprint 탭의 Properties 패널의 Library Options 모드의 영역은 PCB 풋프린트 에디터 디자인 공간에 선택된 개체가 없을 때 풋프린트 파라미터를 보고 편집하는 데 사용할 수 있습니다.

부품이 PCB에 배치되면 이러한 파라미터를 PCB의 Properties 패널의 Component 모드의 Parameters 탭에서 확인할 수 있습니다.
-
PCB에 배치된 컴포넌트의 풋프린트 파라미터는 라이브러리에서 생성된 풋프린트로 전파됩니다 Make PCB Library 또는 Make Integrated Library 명령으로 생성된 라이브러리의 풋프린트로 전파됩니다.
-
풋프린트 파라미터는 Altium Designer의 비교 엔진과 생성된 픽 앤 플레이스 및 ODB++ 출력에 대해 지원됩니다.
Altium MCAD CoDesigner는 구성된 링크에 따라 MCAD에서 네이티브 MCAD 컴포넌트의 배치를 지원합니다. 경우에 따라 모델이 다른 여러 풋프린트가 하나의 컴포넌트에 연결되는 경우도 있습니다(예: PCB에 수직으로 직선 다리가 있는 경우 또는 수평으로 구부러진 다리가 있는 경우의 두 가지 방식으로 장착할 수 있는 LED). 이제 풋프린트 파라미터를 사용하여 서로 다른 풋프린트에서 다양한 MCAD 모델을 참조할 수 있습니다.
네이티브 ECAD와 MCAD 설계 컴포넌트 연결에 대해 자세히 알아보세요.
Designator 및 Comment 문자열
기본 Designator 및 주석 문자열
풋프린트가 보드에 배치되면 설계의 회로도 보기에서 추출한 정보를 기반으로 Designator 및 주석이 지정됩니다. Designator 및 Comment 문자열의 자리 표시자는 보드에 풋프린트를 배치할 때 자동으로 추가되므로 수동으로 정의할 필요가 없습니다. 이러한 문자열의 위치는 Designator 및 Comment 문자열의 Autoposition 옵션의 Properties 패널의 Parameter 모드에서 Designator 또는 주석 문자열을 선택한 경우 패널의 Designator 및 주석 문자열 옵션에 의해 결정됩니다. Designator 및 Comment 문자열의 기본 위치와 크기는 PCB Editor - 기본값 페이지의 각 프리미티브에서 구성됩니다 Preferences 대화상자에서 설정할 수 있습니다.

추가 Designator 및 Comment 문자열
Designator 또는 Comment 문자열의 추가 사본이 필요한 경우가 있을 수 있습니다. 예를 들어, 어셈블리 하우스에서는 각 부품 개요 내에 Designator가 표시된 상세 어셈블리 도면을 원하지만 회사에서는 최종 PCB의 부품 오버레이에서 Designator가 부품 바로 위에 위치해야 한다고 요구할 수 있습니다. 추가 Designator에 대한 이러한 요구 사항은 풋프린트에 .Designator 특수 문자열을 포함하면 됩니다. A .Comment 특수 문자열을 사용하여 대체 레이어 또는 위치에서 주석 문자열의 위치를 지정할 수도 있습니다.
어셈블리 하우스의 요구 사항을 충족하기 위해 .Designator 문자열을 PCB 풋프린트 에디터의 기계 레이어에 배치하고 이 레이어가 포함된 출력물을 설계 어셈블리 지침의 일부로 생성할 수 있습니다.
특수 레이어별 요구 사항 처리
PCB 부품에는 글루 도트 또는 박리 가능한 솔더 마스크 정의가 필요한 등 여러 가지 특수 요구 사항이 있을 수 있습니다. 이러한 특수 요구 사항의 대부분은 부품이 실장되는 보드의 측면에 묶여 있으며 부품을 뒤집으면 보드의 반대편으로 뒤집어야 합니다.
거의 사용되지 않을 수 있는 특수 목적의 레이어를 많이 포함하는 대신 Altium Designer의 PCB Editor는 레이어 쌍이라는 기능을 통해 이러한 요구 사항을 지원합니다. 레이어 쌍은 한 쌍으로 정의된 두 개의 기계 레이어입니다. 부품이 보드의 한쪽에서 다른 쪽으로 뒤집힐 때마다 한 쌍의 기계 레이어에 있는 모든 개체가 해당 쌍의 다른 기계 레이어로 뒤집힙니다. 이 접근 방식을 사용하여 접착제 점(또는 기타 특수 요구 사항)을 포함할 적절한 기계 레이어를 선택하고 사용 가능한 개체를 사용하여 모양을 정의합니다. 해당 풋프린트를 보드에 배치할 때는 레이어 페어링을 설정해야 합니다. 이렇게 하면 이 컴포넌트가 보드의 반대편으로 뒤집힐 때 소프트웨어가 어떤 레이어로 오브젝트를 전송해야 하는지 알려줍니다. PCB 풋프린트 Editor에서는 레이어 쌍을 정의할 수 없으며, 이 작업은 PCB Editor에서 수행됩니다.
레이어 페어링을 정의해야 합니다 before 를 정의해야 컴포넌트가 뒤집힙니다. 컴포넌트가 아래쪽으로 이동한 후에 페어링을 정의하면 기계적인 내용은 뒤집히지만 원래 레이어에 유지됩니다. 뒤집기 전에 레이어 페어링을 만드는 것을 잊은 경우 라이브러리에서 업데이트하여 보드에 배치된 컴포넌트의 인스턴스를 새로 고칠 수 있습니다.
메카니컬 레이어의 이름은 마우스 오른쪽 버튼으로 클릭한 다음 View Configurations 패널에서 마우스 오른쪽 버튼을 클릭한 다음 Edit Layer을 클릭합니다.
메카니컬 레이어 사용을 관리하는 일반적인 접근 방식은 필요한 각 메카니컬 레이어 기능에 전용 레이어 번호를 할당하는 것입니다. 이 접근 방식에서는 모든 디자이너가 동일한 레이어 할당 및 번호 체계를 준수해야 합니다. 또한 동일한 할당 및 번호 체계를 따르지 않는 다른 소스에서 컴포넌트를 가져올 경우 문제가 발생할 수 있습니다. 다른 체계를 사용한 경우 디자인 객체를 현재 메카니컬 레이어에서 해당 기능에 할당된 메카니컬 레이어로 이동해야 합니다.
이 문제는 프로퍼티의 Layer Type 속성을 도입하여 이 문제를 해결했습니다. 라이브러리에서 PCB 에디터로 컴포넌트를 배치하거나, 한 라이브러리에서 다른 라이브러리로 복사하거나, 생성한 경우 IPC Footprint Wizard를 호출하면 해당 레이어 유형에 할당된 기계적 레이어 번호에 관계없이 기존 레이어 유형 할당이 자동으로 일치합니다. 오브젝트는 레이어 유형에 따라 올바른 레이어에 재배치됩니다. 소프트웨어가 레이어 유형별로 일치시킬 수 없는 경우 레이어 번호별로 일치시키는 것으로 되돌아갑니다.
개별 기계식 레이어와 컴포넌트 레이어 쌍 모두에 대해 미리 정의된 유형 목록에서 레이어 유형을 선택할 수 있습니다. 개별 레이어를 마우스 오른쪽 버튼으로 클릭한 다음 아래 표시된 대화 상자에 액세스한 다음 Edit Layer 또는 Add Component Layer 명령을 선택하면 됩니다.
PCB 풋프린트에 높이 추가하기
가장 간단한 수준의 3D 표현에서는 PCB 풋프린트에 높이 정보를 추가할 수 있습니다. 이렇게 하려면 Properties 패널의 Library Options 모드(디자인 공간에 선택된 개체가 없을 때 활성화됨)에서 패널을 열고 컴포넌트의 권장 높이를 Height 필드에 부품의 권장 높이를 입력합니다 Footprint 탭의 필드에 컴포넌트의 권장 높이를 입력합니다.
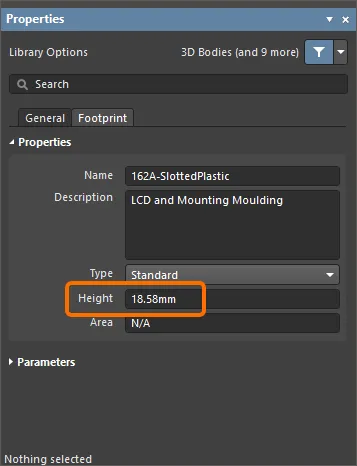
높이 설계 규칙은 보드 설계 중에 정의할 수 있으며(PCB Editor에서 Design » Rules 클릭), 일반적으로 컴포넌트 클래스 또는 룸 정의 내에서 최대 컴포넌트 높이를 테스트합니다.
높이 정보를 정의하는 더 좋은 옵션은 3D Body를 PCB 풋프린트에 부착하는 것입니다.
라우팅 프리미티브로 컴포넌트 관리하기
설계가 전송되면 각 컴포넌트에 지정된 풋프린트가 사용 가능한 라이브러리에서 추출되어 보드에 배치됩니다. 그런 다음 풋프린트의 각 Pad에는 회로도에서 해당 컴포넌트 핀에 연결된 네트 이름으로 설정된 네트 프로퍼티가 있습니다. Pad에 닿는 모든 오브젝트는 Pad와 동일한 네트에 연결됩니다.
PCB 에디터에는 포괄적인 네트 관리 도구가 포함되어 있습니다. 시작하려면 메인 메뉴에서 Design » Netlist » Configure Physical Nets 을 선택하여 Configure Physical Nets 대화 상자를 엽니다. 옵션 메뉴를 보려면 Menu 버튼을 클릭하여 옵션 메뉴를 표시합니다. 헤더 드롭다운을 클릭하여 New Net Name 헤더 드롭다운을 클릭하여 할당되지 않은 프리미티브에 할당할 네트를 선택합니다.

동일한 핀에 여러 개의 Pad가 연결된 풋프린트
아래 표시된 풋프린트인 SOT223 트랜지스터에는 동일한 논리 회로도 컴포넌트 핀인 핀 2에 연결된 여러 개의 Pad가 있습니다. 이 연결을 위해 동일한 Designator '2'를 사용하여 두 개의 Pad가 추가되었습니다. 회로도에서 Design » Update PCB 명령을 사용하여 회로도 Editor에서 설계 정보를 PCB로 전송하면 동기화 결과 PCB Editor에서 두 Pad로 연결되는 연결 라인이 동일한 망에 표시됩니다(즉, 동일한 망에 있음). 둘 다 라우팅할 수 있습니다.
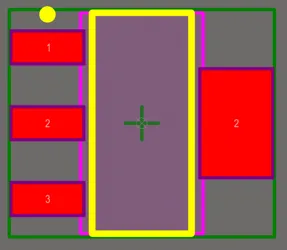
Designator가 2인 두 개의 Pad가 표시된 SOT223 풋프린트.
실크스크린 준비
노출된 구리와 구멍이 겹치는 실크스크린으로 인해 발생하는 일반적인 제조 설계(DFM) 문제를 해결하기 위해 PCB 풋프린트 Editor에는 풋프린트에 맞게 실크스크린을 준비하는 전용 기능이 포함되어 있습니다. 이러한 문제를 효과적으로 해결할 수 있습니다:
-
실크스크린 라인과 Arc의 자동 클리핑;
-
Fill 및 영역의 자동 클리핑 또는 이동;
-
실크스크린 텍스트 문자열의 자동 이동.
실크스크린 준비 도구는 PCB 설계 시에도 사용할 수 있습니다.
자세히 알아보세요.
PCB 풋프린트 에디터에서 실크스크린 준비 도구에 액세스하려면 메인 메뉴의 Tools » Silkscreen Preparation 명령을 사용합니다. 그러면 Silkscreen Preparation 대화 상자가 열립니다.

대화 상자를 사용하여 실크스크린 개체 클리핑/이동 설정을 구성합니다. 사용 가능한 옵션은 다음과 같습니다:
-
Clip to Exposed Copper - 노출된 구리에 개체를 자동으로 클리핑하려면 활성화합니다.
-
Clip to Solder Mask Openings - 솔더 마스크 개구부에 개체를 자동으로 클리핑하려면 활성화합니다.
-
Silkscreen Clearance - 실크스크린 오브젝트와 노출된 구리/솔더 마스크 개구부 및 구멍 사이의 최소 허용 값을 정의합니다.
-
Min Remaining Length - 클리핑 후 선/호 길이가 정의된 값보다 작으면 오브젝트가 풋프린트에서 제거됩니다. 이 길이는 가장자리와 가장자리 사이의 길이가 아닌 정점 간 길이입니다(
![]() 이미지 표시).
이미지 표시).
-
Move Text - 실크스크린 텍스트 문자열을 노출된 구리/솔더 마스크 개구부 및 구멍에서 멀리 이동하려면 그 사이의 거리가 Silkscreen Clearance. 이동은 Max Distance 값에 의해 제한됩니다.
-
Fill & Region - Fill 및 영역과 노출된 구리/솔더 마스크 개구부 및 구멍 사이의 거리가 다음 값보다 작을 때 수행할 작업을 선택합니다 Silkscreen Clearance:
-
None - Fill 및 영역은 그대로 유지됩니다.
-
Clip - Fill 및 영역은 클리핑되어 Silkscreen Clearance. Fill는 해당되는 경우 영역으로 변환됩니다.
-
Move - Fill 및 영역은 노출된 구리/솔더 마스크 개구부와 구멍에서 멀리 이동합니다. 이동은 Max Distance 값에 의해 제한됩니다.
-
Max Distance - 텍스트 문자열, 컴포넌트 Designator, Fill 및 영역을 유지하기 위해 이동할 수 있는 최대 거리를 정의합니다 Silkscreen Clearance.
클릭 OK 을 클릭하여 대화 상자의 설정에 따라 실크스크린 개체의 클리핑 및/또는 이동을 수행합니다.
개체에 대해 작업을 수행할 수 없는 경우(예: 텍스트 문자열의 제한으로 인해 이동할 수 없습니다 Max Distance의 제한으로 인해 텍스트 문자열을 이동할 수 없는 경우 이 개체에 대한 메시지가 Messages 패널에 표시됩니다.
실크스크린 준비 도구 성능의 예는 아래와 같습니다.
IPC 준수 풋프린트 마법사를 사용하여 풋프린트 생성하기
는 IPC Compliant Footprint Wizard 는 IPC 표준 7351의 개정 B를 실제로 준수하는 PCB 풋프린트를 생성합니다 Generic Requirements for Surface Mount Design and Land Pattern Standard. 풋프린트 마법사처럼 풋프린트 치수에서 직접 작업하는 것이 아니라 IPC Compliant Footprint Wizard 는 컴포넌트 자체의 치수 정보를 사용한 다음 IPC에서 발표한 알고리즘에 따라 적합한 Pad 및 기타 풋프린트 속성을 계산합니다.
풋프린트를 정의하는 데 사용되는 Pad 및 Track의 속성을 입력하도록 요구하는 대신 Wizard 는 실제 컴포넌트 치수를 입력으로 사용합니다. IPC-7351 표준을 위해 개발된 공식을 바탕으로 Wizard 는 Pad 및 Track과 같은 표준 Altium Designer 개체를 사용하여 풋프린트를 생성합니다.
이 대화 상자는 IPC 표준 7351 - 표면 실장 설계 및 랜드 패턴 표준에 대한 일반 요구 사항의 개정 B를 준수합니다. IPC-7351B는 2010년에 릴리스되었으며 2007년에 릴리스된 IPC-7351A를 대체합니다.

에 액세스하려면 IPC Compliant Footprint Wizard 에 액세스하려면 IPC Footprint Generator 소프트웨어 확장 프로그램을 설치해야 합니다. 이 확장 프로그램은 기본적으로 Altium Designer와 함께 설치됩니다. 수동으로 설치하거나 제거할 수 있습니다.
확장 관리 방법에 대한 자세한 내용은 Extending Your Installation 페이지(Altium Designer 개발, Altium Designer 애자일)를 참조하세요.
실행하려면 IPC Compliant Footprint Wizard를 실행하려면 Tools » IPC Compliant Footprint Wizard 를 선택합니다.
페이지에서 Select Component Type 페이지에서 풋프린트를 생성할 컴포넌트 제품군을 선택합니다 Select Component Type 페이지를 클릭합니다. 마법사 오른쪽의 미리보기 영역이 동적으로 변경되어 현재 선택된 컴포넌트를 표시하고 생성할 수 있는 패키지 유형도 명시합니다. 다음 표에는 마법사에서 지원되는 컴포넌트 유형과 패키지가 나열되어 있습니다.
| 이름 |
설명 |
포함된 패키지 |
| BGA |
볼 그리드 어레이 |
BGA, CGA |
| BQFP |
범퍼형 쿼드 플랫 팩 |
BQFP |
| CAPAE |
전해 알루미늄 커패시터 |
CAPAE |
| CFP |
세라믹 이중 플랫 팩 - 트리밍 및 성형 걸윙 리드 |
CFP |
| 칩 어레이 |
칩 어레이 |
칩 어레이 |
| DFN |
듀얼 플랫 무연 |
DFN |
| CHIP |
칩 부품, 2핀 |
커패시터, 인덕터, 저항기 |
| CQFP |
세라믹 쿼드 플랫 팩 - 트리밍 및 성형된 걸윙 리드 |
CQFP |
| DPAK |
트랜지스터 개요 |
DPAK |
| LCC |
무연 칩 캐리어 |
LCC |
| LGA |
랜드 그리드 어레이 |
LGA |
| MELF |
MELF 부품, 2핀 |
다이오드, 저항기 |
| MOLDED |
성형 부품, 2핀 |
커패시터, 인덕터, 다이오드 |
| PLCC |
플라스틱 리드 칩 캐리어, 정사각 - J 리드 |
PLCC |
| PQFN |
풀백 쿼드 플랫 무연 리드 |
PQFN |
| PQFP |
플라스틱 쿼드 플랫 팩 |
PQFP, PQFP 노출형 Pad |
| PSON |
풀백 소형 아웃라인 노리드 |
PSON |
| QFN |
쿼드 플랫 노 리드 |
QFN, LLP |
| QFN-2ROW |
쿼드 평면 무연, 2열, 정사각형 |
2열 QFN |
| SODFL |
소형 아웃라인 다이오드, 평면 리드 |
SODFL |
| SOIC |
소형 아웃라인 통합 패키지, 1.27mm 피치 - 걸윙 리드 |
SOIC, SOIC 노출형 Pad |
| SOJ |
소형 아웃라인 패키지 - J 리드 |
SOJ |
| SON |
소형 아웃라인 비 리드 |
SON, SON 노출형 Pad |
| SOP, TSOP |
소형 아웃라인 패키지 - 걸윙 리드 |
SOP, TSOP, TSSOP |
| SOT143/343 |
소형 아웃라인 트랜지스터 |
SOT143, SOT343 |
| SOT223 |
소형 아웃라인 트랜지스터 |
SOT223 |
| SOT23 |
소형 아웃라인 트랜지스터 |
3-리드, 5-리드, 6-리드 |
| SOT89 |
소형 아웃라인 트랜지스터 |
SOT89 |
| SOTFL |
소형 아웃라인 트랜지스터, 평면 리드 |
3-리드, 5-리드, 6-리드 |
| 권선 |
정밀 권선 인덕터, 2핀 |
인덕터 |
마법사의 후속 페이지는 선택한 부품 유형에 따라 변경됩니다. 마법사의 직관적인 페이지에 따라 필요에 따라 특정 컴포넌트 풋프린트를 설정하세요. 작업 시 참고할 사항 IPC Compliant Footprint Wizard:
-
마법사에는 모든 치수가 미터법(mm) 단위로 입력됩니다.
-
전체 패키징 치수, 핀 정보, 힐 간격, 납땜 필렛 및 공차를 입력하고 즉시 확인할 수 있습니다.
IPC 허용 오차를 수정하면 PCB 풋프린트가 IPC를 준수하지 않을 수 있습니다.
-
코트야드, 어셈블리 및 컴포넌트(3D) 본체 정보와 같은 기계적 치수를 입력할 수 있습니다.
-
Wizard 를 다시 입력하면 쉽게 검토하고 조정할 수 있습니다.
-
모든 단계에서 풋프린트의 미리보기가 표시됩니다. 각 컴포넌트 유형에 대해 Preview 영역이 동적으로 업데이트되어 여러 설정에 대해 새로운 위치, 크기 등을 표시합니다. 영역에서 Preview 영역에서  또는
또는  을 클릭하여 2D 및 3D 미리보기 이미지 간에 전환할 수 있습니다.
-
원하는 경우 모델을 생성하기 전에 3D STEP 모델의 미리 보기를 볼 수 있습니다. 페이지에서 Generate STEP Model Preview 페이지에서 Wizard 컴포넌트 유형을 선택한 후 3D STEP 모델의 미리 보기를 보려면 Preview 영역에서 미리 보기를 볼 수 있습니다.
-
Paste Mask는 대형 감열 Pad(2.1mm x 1.6mm 이상 크기)가 있는 패키지의 경우 작은 필링으로 분할됩니다.
-
걸윙 리드가 포함된 패키지의 경우 Pad가 패키지 본체 아래로 늘어나지 않도록 잘라냅니다.
-
대형 중앙 열 Pad가 있는 소형 패키지의 경우, 주변 Pad는 IPC 표준에 따라 Pad 사이에 필요한 간격을 확보하기 위해 잘립니다.
-
Pad 트리밍이 적용되면 대화 상자에 경고가 표시됩니다.
-
풋프린트의 이름과 설명은 입력한 정보에 따라 자동으로 제안되지만 Wizard 에 입력한 정보를 기반으로 자동으로 제안되지만 조직의 요구 사항에 맞게 변경할 수 있습니다.
-
IPC 표준에 따라 마법사는 세 가지 풋프린트 변형(_L, _N, _M)을 지원하며, 각각 다른 보드 밀도에 맞게 조정됩니다.
-
버튼은 Finish 버튼을 누르면 현재 미리 보기된 풋프린트를 생성할 수 있습니다. 전체 작업을 완료하기 전에 Finish 을 클릭하기 전에 Wizard을 클릭하면 선택한 컴포넌트 유형에 대한 시스템 기본값을 사용하여 풋프린트가 생성됩니다.
-
File Based PCB 풋프린트 라이브러리로 작업하는 경우 IPC 호환 풋프린트 배치 생성기를 사용하여 여러 밀도 수준에서 여러 풋프린트를 빠르게 생성할 수 있습니다.
풋프린트 마법사를 사용하여 풋프린트 생성하기
PCB 풋프린트 Editor에는 Footprint Wizard. 이 Wizard 를 사용하여 다양한 패키지 유형 중에서 선택하고 적절한 정보를 입력하면 컴포넌트 풋프린트를 빌드할 수 있습니다. 에서 Footprint Wizard에서 Pad 및 컴포넌트 오버레이에 필요한 크기를 입력합니다.

를 실행하려면 Footprint Wizard를 시작하려면 메인 메뉴에서 Tools » Footprint Wizard 을 선택하거나 디자인 공간에서 마우스 오른쪽 버튼을 클릭하고 Tools » Footprint Wizard 명령을 선택합니다.
페이지를 사용하여 Component patterns 페이지를 사용하여 만들려는 컴포넌트의 패턴을 지정합니다. 목록에서 원하는 패턴을 선택한 다음 드롭다운을 사용하여 컴포넌트의 단위를 선택합니다(Imperial (mil) 또는 Metric (mm)). 사용 가능한 패턴은 다음과 같습니다:
-
Ball Grid Arrays (BGA)
-
Capacitors
-
Diodes
-
Dual In-line Packages (DIP)
-
Edge Connectors
-
Leadless Chip Carriers (LCC)
-
Pin Grid Arrays (PGA)
-
Quad Packs (QUAD)
-
Resistors
-
Small Outline Packages (SOP)
-
Staggered Ball Grid Arrays (SBGA)
-
Staggered Pin Grid Arrays (SPGA)
마법사의 후속 페이지는 선택한 컴포넌트 패턴에 따라 변경됩니다. 마법사의 직관적인 페이지에 따라 필요에 따라 특정 컴포넌트 풋프린트를 설정하세요.
의 풋프린트에 대한 Pad 명명 스타일을 설정할 때
Edge Connectors,
Leadless Chip Carriers (LCC) 또는
Quad Packs (QUAD) 패턴의 명명 순서/방향을 변경하려면 녹색 화살표를 클릭합니다(
![]() 이미지 표시
이미지 표시).
컴포넌트 보고서 생성
활성 PCB 풋프린트에 대한 보고서를 생성하려면 메인 메뉴에서 Reports » Component 명령을 선택합니다. 명령을 실행하면 보고서가 소스 파일과 동일한 폴더에 생성(.CMP) 소스 PCB 라이브러리 문서와 동일한 폴더에 생성되며 기본 디자인 창에서 활성 문서로 자동 열립니다. 보고서에는 풋프린트 치수와 풋프린트를 구성하는 기본 개체 및 해당 개체가 있는 레이어에 대한 분석을 포함한 정보가 나열됩니다.
이 보고서는 Projects 패널에 무료 문서로 추가되며 Documentation\Text Documents 하위 폴더에 무료 문서로 추가됩니다.