연결된 워크스페이스는 높은 무결성으로 데이터를 안전하게 처리하는 동시에 디자인 팀과 공급망 모두 필요에 따라 해당 데이터에 접근할 수 있도록 합니다. 후자의 측면, 즉 누가 워크스페이스에 접근할 수 있는지, 그리고 더 중요한 것은 어떤 데이터에 접근할 수 있는지 여부는 워크스페이스의 사용자 접근 제어 및 공유 기능에 의해 촉진됩니다. 이러한 기능은 다음과 같은 주요 영역으로 분류할 수 있습니다:
사용자 관리
어떤 사용자가 (Altium Designer 또는 외부 브라우저를 통해) 워크스페이스에 연결할 수 있는지. 사용자 및 정의된 그룹 관리는 워크스페이스의 브라우저 기반 인터페이스를 사용하여 수행됩니다. 이 작업은 외부 브라우저에서 수행할 수 있습니다. 자세한 내용은 워크스페이스 멤버십 관리에 대한 자세한 내용(Altium 365 워크스페이스, 엔터프라이즈 서버 워크스페이스)을 참조하세요.
폴더 수준 공유
워크스페이스 폴더를 공유하여 누가 워크스페이스에서 어떤 콘텐츠를 볼 수 있는지 제어할 수 있는 기능을 제공합니다. 이를 통해 다른 사용자가 폴더와 그 콘텐츠를 단순히 볼 수 있는지, 아니면 편집할 수 있는지(효과적으로 디자인 데이터를 폴더에 릴리스/커밋/업로드할 수 있는지) 제어할 수 있습니다. 연결된 하나의 워크스페이스를 여러 개의 효과적인 콘텐츠 '영역'으로 분할할 수 있으며, 폴더 수준의 권한을 제어해 필요에 따라 콘텐츠를 선택적으로 표시하거나 숨길 수 있으므로 적절한 사람에게 적절한 접근 권한을 부여해 적절한 데이터에 접근할 수 있습니다.
Item 수준 공유
공유 폴더에서 누가 어떤 Item을 볼 수 있는지 제어할 수 있는 기능을 제공합니다. 폴더 접근 제어를 통해 제공되는 보다 거친 수준의 공유와는 대조적으로 보다 세밀한 수준의 공유라고 생각하시면 됩니다. 사용자가 폴더 자체에 접근할 수 있는 권한이 있으면 해당 폴더 내에서 공유된 Item을 보고 수정할 수 있습니다(허용된 경우).
Item Revision 수준 공유
공유된 Item의 Revision을 볼 수 있는 사람을 제어할 수 있는 기능을 제공합니다. 가장 세밀한 수준의 공유라고 생각하시면 됩니다. 사용자가 상위 Item 자체에 대한 접근 권한이 있으면 공유된 해당 Item의 Revision을 보고 수정할 수 있습니다(허용된 경우).
이 문서에서는 Altium Designer 내에서 연결된 워크스페이스의 공유 기능에 대해 살펴봅니다. 워크스페이스의 브라우저 인터페이스를 통한 공유 기능에 대해서는 Managing Content Structure & Access (Altium 365 워크스페이스, 엔터프라이즈 서버 워크스페이스)를 참조하세요.
새로운 권한 상속 시스템(자세히 알아보기)으로 업데이트된 Altium 365 워크스페이스에 연결된 경우 이러한 권한이 상위 폴더에서 상속된 경우 폴더, Item 또는 Revision에 대한 권한을 줄이거나 제거하는 것이 불가능하지 않다는 점에 유의하십시오. 이렇게 하려고 하면 오류 메시지가 나타납니다( ). 상위 폴더로부터의 권한 상속을 의도적으로 분리하려면 워크스페이스의 브라우저 인터페이스에서 폴더/Item/Revision의 Inherit permissions from parent 옵션을 비활성화해야 합니다.
폴더 수준 공유
연결된 워크스페이스는 워크스페이스 폴더를 '공유'하는 기능을 지원하여 특정 성격의 워크스페이스 콘텐츠에 대한 연결과 접근를 용이하게 합니다. 폴더를 공유하면 워크스페이스의 디자인 콘텐츠를 쉽게 분할하고 다른 사람들과 공유할 수 있습니다.
워크스페이스의 폴더는 다양한 수준에서 공유할 수 있으며, 폴더의 공개 수준과 접근에 대한 보안 수준을 모두 정의할 수 있습니다. 이는 지정된 개인이나 그룹만 접근할 수 있는 비공개 수준부터 같은 조직의 모든 사람이 콘텐츠를 보거나 변경할 수 있도록 허용하는 수준까지 다양합니다.
-
관리자 수준의 권한이 있는 사용자( Administrators 그룹의 구성원)는 모든 폴더를 보고 관리할 수 있습니다. 워크스페이스의 관리자가 아닌 사용자는 해당 워크스페이스에 로그인할 때 공유된 폴더, 즉 해당 사용자에게 접근 권한이 있는 폴더만 접근할 수 있습니다. 또한, 워크스페이스의 관리자가 아닌 사용자는 자신이 만든 폴더만 공유할 수 있습니다.
-
연결된 워크스페이스에서 프로젝트를 만드는 사용자에게 기본 프로젝트 폴더에 대한 쓰기 권한이 없는 경우, 시스템에서 새 프로젝트를 저장하기 위한 사용자별 Personal Folder 구조를 자동으로 만듭니다. 이 폴더는 구성원의 이메일 주소(Altium 365 워크스페이스의 경우) 또는 사용자 이름(Enterprise Server 워크스페이스의 경우)을 기준으로 최상위 폴더로 표시되며, 해당 사용자의 프로젝트를 저장하는 My Projects 하위 폴더가 있습니다. 폴더 구조/계층 구조는 로그인한 사용자와 관리자만 사용할 수 있으며 다른 사용자에게는 표시되지 않습니다. Managing Project Creation Permissions (Altium 365 워크스페이스, 엔터프라이즈 서버 워크스페이스)에 대해 자세히 알아보세요.
폴더 공유 제어 기능에 접근하기
폴더에 대한 공유 권한은 폴더를 추가할 때 또는 폴더를 만든 후 어느 단계에서나 설정할 수 있습니다. 공유 컨트롤은 Explore 패널의 폴더 관련 속성 대화상자(폴더를 마우스 오른쪽 버튼으로 클릭하고 메뉴에서 Properties 선택)에서 대화상자 왼쪽 하단에 있는 Share 링크를 클릭하여 접근할 수 있습니다. Share For 대화 상자가 열리면 필요에 따라 공유를 구성할 수 있습니다.
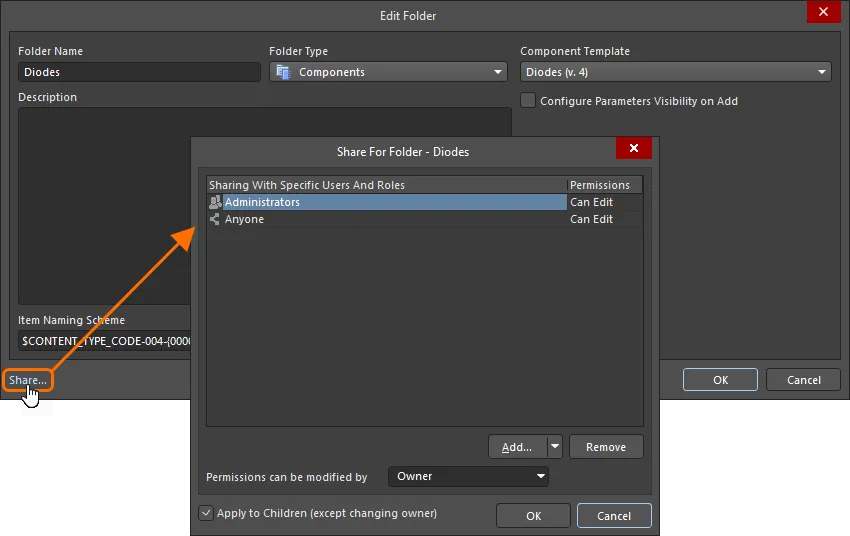
워크스페이스 폴더 공유를 위한 컨트롤에 접근하기.
폴더 공유 대화 상자의 옵션 및 컨트롤
-
Sharing With Specific Users And Roles - 폴더에 접근할 수 있는 사용자 및 그룹을 표시합니다.
-
Permissions - 폴더의 소유자를 표시합니다. 각 사용자와 연결된 드롭다운을 사용하여 해당 사용자에 대한 권한을 지정합니다.
-
Can Edit 읽기 및 쓰기 권한이 있습니다.
-
Can View 읽기 전용 접근 권한이 있습니다.
-
Owner 을 선택하여 워크스페이스 폴더의 소유권을 이전합니다.
추가 제어
-
Add - 드롭다운을 사용하여 다음에 접근합니다:
-
Remove - 를 클릭하여 선택한 그룹 또는 사용자를 제거합니다.
-
Permissions can be modified by - 드롭다운을 사용하여 특정 엔터티에 접근할 수 있는 권한을 구성합니다. 다음과 같은 수준의 제어가 지원됩니다:
-
Owner - 폴더의 소유자만 권한을 변경할 수 있습니다. 편집자는 접근 권한을 변경할 수 없습니다.
-
Collaborators - 편집자는 폴더에 대한 접근 권한을 관리할 수 있는 모든 권한을 가집니다.
-
Apply to Children (except changing owner) - 이 옵션을 활성화하면 모든 하위 Item에 동일한 사용자, 그룹 및 권한(소유자 변경 제외)을 적용할 수 있습니다. 이 옵션은 기본적으로 사용 설정되어 있습니다.
워크스페이스의 브라우저 인터페이스를 통해 권한을 구성할 때의 큰 장점은 계정 관리자가 Altium Designer가 설치된 PC에 묶여 있지 않고 워크스페이스에 연결할 수 있다는 것입니다. 계정 관리자는 워크스페이스에 연결할 수 있는 모든 곳에서 워크스페이스의 폴더 공유 권한 변경에 영향을 줄 수 있습니다.
특정 사용자 및 그룹과 공유
Share For 대화상자를 사용하여 해당 폴더에 접근하고 '볼' 수 있는 사용자를 정확히 결정합니다. Add User 및/또는 Add Role 컨트롤을 사용하여 각각 사용자 및/또는 그룹을 추가할 수 있는 대화 상자에 접근하여 폴더 콘텐츠 공유를 위한 특정 접근 목록을 만듭니다. 검색할 대상 사용자 이름/이메일 또는 그룹 이름을 입력합니다. 검색 결과가 아래에 표시됩니다.
폴더의 소유자(폴더를 만든 사용자)는 항상 폴더에 있는 모든 콘텐츠에 대한 전체 접근 권한을 갖습니다. 따라서 Owner Item은 특정 사용자 및 그룹 목록에 기본적으로 추가되며 제거할 수 없습니다.
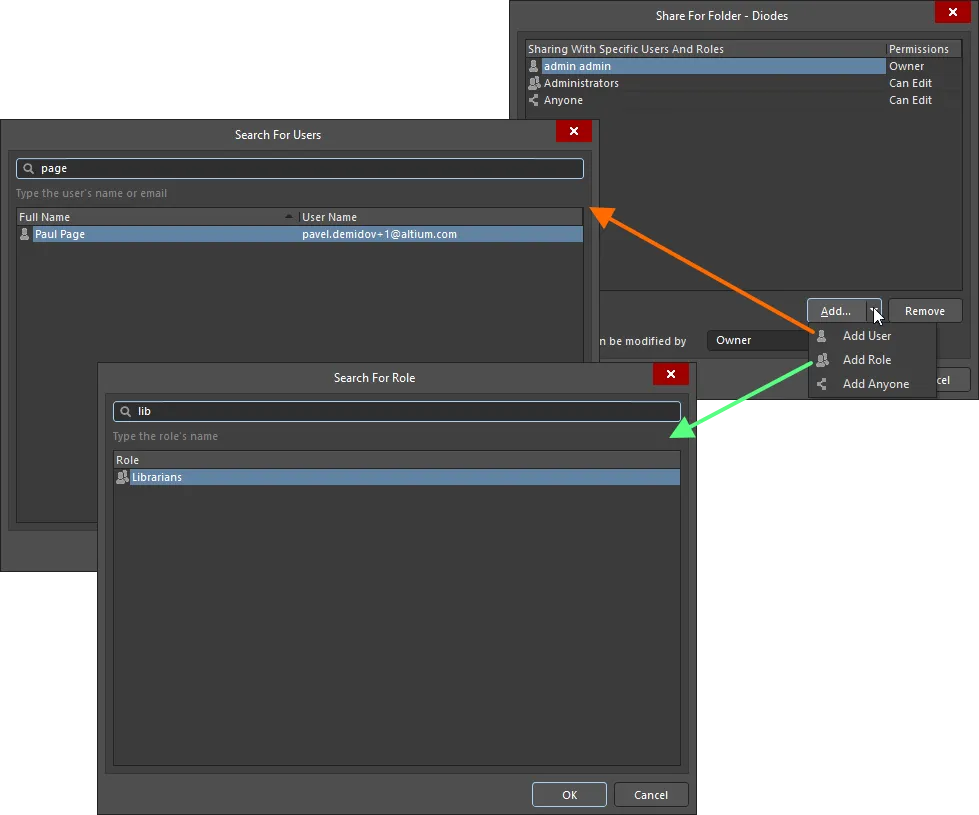
사용자 및 그룹 추가 예시.
주의해야 할 사항:
-
권한 측면에서 사용자/그룹은 Can Edit 옵션이 활성화된 경우 읽기/쓰기 접근 권한이 있습니다. 이 옵션이 비활성화되면 읽기 접근 권한만 있습니다.
-
기존 사용자/그룹이 폴더에 접근할 수 없도록 하려면 Share For 대화 상자에서 해당 사용자/그룹을 선택한 다음
 버튼을 클릭합니다.
-
연결된 워크스페이스의 모든 사용자가 폴더에 접근할 수 있도록 하려면 Add 버튼을 클릭한 다음 메뉴에서 Add Anyone 명령을 선택하여
Anyone 엔티티를 추가합니다.
-
Share For 대화 상자에서 Can Edit 옵션은 기본적으로 활성화되어 있으며, 사용자/그룹이 추가되면 읽기/쓰기 접근 권한을 부여합니다.
-
Explorer 패널을 통해 공유를 구성할 때 새로 추가된 사용자 및 그룹은 Share For 대화창과 Add Folder/Edit Folder 대화창 모두에서 OK 을 클릭할 때까지 최종 설정(저장)이 완료되지 않습니다.
하위 권한
폴더에 대해 정의된 권한은 Share For 대화 상자에서 Apply to Children (except changing owner) 옵션을 활성화하여 하위 폴더 및 폴더에 포함된 Item(및 Revision)에 적용할 수 있습니다.
이렇게 하면 지정된 사용자(또는 그룹)가 공유 중인 폴더 아래의 모든 콘텐츠를 볼 수 있습니다. 반대로 이 옵션을 비활성화하면 사용자는 루트 폴더만 볼 수 있으며, 명시적으로 공유하지 않는 한 하위 폴더의 콘텐츠는 볼 수 없습니다.
폴더의 권한 설정을 변경할 수 있는 사람 지정하기
Explore 패널을 통해 폴더 수준 공유를 구성할 때 폴더의 소유자 또는 워크스페이스의 관리자는 해당 폴더의 권한을 변경할 수 있는 사람(해당 폴더의 Sharing Control )을 지정할 수 있습니다. 이 작업은 Share For 대화 상자에서 Permissions can be modified by 필드를 사용하여 수행합니다.
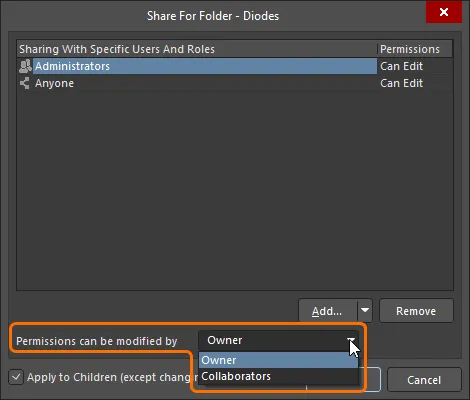
폴더에 대한 공유 제어를 지정합니다.
다음과 같은 수준의 제어가 지원됩니다:
-
Owner - 폴더의 소유자만 권한을 변경할 수 있습니다. 편집자는 접근 권한을 변경할 수 없습니다.
-
Collaborators - 편집자는 폴더에 대한 접근 권한을 관리할 수 있는 모든 권한을 가집니다.
Item 수준 공유
연결된 워크스페이스 내에서 폴더를 공유하는 것과 해당 폴더 내의 데이터를 공유하는 것은 전혀 다른 문제입니다. 예를 들어, 한 폴더를 두 팀이 사용 중인데 한 팀의 콘텐츠는 일반에 공개되지 않는 반면, 다른 팀의 데이터는 공개되어 있을 수 있습니다. 따라서 특정 데이터, 특히 Item과 그 Revision은 숨겨야 하지만 나머지 콘텐츠는 해당 사용자가 볼 수 있도록 해야 합니다. 이를 지원하기 위해 연결된 워크스페이스는 워크스페이스 폴더 내에서 Item을 공유할 수 있는 기능을 지원하여 워크스페이스의 실제 데이터에 대해 보다 세밀한 수준의 공유를 제공합니다.
관리자 수준의 권한을 가진 사용자( Administrators 그룹의 구성원)는 모든 Item을 보고 관리할 수 있습니다. 워크스페이스의 비관리자 사용자의 경우, 사용자가 해당 워크스페이스에 로그인할 때 공유된 Item, 즉 접근 권한이 있는 Item만 접근할 수 있습니다. 또한, 워크스페이스의 관리자가 아닌 사용자는 자신이 만든 Item만 공유할 수 있습니다.
Item에 대한 공유 권한은 Item을 만들 때 또는 만든 후 어느 단계에서든 설정할 수 있습니다. 공유 컨트롤은 Explore 패널의 Item 관련 속성 대화상자(Item을 마우스 오른쪽 버튼으로 클릭하고 메뉴에서 Properties 선택)에서 Item ID 필드 아래에 있는  링크를 클릭하여 접근할 수 있습니다. 필요에 따라 공유를 구성할 수 있는 Share For 대화 상자가 열립니다.
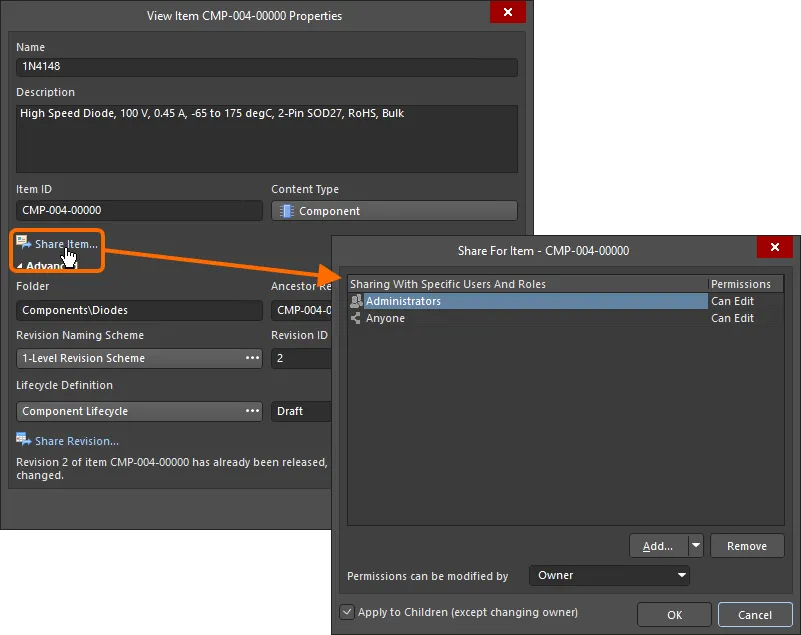
Share For 대화 상자에 접근하여 Item이 다른 사람들과 공유되는 방식을 제어할 수 있습니다.
Item 공유 대화 상자의 옵션 및 제어
-
Sharing With Specific Users And Roles - Item에 대한 접근 권한이 있는 사용자를 표시합니다.
-
Permissions - 폴더의 소유자를 표시합니다. 각 사용자와 연결된 드롭다운을 사용하여 해당 사용자에 대한 권한을 지정합니다.
-
Can Edit 읽기 및 쓰기 권한이 있습니다.
-
Can View 읽기 전용 접근 권한이 있습니다.
-
Owner 을 선택하여 워크스페이스 Item의 소유권을 이전합니다.
추가 제어
-
Add - 드롭다운을 사용하여 다음에 접근합니다:
-
Remove - 를 클릭하여 선택한 그룹을 제거합니다.
-
Permissions can be modified by - 드롭다운을 사용하여 특정 엔터티에 접근할 수 있는 권한을 구성합니다. 다음과 같은 수준의 제어가 지원됩니다:
-
Owner - 폴더의 소유자만 권한을 변경할 수 있습니다. 편집자는 접근 권한을 변경할 수 없습니다.
-
Collaborators - 편집자는 폴더에 대한 접근 권한을 관리할 수 있는 모든 권한을 가집니다.
-
Apply to Children (except changing owner) - 이 옵션을 활성화하면 모든 하위 Item에 동일한 사용자, 그룹 및 권한(소유자 변경 제외)을 적용할 수 있습니다. 이 옵션은 기본적으로 사용 설정되어 있습니다.
Item 수준에서 사용 권한으로 작업하는 컨트롤은 폴더 수준에서 사용 권한을 정의하는 것과 거의 동일합니다.
워크스페이스 폴더의 Item이 특정 사용자와 공유되지만 폴더 자체는 공유되지 않는 경우, 사용자는 워크스페이스의 콘텐츠를 검색할 때 해당 Item을 '볼' 수 없습니다.
폴더를 '볼 수 있는' 권한이 있는 동일한 사용자/그룹이 폴더(및 해당되는 경우 각 하위 폴더)의 Item도 '볼 수 있어야 하는 경우에는 해당 상위 폴더의 권한을 정의할 때 Share For 대화 상자에서 Apply to Children (except changing owner) 옵션을 사용하세요. 이렇게 하면 Item(및 Item 수정) 수준에서 권한이 빠르게 상속됩니다. 이러한 하위 수준에서 특정 Item(또는 Revision)에 대해 언제든지 조정할 수 있습니다. 결국, 누가 어디서 무엇을 볼 수 있는지에 대한 완전한 제어가 용이해집니다.
Item Revision 수준 공유
폴더 및 Item과 마찬가지로, 연결된 워크스페이스의 Item Revision도 허용된 사용자/그룹과 공유할 수 있습니다.
관리자 수준의 권한이 있는 사용자( Administrators 그룹의 구성원)는 모든 Item Revision을 보고 관리할 수 있습니다. 워크스페이스의 비관리자 사용자의 경우, 해당 사용자가 해당 워크스페이스에 로그인하면 공유된 Item 리비전(즉, 접근 권한이 있는 Item)만 접근할 수 있습니다. 또한, 워크스페이스의 관리자가 아닌 사용자는 자신이 만든 Item 리비전만 공유할 수 있습니다.
Item Revision 수준에서 권한으로 작업하는 컨트롤은 폴더 또는 Item 수준에서권한을 정의하는 것과 거의 동일합니다. Item Revision에 대한 공유 권한은 상위 Item을 생성할 때 또는 생성 후 어느 단계에서든 설정할 수 있습니다. 공유 제어는 Explore 패널의 Item 관련 속성 대화상자(Item을 마우스 오른쪽 버튼으로 클릭하고 메뉴에서 Properties 선택)를 통해 접근할 수 있습니다. Advanced 컨트롤을 클릭하여 대화 상자를 확장하여 Item의 고급 속성을 확인한 다음 Lifecycle Definition 필드 아래에 있는  링크를 클릭합니다. 필요에 따라 공유를 구성할 수 있는 Share For 대화 상자가 열립니다.
최상위 상위 Item의 Item Properties 대화 상자에 접근하는 경우 Share Revision 컨트롤을 클릭하면 해당 Item의 최신 개정판에 대한 사용 권한 대화 상자에 접근합니다. 이전에 릴리즈된 Item의 개정판에 대한 공유 권한을 구성하려면 해당 특정 개정판에 대한 Item Properties 대화 상자에 접근해야 합니다.
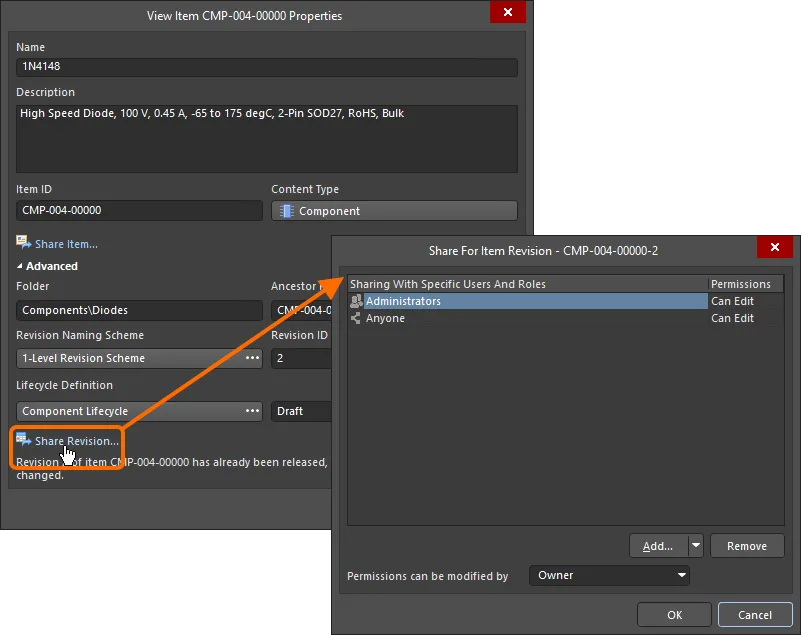
Share For 대화 상자에 접근하여 Item 리비전이 다른 사람들과 공유되는 방식을 제어할 수 있습니다.
Item Revision 공유 대화 상자의 옵션 및 제어
-
Sharing With Specific Users And Roles - Item Revision에 대한 접근 권한이 있는 사용자를 표시합니다.
-
Permissions - Item Revision의 소유자를 표시합니다. 각 사용자와 연결된 드롭다운을 사용하여 해당 사용자의 권한을 지정합니다.
-
Can Edit 읽기 및 쓰기 권한이 있습니다.
-
Can View 읽기 전용 접근 권한이 있습니다.
-
Owner 을 선택하여 워크스페이스 Item Revision의 소유권을 이전합니다.
추가 제어
-
Add - 드롭다운을 사용하여 다음에 접근합니다:
-
Remove - 를 클릭하여 선택한 그룹 또는 사용자를 제거합니다.
-
Permissions can be modified by - 드롭다운을 사용하여 특정 엔터티에 접근할 수 있는 권한을 구성합니다. 다음과 같은 수준의 제어가 지원됩니다:
-
Owner - 폴더의 소유자만 권한을 변경할 수 있습니다. 편집자는 접근 권한을 변경할 수 없습니다.
-
Collaborators - 편집자는 폴더에 대한 접근 권한을 관리할 수 있는 모든 권한을 가집니다.
Item '보기'가 허용된 동일한 사용자/그룹이 Item Revision도 '보기'해야 하는 경우, 해당 상위 Item의 권한을 정의할 때 Share For 대화 상자에서 Apply to Children (except changing owner) 옵션을 사용하세요. 이렇게 하면 Item Revision 수준에서 권한이 빠르게 상속됩니다. 하위 수준에서 특정 Item Revision에 대해 언제든지 조정할 수 있습니다. 결국, 누가 어디서 무엇을 볼 수 있는지에 대한 완전한 제어가 용이해집니다.
워크스페이스 콘텐츠 소유권 이전
워크스페이스의 폴더, Item 또는 Item Revision의 소유자는 현재 소유자 또는 워크스페이스의 관리자가 변경할 수 있습니다. 폴더, Item 또는 Item Revision이 사용자와 공유된 경우 사용자 Item의 Permissions 열에 있는 드롭다운에서 Owner 옵션을 사용하고 나타나는 Transfer Ownership 대화 상자에서 변경 사항을 확인합니다. 양수인에게 이메일 알림이 전송됩니다.

Altium 365를 통한 디자인 데이터의 글로벌 공유
Related page: Altium 365 플랫폼을 통한 글로벌 데이터 공유
Altium 365 인프라 플랫폼의 가장 강력한 측면 중 하나는 글로벌 규모의 협업을 지원한다는 점입니다. 그 핵심은 Global Sharing 에 대한 플랫폼의 지원입니다. Altium 365를 사용하면 모든 장치에서 간소화된 대화형 협업을 통해 현재 설계 진행 상황을 경영진이나 구매 부서 또는 잠재적 제조업체와 손쉽게 공유할 수 있습니다.
전 세계 어디서나 누구와도 데이터를 공유할 수 있습니다. 무엇을 누구와 공유할지는 여러분이 결정할 수 있습니다:
-
무료 웹 기반 Altium 365 뷰어를 사용하여 웹 브라우저를 통해 전자 설계 및 CAM 제조 데이터를 공유합니다. 이 수준의 공유는 설계 보기만 지원하며 댓글 달기는 불가능합니다.
-
워크스페이스 외부의 사람들을 해당 팀으로 초대할 필요 없이 보기 및 댓글만 달거나 편집을 위해 라이브(WIP) 설계를 공유할 수 있습니다. 이렇게 하면 초대된 이해관계자는 전체 워크스페이스의 디자인 데이터에 접근하지 않고도 진행 중인 실시간 디자인 프로젝트를 보거나 편집할 수 있습니다(해당되는 경우).
-
Altium 365 플랫폼에 업로드한 디자인의 '스냅샷'을 영구적으로 누구와도 공유할 수 있습니다. 이 수준의 공유는 공유된 스냅샷의 보기와 댓글 달기를 지원하지만, 이는 특정 시점의 디자인에 대한 정적 스냅샷일 뿐 라이브(WIP) 디자인이 아니라는 점을 명심하세요.
-
워크스페이스의 구성원들과 디자인 데이터 공유. 필요에 따라 프로젝트, 폴더, Item을 공유하세요. 예를 들어, 프로젝트의 경우 댓글과 피드백을 받기 위해 읽기 전용 접근를 공유할 수 있습니다. 또는 읽기/쓰기 접근 권한을 부여하여 지리적으로 분산된 팀의 전체 글로벌 공동 작업을 허용할 수도 있습니다(Altium Designer를 통해 편집 작업 수행).
-
지정된 Manufacturing Package 을 통해 제조업체와 릴리스 데이터를 공유하면 제조업체는 작업 공간에 접근할 수 없으므로 디자인 데이터가 보이지 않도록 Altium 365 플랫폼의 전용 Manufacturing Package Viewer 을 통해 열람할 수 있습니다. 그런 다음 Build Package 을 다운로드하여 보드를 제작 및 조립할 수 있습니다.