Defining PCB Editor Layer Color Preferences for Altium NEXUS
Parent page: PCB Preferences

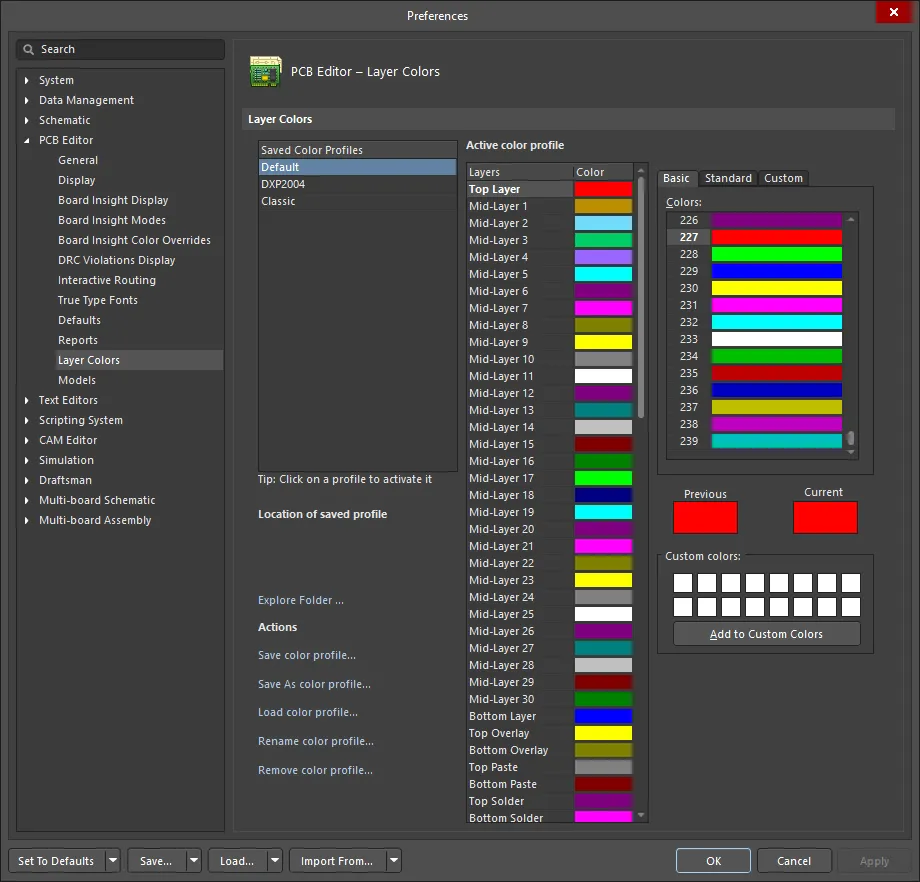
The PCB Editor - Layer Colors page of the Preferences dialog
Summary
The PCB Editor – Layer Colors page of the Preferences dialog provides controls to change the colors used for all supported board layers and system objects associated with viewing a board in 2D. Quickly change the color of a chosen layer or all layers on-the-fly. Alternatively, define a color profile to determine the colors assigned to each and every layer. Color profiles can be saved and loaded to enable the quick application of favorite/desired color schemes.
Access
The PCB Editor – Layer Colors page is accessed by clicking Layer Colors under the PCB Editor folder in the main Preferences dialog (accessed by clicking the  button in the top right corner of the workspace).
Options/Controls
- Saved Color Profiles - lists the names of the currently saved color profiles. Click on an entry to 'activate' it. This allows you to view the colors configured for the layers in that profile in the Active color profile region of the dialog and make any changes as required.
- Location of saved profile - shows the file path of a saved 2D color profile. Hover the cursor over an entry in the Saved Color Profiles list to see the path here.
- Explore Folder - click to open the folder in which the saved color profiles are located.
- Actions – this region presents various commands for working with color profiles at the file level (
*.PCBSysColors):- Save color profile – click to save any changes made to layer colors for the currently selected color profile.
- Save As color profile – click to access the Save Color Profile As dialog from where you can save the currently selected color profile as a distinct, new profile with a different name. The newly saved color profile will be added to the list of saved color profiles.
- Load color profile – click to access the Load Color Profile File dialog from where you can browse to and open a color profile file (
*.PCBSysColors). The chosen color profile will be added to the list of saved color profiles. - Rename color profile – click to access the Rename Color Profile dialog from where you can specify a new name for the profile as required.
- Remove color profile – click to remove the selected color profile. A confirmation dialog will appear. Click No to simply remove the profile from the saved color profiles list. Click Yes if you want to also remove the color profile file from the hard disk.
- Active color profile - this region provides controls to configure the layer colors for the active color profile, i.e., the profile currently selected in the Saved Color Profiles list.
- Layers - lists all supported board layers as well as system layers. For each layer in the list, its currently assigned color is displayed in the color swatch to the right. To change the color for a layer, simply select it in the list, then use the controls to the right to choose a new color.
- Selection region - the region to the right of the layers list offers the same controls as those found in the standard Choose Color dialog. Three tabs are available, essentially giving you simple and advanced modes for choosing the required layer color:
- Basic - this tab provides a flat listing of colors.
- Standard - this tab provides a hexagonal color selector filled with popular colors, as well as controls for quickly choosing black, white, or various shades of gray.
- Custom - this tab provides advanced controls for getting the exact shade of color required. Use the main color area to drag the cross-hair to the 'ball park' color required, then use the vertical slider bar to the right to fine-tune the shade. Use the Color model drop-down field to choose between two color models, either RGB (Red, Green, Blue) or HSL (Hue, Saturation, Luminance). The fields below update as you change the color controls above. Alternatively, enter the values for Red, Green, and Blue directly.
- Previous - shows the previous color used for the selected layer.
- Current - shows the new color chosen for the layer. This color will be applied during the current editing session with the software (if simply clicking OK), and/or will be committed to the color profile, if that profile is saved.
- Custom Colors - this area allows you to store up to 16 custom colors, which is useful if you have finally reached a required color through the color selecting controls and want to effectively 'save' that color for reuse. Clicking on any of the custom color swatches will quickly assign its color as the current layer color.
- Add to Custom Colors - use this button to add the currently chosen color to the custom colors palette.
