Parent page: Designing with a Connected Workspace
Your Workspace is sure to become a welcome part of your design arsenal – your single source for component data, real-time sourcing information, component traceability within designs, and collaboration with your mechanical design team. However there may be a time, for whatever reason, that you can no longer continue your design journey with the Workspace, and need to come off subscription.
Data can be extracted from your connected Workspace in the following ways:
- Batch download of components and models. For components, they are essentially exported to IntLib format. Components can also be acquired into an IntLib through the use of the Content Cart.
- Checking out designs (if under the own version control of the connected Workspace and you don't have a local working copy already).
- Downloading release packages.
The following sections take a look at how these various actions are performed.
Batch Download of Items
The Explorer panel in Altium NEXUS supports the ability to select multiple Items in your connected Workspace and have the source entities for those Items downloaded, en masse, into a newly created single source library or folder, as applicable. The following Item types are supported by this feature:
- Components – with the selected components downloaded into a Zip archive file containing source symbol and model libraries, and a source Integrated Library Package (
*.LibPkg).
- Symbols – with the selected symbols downloaded into a Schematic Library (
*.SchLib).
- Footprints – with the selected 2D/3D component models downloaded into a PCB Library (
*.PcbLib).
- Simulation Models – with the released data applicable to each Item in the selection (
*.SimModel, *.mdl, *.ckt) downloaded to a separate sub-folder.
Batch Download of Components
To download multiple components:
- Browse to the Workspace folder containing the components you want to download.
- Select the revision of the component(s) you want to include in the download. You can only choose one revision of a particular component (typically the latest revision) but can include as many different components in the download as required.
- Right-click on an entry in the selection and choose the Operations » Download selected component to zip command from the context menu.
- In the Save As dialog, specify the name and location for the generated Zip file. By default, the file will be named in the format
Components - <Date> - <Time>.zip.
-
Once ready, click the Save button to proceed with the download and generation of the Zip file. An Integrated Library Package (*.LibPkg) will be created with source SchLib (with symbols, parameters, and model links) and PcbLib (with footprint models) files generated and added. This is then compressed into the Zip file, which is generated in the specified folder. An information dialog will confirm successful generation of the file.
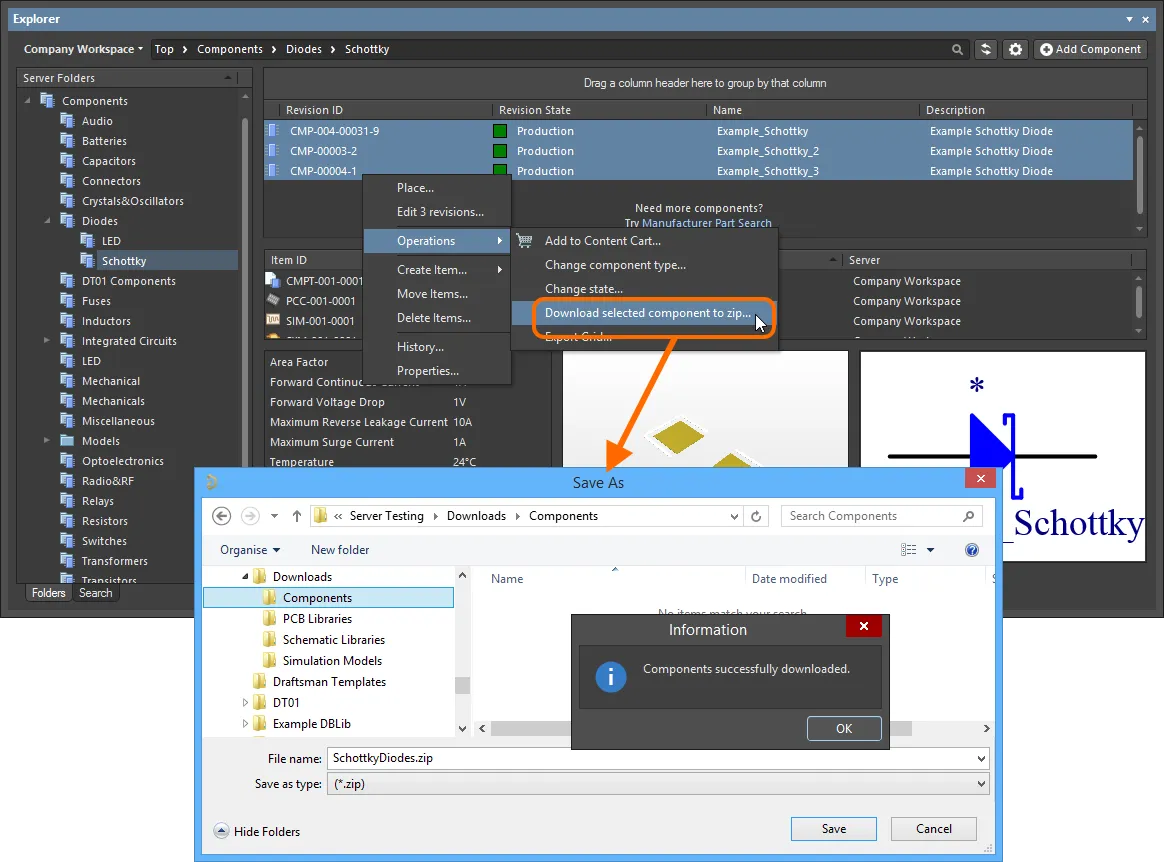
Example download of multiple selected components into a ZIP archive.
Use the source in the Zip archive to quickly generate an integrated library containing your chosen component(s).
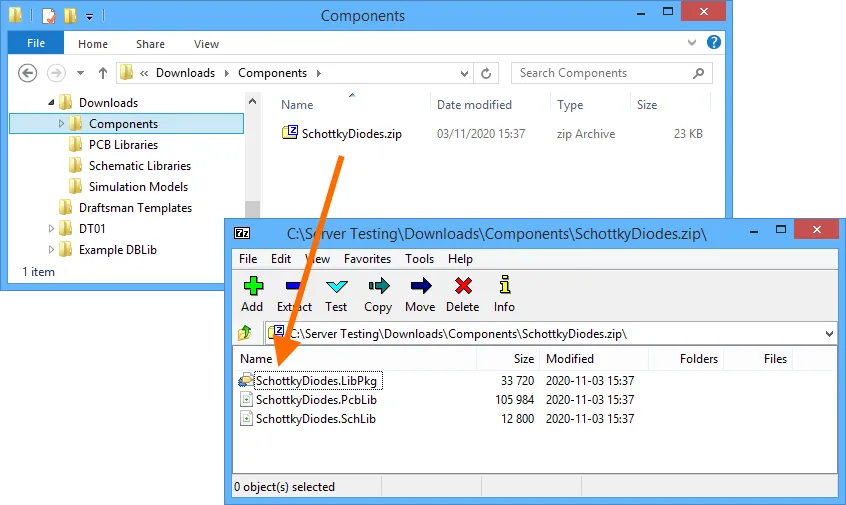
Resulting Zip archive with the source for the downloaded components.
Batch Download of Schematic Symbols
To download multiple schematic symbols:
- Browse to the Workspace folder containing the symbols of interest.
- Select the symbols required for download using standard multi-select controls (Ctrl+Click, Shift+Click).
- Right-click on the selection and choose the Operations » Download selected symbol in library command.
- Use the Choose destination file dialog to determine where, and with what name, the new Schematic Library file is to be generated.
- Click Save – the SchLib will be created, with progress displayed in a dedicated Downloading dialog.
Once the download is complete, the Downloading dialog provides the ability to explore the downloaded content within Windows Explorer (click Explore), or to open the library within Altium NEXUS (click Open).

Example download of multiple selected symbols into a Schematic Library document.
Each symbol is named using the source symbol's Name field.
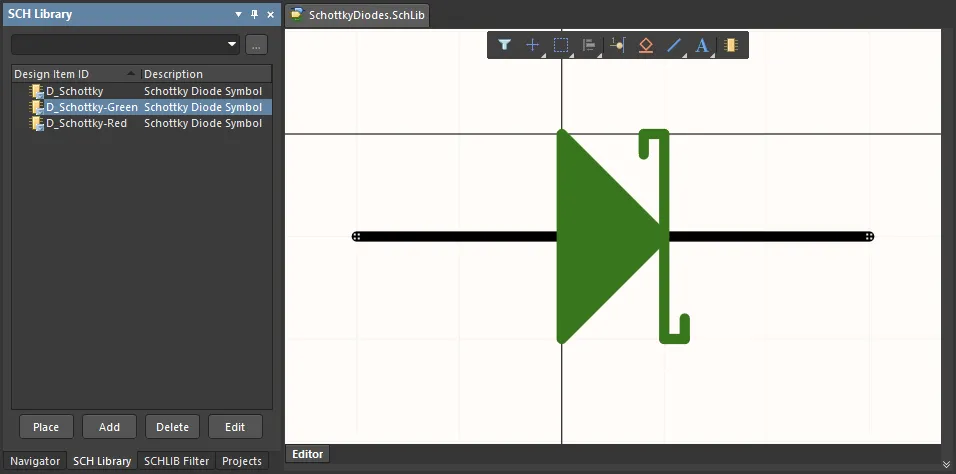
Resulting Schematic Library document with the downloaded symbols.
Batch Download of Simulation Models
To download multiple simulation models:
- Browse to the Workspace folder containing the simulation models of interest.
- Select the simulation models required for download, using standard multi-select controls (Ctrl+Click, Shift+Click).
- Right-click on the selection and choose the Operations » Download selected sim model to folder command.
- Use the Choose destination folder dialog to determine the parent download folder for the models.
- Click Select Folder – the download will proceed, with progress displayed in a dedicated Downloading dialog.
Once the download is complete, the Downloading dialog provides the ability to explore the downloaded content within Windows Explorer (click Explore).
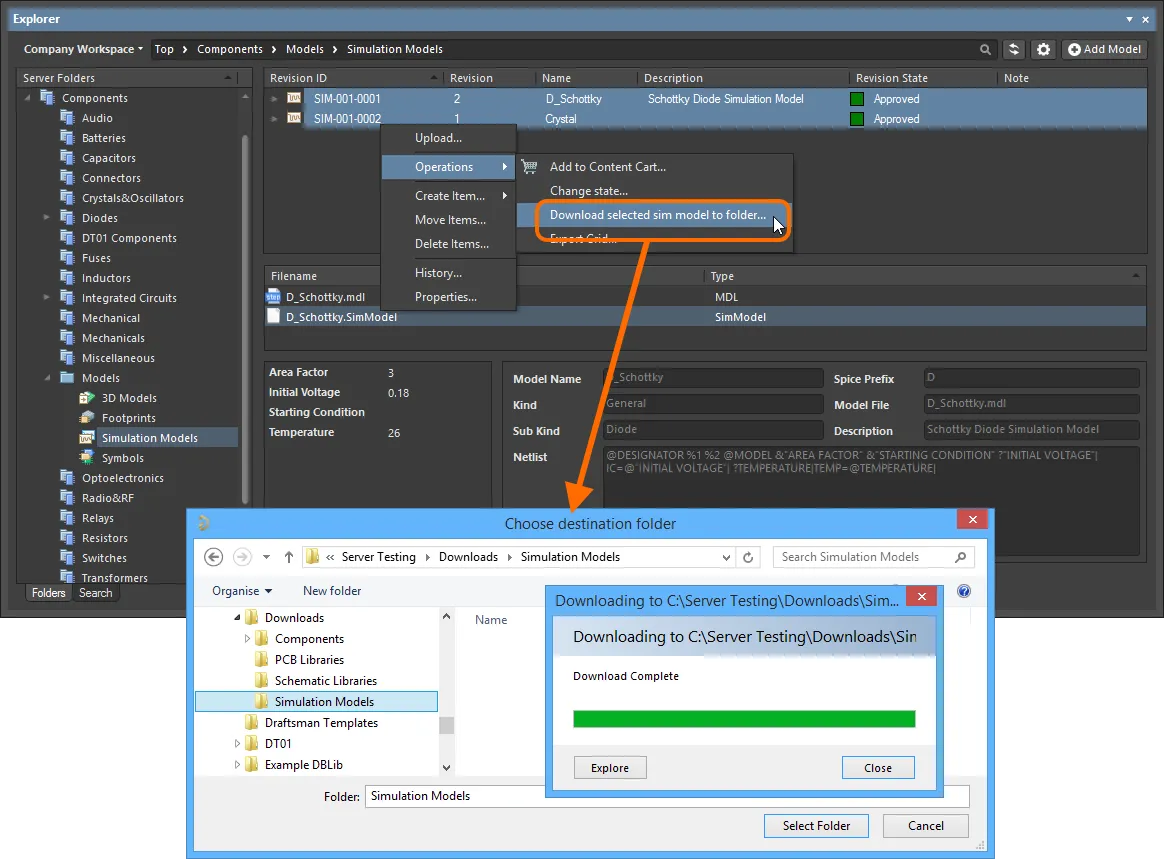
Example download of multiple selected simulation models into a designated folder.
Within the destination folder, a sub-folder for each Item in the selection will be created, named using the Item-Revision ID. The release data can be found in the Released sub-folder therein.

Accessing the data for a Simulation Model Item included in a batch download.
Component Extraction using the Content Cart
To be able to use this functionality in Altium NEXUS, you will need to enable the use of legacy component management methodologies. This is disabled by default in Altium NEXUS, as it is not recommended. You can restore this functionality by enabling the
Legacy.UnManagedLibraries option in the
Advanced Settings dialog – accessed by clicking the
Advanced button, on the
System – General page of the
Preferences dialog. You will need to restart Altium NEXUS for the changes to this setting to take effect.
You also have the ability to acquire components from your connected Workspace into an Integrated Library (*.IntLib). The vehicle through which this is done – your interface to the Workspace's Data Acquisition Service – is the Content Cart. Access to the Content Cart dialog is made from within the Explorer panel in Altium NEXUS. While browsing your Workspace from which you wish to obtain data, right-click on an Item Revision that you wish to acquire and choose the Operations » Add to Content Cart command from the context menu.
From the Content Cart dialog, the process to acquire into an IntLib is as follows:
-
Click on the Select target server link and choose IntLib file from the menu.

Set the target of the Content Cart to be an IntLib file.
-
Specify the name, and location, for the generated IntLib file. By default, the file will be named in the format Integrated_Library - <Date> - <Time>.IntLib, and generated in the location \Users\Public\Documents\Altium\NEXUS<Version>\Library\ExportCmpLib. Modify this as required through the Save As dialog – accessed by clicking the Change link.

Accept the default target folder and filename, or change as required.
- If you need to acquire additional components into the same IntLib, click the Add More Items link, and choose the Select entry to access the Choose Item dialog. From here you can browse the source Workspace for more components. Alternatively, choose the Add manually entry to access the Add new items dialog. This dialog allows you to paste an external list of components that you require (one item per line), and which can then be searched for within the source Workspace, using a chosen search criteria (GUID, Item ID, Name, or MPN).
-
Once ready, click the  button to proceed with generation of the IntLib. A temporary Integrated Library Package (
*.LibPkg) will be created, with source SchLib (with symbols, parameters, and model links) and PcbLib (with footprint models) files generated and added. This is then compiled to produce the IntLib file, which is generated in the specified folder. An information dialog will confirm successful generation of the file.

Deliver the cart to the target folder, which will contain the required Integrated Library file.
After generation, the IntLib can be added as part of the available file-based libraries for the software (through the Installed tab of the Available File-based Libraries dialog). It will then be available for use from the Components panel. Place components from the IntLib into your design as required.
Checking Out Designs under the Full Version Control
For a design project under the full Workspace's version control – created and stored within the connected Workspace's Versioned Storage Git design repository – extraction from your Workspace is simply a case of checking out the design as a local working copy. This is performed directly from within Altium NEXUS using the File » Open Project command. The Open Project dialog will appear, from where you can choose which project to open from your Workspace – when connected to a Workspace, that Workspace will appear in the Locations region of the dialog, distinguished by the  icon and appearing with the name given to the Workspace.
Only those projects that have been shared with you (you have permission to access to) will be listed.
You have the option to open the project to the default checkout path or use the

drop-down menu to specify a custom path. The default checkout path is defined as a property of the design repository in which the project resides. For a Git repository (e.g. the
Versioned Storage repository that is native to the connected Workspace), this is the
Local Path field found in the
Git Repository properties dialog. Access the properties dialog by selecting the entry for the repository – on the
Data Management – Design Repositories page of the
Preferences dialog – and clicking the

button.
Once opened, the project will appear under an entry for your Workspace, within the Projects panel in Altium NEXUS.

Obtain a local copy of a project by opening it (essentially checking it out of your connected Workspace).
Downloading Release Packages
Extraction of any and all releases of design projects – released into your connected Workspace using the Project Releaser in Altium NEXUS – is simply a case of downloading those release packages from within the Workspace's browser interface.
Release packages are presented in the Manufacture view when browsing a specific design project through the detailed management page for the project – a detailed, CAD-centric view of the project.
The detailed management page for the project is opened by selecting the required project, clicking the

control above the listing of projects, and choosing the
Open entry on the associated menu. Alternatively, double-click directly on the required project entry in the list (or click on its name). The page will open in a new browser tab.
Any and all of the data sets included in a release can be downloaded. Click the  button associated with the release to access a window in which to define which of that release's data sets to download. After clicking the
  button a single Zip archive containing a folder for each included data set will be downloaded to your Web browser's default downloads folder.
Click the Show Files control to browse the files involved with each data set that is part of the release. Download is supported at all levels of granularity – from the whole data set, to a particular folder/type of output, down to the individual file level. Hover over an entry and click the  button to start the download. For a data set or specific folder of output, a Zip archive will be downloaded. For an individual file, that file (not zipped) will be downloaded.
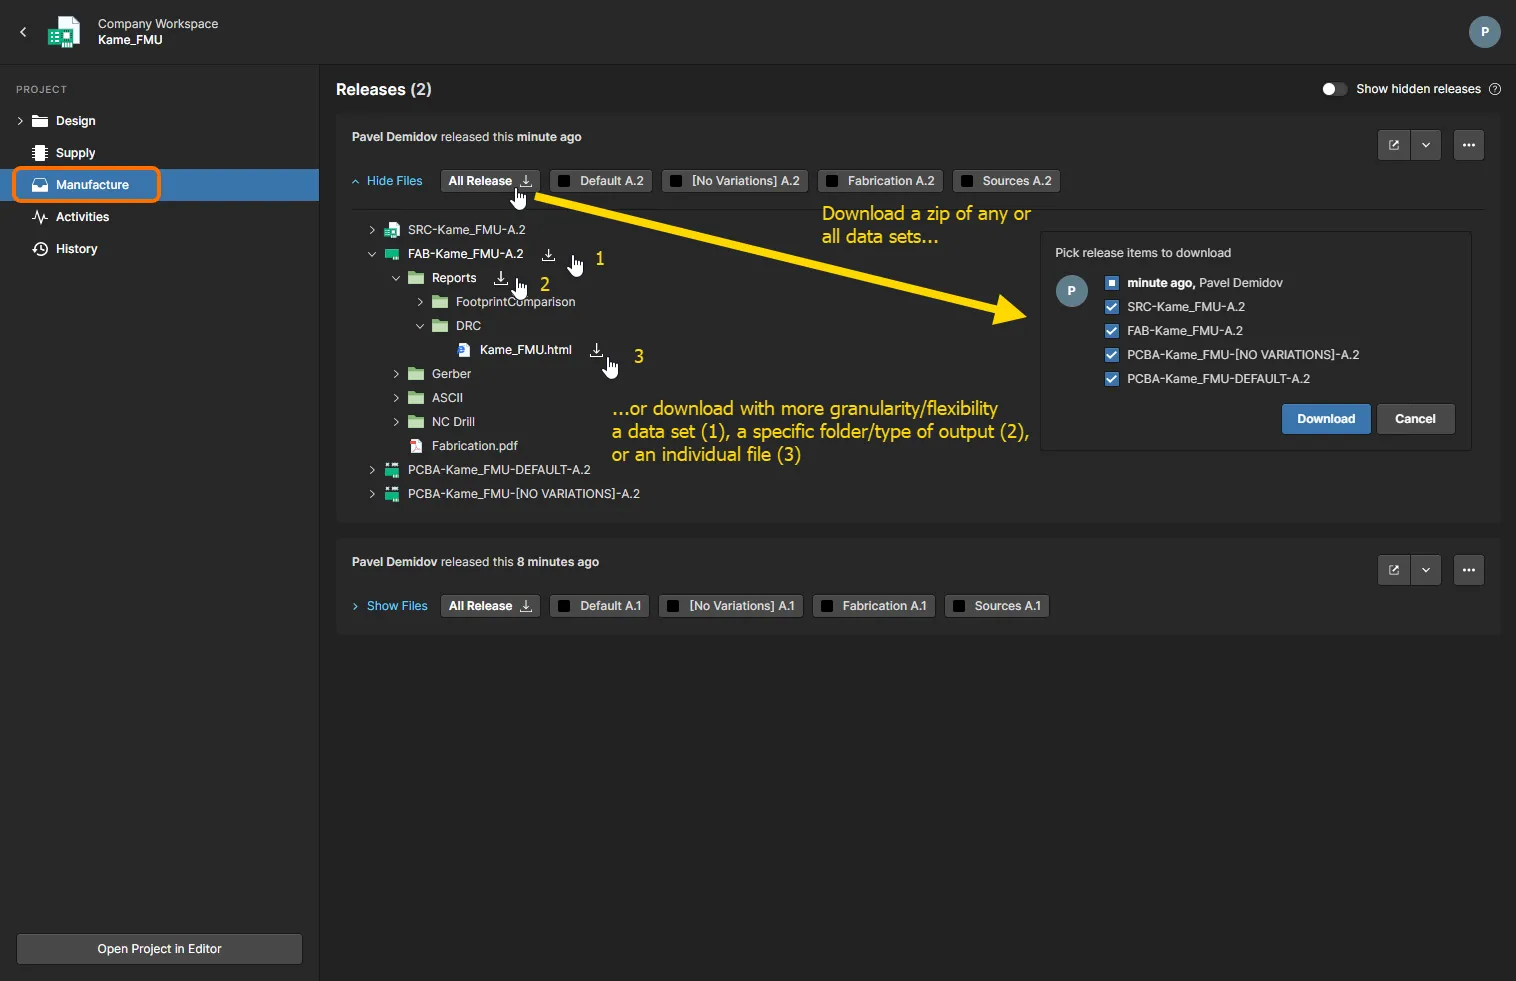
The Manufacture view gives you access to the released data packages, with the ability to download released data at varying levels of granularity.
Data can also be downloaded when viewing a release package. To open a release package for viewing click on its associated

button to open the full release package. Alternatively, click the

button and choose what to view – either the full release package (
All Release) or a specific assembly (variant). An opened project release is presented in a new
Manufacturing Portal browser tab.