プロジェクトを扱う際に推奨され、最も強力な方法は、接続されたワークスペース内で直接新しいプロジェクトを作成することです。既存のプロジェクトがある場合は、それをオンラインで利用可能にし、正式なバージョン管理を有効にすることで、ワークスペースに取り込むことができます。どちらの場合も、プロジェクトはワークスペースのネイティブバージョン管理システム(VCS)を通じて保存および管理されます。これにより、Altium Designerを通じてプロジェクトを扱う際に、プロジェクトの全機能を利用できます。ワークスペースのVCSの完全な管理下にプロジェクトを置くことは、そのプロジェクトを複数の人々と共有し、Altium Designerを通じて編集(ワークスペースのメンバーである場合)し、履歴追跡や高度なプロジェクト共有など、プラットフォームの追加機能を利用する唯一の方法です。
バージョン管理されていないローカルプロジェクトや外部バージョン管理下にあるプロジェクトは、
シンプル同期と呼ばれる方法を使用してワークスペースに登録できます。プロジェクトのミラーがワークスペースに作成され、同期されます。ローカルファイルの変更が保存されると(または外部設計リポジトリに保存およびコミットされると)、それらの変更は自動的にワークスペース内のミラープロジェクトと同期されます。シンプル同期を使用すると、Altium 365プラットフォームを通じて利用可能なコラボレーション機能を楽しみながら、元のプロジェクトをそのままの場所に保持できます。ただし、外部VCS下にないローカル設計プロジェクトの場合、そのプロジェクトは単一の人物(そのプロジェクトをオンラインでワークスペースに利用可能にした人物)によってのみ編集できることに注意してください。
既存のプロジェクト(ローカルプロジェクトまたは現在外部バージョン管理下にあるプロジェクト)をワークスペースで利用可能にするには、通常どおりAltium Designerでプロジェクトを開き、Projectsパネルのエントリを右クリックして、コンテキストメニューからMake Project Available Onlineを選択し、Make Available Onlineダイアログにアクセスします。エンタープライズサーバーワークスペースを使用する場合、Make Project Available on ServerコマンドがMake Available On Serverダイアログを開きます。
プロジェクト作成プロセステーマに対して1つ以上のアクティブなプロセス定義がワークスペースに接続されている場合、既存のプロジェクトをワークスペースで利用可能にする操作は、Projectsパネルでプロジェクトエントリを右クリックし、Convert to Managed Projectサブメニューからコマンドを選択することで行われます。プロセスベースのプロジェクト変換についてさらに学びましょう。

既存のローカルプロジェクトをワークスペースで利用可能にし、事実上ワークスペースに「登録」し、それの「ミラー」を作成します。
Make Available Onlineダイアログのオプションとコントロール
-
Project Name – ワークスペース内のプロジェクトの名前。デフォルトでは、元のプロジェクトの名前になります。
-
Description – プロジェクトの望ましい説明を入力します。
-
Version Control – このオプションをチェックすると、ローカルプロジェクトがワークスペース独自のVCS(Git)に追加されます。このオプションがチェックされていない場合、プロジェクトファイルは基本アクセスを可能にし、他の人との閲覧やコメントのみの共有を可能にするために、単にワークスペースに保存されます – いわば、形式の緩いシンプル同期です。正式なバージョン管理を有効にすることをお勧めします。そうすることで、ワークスペースとAltium 365プラットフォームを通じて、提供される最大の機能にアクセスできます。このオプションは、プロジェクトが現在バージョン管理されていない場合にのみ利用可能です。
-
Migrate to Altium 365 Versioned Storage – 外部VCSを使用するプロジェクトを、ワークスペースのVCSの完全な管理下にあるプロジェクトに移行するためにこのオプションを有効にします。そのようなプロジェクトは、ワークスペースのネイティブVCS機能から恩恵を受けることができます。このオプションは、プロジェクトが現在外部VCS下にある場合にのみ利用可能です。
-
Advanced – 追加のオプションにアクセスするためにクリックします。
Make Available On Serverダイアログのオプションとコントロール
-
Project Name – ワークスペース内のプロジェクトの名前。デフォルトでは、元のプロジェクトの名前になります。
-
Description – プロジェクトの望ましい説明を入力します。
-
Migrate to Altium Versioned Storage – 外部VCSを使用するプロジェクトを、ワークスペースのVCSの完全な管理下にあるプロジェクトに移行するためにこのオプションを有効にします。そのようなプロジェクトは、ワークスペースのネイティブVCS機能から恩恵を受けることができます。このオプションは、プロジェクトが現在外部VCS下にある場合にのみ利用可能です。
-
Advanced – 追加のオプションにアクセスするためにクリックします。
-
Repository - このドロップダウンメニュー(存在する場合)には、Workspaceのバージョン管理サービスを通じて管理され、共有されているすべての設計リポジトリが表示されます。新しいプロジェクトとそのファイルを保存するリポジトリを選択します。デフォルトでは、単一のGitベースのリポジトリ(Versioned Storage)が利用可能です。
追加のRepository Folderフィールドがあり、リポジトリ内の別のターゲットフォルダを指定または参照するために使用できます。 をクリックして、リポジトリ内に必要なフォルダ構造をナビゲートして作成できるAdd to Version Controlダイアログを開きます。
リポジトリドロップダウンメニューとリポジトリフォルダフィールドは、SVNリポジトリの使用が有効になっているバージョンまたはサーバ製品からEnterprise Serverをアップグレードした場合にのみ表示されます。代わりに、Enterprise Serverは、Workspaceの設計プロジェクトすべてを収容するための単一のGitベースの設計リポジトリを提供し、この場合リポジトリドロップダウンメニューは表示されません。
Altium On-Prem Enterprise Serverでは、バージョン7.2からSVNはサポートされていません。SVNプロジェクトの管理に関する制限を避けるため、SVNプロジェクトをEnterprise Server Workspaceの組み込みGitリポジトリに移行することをお勧めします。これは、サーバーをアップグレードする前にこちらで説明されているように行うことができます。
Altium On-Prem Enterprise ServerでのSVNの廃止についての詳細は、Altium On-Prem Enterprise Server 7.2.1でのSVN廃止ナレッジベース記事を参照してください。
-
Folder - このフィールドは、移行されるプロジェクトのフォルダをWorkspaceのフォルダ構造内に作成する場所を指定するために使用されます。新しいプロジェクトのデフォルトパスは、WorkspaceのブラウザインターフェースのAdmin – Settings – Projectsページで指定されます(デフォルトでは、これはProjects\<ProjectName>になります)。 をクリックして、必要に応じて異なるWorkspaceフォルダを参照して選択できるChoose Folderダイアログを開きます。これは、Explorerパネルの簡易版です。
Make Available Onlineダイアログを使用して、プロジェクトのNameを変更し、Descriptionを追加します。デフォルトでは、名前は元のプロジェクトのものになります。
Version Controlオプションをチェックすると、プロジェクトがWorkspaceの独自の組み込みVCS(Git)の下に追加されます。このオプションがチェックされていない場合(Altium 365 Workspaceのオプションのみ)、プロジェクトファイルは単にWorkspaceに保存され、基本的なアクセスを可能にし、他の人が閲覧やコメントをするための共有を有効にします - シンプル同期の配置です。バージョン管理を有効にすることをお勧めします。そうすることで、WorkspaceおよびAltium 365プラットフォームを通じて、およびそれによって提供される最大の機能にアクセスできるようになります。プロジェクトをWorkspaceでミラーリングする機能(シンプル同期)は、Altium 365 Workspaceに接続している場合にのみ利用可能です。
ローカルプロジェクトがすでにバージョン管理(外部設計リポジトリ)の下にある場合、Migrate to Altium 365 Versioned StorageオプションがMake Available Onlineダイアログで利用可能になります。外部VCSからWorkspaceネイティブVCSへの移行についてもっと学びましょう。
Altium 365 Workspaceでのプロジェクト共有:
もしVersion Controlオプションが無効になっている場合 – つまり、ローカルプロジェクト(外部VCS下ではない)に非公式のシンプル同期機能を使用する場合 – 設計プロジェクトは一人のみ(そのプロジェクトをWorkspaceで利用可能にした人、つまり所有者)によって編集できます。シンプル同期の強みは、他の誰にもあなたの設計を編集させたくないが、Altium 365のグローバル共有パラダイムを利用して、その設計を複数の他の人と閲覧やコメントのために共有したい場合に発揮されます。
もしVersion Controlオプションが有効になっている場合 – WorkspaceのVersioned StorageGitベースの設計リポジトリの使用を通じて – 複数の人がプロジェクトを編集、または閲覧やコメントのために共有されます。
ダイアログのAdvancedリンクをクリックすると、Folderフィールドが表示されます。このフィールドは、ミラーリングされるプロジェクトのフォルダをWorkspaceのフォルダ構造内に作成する場所を指定するために使用されます。新しいプロジェクトのデフォルトパスは、WorkspaceのブラウザインターフェースのAdmin – Settings – Projectsページで指定されます(デフォルトでは、これはProjects\<ProjectName>になります)。必要に応じて異なるWorkspaceフォルダを参照して選択するために、 ボタンをクリックします。
Make Available Online ダイアログでプロジェクト移行のプロパティを必要に応じて定義した後、OKをクリックします。外部バージョン管理下にないプロジェクトがオンラインで利用可能にされた場合(Altium 365 WorkspaceでVersion Controlオプションがチェックされた)、プロジェクトとファイルはWorkspaceのVersioned Storage設計リポジトリにコミットおよびプッシュされます。Projectsパネルは、Workspace設計リポジトリとローカル(作業コピー)リポジトリの間に存在する完全に同期された状態を、関連する アイコンによって示します。プロジェクトは真のWorkspaceプロジェクトになります - 単にWorkspaceに「登録」されたのではなく、実際にWorkspaceのバージョン管理の下にコミットされます。設計に加えられた変更は、Workspaceのリポジトリに保存(コミット/プッシュ)されなければなりません。

Workspaceで利用可能にされたプロジェクトは、その後、WorkspaceのブラウザインターフェースのProjectsページから利用可能になります。
Workspaceで利用可能にされたプロジェクトは、最初は作成者(所有者)とWorkspaceのすべての管理者に対して読み書きアクセスで共有されます。プロジェクトアクセス権限を設定する方法の詳細については、
設計の共有を参照してください。
既存の外部バージョン管理リポジトリを使用する場合の制限
前述のように、ローカルの設計は既に既存の外部バージョン管理システム(Git、SVN、EPDMなど)で追跡されている場合があります。Altium 365 Workspaceを使用する場合、以前と同様にこのセットアップを続け、Make Project Available Online機能を使用して、それらの設計をWorkspaceに登録することでWorkspaceで利用可能にすることができます。
このモードでは、設計に変更を加えて外部VCSリポジトリにそれらの変更をコミットするたびに、その設計データはバックグラウンドでWorkspaceにミラーリングされ、通常どおり必要な処理が実行されます - プレビュー、使用箇所など。ただし、注意すべきいくつかの制限があります:
-
新しい設計プロジェクトの作成は、以前のフローに従う必要があります。つまり、外部VCSシステムで手動で作成されます。その後、プロジェクトはMake Project Available Online機能を使用してワークスペースに登録され、ミラーリングされます。
-
設計変更が行われたが、コミット/プッシュがAltium Designerを通じずに外部ツールによって実行された場合、それらの変更はワークスペースのミラープロジェクトには表示されません。これは、プロジェクトが次にAltium Designerで再オープンされたときに修正され、ローカルプロジェクトがミラーワークスペースバージョンと自動的に同期されます。変更が別のユーザーによって行われた場合、再オープンされたプロジェクトファイルは
Out Of Date ( )として表示され、バージョンコントロールのUpdateコマンドを使用して修正できます。
-
プロジェクトを2人目の人が開く場合、その外部VCSリポジトリへのアクセスが必要になります。
-
権限管理は、ワークスペースとマスターソース(外部のGit/SVNなどのVCSリポジトリ)の両方で設定/維持する必要があります。
-
Altium 365プラットフォームを通じて提供される一部の機能は、プロジェクトがワークスペースのネイティブバージョンコントロールシステム下にある場合にのみ機能します。外部バージョンコントロールシステムを使用してプロジェクトを保持することで、プラットフォームに利用可能になるこれらの機能は利用できません。外部VCSからワークスペースのネイティブVCSへの移行は可能です。次のセクションを参照して、これを実現する手順を確認してください。
GitHubを使用して作業する
外部バージョンコントロールシステム(VCS)としてGitHubプラットフォームを使用することは、設計プロジェクトをホストおよび共有するための人気の方法であり、GitリポジトリはAltium Designerによってサポートされています。上記のAltium 365ワークスペースの場合と同様に、既存の外部VCSアレンジメントはワークスペースと同期(ミラーリング)され、その高度なデータ管理およびコラボレーション機能を利用できます。
GitHub自体の使用方法は、会社の慣行や手元にあるGitツールによって異なりますが、一般的には、設計プロジェクトはローカルGitリポジトリで作成され、その後GitHub(リモート)リポジトリにプッシュされるか、GitHubからローカルリポジトリにクローンされます。ローカルGitリポジトリにあるプロジェクトは、Altium Designerで編集用に開くことができます。ソフトウェアはローカル/リモートのGitHubリポジトリを認識して使用します。
GitベースのプロジェクトがAltium 365ワークスペースにミラーリングされた場合(Make Project Available Online)、プロジェクトはAltium Designer内の他のプロジェクトと同様に管理および作業できます。このアレンジメントでは、ワークスペースは引き続きプロジェクト管理システムのすべての利点を提供し、GitHubと透過的に通信して主要なVCSアクション(コミット、プッシュ、プルなど)を実行します。Altium DesignerはGitHubログイン資格情報を要求し、その後のGitHubとのやり取りにこれらを保持します。
GitHubアカウントが
二要素認証で設定されている場合、Altium Designerは自動的にGitHubに接続することはできません。
GitHubプロトコル
Git VCSによって提供されるデータ転送プロトコルの範囲がありますが、Altium Designerは現在、ローカルGitリポジトリとそのリモートマスターリポジトリ間の接続についてHTTP/HTTPSプロトコルのみをサポートしています。実際には、適用されるプロトコルはリモートリポジトリ接続のURLプレフィックスによって設定されます。https://<remote repository>、ssh://<remote repository>、git://<remote repository>などです。
GitHubはSSHとHTTPSプロトコルの両方をサポートしており、接続にはHTTPS URLの使用を推奨しています。
► GitHubでどのリモートURLを使用すべきか?を参照してください。
HTTPSプロトコルは、安全な接続を提供し、使用および実装が簡単であるという利点がありますが、SSHは公開鍵の必要性やファイアウォール/プロキシポートの要件など、扱いがより複雑であり、安全性が低いとも言え、SSO(シングルサインオン)認証の利便性を提供しません。
同様に、認証と設定の複雑さがないため、GIT接続プロトコルはここでは推奨されていません(またはサポートされていません)。
外部VCSシステムがHTTPS以外のプロトコル、たとえばGitHub SSH接続にバインドされている場合、これはリモートからクローンされたリポジトリにプリセットされます。このプロトコルはAltium Designerと互換性がないため、プロジェクトをAltiumワークスペースと統合しようとするとエラーが発生します。SSH接続の場合、リポジトリ自体がこのプロトコルをサポートしている場合、サポートされているHTTPS接続プロトコルを使用するようにリポジトリを更新するよう提案されます。ローカルGitリポジトリで使用されているリモートURLプロトコルが不明な場合は、git remote – vコマンドを使用して確認できます。
 Git Bashコマンドラインインターフェースを使用して、リポジトリのリモートURL設定を確認します。
リポジトリを異なるURL、たとえばAltium Designerとの互換性を可能にするHTTPSプロトコルに再設定するには、git remote set-url <name> <URL>コマンドを使用します。ここで、URLのプレフィックスはプロトコルタイプを指定します。
 リモートリポジトリ接続URLプロトコルを変更し、リモートコマンドで確認します。
外部VCSからワークスペースネイティブVCSへの移行
Altium 365ワークスペースに接続されている場合、Altium Designerはまた、外部VCSシステムを使用するプロジェクトを、設計ファイルを独自のGitリポジトリでホストする完全に管理されたワークスペースプロジェクトに忠実に移行する機能を提供します。変換された設計プロジェクトは、以前のVCSコミットの履歴を保持し、ワークスペースのネイティブVCS対応機能、高度なプロジェクト共有、シングル認証、およびイベントベースの履歴タイムラインなどの利点を享受できます。
プロジェクトVCS移行機能は、GitおよびSVNの外部バージョンコントロールシステムの両方をサポートしており、ローカルファイルベースのプロジェクトをオンラインで利用可能にする場合、またはミラー(同期のみ)プロジェクトをワークスペース自身のGit VCSの下に昇格させる場合に利用できます。
外部バージョンコントロールの下に格納されたプロジェクトを単純に移行するには、Projectsパネルでプロジェクト名を右クリックし、コンテキストメニューからMake Project Available Onlineオプションを選択するか、メインメニューからProject » Make Available Onlineを選択します。次に表示されるMake Available Onlineダイアログで、Migrate to Altium 365 Versioned Storageオプションをチェックし、操作を確認します(OK)。
有効にされたMigrate to Altium 365 Versioned Storageオプションは、外部VCSリポジトリをワークスペースGitリポジトリに置き換え、プロジェクトをAltium 365ワークスペースで格納および管理されるものに変換し、可能な場合は外部VCSからのバージョンコミット履歴を持ち込むことを意味します。移行オプションがチェックされていない場合、プロジェクトはワークスペースにミラーリングされます(Simple Syncアレンジメント)が、外部リポジトリをそのVCSストレージとして維持します。Altium DesignerがEnterprise Server Workspaceに接続されている場合、VCS移行も利用可能です。この場合、Make Available On ServerダイアログでMigrate to Altium Versioned Storageオプションが利用できます。移行オプションがチェックされていない場合、プロジェクトの外部リポジトリはそのVCSストレージとして維持されます(Simple Syncの配置はEnterprise Server Workspaceではサポートされていません)。
 ローカルVCSプロジェクトをAltium 365 Workspaceの完全に管理されたVCSプロジェクトに移植するには、オンラインで利用可能にする際にVCS移行オプションをチェックします。
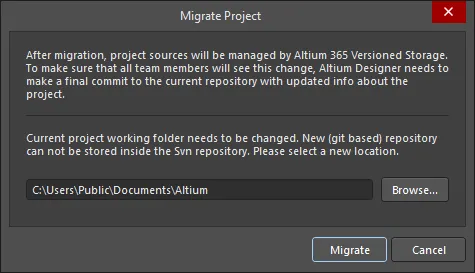
Migrate Projectダイアログが開き、プロジェクトがWorkspaceのVCSの完全な管理下に移行されることを警告します。新しい(gitベースの)ローカルプロジェクトリポジトリが作成されるハードドライブ上のフォルダを選択するためにBrowseボタンをクリックします。移行を進めるにはMigrateボタンをクリックします。

Migrate Projectダイアログ
指示に従った後、最終VCSコミットを含むと、プロジェクトはWorkspace Gitリポジトリのバージョン管理下にあります。外部VCSのコミット履歴とそのコメント/メッセージは、新しいWorkspace VCSプロジェクトに移植され、Altium DesignerのHistory viewでアクセスできます - Projectsパネルでプロジェクト名を右クリックし、History & Version Control » Show Project Historyコマンドを選択します。
 移行されたとき、プロジェクトの外部VCSコミット履歴(左に表示)はAltium Designer History view(右)に転送されます。
移行プロセス後にProject Historyを初めて開くと、含まれるすべてのコミットのデータが計算されていることがわかります。Workspaceはこれらのコミットとそれらの違いを処理するために時間が必要です。
外部VCSプロジェクトが既にAltium 365 Workspaceでmirrored project(同期されたローカル-サーバーファイル)として管理されている場合、そのVCSファイルはProject History view、Project Optionsダイアログ、またはProjectsパネルの History & Version Control右クリックコンテキストメニューから利用できるMigrate to Altium Versioned Storageコマンドを使用して、サーバーのネイティブGitリポジトリに移行できます。
 Workspaceと同期(ミラーリング)されたVCSプロジェクトは、Migrate Project to Altium Version Controlオプションを使用して移行されます。
移行パフォーマンスは、ソースの外部VCSがGitベースの場合が最も速いです - プロセスは単純です。Altium 365 Workspace VCSもGitベースだからです。しかし、SVNの場合、リポジトリのサイズと含まれるコミットの数に応じて、移行には時間がかかる場合があります。
VCS移行の制限
-
Git
-
Altium 365 Workspaceに接続されている場合、複数のPCBプロジェクトを含むGitリポジトリがサポートされています。OKをクリックすると、Make Available Onlineダイアログで、移行するファイルを選択するように求められます。
-
プロジェクトファイル(
*.PrjPcb)は、Gitリポジトリのルートフォルダに配置する必要があります。
-
SVN
-
基本的なSVN
Fileプロトコルはサポートされていません。
-
SVNリポジトリに複数のプロジェクトが含まれている場合、移行プロセスは既存のSVN作業コピーに加えて新しいローカルフォルダを作成します。これは、Altium 365 WorkspaceストレージがGitベースであり、GitリポジトリをSVN作業コピー内に格納することはできないためです。
-
プロジェクトフォルダに対してのみコミットを認識する移行プロセスのため、プロジェクトフォルダに関連する外部ファイルを含むコミットは表示されない場合があります。
外部VCSプロジェクトをAltium 365 Workspaceに成功裏に移行した後、外部リポジトリへのリンクは自動的に削除されます。この機能はAltium Designer 23.0で実装されました。プロジェクトが以前のバージョンのAltium Designerを使用してAltium 365 Workspaceで利用可能にされた場合、リポジトリのエントリがPreferencesダイアログのData Management - Design Repositoriesページに表示されることがあります。Workspaceの管理者であり、リポジトリがWorkspaceプロジェクトを参照していない場合、リポジトリをWorkspaceから削除するには、そのエントリを選択してRemoveボタンをクリックします。プロジェクトがソフト削除(ゴミ箱に移動)されている場合は、リポジトリを参照しているため、永久に削除する必要があります。WorkspaceのVersioned Storageリポジトリは削除できません。
移行後のコラボレーション
-
WorkspaceチームメンバーがプロジェクトをAltium Versioned Storageに移行した場合、他のプロジェクトコラボレーターがチームWorkspaceに接続し、その後、ローカル(作業中)プロジェクトコピーを更新することを確認する必要があります。後者は、Projectsパネルでプロジェクトファイルに関連付けられた
 アイコン(Out of Date)によって示され、Project » History & Version Control » Update Whole Projectコマンドによってアクションされます。
-
移行されたプロジェクトが更新されると、Altium Designerは新しいリポジトリへのリンクを更新するために、プロジェクトのローカル作業フォルダを再構築することを提案します。Fix version control linkダイアログで推奨されるオプションを選択して、ローカルプロジェクトの更新を完了します。

-
プロジェクトコラボレーターがチームWorkspaceに接続せずにVCS設計変更をコミットした場合、これらは外部リポジトリに登録され続け、したがって移行されたWorkspace VCSプロジェクトと同期していないことに注意してください。
-
移行中、Altium Designerは元のリポジトリに通知マークを設定するコミットを実行し、他のチームメンバーのAltium Designerインスタンスによって移行されたと認識できるようにします。

外部VCSからWorkspace VCSへのプロジェクトの手動移行
外部VCSリポジトリを使用するプロジェクトを、Altium WorkspaceおよびそのネイティブGit VCSリポジトリで完全に管理されるものに手動で移行することが望ましい場合があります。これを行うには、プロジェクトのスナップショットを作成し(これにより、外部VCSおよびWorkspace(既にそこで利用可能にされている場合)から切断されます)、その後、WorkspaceのVCSの下で再び利用可能にします - いわば新たに始めるかのように。以下の手順に従ってください:
-
外部バージョン管理システムからプロジェクトを切断(削除)します。これは、現在のVCSへの外部インターフェースツールから、またはAltium Designerを通じて実行できます。後者の場合、ProjectsパネルとStorage Managerパネルの両方にバージョン管理からプロジェクトを削除するコマンドがありますが、最もクリーンな方法はプロジェクトパッケージャーを使用することです。プロジェクトパッケージャーを使用すると、バージョン管理の荷物なしでプロジェクトのスナップショットが作成され、以前にプロジェクトをワークスペースで利用可能にしていた場合、ワークスペース内のプロジェクトへのリンクが削除されます。
すでにプロジェクトをワークスペースで利用可能にしている場合は、パッケージングプロセスの一環としてそれをリンク解除することをお勧めします。これを行うには、プロジェクトパッケージャーウィザードのZip File OptionsページのManaged Projects領域で、Unlink project from the server during packagingオプションを有効にします。これにより、パッケージングプロセスの一部として、ワークスペース内のミラープロジェクトへのリンク情報(*.PrjPcb内に存在)が削除されます。
-
プロジェクトパッケージャーによって作成されたZipアーカイブから「クリーン」なプロジェクトを展開します。
-
Altium Designerでプロジェクトを開きます。これにより、プロジェクトは管理されていない(以前はそうであった場合)、またはバージョン管理の下にないことに注意してください。したがって、これはクリーンで未管理のプロジェクトです。
-
この次のステップは、以前にプロジェクトをワークスペースで利用可能にした場合のみです。パッケージングプロセスはプロジェクトのリンクを解除しましたが、ワークスペース内のミラープロジェクトはそのまま untouched です。まずサーバー側のプロジェクトを削除する必要があります。Altium 365プラットフォームインターフェースを通じてワークスペースのブラウザインターフェースにアクセスします。Projectsページから削除するプロジェクトをクリックして選択し、次に
 コントロールをクリックしてコンテキストメニューからDeleteコマンドを選択します。
ワークスペース内のプロジェクトの古いバージョンを保持したい場合は、それをリネームするか、オンラインで利用可能にする際に新しいプロジェクトインスタンスをリネームするか、どちらかを選択して要件に最も適した方法を選択してください。
-
次に、プロジェクトを再度オンラインでワークスペースに利用可能にします。これを行うには、Projectsパネルのエントリを右クリックし、コンテキストメニューからMake Project Available Onlineを選択し、Make Available Onlineダイアログにアクセスします。Enable Formal Version Controlオプションを必ず有効にしてください。これにより、プロジェクトがワークスペース自身の組み込みVCS(Git)の下に追加されます。
上記のステップの代わりに、(上記のステップ2で説明されている)展開されたプロジェクトスナップショットを直接ワークスペースにアップロードして使用することもできます。 New – Upload Projectオプションは、ワークスペースブラウザインターフェースのProjectビューので利用可能です。結果として作成されたプロジェクトは、Altium Designerで開くことができ、ワークスペースとそのネイティブVCSリポジトリによって完全に管理されます。
プロジェクトは基本的にその歴史を新たに開始します。以前のバージョン履歴は保持されません。プロジェクトパッケージャーを使用し、その時点でのデザインのスナップショットを取ることで、バージョン管理からプロジェクトを削除するのではなく、その時点までの以前のVCSリンクされたプロジェクトの履歴を保持します。
ワークスペースのSVNからワークスペースのGitへの移行
Altium On-Prem Enterprise Serverでは、バージョン7.2からSVNはサポートされていません。SVNプロジェクトの管理に関する制限を避けるために、SVNプロジェクトをEnterprise Serverワークスペースの組み込みGitリポジトリに移行することをお勧めします。これは、サーバーをアップグレードする前に以下に説明されているように行うことができます。
Altium On-Prem Enterprise ServerでのSVNの廃止についての詳細は、Altium On-Prem Enterprise Server 7.2.1でのSVN廃止ナレッジベース記事を参照してください。
Altium DesignerがEnterprise Serverワークスペースに接続され、デザインプロジェクトがワークスペースのバージョン管理サービスを通じて管理されているSVNリポジトリに格納されている場合、プロジェクトパネルのエントリを右クリックして、コンテキストメニューからHistory & Version Control » Migrate Project to Altium Versioned Storageコマンドを選択することで、このプロジェクトをワークスペースの組み込みGitリポジトリ(Versioned Storage)に移行できます。または、プロジェクトオプションダイアログのMigrate to Server Versioned Storageボタンをクリックします。

最終VCSコミットを含むプロンプトに従った後、プロジェクトはワークスペースGitリポジトリのバージョン管理に移行されます。
プロジェクト同期の制御
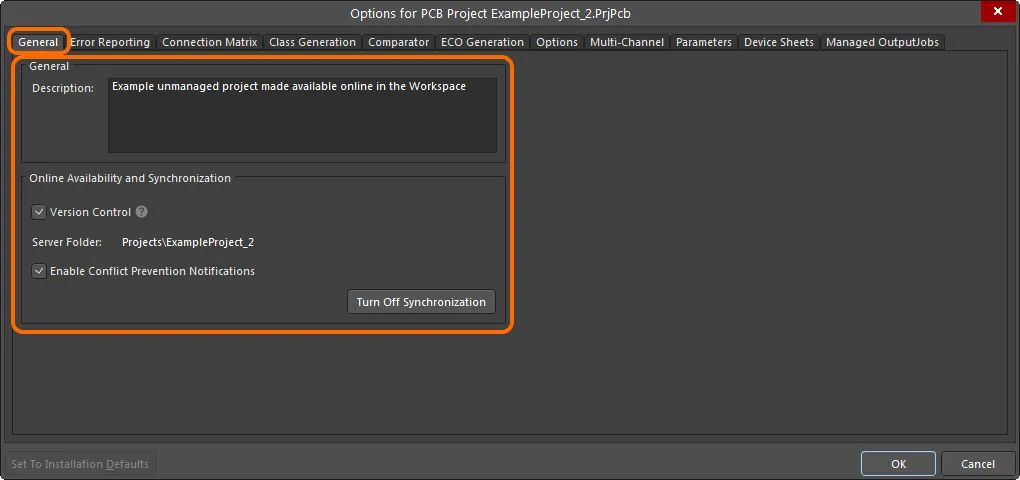
ローカルプロジェクトがAltium 365ワークスペースで利用可能になった後、そのオンラインでの利用可能性と同期に関する制御は、Project OptionsダイアログのGeneralタブを通じて提供されます。
Generalタブは、Altium DesignerがAltium 365ワークスペースに接続されている場合にのみ表示され、Enterprise Serverワークスペースには表示されません。
Generalタブは、Altium NEXUSがAltium 365ワークスペースに接続されている場合にのみ表示され、NEXUS Serverワークスペースには表示されません。

プロジェクトをオンラインで利用可能にしたことに関連するオプションと制御は、プロジェクトオプションダイアログのGeneralタブに表示されます。
タブのGeneral領域で利用可能なオプションを使用して、プロジェクトの説明を変更します。これはワークスペース内のミラープロジェクトにのみ影響します。
タブのOnline Availability and Synchronization領域では、Version Controlオプションが現在のオンラインでの利用可能性のスタイルを反映しています:
-
オプションが有効 – プロジェクト(およびそのソースファイル)は、ワークスペース自身のネイティブVCS(Git)の下に格納されます。これにより、ワークスペースとAltium 365プラットフォームを通じて、およびそれによって提供される最大の機能にアクセスできるため、推奨されるアプローチです。
-
オプションが無効 – プロジェクトファイルは、基本的なアクセスを提供し、他の人との共有を可能にするためにワークスペースに格納されます。シンプル同期の配置です。
これらの二つの間で必要に応じて変更してください。
このオプションは、プロジェクトが外部VCSリポジトリの下に格納されている場合には利用できません。
ローカルプロジェクトと、ワークスペースで利用可能にされたその管理されたインカーネーションとの同期を停止したい場合は、 ボタンをクリックしてください。プロジェクト同期を解除ウィンドウが表示されます。Unlinkオプションをクリックし、その後OKをクリックしてプロジェクトオプションダイアログに戻ります。ローカルプロジェクトは、ワークスペース内のプロジェクトと関連付けられなくなります。
これは、ローカルプロジェクトを保存した後にProjectsパネルで反映され、プロジェクトがアクティブなプロジェクトグループ(*.DsnWrk)の下に表示されるようになり、アクティブなワークスペースの下のエントリとしてではなくなります。ワークスペース内のプロジェクトへのリンクがプロジェクトファイルから削除されるため、保存が必要です。
ワークスペース内のプロジェクトはこのアクションによって削除されることはありません - そのまま残ります。
 ローカルプロジェクトと、ワークスペースで利用可能にされたそのインカーネーションとの接続を切ることができます。
ローカルプロジェクトを再びオンラインで利用可能にすることができます。これは、ミラーリングされたプロジェクトまたは完全なVCSプロジェクト(Version Control)としてです。Project OptionsダイアログのGeneralタブでは、 ボタンを使用してMake Available Onlineダイアログにアクセスできます。
同期を解除した後にローカルプロジェクトを再びオンラインで利用可能にする場合、プロジェクト名を変更する必要があるかもしれません。同期を解除してもワークスペース内のプロジェクトが削除されるわけではないため、同じ名前とフォルダー位置を持つこのプロジェクトがまだ存在する可能性があります。同じプロジェクト名を使用する必要がある場合は、ワークスペース内の以前のプロジェクトインスタンスを常に削除できます。
 ローカルプロジェクトは、Project OptionsダイアログのGeneralタブのから、ワークスペース内でオンラインで利用可能にすることもできます。