Altium Designerソフトウェアは、Altium Designer環境のさまざまな設定を設定できる中央の場所を提供します。これには、さまざまなエディターとその機能に特有のグローバルオプションも含まれます。これらは、プロジェクトや関連ドキュメント全体に適用されるグローバルシステム設定です。
設定の構成は、デザインスペースの右上にある コントロールをクリックしてアクセスされる設定ダイアログ内で行われます。
 グローバルシステムとエディタ固有の設定を設定するための中央制御、環境設定ダイアログへのアクセス。
設定はカテゴリーに分類されています。ダイアログの左側にあるカテゴリー名をクリックして、そのカテゴリーの選択肢を開きます。カテゴリー内の項目をクリックすると、右側にその領域の詳細ページが表示されます。領域の上部にあるバナーには、編集中のページの名前が<CategoryName> - <ChildPageName>の形式で表示されます。ロードされたページで利用可能なコントロールとオプションを使用して、必要に応じてそのソフトウェア領域の設定を構成します。これは、会社の方針を満たすことと、あなたの好みの作業環境を組み合わせることができます。
-
ワークスペースに接続されると、Data ManagementのPreferencesページの横に緑色のアイコン(
 )が表示され、そのページがワークスペースの管理下にあることを示します。
-
設定ページのオプションが変更されると、左側のペインでそのページのエントリが太字になり、その名前の右側にアスタリスク(*)が表示されます。
設定カテゴリ
以下のカテゴリの設定が利用可能です:
設定をデフォルトにリセットする
設定ダイアログでは、選択した設定ページ、選択したカテゴリのページ、またはすべてのページのオプションとコントロールをデフォルトに戻す機能を提供しています。ダイアログの下部にあるSet To Defaultsボタンをクリックし、次のコマンドのいずれかを選択します:
-
Default (Page) - 選択した子設定ページのオプションとコントロールをデフォルトに戻すために使用します。
-
Default (Branch) - 選択したカテゴリのすべての子設定ページのオプションとコントロールをデフォルトに戻すために使用します。望ましい親カテゴリフォルダが選択されていることを確認してください。そうでない場合、このコマンドは使用できません。
-
Default (All) - すべての設定ページのオプションとコントロールをデフォルトに戻すために使用します。
Altium Designerをアンインストールする際には、システムアプリケーションデータとセキュリティファイル、ユーザーアプリケーションデータファイル、およびユーザーローカルアプリケーションデータを含む、設定ベースのフォルダーのみを削除することもできます。
Remove Preferencesオプションを
Altium Designer Uninstallerウィザードで選択することによります。
設定の保存と読み込み
設定ダイアログでは、設定ファイルまたはワークスペース内のデザイン設定アイテムから設定を保存したり、読み込んだりすることができます。
設定ファイルを使用した設定の保存と読み込み
設定を設定ファイル(*.DXPPrf)に保存するには、設定ダイアログの下部にあるSaveボタンをクリックし、Save to fileを選択します。ファイルの場所と名前を選択できるダイアログが開きます。
設定ファイルから設定を読み込むには、設定ダイアログの下部にあるLoadボタンをクリックし、Load from fileを選択します。設定の読み込みダイアログが表示され、そこから目的のファイルを参照して開くことができます。
接続されたワークスペースを使用した設定の保存と読み込み
接続されたワークスペースに設定を保存するには、設定ダイアログの下部にあるSaveボタンをクリックし、Save to serverを選択します。その後、Choose Itemダイアログが表示されます。これを使用して、設定をその次のリビジョンに保存する既存のデザイナー設定アイテムを選択します。
目的のデザイナー設定アイテムが存在しない場合、選択したワークスペースフォルダ内でChoose Itemダイアログのリビジョンリスト領域を右クリックすること(または、フォルダがまだアイテムを含んでいない場合は、Add an itemコントロールをクリックすること)により、その場で作成することができます。そして、Create Item » Altium Designer Preferencesコマンドを選択します。

Altium Designerのアクティブインスタンスで定義された設定を、ワークスペース内の目標とするデザイナー設定項目の計画されたリビジョンに保存します。
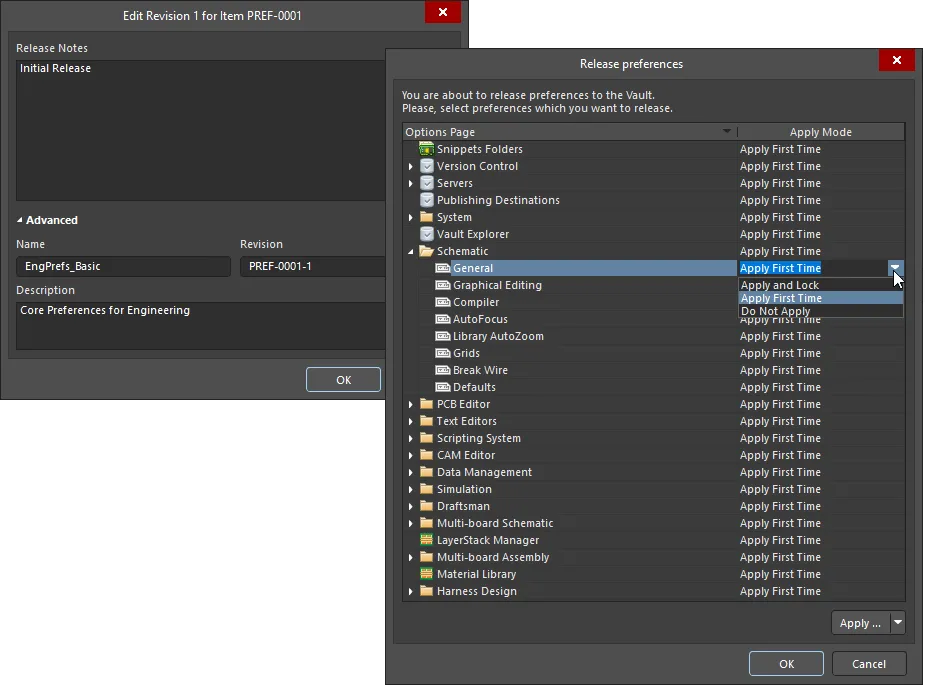
必要なターゲット項目リビジョンを選択した後、OKをクリックします。するとEdit Revisionダイアログが表示され、ここで名前、説明を変更し、必要に応じてリリースノートを追加できます。OKをクリックして進むと、設定のリリースダイアログが表示されます。このダイアログは、Altium Designerの設定の範囲がデザイナー設定の対象リビジョンにリリースされる方法を管理するために使用されます。

リビジョンを必要に応じて編集し、リリースノートを追加した後、リリース設定ダイアログを通じて設定のリリース方法を定義します。設定/プリファレンスがリリースされるモードは、後でデザイナーのプリファレンスのリビジョンを再利用する際のアクセシビリティを決定します。
ダイアログには、Preferencesダイアログにあるオプションのページごとのエントリーが表示され、以下の追加の(そして役立つ!)Altium Designerの設定範囲のエントリーが含まれます:
-
Customizations (Systemの下) – ユーザーインターフェースのカスタマイズ(メニュー、ショートカット、ボタンなど)。
-
Item Manager (Systemの下) – アイテム更新設定。
-
Vault Explorer – Explorerパネルに関連する設定。
-
View Configurations (PCB Editorの下) – レイヤーの色とアクティベーション、カスタム表示設定。
-
Snippets Folders (PCB Editorの下) – デザインスニペットの対象フォルダ。
-
LayerStack Manager – スタックアップエディタに関連する設定。
-
Material Library – 材料ライブラリに関連する設定で、スタックアップエディタでレイヤースタックアップを定義する際に使用されます。
このダイアログでは、ワークスペースからデザイナーの設定のリビジョンが読み込まれたときに、Altium Designerにどのように設定を適用するかについて3つの適用モード – Apply Modes – が提供されます:
-
Apply and Lock – 設定/プリファレンスは読み取り専用(編集不可)オプションとしてAltium Designerに読み込まれます。ユーザーがワークスペースに接続されていないときに、編集可能な状態に戻ります。
-
Apply First Time – 設定/プリファレンスは初期設定としてAltium Designerに読み込まれ、ユーザーによって編集できます。
-
Do Not Apply – 設定/プリファレンスはAltium Designerに読み込まれず、既存の設定が維持されます。
2つの適用モード(上記)の違いは、デザイナー設定項目の改訂が
環境設定に追加される場合に最も役立ちます。この設定では、ユーザーがワークスペースに接続してその設定を使用することを選択したときに、設定が自動的に適用されます。
追加設定は、Customizationsを除き、初回適用または適用しないにのみ設定できます。
Apply Modeは以下のように定義できます:
-
個別のエントリーについては、該当するApply Modeセル内をクリックし、ドロップダウンメニューから必要なモードを選択します。
-
展開可能なセクション/カテゴリ内の全エントリーについては、そのセクション/カテゴリのエントリーに対応するApply Modeセル内をクリックし、ドロップダウンメニューから必要なモードを選択します。
-
一括で全エントリーについては、ダイアログの右下にあるApplyボタンに関連付けられたメニューを使用します。
セクション/カテゴリーレベルでのカスタムのエントリーは、子エントリーが異なるモードレベルにあることを意味します。
必要に応じてモードを定義したら、OKをクリックします。リリースが進行し、対象のデザイナー設定のリビジョンに設定が保存されます。リビジョンに保存されたリリースデータには、設定ページの設定ファイルと、アプリケーションの外観に関連する設定ファイルが含まれ、すべてが一つのzipファイル – preferences.zipにきれいに収められています。
デザイナー設定項目に保存されている設定セットを変更する必要がある場合は、必要に応じてアクティブな設定を変更し、その設定をその項目の次の計画されたリビジョンに保存してください。
設定ファイルのダウンロード
設計者の設定項目のリビジョンに保存されている設定ファイルのzip (preferences.zip) をダウンロードするには、Explorerパネルでそのリビジョンを右クリックし、コンテキストメニューからOperations » Downloadコマンドを選択します。ファイルは選択したディレクトリのサブフォルダーにダウンロードされ、アイテムリビジョンIDを使用して名付けられます。ファイルはその中のReleasedフォルダーで見つけることができます。zipには以下が含まれます:
-
リビジョンのリリース時にApply ModeがApply First TimeまたはApply and Lockに設定された各設定ページの設定ファイル(
*.ini)。
-
リビジョンのリリース時にApply ModeがApply First Timeに設定された追加の設定に関連するファイル。これには例えば以下が含まれます:
-
オブジェクトデフォルト (
ADVPCB.DFT, Sch_DefPrimitives.dft, Sch_DefPrimitives.MMsdft, PcbDrawing_Primitives.xml)
-
2Dおよび3Dビューの設定ファイル (
*.config_2dsimple, *.config_3d)
-
PCBカラーテンプレート (
*.PCBSysColors)
-
DXP.RAF
-
DXP.RCS
-
UserTools.TLT
設計者の設定項目自体のトップレベルエントリから Downloadコマンドにアクセスし、その項目の最新リビジョンに保存されている設定ファイルをダウンロードします。
Workspaceに接続すると、利用可能なデザイナーの設定のリビジョンを自由に再利用できます。ローカルファイル(*.DXPPref)に保存された設定を読み込む必要がある場合も、その機能は引き続き利用可能です。
Workspaceに接続しない場合でも、有効なAltium Designerライセンスの下でAltium Designerを使用することはできますが、そのWorkspaceやそれが提供する他のサービスにはアクセスできません。したがって、Workspaceベースのデザイナー設定を再利用することはできません。ローカルに定義されたファイルベースの設定のみを使用できます。
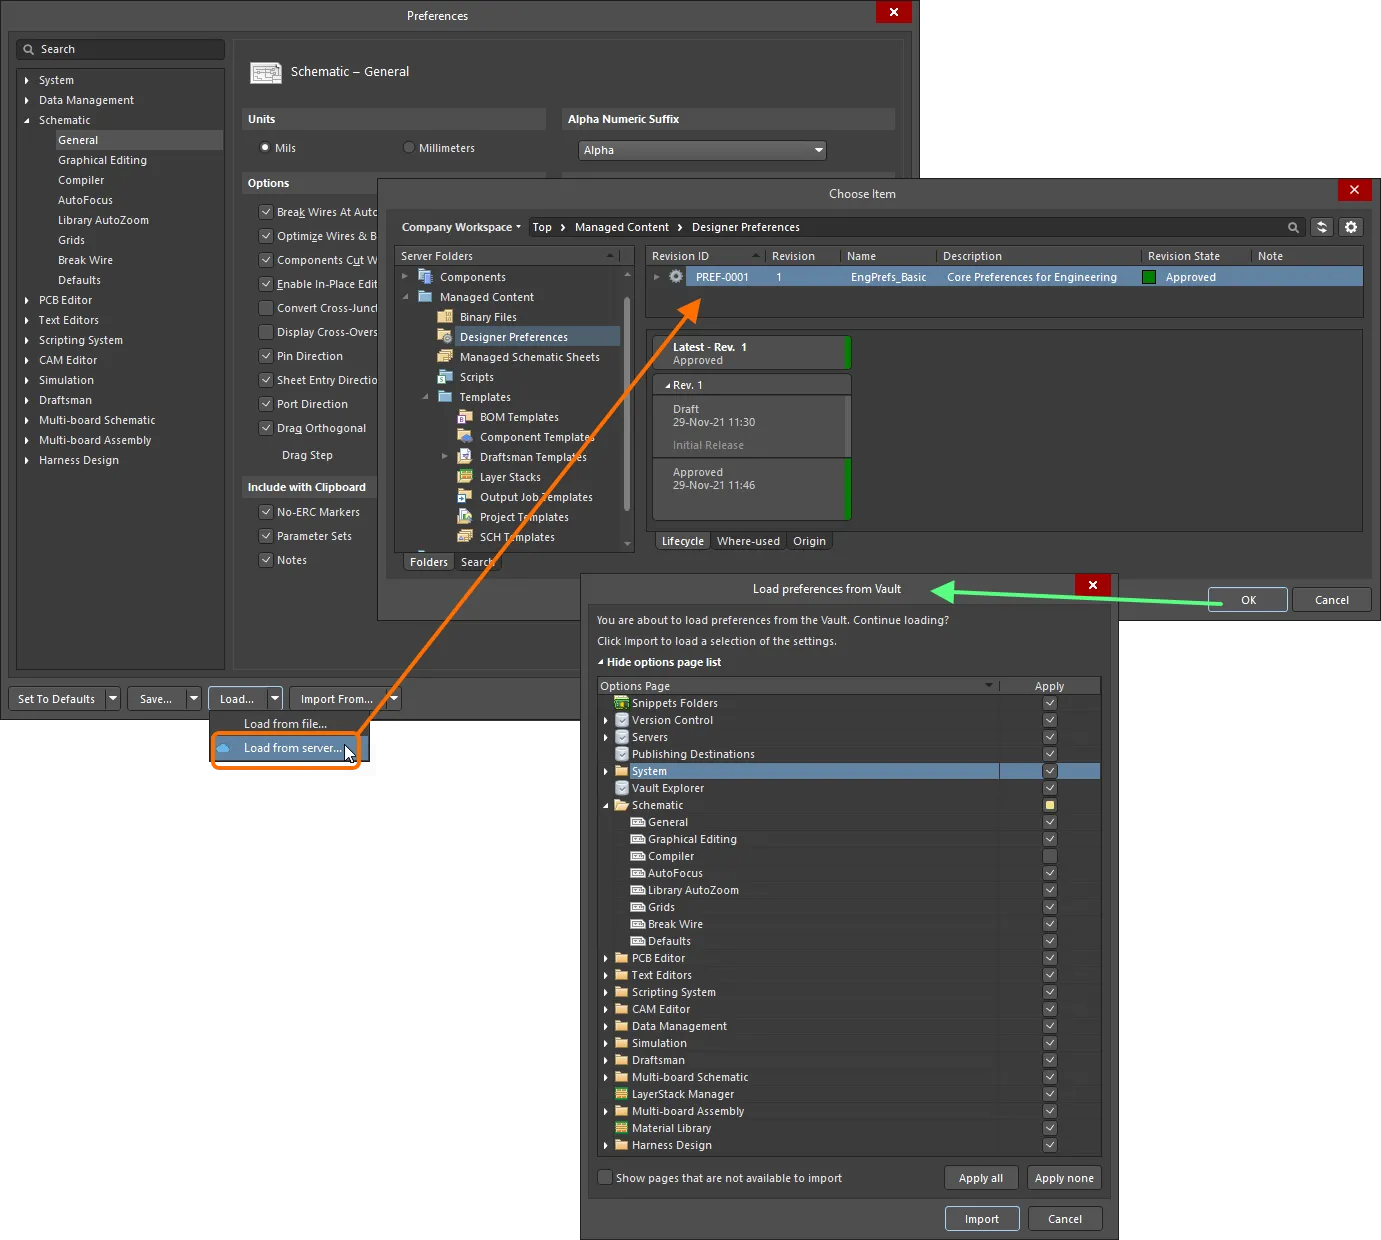
ワークスペースからAltium Designerにデザイナー設定のリビジョンをロードするには、PreferencesダイアログのLoadドロップダウンメニューからLoad from serverコマンドを選択し、Choose Itemダイアログを通じて希望するアイテムリビジョンを選択します。 OKをクリックすると、Load preferences from Vaultダイアログが表示されます。このダイアログは、リビジョンがリリースされたときにRelease preferencesダイアログを通じて定義した各設定/設定エントリの正確なセットアップを反映しています。

デザイナーの設定のリビジョンを手動で選択し、その定義された設定/プリファレンスをAltium Designerに適用します。ワークスペースから読み込む設定/プリファレンスを、Load preferences from Vault ダイアログを使用して確認し、必要に応じて調整します。
-
 – エンティティはApply and LockまたはApply First Timeに設定されます。
-
 – エンティティはDo Not Applyに設定されます。

アイコンは、セクション/カテゴリがカスタムであることを示しています(子エントリは異なる適用モードレベルにあります)。
Importをクリックすると、アイテムリビジョンで定義された設定がAltium Designerのインスタンスに適用されます。必要に応じて、エンティティの適用状態を切り替えることで、その場で変更を加えることができます。ただし、Do Not Applyと設定されていたエンティティを有効にすると、Apply First Timeになることに注意してください。
設定は進行状況を示すダイアログと共に読み込まれます。プロセスが完了した後、最終的なダイアログが表示され、メニュー、ツールバー、またはロケールの変更が有効になるためにAltium Designerを再起動する必要があるかもしれないことを警告します。
リリース中にApply and Lockに設定された設定ページは、Altium Designerでデザイナー設定のリビジョンが読み込まれると読み取り専用に設定されます。これは、ページの右上に表示される記号 と、設定ダイアログの左側にあるメインツリーのページのエントリの右に表示される記号
 によって示されます。

Altium Designerで再読み込みされた際に、適用してロックとしてリリースされた設定は、現在のセッションで読み取り専用になります。
そのようなページは、ユーザーがワークスペースに接続している間、そのセッションのみロックされたままになります。
リリース時にDo Not Applyに設定された設定は、Altium Designerで設定が読み込まれたときに変更されません。
環境設定の一部としてのデザイン設定項目の再利用
リリースされた設定セットは、1つ以上の定義された環境設定で構成データ項目としても使用できます。環境設定は、デザイナーの作業環境を会社が承認したデザイン要素のみを使用するように制限するために使用されます。環境設定は、ワークスペースを通じて提供されるサービスであるチーム設定センター内に定義され保存されます。詳細については、Environment Configuration Management(Altium 365 ワークスペース、エンタープライズサーバーワークスペース)を参照してください。
ワークスペースに接続し、利用可能な環境設定の選択から(該当する場合)選択すると、Altium Designerは設定の使用に関して構成されます。選択した環境設定にデザイナー設定項目のリビジョンが定義されている場合、それが直ちに適用されます。選択した環境設定がデザイナー設定項目のリビジョンを指定していない場合、設定は手動で定義可能です。言い換えると、デザイナー設定項目のリビジョンを手動で再利用するか、ローカルに保存された設定ファイルを使用する自由があります。
デザイナー設定項目のリビジョンを含む環境設定の施行下では、Altium Designerの既存の設定は、そのリビジョンで有効にされた設定に置き換えられます – Apply First Timeまたは Apply and Lockに設定されたものです。設定がDo Not Applyに設定されていた場合、設定は適用されたときに変更されずに残ります。
ワークスペースでアイテムリビジョンに最初にリリースされたときに設定がApply First Timeに設定されていた場合、それらの設定はAltium Designerで後にロードされると一度だけ適用されます。接続したユーザーがその後これらの設定オプションを変更した場合、ユーザーが次にワークスペースに接続したときには上書きされません。
設定管理メニュー(設定ダイアログの下部)は、Saveコマンドを除いて無効になっていることに注意してください。
以前のAltium Designerバージョンからの設定のインポート
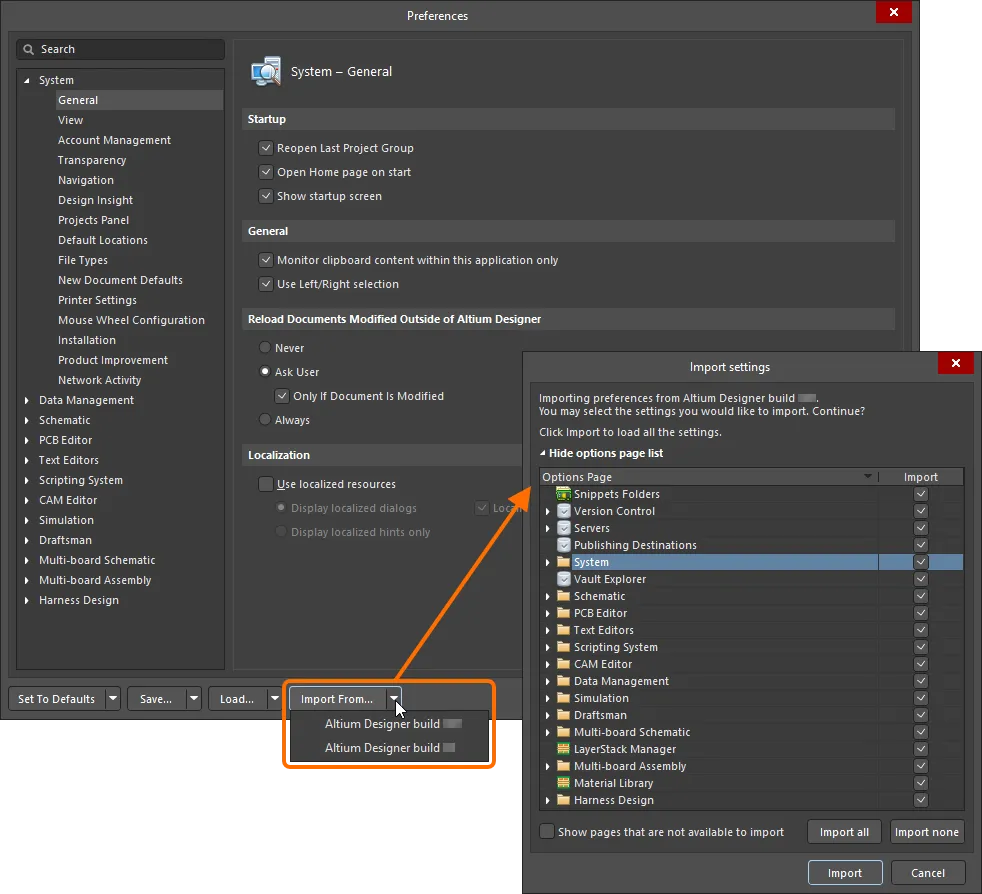
以前のバージョンのAltium Designerから設定を読み込むには、ダイアログの下部にあるImport Fromをクリックします。関連するメニューには、コンピュータに現在インストールされているすべての以前のバージョン/リリースがリストされ、そこから設定をインポートできます。必要なバージョンを選択した後、選択したインストールから設定をインポートするかどうかを選択できるImport settingsダイアログが開きます。

以前のバージョンのインストールから設定をインポートします。
設定は、Altium Designerの任意の個別にインストールされたバージョンインスタンス(AD10以降のインストールされたビルド)または次のいずれかのpre-AD10メジャーリリースからインポートできます:Summer 09、Winter 09、Summer 08、およびAltium Designer 6。
Altium Designerの新しいバージョンをインストールして起動した後、起動時に最新の以前のインストールから設定をインポートすることをお勧めします。初期起動時にインポートする利点は、以前のインストールで設定された通りに作業環境を整えることができることです。後の段階で設定をインポートすると、この環境の一部分のみが「復元」されます。