接続されたワークスペースと統合された場合、Altium Designerのプロジェクトは、中央で管理されたプロジェクトに対して分散設計チームが協力して作業できるようにします。設計インターフェースは、設計協力プロセスを強化するためにさまざまな設計文書にコメントを付けることをサポートしています。コメント、つまり、ユーザーが追加したメモは、文書に配置され、他のユーザーによって返信されることができます。

Comments and Tasksパネル
配置されたコメントは、共有アクセス権を持つ協力ユーザー(文書に共有アクセス権を持つユーザー)にリアルタイムで利用可能であり、プロジェクトの構成文書をいかなる方法でも変更することなく、サーバーに独立して保存されます。コメント機能はComments and Tasksパネルを通じて管理されます。 Comments and Tasksパネルでコメントエントリが選択されると、システムは関連する設計文書を開き(必要に応じてロードします)。
Comments and Tasksパネルを使用すると、ワークスペースプロジェクトのアクティブな文書の定義されたエリアまたはポイントにコメントを追加し、これらのコメントをワークスペースメンバーに割り当てて、実質的に彼らにタスクを作成することができます。このパネルは、文書に取り組んでいるすべてのユーザーがコメントを追加し、実際に文書自体を変更することなくすべてのコメントを表示できるようにします。この機能は、文書内の問題を物理的にマージして競合を受け取ることなく指摘する必要がある場合に、強力な協力プロセスの促進に役立ちます。Comments and Tasksパネルは、基本的に「やるべきこと」リストを作成するために使用でき、設計が成熟するにつれて、コメントを解決して閉じることができます。配置されたコメントは、共有アクセス権を持つ協力ユーザーにリアルタイムで利用可能であり、プロジェクトの構成文書をいかなる方法でも変更することなく、ワークスペースに独立して保存されます。
タスクの作成と管理の機能にアクセスできない場合、この機能は利用できず、パネルはコメントという名前になります。
Comments and Tasksは、Altium Designerと関連するワークスペースのブラウザインターフェース設計ビューの両方で追加および管理できることに注意してください。2つのコメントシステムの機能は基本的に同じであり、プロジェクトとコメントデータの両方がワークスペースに保存されているため、システムはリアルタイムで連携して動作します。
ウェブビューアでのコメント(Altium 365ワークスペース、エンタープライズサーバーワークスペース)に関する詳細情報については、こちらを参照してください。
コメントがサポートされている場所
回路図
コメントは、回路図文書のオブジェクト、特定のポイント、またはエリアに適用できます。
PCB
コメントは、PCB文書(2Dレイアウトモード)のオブジェクト、特定のポイント、またはエリアに適用できます –  。
。
PCB文書でコメントにフォーカスすると、レビュアーが持っていた同じビュー(可視レイヤー、アクティブレイヤー、上/下ビュー)に自動的に切り替わります。コメントにフォーカスしたときのビュー設定の切り替えの例は以下の通りです。
❯ ❮
JavascriptID: PCB_LayerSpecificComments_AD23
|
|
|
ドラフツマン
コメントは、PCB、マルチボード、またはハーネスデザインプロジェクトのドラフツマン文書の特定のポイントまたはエリアに適用できます –  。
。
マルチボード回路図
マルチボード回路図文書でのコメントは、MBS.Commentsオプションが詳細設定ダイアログで有効になっている場合に利用可能です。
マルチボード回路図文書のオブジェクト、特定のポイント、またはエリアにコメントを適用できます –  。
。
ハーネス配線図とレイアウト図
ハーネス設計プロジェクトの配線図やレイアウト図書類におけるコメントは、Harness.Commentsオプションが詳細設定ダイアログで有効になっている場合に利用可能です。
コメントは、配線図やレイアウト図書類のオブジェクト、特定の点、またはエリアに適用できます。
ActiveBOM
ActiveBOMドキュメント内のコメントは、BOM.Commentsオプションが詳細設定ダイアログで有効になっている場合に利用可能です。
コメントはActiveBOMドキュメントの行に適用できます –  。
。
Comments and Tasksパネルへのアクセス
パネルは、ワークスペースプロジェクト内で以下の方法でアクセスできます:
-
デザインスペースの右下にあるPanelsボタンをクリックし、Comments and Tasksを選択します。
デザインスペースの右下のメニューにあるパネル名の隣のワークスペースアイコンは、関連するパネルのデータを表示するためにワークスペースへの接続が必要であることを示しています。青いアイコン( )は、現在ワークスペースへの接続があることを示し、灰色のアイコン(
 )は、現在接続がないことを示し、パネルのデータにアクセスする前にワークスペースへの接続が求められます。
-
View » Panels » Comments and Tasksコマンドをメインメニューから選択します。
-
デザインスペースに配置されたコメントのマーカーピンをダブルクリックします。
Comments and Tasksパネルにアクセスするためには、アクティブなドキュメントが開かれたワークスペースプロジェクトの回路図、PCB、ActiveBOM、マルチボード回路図、またはDraftsmanドキュメントである必要があります。共有されているプロジェクトのみが選択可能です。
ワークスペースに接続していない場合のコメント追加
コメント機能を使用する前に、ワークスペースに接続してプロジェクトを開き、コメントをサポートするドキュメントの種類(回路図、2D PCB、Draftsman、ActiveBOMを含む)を開いていることを確認してください。File » Open Projectコマンドを使用して、共有されているワークスペースプロジェクトから選択します。Comments and Tasksパネルは、これらの前提条件についてヒントを提供します。
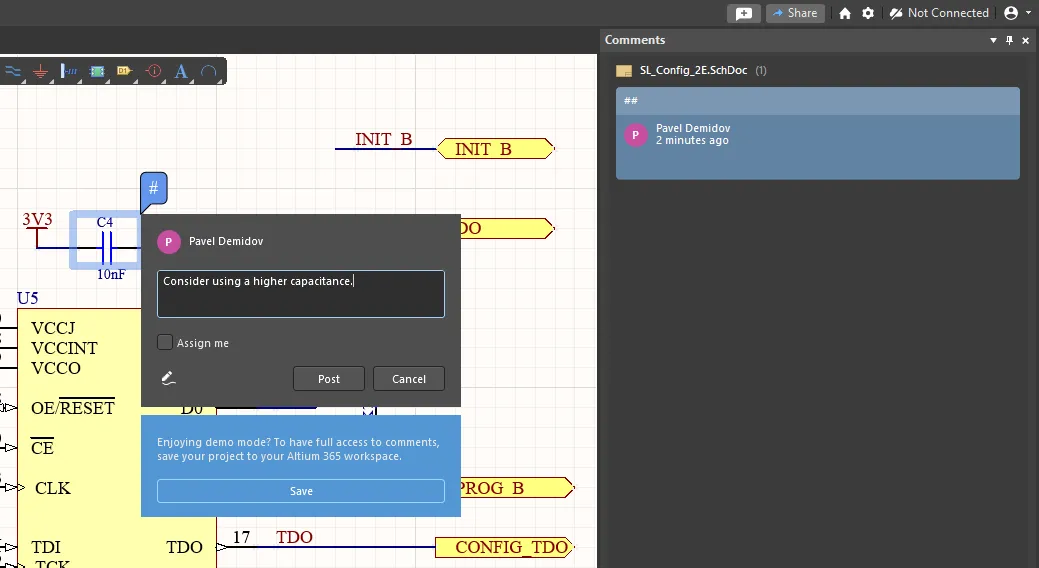
サブスクリプションの利点を享受しているが、会社用のAltium 365ワークスペースをまだ作成していない場合、デモモードでコメント機能をテストできます。AltiumアカウントにAltium Designerからサインインしてローカルプロジェクトで作業している場合、最大3つのコメントを配置できます。コメント機能を完全に活用し、配置したコメントを保存するためには、プロジェクトをワークスペースで利用可能にする必要があります – これを行うための適切な制御が、デザインスペースのポップアップコメントダイアログのメッセージボックスで提供されます。

Altium 365 Workspaceがまだアクティブ化されていない場合は、デモモードでコメント機能を試してみてください。
Comments and Tasksパネルのオプション
Comments and Tasksパネルの上部にあるボタンを使用して、パネルとエディター空間でのコメントの可用性を設定し、言及されたユーザーに通知するかどうかを指定します。
パネルの ボタンは、ドキュメント上のコメントマーカーピンの表示を切り替えます。Comments and Tasksパネルのリストにあるコメントエントリは、通常どおり選択できます。
Comments and Tasksパネル( )のフィルタードロップダウンメニューを使用してコメントフィルタリングを設定し、関連する
 ボタンを使用してフィルターされたビューとフィルターされていないビューを切り替えます。
 ボタンメニューのオプションを使用して、コメントの可視性と通知を設定します:
-
Unresolved Only - 解決されたコメントはリストに含まれません。
-
Current document only - 現在アクティブなドキュメントに配置されたコメントのみを表示します。
-
Notification settings - Notification Settingsダイアログを開いて、この設計のすべてのコメントアクティビティに対するメールアラートの受信を設定します(All)、言及されたり割り当てられたコメントのみ(My)、またはメールアラートをまったく受信しない(None)。► メール内容の例 。
。
-
Export Comments - Comment Export Configurationダイアログを開いて、コメントをPDFファイルにエクスポートする設定を行います。

出力されるPDFには、設計に関するコメントの情報が含まれます:コメントID、著者、作成日時、コメントテキスト、タスクの担当者(タスクの場合)、およびコメントのステータス(コメントの場合はResolved、タスクの場合はTo Do / In Progress / Resolvedのステータス)。設計に関連するすべてのコメントを、コメントが行われた時期に関係なくエクスポートするか、特定の設計リリース間で行われたコメントのみをエクスポートするかを選択できます。生成されたPDFドキュメントに含めるスクリーンショットを定義するいくつかのオプションもあります。両方を合わせることで、コメントがどこにあり、何に適用されるか(ポイント、コンポーネント、エリア)に関する情報が提供されます。両方ともチェックを外した場合、コメント自体のみが得られます。設定が完了したら、ExportをクリックしてPDFを生成し、続くダイアログで場所と名前(デフォルトではプロジェクトの名前)を決定します。
-
Entire designs snapshots - 指定された時間Period内にコメントがある各ソースドキュメントのスナップショットを含めます。これにより、ドキュメント上のコメントマーカーによって番号付けされたコメントがどこにあるかの視覚的確認が提供されます。
-
Original design screenshots - コメントが作成されたときに撮影されたオリジナルスナップショットを含めます(これは、メイン設計空間でコメントマーカーがクリックされたときにコンテキストコメントウィンドウから利用可能です)。これにより、コメントが適用されるポイント、エリア、またはコンポーネントが示されます。
コメントをPDFにエクスポートする設定も、プロジェクトのリリースの一部として出力ジョブファイルを通じて構成および生成できます。Export Comments出力をReport Outputsカテゴリの一部として追加します。
コメントエクスポート機能は、プロジェクトが存在するワークスペースのメンバーのみが利用できます。ワークスペース外のユーザーと共有されたプロジェクトの場合は利用できません。
配置
回路図、2D PCB、またはDraftsmanなどのオブジェクトベースのグラフィカルエディターの設計空間にコメントを配置するには、まずそのコマンドを実行します。これは、次のいずれかを実行することで行うことができます:
-
 ボタンはComments and Tasksパネルで利用可能です。
-
設計空間の右上隅付近をクリックします。
-
メインメニューからPlace » Commentをクリックします。
-
Ctrl+Alt+Cキーボードショートカットを使用します。
-
右クリックし、設計空間からCommentを選択します。
ドキュメントタイプによって(上記参照)、コメントはオブジェクト、特定のポイント、またはアクティブドキュメント上のエリアに割り当てることができます。コマンドはコメント配置モードを呼び出し、カーソルは選択のためにオブジェクトを検出してハイライトする青い円を持つ十字線に変わります:
-
ハイライトされたオブジェクトをクリックして、そのオブジェクトにコメントを添付(ピン)します。
-
ハイライトされていないエリアをクリックして、ドキュメント上のその特定のポイントにコメントを添付します。
-
オブジェクトから離れてカーソルをドラッグして長方形のハイライトエリアを作成し、再度クリックしてその最終形状を確認し、指定されたエリアにコメントを添付します。► 例を見る 。
。
ActiveBOMドキュメントでは、ActiveBOMドキュメントのセルをクリックして、そのBOMの行にコメントを追加します。行を右クリックしてからCommentコマンドを選択し、この行にコメントを追加します。
配置アクションは、コメントテキストを入力するためのフィールドを提供するコメントエントリダイアログを開き、グラフィカルドキュメントの場合は、適用可能な場合にコメントにフリーハンドの描画を追加するための追加オプションも提供します( )。Assign a task toオプションを選択して、自分自身またはコメントで言及されたユーザーのいずれかにタスクを割り当てます(詳細は以下を参照)。
 をクリックしてコメントの作成を確認すると、コメントがドキュメント上の番号付きピンマーカーに関連付けられ、Comments and Tasksパネルにコメントの要約エントリも追加されます。オブジェクトにコメントを配置し、そのコメントで別の登録ユーザーに言及し、コメントのピンインジケーターを移動し、コメントにフリーハンドの描画を追加する。
配置されたコメントは、プロジェクトにアクセスできるすべてのユーザーに即座に利用可能となり、接続されたワークスペースのブラウザベースのプロジェクトビューでも利用可能になります。
標準のComments and Tasksに入力できる文字数は2000文字に制限されています。
言及とタスクの割り当て
コメント入力ダイアログのテキストとともに、@文字を入力することで、接続されたワークスペースに登録されている他のユーザーや役割への「言及」参照を追加できます。ドロップダウンリストから名前/メールを選択して、コメントにユーザー(ワークスペースメンバー)参照を追加し、 Assign a task toエントリとしても追加します。これは、タスクがユーザーに割り当てられることを意味します。コメントが特定のユーザーに割り当てられると見なされないようにする場合は、このオプションのチェックを外します。役割グループ(例:「エンジニア」)とその構成ユーザーも言及として追加できます。

言及されたユーザーが現在のプロジェクトにアクセス権を持っていない場合、そのユーザーと共有するように招待されます。このオプションは、プロジェクトの所有者またはワークスペースの管理者である場合に利用できます。ユーザーアクセス権はShareダイアログを通じて付与されます。ユーザーは共有アクセスを通知するメールを受け取ります。共有ダイアログをキャンセルした場合、プロジェクトは共有されませんが、コメントは通常どおり配置されます。
► デザインの共有に関する詳細情報を見る。
タスクがユーザーに割り当てられると、そのユーザーの画像/写真がComments and Tasksパネルのコメントダイアログとコメントタイルの左上に表示されます。また、タスクはプロジェクト名とシーケンス番号(例:Kame_FMU-1)で命名され、通常のコメントの場合とは異なり、単純な番号ではありません。この名前はコメントダイアログとコメントタイルにも表示されます。それをクリックすると、選択されたタスクがタスクリストでフォーカスされた状態で、ワークスペースのブラウザインターフェースのTasksページが開きます。
位置設定
コメントの場所は、配置中または配置後に関連付けられた「ピン」を新しい位置にドラッグすることで移動します。選択されたとき、コメントピンには関連するオブジェクトまたは領域への接続線が含まれます。
ドキュメントエディター内でコメントピンを移動(ドラッグ)できますが、初期に定義されたポイントまたは領域を変更することはできません。
配置モードでクリックしてドラッグすることにより、初期配置中にコメントを配置することもできます ► 例を見る 。
。
画像の貼り付け
コメントに画像を追加するには、まずエクスプローラーウィンドウやブラウザページから画像を右クリックしてクリップボードにコピーします。画像を添付するには、コメント自体のフィールド(Add others with @ or paste imagesと記載されているフィールド)で右クリックPaste(またはCtrl+Vショートカット)を使用します。
各画像は最大2MBまでです。コメントに画像を貼り付けた後、画像をクリックすると右の画像に示されているように全画像が表示されます。

下に示されているように、テキストなしで貼り付けた画像のみを含むコメントも投稿できます。

描画
コメントを配置または編集する際に、 オプションボタンを選択して自由手描きの描画を追加できます。線を作成するためにクリックしてドラッグし、現在選択されているコメントに描画を関連付けるために右クリックします。

PropertiesパネルのFreehand Drawingモードにアクセスするには、自由手描きモードがアクティブであることを示す アイコンがデザインスペースに表示されているときにTabキーを押します。これらのオプションを使用すると、Commandsドロップダウンの下でコメントのやり直しと元に戻し、Propertiesドロップダウンの下で幅、サイズ、色を変更できます。
一般的なタスク
現在のプロジェクトに適用されるが、プロジェクトのコメントやドキュメントに関連付けられていない一般的なタスクは、パネルの別のグループにプロジェクトのエントリの下にリストされます。一般的なタスクには、パネルで同じ内容と属性(担当者、優先度など)が表示されます。

Comments and Tasksパネルに一般的なタスクがリストされています。
パネルの一般的なタスクエントリをクリックして、そのコメントダイアログにアクセスします。選択した一般的なタスクに対してコメント(貼り付けられた画像を含む)を投稿するためにダイアログを使用します。
切り離されたコメント
プロジェクトドキュメントが削除された場合、またはそのUniqueIDが変更された場合、そのドキュメントのコメントは「切り離された」となることがあります。これらのコメントは、パネルのDetached Comments折りたたみ可能な領域から引き続きアクセスできます。現在開かれているドキュメントのデザインスペースにそのダイアログを表示するために、Comments and Tasksパネルの切り離されたコメントのタイルをクリックします。

コメントの扱い方
デザインドキュメントに配置されたコメントは、Comments and Tasksパネル(番号付きエントリのシーケンスとして)と対応するドキュメントエディター(番号付きピングラフィックとして)の両方に登録されます。各パネルエントリはコメントスレッドを表し、誰がコメントを配置したか、いつ配置したか、初期コメントのテキスト、適用されたメンション/割り当て、スレッド返信の数などの要約情報を提供します。
コメントスレッドは、Comments and Tasksパネルのエントリを選択するか、デザインスペースの関連ピンをクリックすることで開かれます。これにより、ドキュメントエディターでコメントが強調表示され、初期コメントと任意のユーザー返信を含むコメントエントリダイアログが開きます。選択されたコメントが別のデザインドキュメントに関連付けられている場合、システムはそのドキュメントを開き(必要に応じてロードします)。
デザインスペースのピンマーカーを選択することによるコメントのナビゲーション、およびComments and Tasksパネルのエントリを選択することによるナビゲーション。
コメントダイアログ
配置されたコメントとの対話は、ポップアップコメントダイアログを通じて行われ、選択されたコメントスレッドのすべてのエントリが表示され、エントリのプレビュー、返信、編集、解決、および削除のオプションが含まれます。このダイアログは、コメントを初めて配置するとき、またはComments and Tasksパネルまたは設計スペースで配置されたコメントが選択されたときに開きます。Escを押すか、設計スペースをクリックしてコメントダイアログを閉じます。
ダイアログのヘッダーにある前/次のボタン
( )
)を使用して、利用可能なすべてのコメントを順番に確認します。
プレビュー
最初のコメントでOriginal Snapshotオプションを選択して、コメントが配置されたときのエディターエリアのグラフィカルキャプチャを表示します。スクリーンショットの右上にある アイコンまたはスクリーンショット自体をクリックして、フルサイズのプレビューを開きます(このプレビューの右上にある
 アイコンまたは画像自体をクリックして閉じます)。

返信
テキストを入力し、オプションでユーザーメンション('@')をReplyフィールドに追加して、コメントスレッドに新しいエントリを追加します。ドロップダウンで指定されたユーザーに割り当てられたタスクを作成するには、Assign a task toオプションを選択します。 をクリックしてエントリを確認します。

編集と削除
既存のコメントは、そのコメントの著者によってEditオプションを使用して編集できます。 メニューから利用可能です。
 ボタンをクリックしてコメントの編集を確認します。
現在選択されているコメントを削除するには、 Deleteオプションを使用します。初期コメント(返信ではない)が削除されると、スレッド全体が削除されることに注意してください。
Convert to Taskオプションを使用して、コメントを自分に割り当てられたタスクに変換します。
コメントスレッドへのURLをコピーするには、Copy Linkオプションを使用します。このリンクは、コメントのオブジェクト、ポイント、またはエリアがズームされて中央に配置されたWorkspaceのブラウザインターフェースのWebビューアでこのプロジェクトを開くために使用できます。

解決
 /
/  ボタンをクリックして、コメントの状態を
ResolvedとUnresolved(デフォルト)の間で切り替えます。解決済みのコメント(完了として閉じられた)は非アクティブで編集不可であり、Comments and Tasksパネルおよびドキュメント上のピンマーカーの両方がグレーアウトされます。

タスクの優先度とステータスの設定
タスクコメントがユーザーに割り当てられている場合、その優先度とステータスを設定できます。タスクは初期にMedium優先度とTo Doステータスに設定されますが、コメントダイアログの上部にある関連するコントロールをクリックすることで変更できます。

コミットタグとリリースリビジョンID情報
適用可能なコメント/タスクをComments and TasksパネルおよびAltium Designerのコメントダイアログで表示すると、コミットタグとリリースリビジョンIDが表示されます。
-
タグ付きコミットの設計スナップショットをレビューしているときにWebビューアで作成されたコメントには、関連するタグ名が含まれます。タグ名のリンクをクリックして、関連するコミットスナップショットをWebビューアで開きます。
-
特定のリリースをレビューしているときにWebビューアで作成されたコメントには、リリースリビジョンIDが含まれます。リリースリビジョンIDのリンクをクリックして、このリリースの製造ポータルを開きます。

Jiraタスクの操作
Altium 365 WorkspaceでJira統合が有効になっており、Jiraアプリケーションが設定されている場合、配置されたコメントには、Atlassian Jira®サービスのJira問題を配置してリンクする追加オプションが含まれます。従来のコメントとそれに関連するタスクと同様に、配置されたJira問題は、設計ドキュメント内で表示、編集、コメントを行うことができ、Comments and Tasksパネルを介して表示/選択することができます。
配置されたJiraタスクインスタンスは、Jiraスペースの対応する問題と同期されます。Jira問題とWorkspaceタスク間の双方向データ同期により、JiraスペースとAltium 365を連携させながら、設計プロジェクトの管理を行うことができます。
-
Jira統合ページを参照して、機能の概要を確認してください。
-
ブラウザベースのインターフェースの探索ページを参照して、Altium 365 WorkspaceでJira統合を設定する方法の詳細を確認してください。
-
Webビューアページを参照して、Altium 365 WorkspaceのブラウザインターフェースのWebビューアでJiraタスクを操作する方法の詳細を確認してください。
Jira問題の作成
設計プロジェクトのJira Issueタスクを配置するには、通常どおりコメントインスタンスを配置し、次にコメントダイアログでJira Issueオプションを選択します。問題タイプを選択し、要約を追加して、同期されたJira問題タスクを作成します。
❯ ❮
Javascript ID: CommentsAndTasks_JiraIntegration_CreateIssue_AD24_8
|
まずコメントインスタンスを配置することにより、現在のプロジェクトドキュメントにJiraタスクを配置します。コメントドロップダウンメニューから、代替Jiraモードを利用できます。
ダイアログのJira Issueオプションを選択することにより、Jiraタスク配置を呼び出します。
Create Issueオプションを選択していない場合はクリックします。
作成する問題のタイプを、Jiraサービスで利用可能なものからIssue Typeドロップダウンリストで選択します。
問題のSummaryとオプションの説明/担当者を入力します。 Assigneeドロップダウンリストには、Jiraアカウントの登録メンバーのみが含まれます。Postを選択して確認します。
Jira問題は初期ドキュメントコメント位置に配置され、Comments and Tasksパネルに含まれ、Jiraスペースの問題へのリンクが提供され、タスクの優先度(Medium、Highなど)およびステータス(To Do、In Progressなど)の設定へのインタラクティブアクセスが含まれます。
|
Jira関連コメントへの投稿/返信時に入力できる文字数は20,000文字に制限されています。
コメントダイアログまたはComments and TasksパネルでWorkspace Jira問題のTask IDを選択して、デフォルトブラウザの新しいタブでその問題をJiraスペースで直接開きます。WorkspaceのTask IDはJiraスペースのIssue Keyにマッピングされ、Summary、Description、Assignee、Commentsなどの主要なJiraパラメーターは両インスタンス間でマッピングされます。Workspace Jira問題を作成したWorkspaceユーザーはJira側のIssue Reporterです。Workspace Jira問題を作成する際にAttach original snapshotオプションが選択された場合(上記参照)、現在のWorkspaceドキュメントのスナップショット画像がJira添付ファイルとして含まれることに注意してください。

配置されたWorkspace Jiraタスクは、Jiraスペースに同期されたJira問題を作成します。WorkspaceのTask IDとJiraのIssue Keyのマッピングによって、2つはリンクされます。
WorkspaceとJiraの問題間でマッピングされたパラメーターに加えて、タスク関連のPriorityおよびProgressステータス設定も同期されます。たとえば、Workspaceの問題タスクをMediumからHigh優先度状態に移動すると、Jira側の問題に即座に反映され、Jira側で進行状態をTo DoからIn Progressに変更すると、Workspace Jira問題の状態も同様に変更されます。更新されたデータを表示するには、Comments and Tasksパネルの上部にある  ボタンをクリックしてデータの更新を実行する必要があります。
Jira Issueへのリンク
Altium 365 Jira Integrationでは、コメントダイアログのJira Issueモードを通じて、WorkspaceタスクをAtlassian Jiraサービスの既存のJira問題にリンクすることもできます。指定されたJiraプロジェクトの任意の問題にリンクでき、それがWorkspace Jiraタスクと同期されます。
❯ ❮
Javascript ID: CommentsAndTasks_JiraIntegration_LinkIssue_AD24_8
|
既存のJira Issueに関連付けたいドキュメントエリアまたはオブジェクトにコメントインスタンスを配置し、コメントダイアログでJira IssueモードとLink Issueオプションを選択してください。
課題の選択または検索ドロップダウンを使用して、新しく配置されたJiraタスクインスタンスにリンクするJira Issue(要約テキストとして表示)を選択します。必要なJira Issueを検索するためにテキストフィールドに入力を始めてください。
ダイアログのJira Issueドロップダウンは、Jiraスペースから選択された課題を表示します。必要に応じて、元のスナップショットを添付オプションをチェックして、現在のドキュメントビューの画像をJiraに転送してください。
投稿ボタンをクリックして、ワークスペースJiraタスクと選択されたJira Issueとのリンクを確立します。
新しいJira IssueタスクはComments and Tasksパネルおよびコメントダイアログに表示され、既存の(または追加された)コメントが含まれます。ダイアログのすべての返信を表示オプションを選択して、完全なリストを表示してください。
|
リンクされたJira Issueは、ワークスペースJiraタスクと同期され、課題のCommentsおよびJira Issueによって定義されたProgressおよびPriorityの状態が設定されます。この例ではIn ProgressおよびHighです。Jira IssueのWeb links エントリーは、Altium 365ワークスペースJiraタスクがこの課題にリンク(または再リンク)されたことを示すようになります。

ワークスペースのコメントダイアログのJira Issueエントリを指定することにより、既存のJira Issueがワークスペースタスクにリンクされます。
To-Doパネル
上記で説明したComments and Tasksの割り当てのための包括的な機能セットを提供する接続されたワークスペースを使用しながら、To-Doパネルにアクセスしてタスクを追跡することもできます。To-Doパネルは、アクティブなプロジェクトに現在定義されているすべてのTo-Do項目をリストします。To-Do項目は、ドキュメントに関連して後で実行する必要があるタスクのリマインダーとして使用されます。

To-Doパネル
To-Doパネルの内容と使用法
アクティブなプロジェクトのTo-Doパネルは、2種類の「to-do」項目をリストできます:
-
プロジェクトレベルのTo-Do項目。
-
プロジェクト内のテキストベースのドキュメントに追加されたドキュメントレベルのTo-Do項目。
各To-Do項目には、以下の情報が表示されます:
-
Done - このチェックボックスを使用して、定義されたタスクが完了したときに項目をチェックします。
-
Action Item - 実行する必要がある実際のタスク。
-
Priority - 実行するタスクの重要度(Lowest、Low、Normal(デフォルト)、High、Highest)。
-
Document - ドキュメントレベルのTo-Do項目が追加されたソースドキュメントへの参照。
-
Owner - このタスクを入力した人または実際にタスクを実行する人の名前である可能性があります。
-
Category - タスクが実行されるプロジェクト内の特定の領域(例えば、回路図、設計ルール、ルーティング、制約など)である可能性があります。
プロジェクトレベルのTo-Do項目の追加
プロジェクトレベルのTo-Do項目は、パネル自体から追加されます。項目を追加する前に、デザインエディタウィンドウのアクティブなドキュメントが、To-Do項目を定義したいプロジェクトの設計ドキュメントの1つであることを確認してください。
新しいTo-Do項目を追加するには、パネル内を右クリックして、表示されるコンテキストメニューからAdd Project To-Do Itemエントリを選択します。Edit To-Do Itemダイアログが開きます。

このダイアログを使用して、プロジェクトに必要なタスクに適したテキストを入力します。ダイアログの利用可能なフィールドを使用して、task's Priority、Owner、Categoryを定義します。必要な項目を定義した後、OKをクリックして、新しい項目をパネルに追加します。
ドキュメントレベルのTo-Do項目の追加
ドキュメントレベルのTo-Do項目は、テキストベースのソースドキュメント(例:VHDLファイル、制約ファイル、組み込みソースコードドキュメントなど)に追加されます。項目を追加する前に、必要なドキュメントがデザインエディタウィンドウでアクティブであり、このドキュメントが現在定義している全体のTo-Do項目のプロジェクトに属していることを確認してください。
新しいTo-Do項目を追加するには、ドキュメント内でTo-Do項目を配置したい必要な位置にテキストカーソルを置き、右クリックして表示されるポップアップメニューからAdd To-Do Itemを選択します。Edit To-Do Itemダイアログが表示されます。このダイアログを使用して、ドキュメントで実行する必要があるタスクに関する適切なテキストを入力します。ダイアログの利用可能なフィールドを使用して、タスクのPriority、Owner、Category(例:フォーマットパス、コードレビューパスなど)を定義します。To-Do項目を必要に応じて定義した後、OKをクリックしてダイアログを閉じ、現在のドキュメントにフォーカスを戻します。To-Do項目のエントリーがTo-Doパネルに表示され、現在のテキストカーソル位置にマークされたポイントにも表示されます。エントリーは、そのドキュメントタイプに定義されたコメントデリミタ(コメント区切り文字)の間にコメントとして表示され、項目の実際のテキストと一意の識別子が以下の画像に示されています。

右クリックメニュー
右クリックメニューには、以下のコマンドが提供されます:
-
Goto Source - このコマンドは、パネルで選択された項目がドキュメントレベルのTo-Do項目である場合に利用可能になります。このコマンドを使用して、(まだ開いていない場合は)関連するソースドキュメントを開き、それをデザインエディタウィンドウでアクティブなドキュメントにします。テキストカーソルがTo-Do項目のテキストの始まりに配置されます。
-
Add Project To-Do Item - アクティブなプロジェクトのパネルにプロジェクトレベルのTo-Do項目を追加します。
-
Edit - 選択されたTo-Do項目を編集します。Edit To-Do Itemダイアログが表示され、必要な変更を行うことができます。
-
Delete - パネルから選択されたTo-Do項目を削除します。
-
Show Completed Items - このオプションを有効にすると、完了とマークされたTo-Do項目のみ(Doneオプションが有効)がパネルに表示されます。
-
Report - パネルに現在表示されているすべてのTo-Do項目を含むレポートを生成します。コマンドを起動すると、Report Previewダイアログが開き、レポートを構成し、印刷し、さまざまなファイル形式でエクスポートできます。
ノート
-
パネルにドキュメントレベルのTo-Do項目が定義され、対応するソースドキュメントがデザインエディタウィンドウでアクティブなドキュメントである場合、パネル内のTo-Doエントリー全体のテキストが太字になります。
-
パネル内のTo-Do項目エントリーをダブルクリックすると、Edit To-Do Itemダイアログが開き、タスクの定義を変更することができます。
-
パネル内のエントリーは、その列のヘッダーをクリックすることで任意の列でソートすることができます。一度クリックすると昇順でソートされ、もう一度クリックすると降順でソートされます。
-
直接フィルタリングを使用すると、パネル内で直接タイピングすることにより、すぐにTo-Do項目エントリーにジャンプすることができます。パネルの任意のデータ列に基づいてフィルタリングすることができます。右矢印キーと左矢印キーを使用してフィルタリングのための列間を切り替えるか、または列内のフィールドを直接クリックします。このフィルタ機能を使用するには、データ列内をクリックして、ジャンプしたいエントリーの最初の文字をタイプします。その列で、タイプした文字で始まる最初のエントリーが選択され、フィルタリングがタイプされた文字に基づいていることを示すために文字が強調表示されます。