Altium Designer, in conjunction with your connected Workspace, caters for the ability to store component datasheets within that Workspace and, in doing so, link them to target components. This allows you to more fully describe and support a component, in a centralized fashion, while reducing the reliance on external storage mediums (shared network drives for example). Storing datasheets next to the very components that need to reference them also means you no longer need to have a live internet connection to consult a reference document that can often, and frustratingly, disappear without warning at the whim of the hosting website!
Attaching a Datasheet to a Component Item in the Explorer Panel
Copy Link
Copied
For an existing component in a Workspace, one or more datasheets can be attached (uploaded) to that component – essentially creating a link between the component and the datasheet(s) – through the Explorer panel. While browsing the required component, switch to its Data Sheet aspect view tab.

Through the Explorer panel, datasheet management for an existing component is performed from within that component's Data Sheet aspect view tab.
Drag and Drop Attachment
By far the easiest method to attach a datasheet to a component is to select it within your Windows File Explorer, then drag and drop it onto the indicated area of the component's Data Sheet aspect view tab, in the Explorer panel. You can attach any number of datasheets to a component. Once dropped, the file(s) will be uploaded.
You can also drag and drop a datasheet link from a web page in your Web Browser. This enables you to streamline the process of acquiring datasheets, and cuts out the 'middle man' as it were – dispensing with the need to download the documents from manufacturer websites to a local drive first.
A chosen datasheet file is uploaded into a dedicated item within the Workspace – a
Datasheet Item. When attaching multiple datasheets, each is uploaded into its own Datasheet Item.
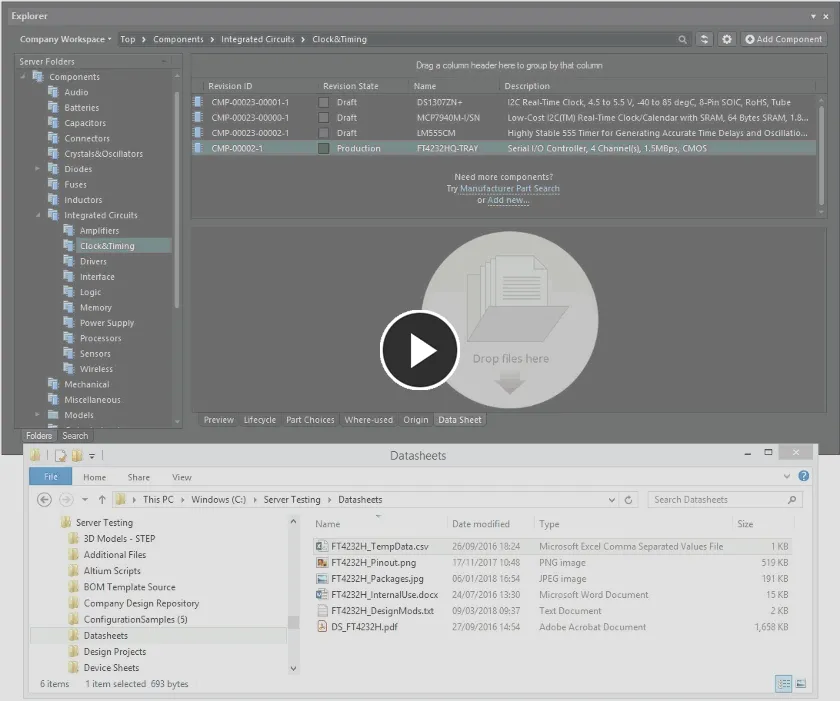
Attach one or more datasheets to an existing component in the Workspace by dragging and dropping the datasheet(s) onto the component's Data Sheet aspect view tab.
Browse for a Datasheet to Attach
Alternatively, you can browse for a datasheet you wish to attach to the component. To do this, right-click within the component's Data Sheet aspect view tab, and choose the Add File command from the context menu. The standard Windows Open dialog will appear, with which to browse to, and open, the required datasheet. After clicking the Open button, the file will be uploaded.
Only a single datasheet at a time can be uploaded to the component in this way.
A chosen datasheet file is uploaded into a dedicated item within the Workspace – a
Datasheet Item. When attaching multiple datasheets, each is uploaded into its own Datasheet Item.
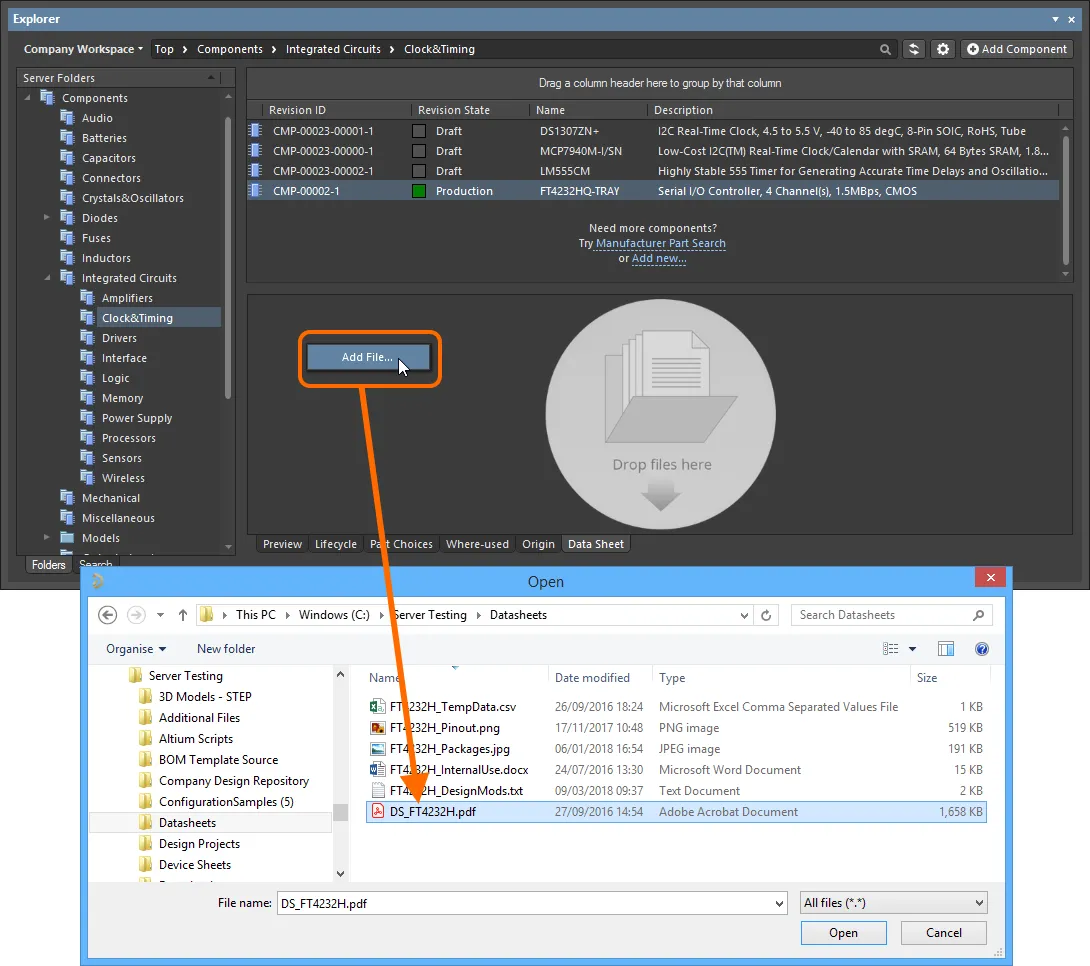
Attach a datasheet to an existing component in the Workspace using the traditional, dialog-based 'browse-and-open' approach.
Post-Attachment Management
Once uploaded and attached to a component, the datasheet will be presented on the Data Sheet aspect view tab in terms of its:
- Caption – this is the user-definable name for the attachment, presented in the Explorer panel, and also in the References sub-menu for a component, after it is placed on a schematic sheet. By default, after initial upload, this will be the filename of the attachment (including extension). Note that the actual filename for the datasheet is not changed in any way.
- File type – the type of file. A file of any format can be attached as a datasheet to the component.
- File size – the size (on disk) of the attached file.
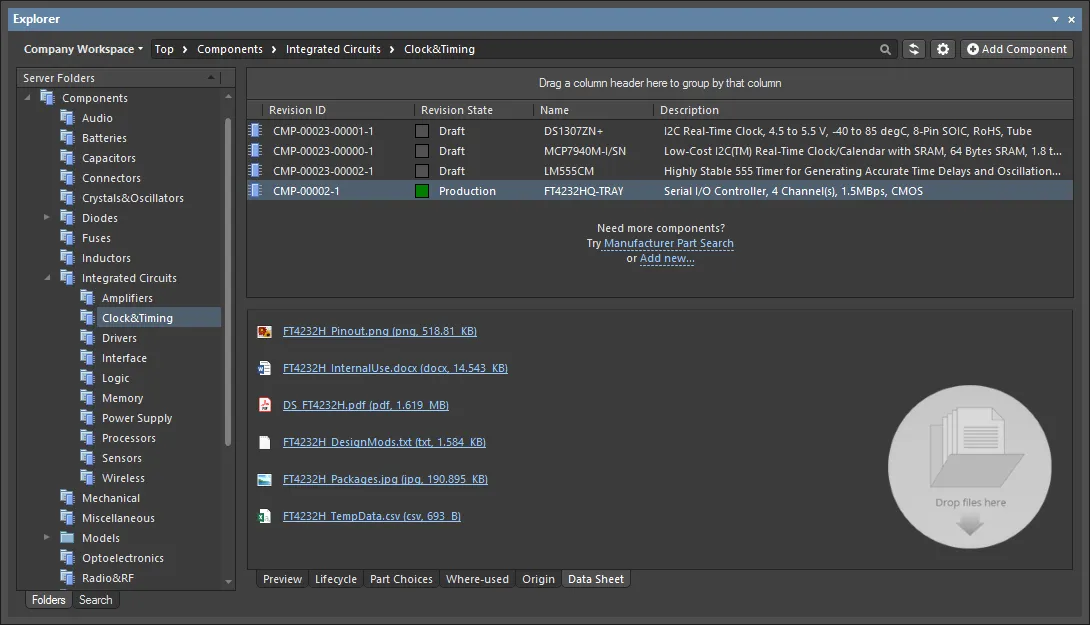
Example datasheets attached to a component, of varying file types.
Note that a datasheet is attached/linked to a component, and not a specific revision of that component. Once attached, it is available for all revisions of that component. Conversely, if it is removed while browsing a specific revision of the component, it will be removed from all revisions.
After attaching a datasheet to a component, all management for that datasheet is performed from within the Data Sheet aspect view tab. This includes being able to quickly open the document by clicking on its entry.
The attachment will open either within Altium Designer (for example a txt document), or in the applicable external application.
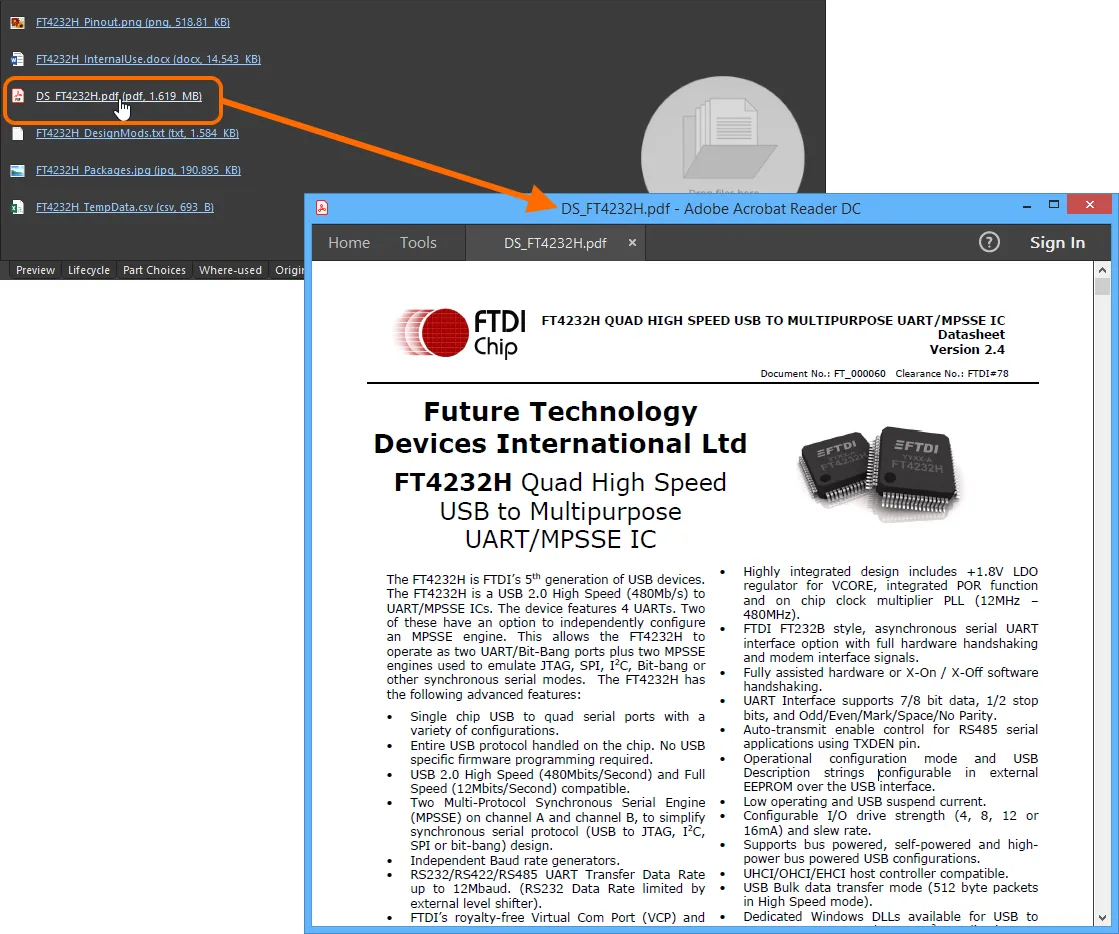
Use the hyperlinked name of the datasheet to quickly access it. In this example, a PDF datasheet is opened in the applicable, external PDF Viewer application.
In addition, the following commands are available on the right-click context menu:
-
Add File – use this command to attach another datasheet to the component. Once attached, the datasheet is available to all revisions of that component, since it is linked at the item level.
The software checks the content of the new file being uploaded and acts accordingly:
- If its content is the same as a datasheet file already uploaded to this component, the upload will not proceed, even if the file is given a different name.
- If its content is the same as a datasheet file already uploaded to another component in the Workspace, upload will again not proceed. Instead, a link is created between the component and that existing datasheet.
- If the datasheet is a new version, with modified content, but same name, bear in mind it will not replace the existing (former) version. It will be uploaded as an additional datasheet attachment.
- Edit – use this command to access the
![]() Caption dialog, with which to modify the caption for the datasheet (its display name within the software) as required.
Caption dialog, with which to modify the caption for the datasheet (its display name within the software) as required.
-
Delete – use this command to effectively remove the datasheet attachment from the component. Only the link between the component and underlying Datasheet Item is deleted. The latter itself is only deleted if no other component is linked to that datasheet.
If a datasheet is removed while browsing a specific revision of the Component Item, it will be removed from all revisions, since it is linked at the item level.
- Open – use this command to open the datasheet. The attachment will open either within Altium Designer (for example a txt document), or in the applicable external application.
- Save As – use this command to save the attachment to your local media or network drive. Use the standard Windows Save As dialog to determine where, and with what name, the file is saved.
The Datasheet Item
Facilitating the ability to attach a datasheet to a component is the Datasheet Item. When a datasheet is attached to a component, the actual datasheet file is uploaded into a single revision of this content type, and the component linked to that Datasheet Item.
Datasheet Items are stored within
Datasheets folders. These are designated to be system folders, and so by default are not visible. For day-to-day usage of datasheets, you need not worry about the mechanics underlying those attachments. However, as Engineers we always like to see what's going on 'in the box', and so the folders and items can be revealed by enabling the
Explorer.ShowSystemFolders option, in the
Advanced Settings dialog. Access this dialog by clicking the
Advanced button, on the
System – General page of the
Preferences dialog.
When a new datasheet file is attached to a component, and that file has not already been uploaded (attached to a different component), the resulting Datasheet Item will be created in a Datasheets sub-folder of the active folder.
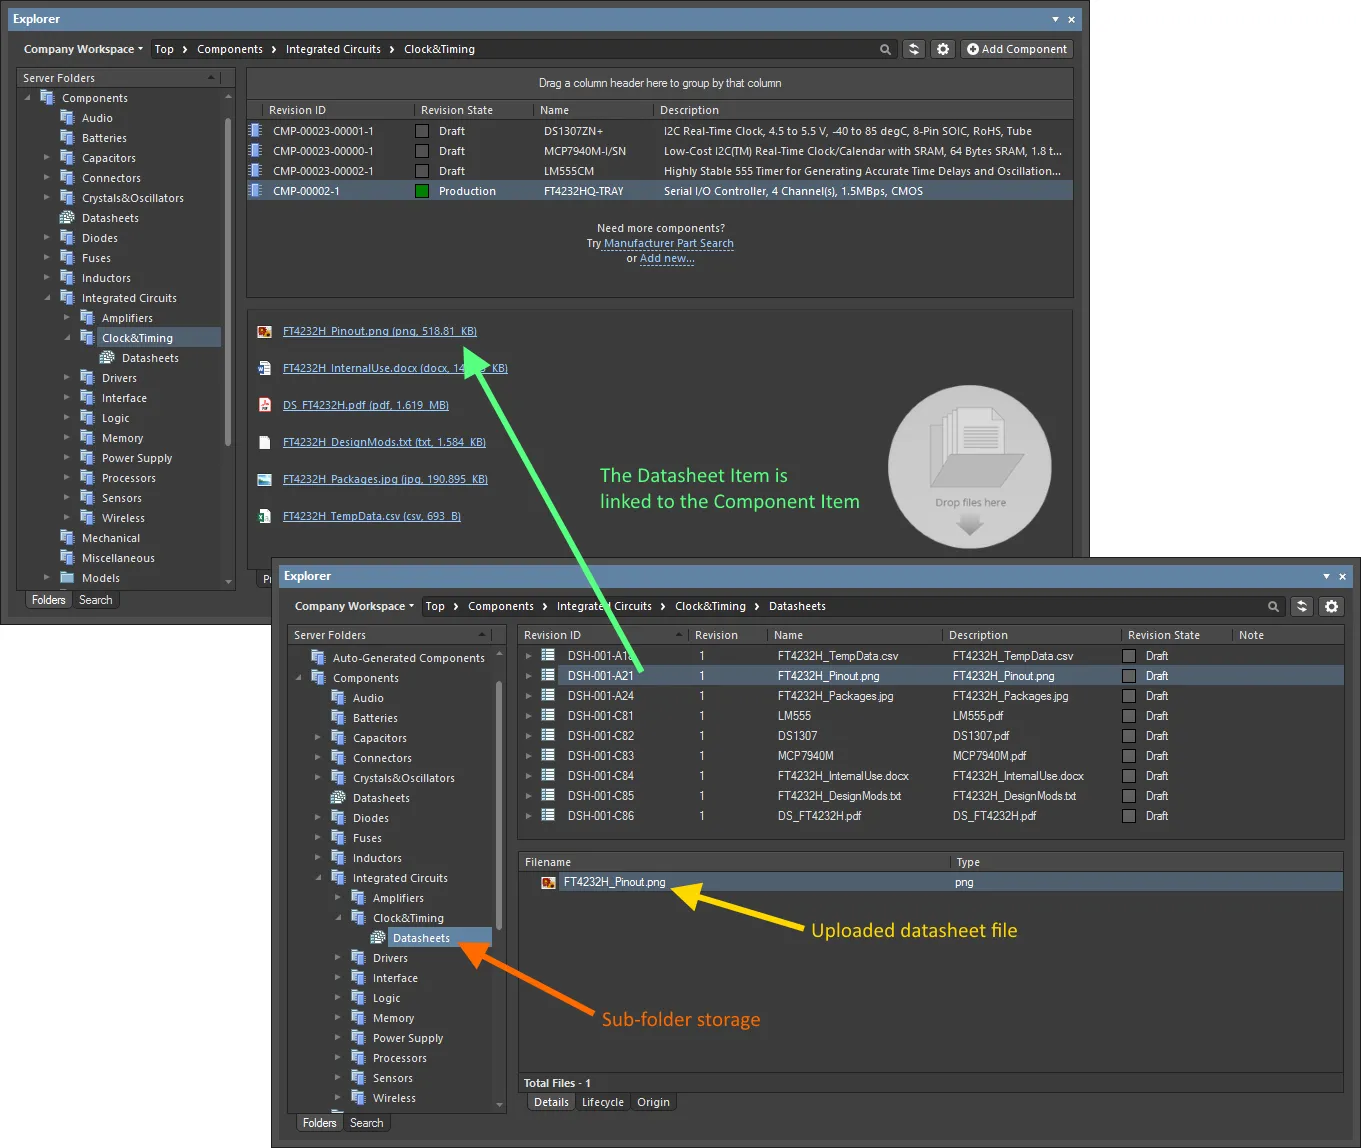
The mechanics of an uploaded datasheet – the Datasheet Item is linked to the component.
If the datasheet being attached has the same content as a datasheet file already uploaded to another component in the Workspace, a link is created between the component and that existing datasheet. Note that the Datasheet Item itself may reside in a Datasheets folder anywhere in the Workspace.
While you can open and download the file stored within a Datasheet Item, it is not advisable to reveal and work with Datasheet Items. Datasheet management should really only be performed through the component's Data Sheet aspect view tab.
Attaching a Datasheet in the Component Editor
Copy Link
Copied
One or more datasheets can also be attached to a component when creating/editing that component through the Component Editor. The following sections take a look at how this is done in both operational modes of the editor.
In Single Component Editing Mode
One or more datasheets can be attached to the active component, while defining that component through the Component Editor in its Single Component Editing mode.
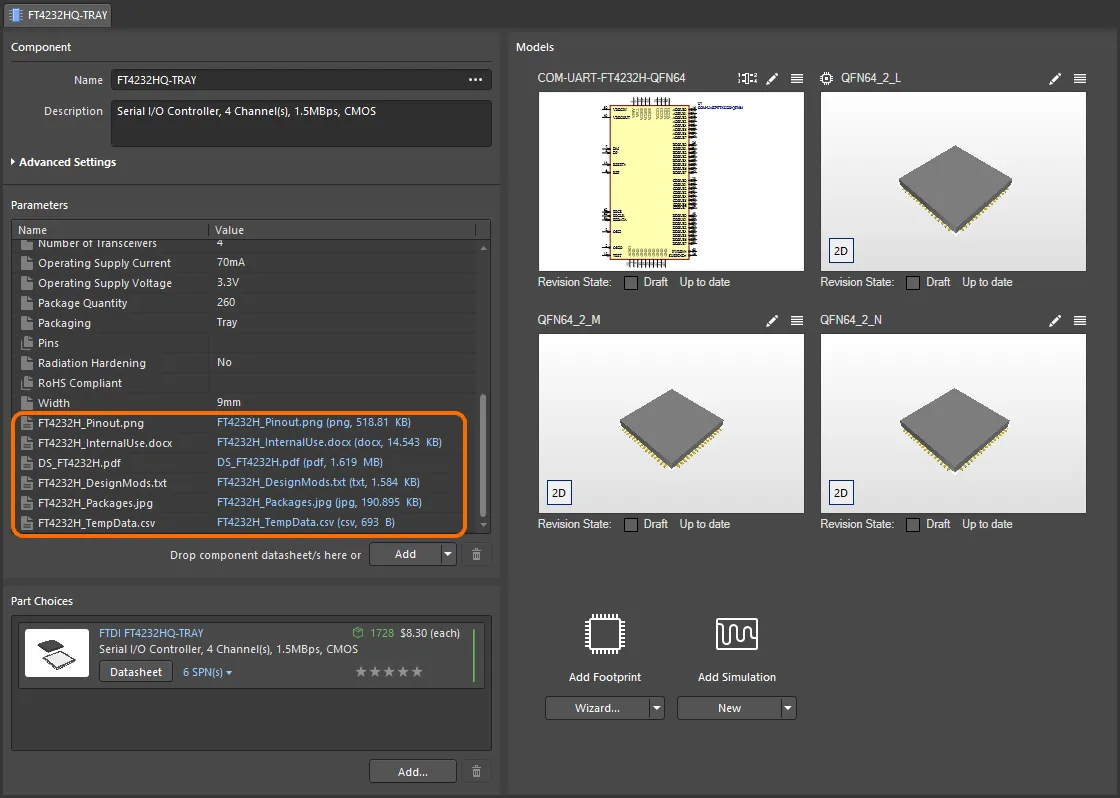
Linking various datasheets, as seen from the perspective of editing a component in the Component Editor (Single Component Editing mode).
With the new (or existing) single component opened in the temporary Component Editor for direct editing, one or more datasheets can be added in the following ways:
- By dragging and dropping from Windows File Explorer to anywhere within the Parameters region.
- By dragging and dropping a datasheet link from a web page in an external web browser, to anywhere within the Parameters region.
- By clicking the drop-down part of the
 button and choosing Datasheet from the associated menu. Use the Open dialog to browse to, and open, the required datasheet(s).

Example demonstrating attachment of datasheets from a local drive, and then editing the local caption for the main datasheet.
Once uploaded, you can:
- Open a datasheet by clicking on its Value entry in the Parameters region.
- Change the caption for a datasheet, by clicking on its Name entry in the Parameters region and typing the new name as required. Changing a caption for a datasheet is local to that component.
- Remove the datasheet from the component, by selecting its entry in the Parameters region and clicking the
 button below the region.
In Batch Component Editing Mode
One or more datasheets can be attached to one or more components, while defining component(s) through the Component Editor in its Batch Component Editing mode. This, for example, allows you to quickly attach the same required datasheet(s) to all components in a particular family.

Linking various datasheets, as seen from the perspective of editing a component in the Component Editor (Batch Component Editing mode).
Attaching datasheets to a component definition involves a sequence of steps, summarized here and detailed in the sections thereafter:
- Enabling the use of datasheets.
- Uploading datasheets to a selected component.
- Assigning uploaded datasheets to other component definitions.
Enabling the Use of Datasheets
Copy Link
Copied
To be able to attach datasheets to a component definition in the editor, you need to first enable the use of datasheets. This is done from the Required Models/Parameters region of the editor. Click on the Add control at the bottom of the region, and choose Datasheet from the context menu.
Specifying the use of datasheets does not mean a component definition has to use it, but rather adds a field for datasheets to the component's definition.
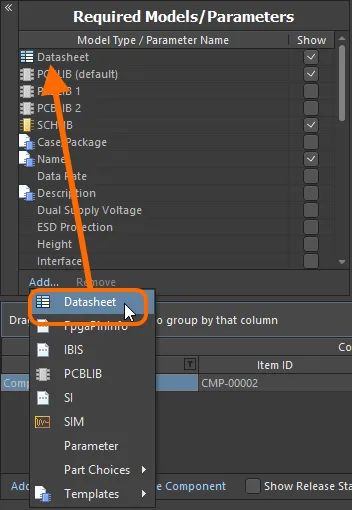
Enable the use of datasheets for components.
Remember that the Show option associated to the entry allows you to toggle the display of the corresponding Datasheets column in the lower region of the editor – where the component definitions themselves are defined.
Uploading Datasheets to a Selected Component
Copy Link
Copied
Having enabled the use of datasheets, you now need to upload them. Essentially, you upload any number of datasheets for the currently selected component, but can then assign all, or specific sheets, across the various components being defined. Once the Datasheet entity has been added to the Required Models/Parameters region, a Datasheet entry will be presented in the Model Links region. Clicking on this will show the list of datasheets currently assigned (linked) to the selected component, in the preview region.
The preview region will only show the datasheets linked to the selected component.
While the Datasheet entry appears in the Model Links region, it is not a model link in the true sense of the word. It is not a single Item, but rather a 'bucket' representing a summation of Datasheet Items into which datasheets are individually uploaded. It presents no other data attributes (no revisions, location, release status, etc).

The Datasheet 'bucket', and the available listing of uploaded datasheets. In reality, each datasheet is uploaded into a unique underlying Datasheet Item.
With a component definition selected in the editor, a datasheet can be uploaded to that component in various ways:
- Dragging and dropping from Windows File Explorer to the preview region, or the Datasheets cell for that component definition.
- Dragging and dropping a datasheet link from a web page in an external web browser, to the preview region, or the Datasheets cell for that component definition.
- Right-clicking in the preview region and choosing the Add File command from the context menu. Use the Open dialog to browse to, and open, the required datasheet(s).
Once uploaded, you can:
- Open a datasheet by clicking on its entry in the preview region (or by right-clicking on its entry and choosing Open from the context menu).
- Change the caption for a datasheet, by right-clicking on its entry in the preview region and choosing Edit from the context menu. The Caption dialog will appear with which to do so. Changing a caption for a datasheet is local to that component.
- Remove the datasheet from the component, by right-clicking on its entry in the preview region and choosing Delete from the context menu.
- Download the file by right-clicking on its entry in the preview region and choosing Save As from the context menu.
Assigning Uploaded Datasheets to other Component Definitions
Copy Link
Copied
When you initially attach (upload) a datasheet, you are doing so for the currently selected component. But the beauty of the system is that all uploaded datasheets are available for linkage to other components being defined as well. Click the control at the right of the Datasheets cell to access a listing of the available datasheets, and use the associated checkboxes to attach/remove a datasheet to/from the component.
Only those datasheets uploaded during the session with the Component Editor will be available, and not all datasheets uploaded to components throughout the entire Workspace.

Example demonstrating attachment of datasheets that have already been uploaded, to another component definition.
Each datasheet that is assigned to a component appears in the Datasheets cell, separated by a comma.
Accessing a Datasheet from the Placed Component
Copy Link
Copied
Once a component is placed onto a schematic document within a design project, you can access any datasheets that are linked to it from the right-click References context sub-menu.
The References sub-menu will also contain any additional named links defined for the component.
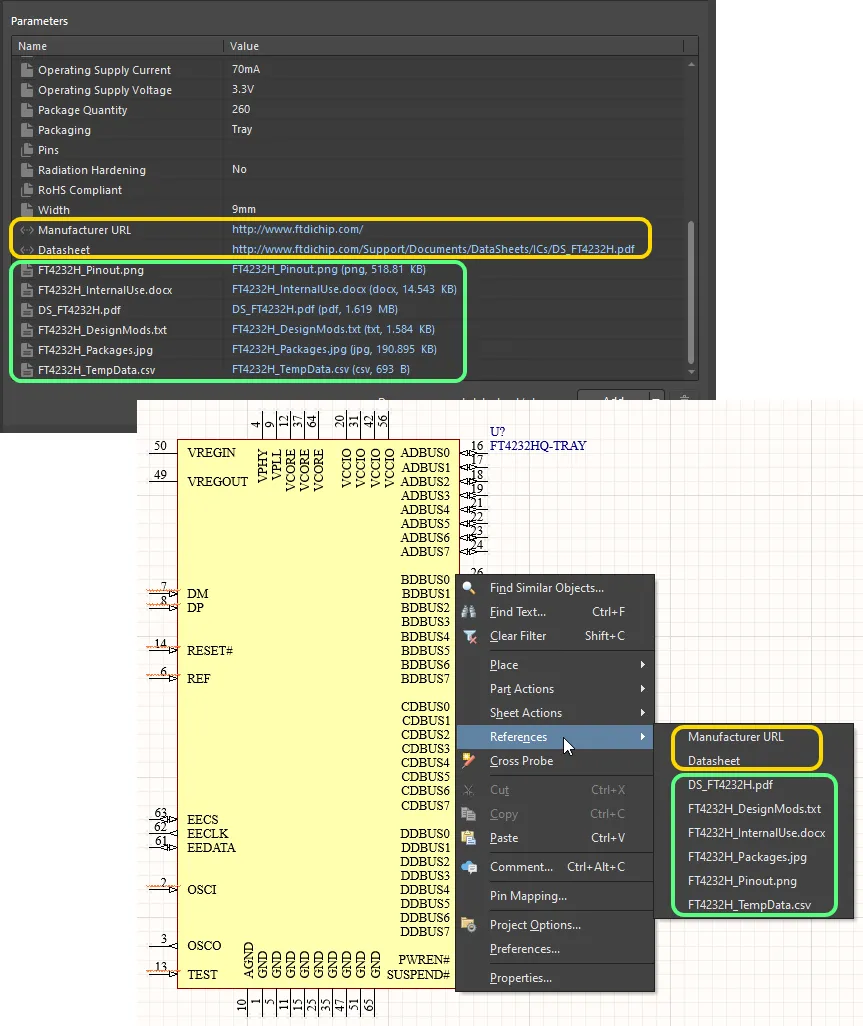
Accessing datasheets for a placed component on a schematic sheet.
