Parent page: Item Lifecycle Management
The Altium Vault provides great flexibility for deciding who can make particular state transitions for an Item Revision in a vault - the action of transitioning a revision from one state, to another different state, as defined by the lifecycle definition employed for its parent Item. It is possible to prohibit standard (non-administrative) users from transitioning between specific lifecycle states on-the-fly, while opening up permissions to more than just Vault Administrators. You have the ability to specify permissions at the global level - as part of global vault operation permissions - and also at the individual state transition level. The latter act in conjunction with those settings at the global level, and facilitate fine-tuning of permissions for those more important transitions (for example setting an Item Revision to be Ready for Production).
Alternatively, standard users can be made to request approval for specific state transitions. In turn, these Approval Requests are sent to, viewed, and acted upon, by those designated to be members of one or more Approval Groups.
With various levels of permission control, you can define a lifecycle state transition strategy that adheres to your organization's preferred approach.
Defining Permissions
Permissions can be defined at two levels:
- Globally - defining which users and/or roles can perform state transitions, across the entire range of defined transitions across all defined lifecycle definitions.
- Locally - specifying permissions at the individual state transition level.
Global State Transition Permissions
Global state transition permissions are defined and managed using the Edit Operation Permissions dialog. Access to this dialog is made from the Data Management - Vaults page of the Preferences dialog. Select the Altium Vault whose permissions you wish to browse/modify, then click the Properties button and choose the Edit Operation Permissions command, from the associated menu.
The vault operation entry of significance here is Move revision between lifecycle states.
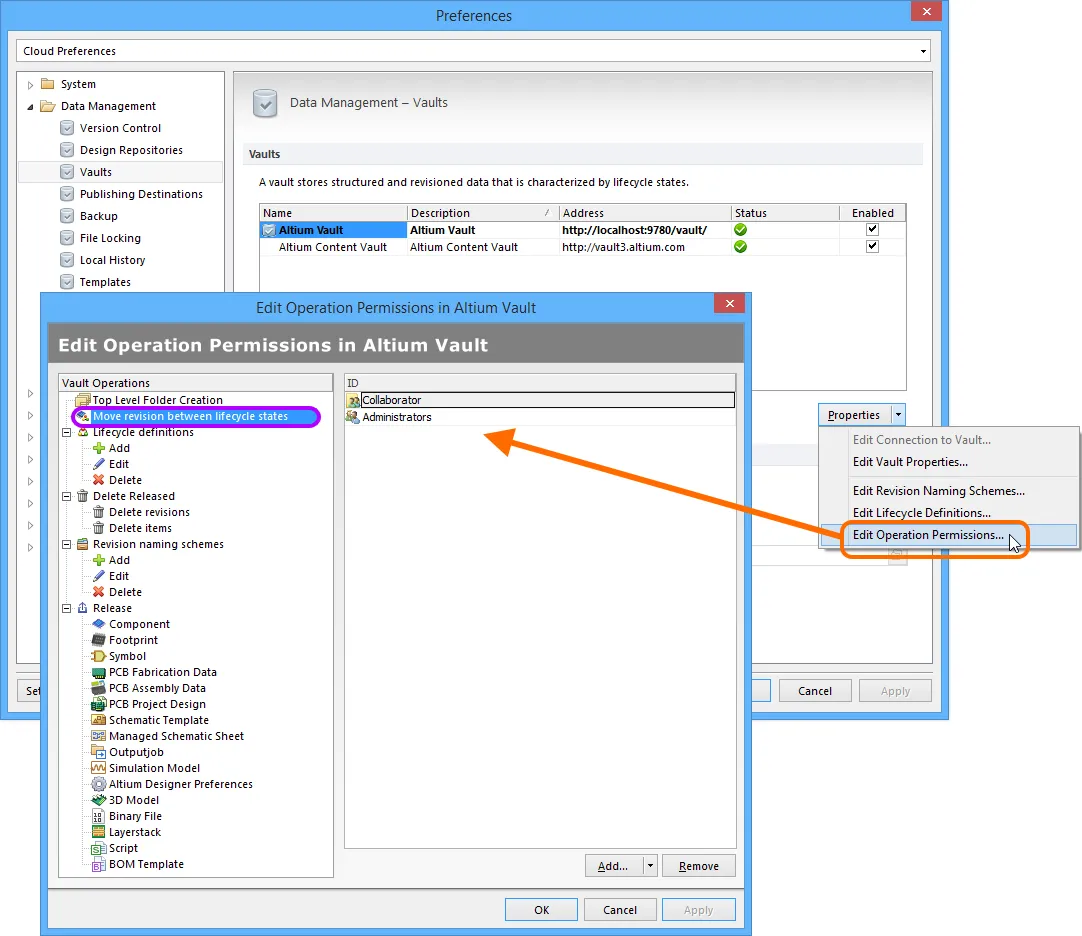
Access and configure, at the global level, who is permitted to perform lifecycle state transitions.
For a newly-installed Altium Vault, the default permission settings for this operation are:
- Collaborator
- Administrators.
For most cases, these default permission settings will be fine and would need to be modified only in exceptional circumstances.
Define additional permissions as required (click the Add button). State transition permissions at this global level can be assigned to the following entities:
-
 Administrators (itself a defined role)
-
 Collaborator (this is a user who has edit rights for an Item/Revision).
-
 Owner (this is the person who created the initial Item)
-
 Specific user-defined Role
-
 Specific User
Management of Users and Roles for an Altium Vault is performed from the
Users area of the vault's browser-based interface, accessed from an external browser. For more information, see
Managing the Users of an Altium Vault.
Local State Transition Permissions
Permissions for a particular state transition are defined in the associated State Transition Properties dialog, accessed from the applicable States and Transitions region of the lifecycle definition currently being configured in the Edit Lifecycle Definitions dialog.
Access the
Edit Lifecycle Definitions dialog from the
Data Management - Vaults page of the
Preferences dialog. Simply select the required vault, click the
Properties button and, from the associated drop-down menu, select the
Edit Lifecycle Definitions command.
To edit the properties of a transition, click to select it, then click on the  control, to the right of the transition's name.
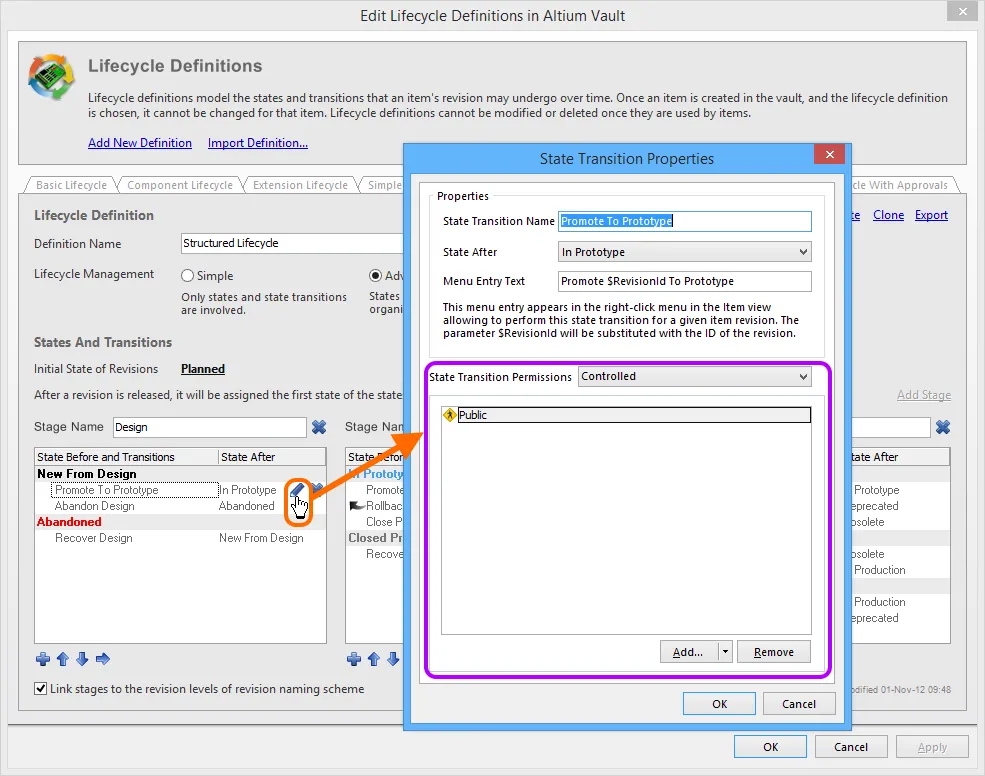
Access controls for defining permissions for the state transition being edited.
Choose the type of permission control that you wish to employ for the transition, using the State Transition Permissions field. Two options are provided:
- Controlled - this type allows you to refine exactly who can perform this transition, through specification of one or more users and/or roles. This type of local permission control is used in combination with permissions set at the global level (see How Permissions are Applied). Use the controls in the region below to define permitted entities accordingly. By default, the Public entity is added, meaning that all users at this local level are permitted to perform the transition.
To set up specific users and/or roles, first select and then remove, the
Public entity. You can then add a user or role as required from the menu associated to the
Add button. Use the subsequent
Search For Users dialog, or
Search For Role dialog, to find the required user or role respectively.

With Controlled permissions, you can switch from public access, to only those users/roles specified.
- Using Approvals - this type allows any standard user to request that this state transition be performed. Requests are handled by one or more users added (individually or through roles) to defined Approval Groups. Any member of such a group can authorize, or reject, a transition request. In addition, multiple approval groups can also be defined, and ordered. This allows for multiple levels of approval.
Use the controls in the region below to define the approval group(s) accordingly. By default a single, empty approval group is added ready - New Approval Group. This can be renamed as required using the Edit Approval Group Name command from the menu associated to the Add button (or the region's right-click menu).
You can add a user or role to a selected approval group as required, from the menu associated to the Add button (or the region's right-click menu). Use the subsequent Search For Users dialog, or Search For Role dialog, to find the required user or role respectively. Order multiple approval groups using the Move Up and Move Down commands from a menu - approval is from the top, down.
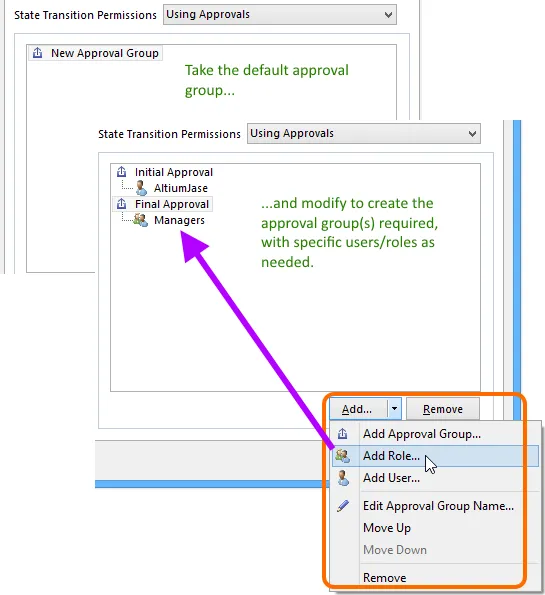
With Using Approvals, all non-admin users must request transition, which is acted on
by a user in one or more defined approval groups.
Management of Users and Roles for an Altium Vault is performed from the
Users area of the vault's browser-based interface, accessed from an external browser. For more information, see
Managing the Users of an Altium Vault.
By default, all created state transitions use the Controlled type of permission control. If you switch to Using Approvals, and define approval groups, then these will be stored, should you switch between the two modes again.
How Permissions are Applied
How permissions are applied, depends on the type of permission control chosen and configured at the state transition level:
- Controlled Permissions - for a user to be able to perform the state transition, the following conditions must be met:
- They must have permission at the global level to Move revision between lifecycle states (defined in the Edit Operation Permissions dialog).
- They must have permission at the local level for this particular state transition.
- They must also be a collaborator for the Item Revision whose lifecycle state is being transitioned (i.e. they must have editing rights).
These three conditions are ANDed - if one is not met, then the user will be prevented from performing that specific transition.
For non-administrative users, the default permission settings (Collaborator at the global level, and Public at the local state transition level) mean that you just need to make a user a collaborator for the required Item Revision, to meet all conditions. Then for key transitions, you can simply tighten permissions at the local state transition level, so that not just any collaborator can perform the transition.
- Using Approvals - all non-administrative users must use the approvals system, and send a request to perform the state transition. The approvals system doesn't require the user to have permission to make state transitions at the global level, nor does a user require to be a collaborator for the Item Revision.
While a user does not need to be a collaborator for the Item Revision, it must be shared with them, otherwise they will not be able to see it in the vault.
Vault Administrators will always be able to transition Item Revisions between different states, irrespective of locally defined state transition permissions.
Approval Requests
The following sections take a closer look at the various aspects of using the approval system to allow non-administrative users to perform specific state transitions.
Creating a Request (Requesting Approval)
Requesting approval for a state transition is performed from the Lifecycle aspect view for the required Item Revision (in the Vaults panel), or from the graphical lifecycle region in the detailed Item view. Simply right-click on the lifecycle for the revision and choose the command that requests the transition. A Confirm dialog appears, in which you can enter a note as to why you are making the request - which can aide the approval group members in their deliberations over whether or not to ultimately approve your request! Click Yes to effect creation of the request.
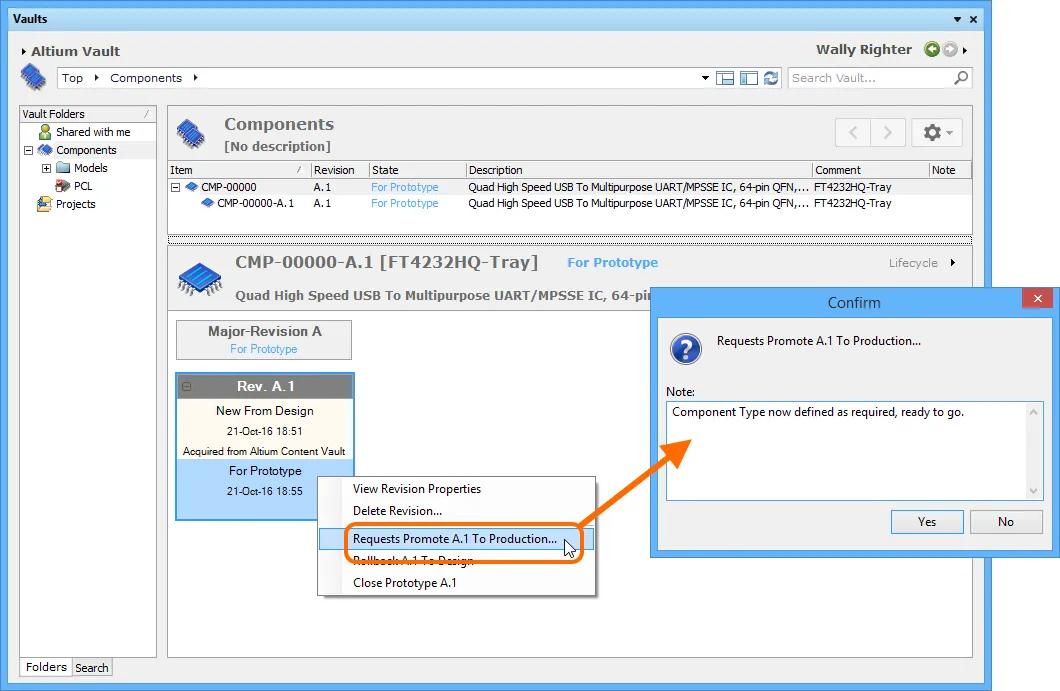
Request the state transition, and add a helpful note to substantiate your case.
Upon creation, members of the applicable approval group for that state transition will receive notification in their message stream, on the Stream page of the vault's browser-based interface (and summarized on the Home page of that interface).

Once the request is created, notification is sent to the members of the (initial) approval group, alerting them that action is required.
Viewing Approval Requests
For both the originator of a state transition request (Requester) and the user(s) defined in the applicable approval group for that state transition (Approvers), pending requests are presented through the Vaults panel using a dedicated Approval Requests folder.
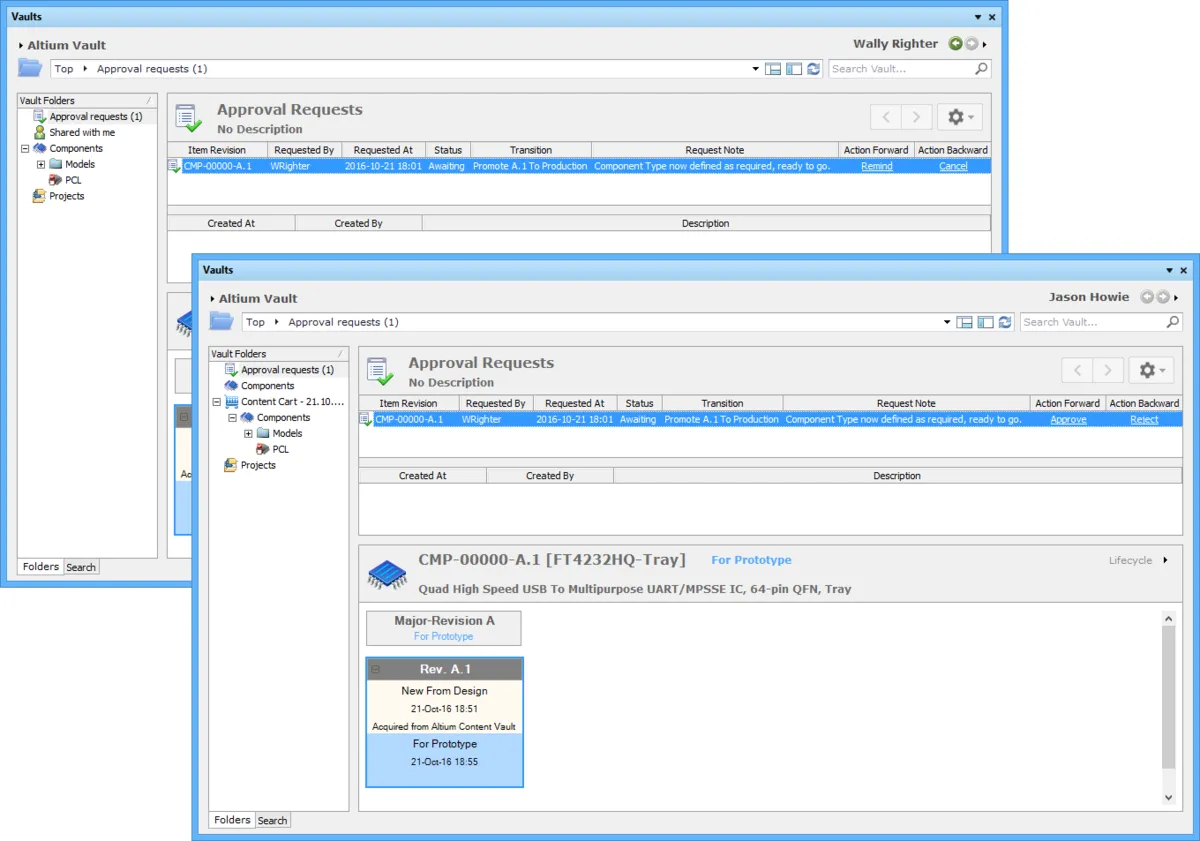
An example Approval Request in the Approval Requests folder, as seen by the requester (Wally Righter) and one of the members of the defined (initial) approval group for
the particular state transition (Jason Howie).
The number next to the
Approval Requests folder name indicates how many pending requests there are. If the option to
Show Approved Requests is enabled (from the

menu), then this number will reflect the total (pending + approved).
When there are no pending requests, the folder will not be presented. However, if there are approved requests, and the option to Show Approved Requests remains enabled, the folder will remain visible to browse those approved requests. Note that if you disable the Show Approved Requests option, and there are no pending requests, the folder will disappear once again.
The following information is presented for each approval request:
- Item Revision - the specific Item revision for which the request is being made.
- Requested By - the originator of the request (the requester). The entry here takes the user's User Name.
- Requested At - the date and time at which the request was created.
- Status - the current status of the request. This can be one of the following states:
- Awaiting - the request is currently awaiting action by one or more approvers.
- Approved - the request was approved. Note that this state will only be entered upon full, complete approval, by all approval groups defined for that transition.
- Transition - the specific state transition that is being requested for this Item revision.
- Request Note - any note that has been added by the requester, at the time the request was made.
- Action Forward - the controls presented here are only for pending requests (those with a status of Awaiting). Controls differ to cater for the two parties as follows:
- Requester - the user who created the request can Remind it.
- Approvers - a user within an approval group can Approve the request.
- Action Backward - the controls presented here are only for pending requests (those with a status of Awaiting). Controls differ to cater for the two parties as follows:
- Requester - the user who created the request can Cancel it.
- Approvers - a user within an approval group can Reject the request.
Action-based commands for the approval request are also available from the right-click menu for the Item Revision's lifecycle (within the Lifecycle aspect view).
The central section of the page is used to present approval information - see the Approval Information Stream section for more detail.
Actioning a Request
As briefly described in the previous section, both requester and approver have actions that they can take. The following collapsible sections take a closer look at each of those actions:
Remind
This action can be taken by the requester if they have been waiting for approval, but have not yet got it. It is analogous to nudging someone, or bumping a forum post - in other words a polite way of reminding those in the applicable approval group that they need to take action (either way). Simply click the Remind control associated with the approval request. A Confirm dialog appears, in which you can enter a note that perhaps raises the level of urgency for the approval to be made! Click Yes to effect the reminder - members of the applicable approval group for that state transition will receive the reminder in their message stream, on the Stream page of the vault's browser-based interface.

Example use of the Remind action, and the subsequent reminder notification received by an approval group member.
Approve
This action can be taken by a member of the applicable approval group, to approve that request. Simply click the Approve control associated with the approval request. A Confirm dialog appears, in which you can enter a note if required. Click Yes to effect the approval - the requester for that state transition will receive notification in their message stream, on the Stream page of the vault's browser-based interface.
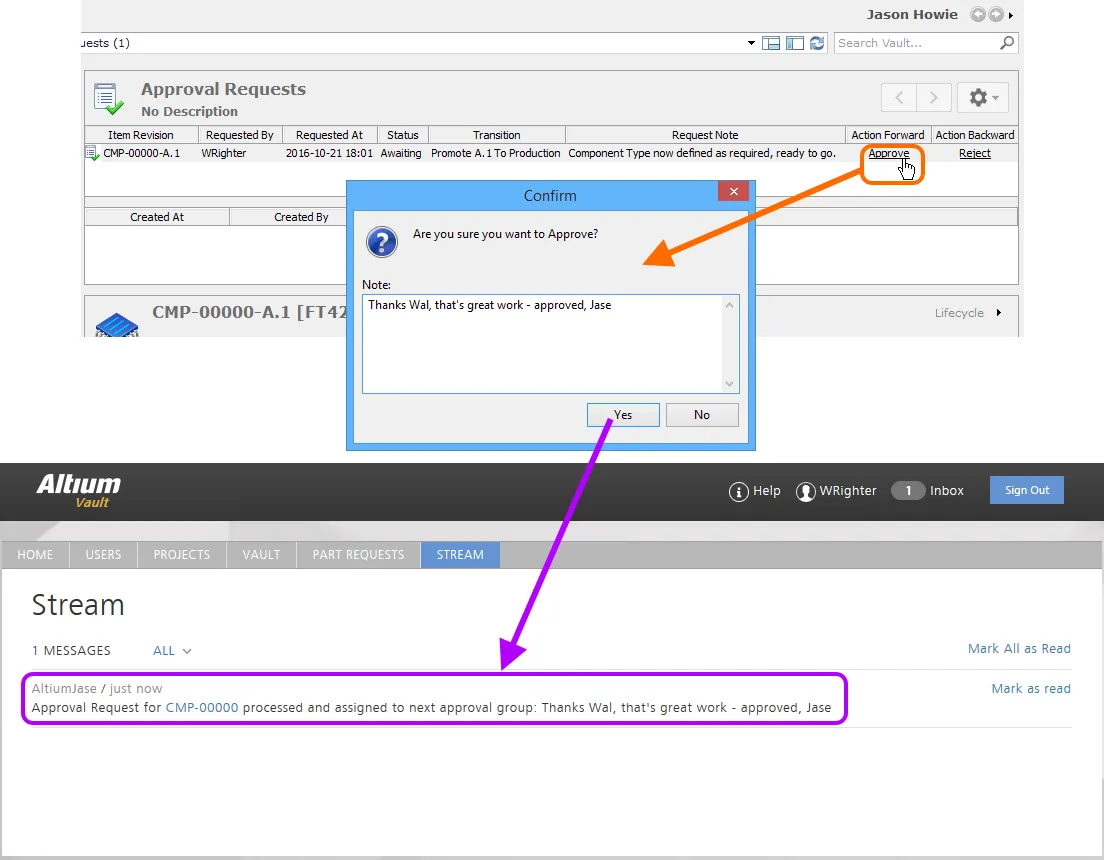
Example use of the Approve action, and the subsequent notification received by the requester.
If there is only one approval group, approval of the request will result in the state transition occuring automatically. If there are multiple approval groups, then the request will await approval from a member of the next group.
Reject
This action can be taken by a member of an approval group, to reject that request. Simply click the Reject control associated with the approval request. A Confirm dialog appears, in which you can enter a note if required, perhaps indicative of why the request has been rejected. Click Yes to effect the rejection - the approval request will be deleted, and the requester for that state transition will receive notification in their message stream, on the Stream page of the vault's browser-based interface.

Example use of the Reject action, and the subsequent notification received by the requester.
Cancel
This action can be taken by the requester if they have been waiting for approval, but have since decided to cancel the request. This could happen, for example, if another issue has since been found that would negate the need to transition to the required lifecycle state. Simply click the Cancel control associated with the approval request. A Confirm dialog appears, in which you can enter a note if required. Click Yes to effect the cancellation - the approval request will be deleted.

Example use of the Cancel action, and the subsequent notification received by an approval group member.
Approval Information Stream
When a request is approved, notification is also available in the central region of the page, when browsing that approval request. This information consists of the following elements:
- Created At - the date and time at which the approval request was approved.
- Created By - the member of the relevant approval group who approved the request (displayed as <FirstName> <LastName>).
- Description - an entry that consists of an auto-generated messsage, along with any note included by the approver, at the time approval was given. The auto-generated part of the description depends on the type of approval:
- Final approval (from a member of the only, or last, approval group) - task approved and completed.
- Intermediate approval (from a member of an approval group that is not the last approval group) - task approved and assigned to next approval group <ApprovalGroupName>.

An example of the approval stream for a particular Item Revision, as seen by the requester. In this case, the transition had to pass through two stages of approval (obtaining
approval from a member of two different approval groups).
Such approval information is available only for approval requests that have a status of Approved, or have a status of Awaiting, and have been approved by the first of multiple associated approval groups.
The following people see this information:
- The requester of the state transition.
- The user who gives final approval for the request. So where multiple approval groups are involved, only the member of the final approval group - who gives the final approval - will see this information. A member of an approval group that gives intermediate approval will not see this stream.
