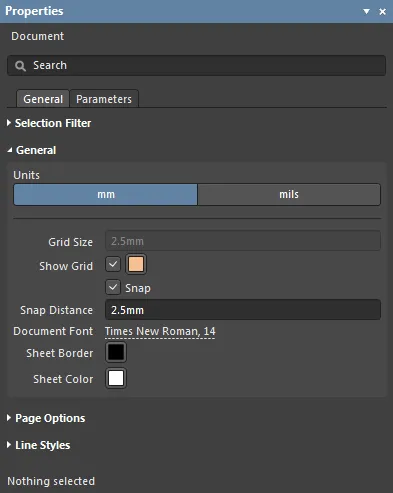
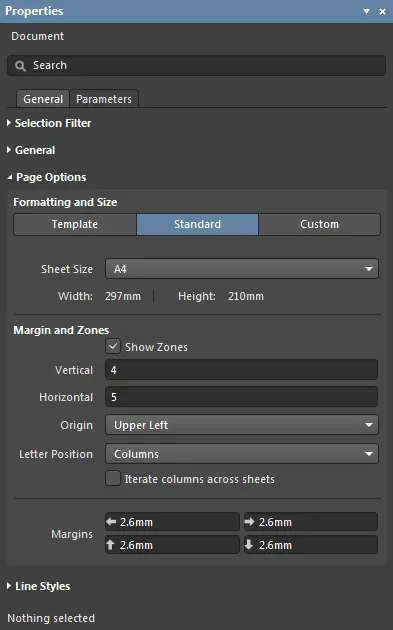
When the active document is a multi-board schematic document (*.MbsDoc) and when no design object is currently selected in the design space, the Properties panel presents the Document Options.
The following collapsible sections contain information about the options and controls available under the panel's General tab:
Selection Filter

The options in this section of the panel determine which multi-board objects may be selected in the design space.
- All Objects button – select remove object filtering so that all types of objects may be selected.
- Object buttons – toggle each object button to enable/disable the ability to select that object type.
General

-
Units – select the measurement units that apply to the multi-board document and its graphic elements.
The measurement units can also be toggled between Imperial and Metric by choosing the View » Toggle Units command from the main menus (shortcut: Q). You can quickly verify the active units from the Status Bar, by looking at the entry for the coordinates, at the left-hand end of the bar.
- Grid Size – set the measured distance between each sheet grid line. Note: this option is not editable in multi-board documents.
- Show Grid – check to display grid lines at the default Grid Size in the document sheet. Click the associated color button (
 ) to specify the color of the grid lines in the color selector drop-down, which includes options for preset colors, HEX/RGB color values, and the graphic selection of color shades.
-
Snap – when checked, the ghost/preview cursor will snap (jump) to grid line intersections while the editor is in object placement mode. The cursor will also snap to graphic object vertices (corners, etc.,), line midpoints and circle centers. This allows you to quickly and easily align the various elements on your document, to arrive at the layout for your logical multi-board system design exactly the way you want it.
The snapping functionality can also be toggled on or off by choosing the View » Toggle Snapping command from the main menus (shortcut: Shift+E). You can quickly verify the status of the snapping feature from the Status Bar, which will either display Snapping: Enabled, or Snapping: Disabled.
- Snap Distance – set the distance at which the preview cursor will snap onto the targets outlined above. The preview cursor changes to an orange dot when a midpoint, vertex, or center is snapped to.
- Document Font – set the font size, style and any additional font attributes that will be used for the text associated with all objects in the document sheet. For any given object, the font settings may be overridden in its corresponding Properties panel mode, which is enabled when that object is selected.
- Sheet Border – click the associated color button to set the zone border line and character color for the document sheet.
- Sheet Color – click the associated color button to set the background color for the document sheet.
Page Options

Formatting and Size
- Template mode – set the page size and format by selecting from a range of predefined schematic sheet templates. The list includes templates found in the location specified in the Data Management – Templates page of the Preferences dialog. Note that a default schematic sheet to be used for new multi-board documents may be defined in the System – New Document Defaults page of the Preferences dialog.
- Template – use the drop-down menu to select from a list of standardized page templates, and if required, use
 to refresh the template and drawing.
- Width/Height – the dimensions of the current page size shown in the current document units (see the General section above).
- Source – use the browse button (
 ) to navigate to and select an alternative template source in the schematic
 *.SchDot format.
- Standard mode – set the sheet size to a standard page format.
- Sheet Size – use the drop-down menu to select from a list of standard page dimensions.
- Width/Height – the dimensions of the current page size in the current document units.
- Custom mode – set the sheet size to specified custom dimensions.
- Width – enter the required sheet width measurement.
- Height – enter the required sheet height measurement.
Margin and Zones
Defines the size of the sheet border graphics and its zone divisions. Uncheck the Show Zones box to hide the zone divisions in the border graphics.
- Vertical – set the number of divisions (rows) in the vertical sheet margin. The alpha-numeric zone labeling type is defined by the Origin and Letter Position settings.
- Horizontal – set the number of divisions (columns) in the horizontal sheet margin.
- Origin – sets which corner of the document sheet(s) the perimeter zone alpha-numeric indicators will begin from (zone position
A-1 or 1-A).
- Letter Position – set where the letter zone indicators are placed on the document sheet, either in the horizontal perimeter zones (columns) or the vertical zones (rows).
- Margins – set the distance (in the current units) between the page edge and each of the four border lines as indicated by the arrows associated with each entry field.
Line Styles
The following collapsible section contains information about the options and controls available under the panel's Parameters tab:
Parameters
When a design object is selected in the design space, the Properties panel will present options specific to that object type – the panel changes to that object 'mode'. The following table lists the object types available for placement within a multi-board schematic document, where each listed entry links to its associated properties information (Properties panel mode) page.