Working with the Selection Filter in Altium Designer
Even a small circuit can involve dozens of components spread over multiple schematic sheets, to which you can easily add hundreds of pads, vias, and tracks as you design the PCB. As you work on the design, you will be constantly adding and editing - to do that efficiently you need an editing interface that allows you to easily select, examine and modify only those objects you are after.
To edit multiple objects you first need to select them - the challenge has been selecting only those objects you are after...
Altium Designer simplifies this challenge with the Selection Filter. The filter is available at the top of the Properties panel, which is displayed whenever there is nothing selected in the schematic or PCB editor's design space.
Accessing the Selection Filter
The Selection Filter is located at the top of the Properties panel. To open the panel, press F11, or use the  button on the bottom right.
The Selection Filter is displayed when there is nothing selected in the design space. In this mode, the Properties panel is used to configure the base properties in that editor (schematic, PCB, etc.,) as indicated at the top of the panel.
A blue button indicates that that object-kind can be selected.

 The Schematic and PCB editor Selection Filters are available in the Properties panel when there is nothing selected in the design space.
Working with the Selection Filter
All editing actions require the target objects to be selected first, so selecting is core to becoming proficient at editing in Altium Designer. The selection filter greatly simplifies the selection process, allowing you to quickly create a filter that only allows the object kinds of interest to be available for selection. All object kinds that are not enabled remain visible but cannot be moved or edited.
- The All - On button is a global toggle; use it to toggle all object types on. With this button, you can turn all object types on, and still selectively enable only the one(s) you need.
- The All - Off button is a global toggle; use it to toggle all object types off. With this button, you can turn all object types off, and still selectively enable only the one(s) you need.
- The Custom button is used to toggle only certain object types on. With this button, you can turn certain object types on or off. If the object-type button is blue, that specific object-type is enabled.
 Use the Custom button to toggle all object types you need.
Once you have applied a filter, you can select the objects of interest using the standard selection techniques.
Post Selection Filter
A common challenge is selecting certain objects-types within a group of objects. Rather than attempting to carefully select only the objects of interest, another approach is to perform a broader selection and then filter down the result set.
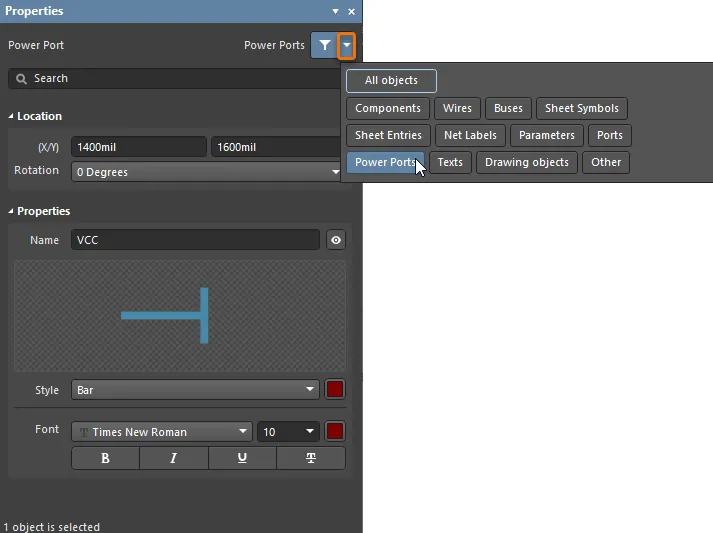
The post-selection filter is available at the top of the Properties panel, as shown in the image below.
To use the Post Selection Filter:
- Select the objects.
- Click the Post Selection Filter down arrow (highlighted in orange in the image above) to display the object-type buttons, then enable only those objects required. In the image above, a section of the circuit was selected then the Post Selection Filter was used to filter out all objects except Net Labels and Power Ports, ready to have their text properties edited.
- Click the funnel icon to clear the Post Selection Filter.


