The starting point for every design created in Altium Designer is a project. An Altium Designer project collects together a set of design documents whose output ultimately defines a single implementation of what you intend to create. For example, the schematics and PCB in a PCB project include the file set required to manufacture a printed circuit board. In contrast, the logical schematic and physical assembly files in a multi-board project output the file set to manufacture and assemble a complete product with multiple connected PCBs.
The set of design documents that make up a project can be brought together from any accessible source, local to the machine or otherwise, and are related together by the project as a unified design. Changes made to an individual project document are synchronized with the other design documents when the project is automatically compiled through dynamic compilation, compiled, allowing the changes to be propagated between design domains – for example, between documents in the Schematic and PCB domains.
In versions of the software before Altium Designer 20.0, the project had to be manually compiled to build the Unified Data Model. Since then, the design data model is incrementally updated after each user operation through dynamic compilation – creating what is referred to as the Dynamic Data Model (DDM). There is no manual compilation of the project involved; it is all done automatically. The design connectivity model is incrementally updated after each user operation, thanks to dynamic compilation.
An Altium Designer project, and its representative project file (*.Prjxxx, where xxx indicates the type of project), maintains the relationship between its constituent design documents, and also stores project-level data and option settings. The project file, and its collection of document types, will depend on the kind of project that has been created.
Project Files and Options
Altium Designer supports a number of different kinds of projects.
- PCB Project (
*.PrjPcb) – The set of design documents required to manufacture a printed circuit board.
- Multi-board Project (
*.PrjMbd) – The set of design documents and sub-project links required to create a product with multiple interconnected PCBs.
- Integrated Library (
*.LibPkg) – The set of design documents required to produce a self-contained integrated library (*.IntLib).
- Script Project (
*.PrjScr) – A set of design documents that stores one or more Altium Designer programming scripts.
More on Project Types
More information on project types
PCB Project
In a Printed Circuit Board (PCB) project, the electronic circuit is captured as a schematic, which is built up from libraries of component symbols that are placed and wired together.
The design is then transferred to the PCB editor where each component is instantiated as a footprint (pattern) and the circuit wiring becomes point-to-point connection lines. A shape for the final PCB is defined, along with the physical layers the board will include. Design rules specify the layout requirements, such as routing widths and clearance. The components are positioned within the board shape, and the connection lines are then replaced by routing, either manually or automatically.
When the design is complete, standard format output files are generated which can be used to fabricate the blank board, configure an assembly machine, and so on.
Altium Designer also supports the concept of projects that are stored and managed entirely within an Altium Server. Projects can be created as, or converted to, Managed Projects that are hosted in a secure version-controlled repository within the server. This approach greatly simplifies the process of managing project storage, versioning, lifecycle, and implementing design collaboration.
► Read more about Managed Projects.
Projects that are managed in a server are shown with an indicative icon, such as  for a manged PCB project.
Multi-board Project 
In a Multi-board project, the logical design is captured using a schematic document that connects together sub-project modules, which in turn represent existing PCB projects. The Multi-board schematic data is then transferred to a Multi-board assembly document where the physical board assemblies, as defined by the sub-projects, are positioned together and within an added enclosure.
A Multi-board project (*.PrjMbd) effectively defines the electrical and physical connectivity between existing PCB design projects through the application of a logical schematic document (*.MbsDoc ) and synchronized assembly document (*.MbaDoc). As with other project types, a Multi-board project can be stored in and accessed from an Altium Server.
► Read more about Multi-board Projects.
Integrated Library 
An Integrated Library is created in a library package project (*.LibPkg), where schematic symbols are created in a Schematic Library (*.SchLib), and reference links defined to matching models in other domains. Referenced models can include PCB footprints, circuit simulation models, signal integrity models, and three-dimensional mechanical models.
Files that contain the models (PCBLibs, etc) are added to the Integrated Library Package (*.LibPkg), or search paths are defined to identify their location. The source schematic symbol libraries and required models are then compiled into a single file (*.IntLib), referred to as an Integrated Library.
Components can be hosted in and sourced from an Altium Server as an advanced solution to managing design component data. An Altium Server provides secure high-integrity storage for component data, with the added benefits of lifecycle management and up to date supply chain information.
► Read more about Managed Components.
Script Project 
A Script (*.pas) contains a set of instructions (automated commands) that are interpreted when it is executed in Altium Designer. The scripts are written and debugged in the same editor environment.
There are two types of Scripts – script units and script forms. A script Unit can use the X2 Application Programming Interface (API) to modify or manipulate design objects on a design document. A script Form hosts controls as a user interface and harnesses the X2 API to provide script dialogs that act on active design documents.
Script Units, Forms and Data Models are contained in a Script project (*.PrjScr) that can be accessed locally, or stored in and accessed from an Altium Server.
Open a Project
Altium Designer projects can be stored and therefore retrieved from a range of locations. The appropriate menu command to open a project can depend on its type and where it is stored, however, the File » Open Project command caters for the majority of situations via the Open Project dialog.

The dialog offers project source selections for the default location (typically on the hard disk that also host the software), the server currently connected to Altium Designer, or the list recently opened projects. Also offered is the ability to browse to and open a project (*.Prjxxx) via the standard Windows Open dialog. When opening a server-based managed project, the dialog's  button menu allows you to define a custom local file checkout path other than that specified by the software preferences.
The Altium Designer installation includes several example projects that can be found in the Examples directory within the Windows documents area – for Altium Designer installed on a typical Windows® system, for example, navigate to C:\Users\Public\Documents\Altium\xxx\Examples – where xxx is the Altium Designer version.
Open a Project from an SVN Design Repository
To open a project from an SVN Design Repository, select File » Check Out from the main menu. This opens the Check Out dialog where you can select from the range of available SVN repositories (upper drop-down menu) and nominate the project folder to which to 'check out' the local working copy.
Design Repositories are established and connected to in the Data Management – Design Repositories page of the Preferences dialog – the default checkout path is set in the SVN Design Repository dialog, opened from the  button on this page.
Project-specific Options
The exact set of Project Options stored will depend on the project type. Project settings are configured in the Project Options dialog. You can access this from Project » Project Options on the main menu, or by right-clicking on the project name in the Projects panel then selecting Project Options from the context menu.
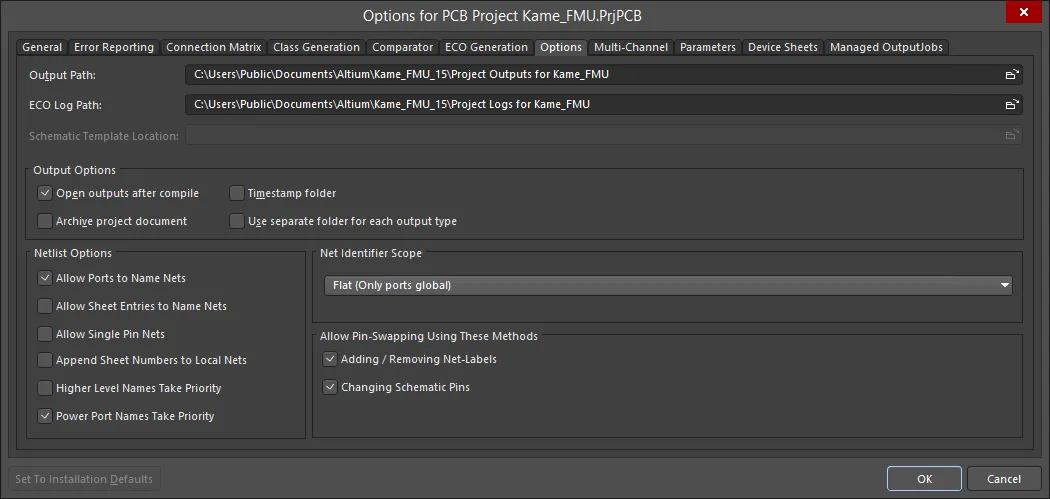
The project options are configured in the Project Options dialog. Press F1 over any of the tabs for help.
More on Project Option Settings
More information on Project Options dialog settings
The options and settings that can be configured in the various Options dialog tabs include:
Settings defined in the Project Options dialog are stored in the project file (*.PrjPcb). Other project settings that are defined in other dialogs and then stored in the project file include:
- Schematic annotation settings.
- Output settings such as; reports, print, Gerber, and so on. Note that these are the output settings accessed via the schematic or PCB editor menus, rather than the output settings defined in an OutJob document.
Note that Server Parameters are stored with a Managed Project in its host Altium Server.
The Projects Panel
The Projects panel is command central when it comes to working with projects and their constituent design documents in Altium Designer. Any open documents that have not been created as part of a project or added to an existing open project also will be listed.
Select View » Panels » Projects to open the panel, or choose the Projects option from the  button menu located at the bottom right of the main application window.
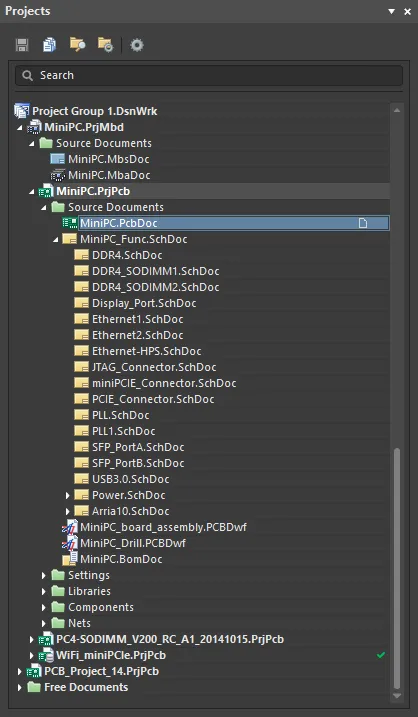
The content of the Projects panel is a logical representation of an opened project.
Most project-related tasks for local and server-based (managed) projects are available from the Projects panel, which can be used in conjunction with the Storage Manager panel to fully manage design projects of all types, and from all storage sources.
► See Projects Panel for more information on the panel, including its icons, display options and available commands.
► See Project Navigation for information on the panel's navigation and Project Insight preview capabilities.
Project Group
In Altium Designer you can open and edit multiple projects, and if desired, save the collective set of projects as a Project Group (
*.DsnWrk).
This can be of particular advantage when the set of projects are related or linked, such as a product design that is composed of multiple PCBs. Creating a Project Group that includes all the relevant projects allows you to open, manipulate, and save multiple projects as a single entity.
More on Using Project Groups
More on using Project Groups
- In the Projects panel, the uppermost entry displays the current Project Group – either the default one (
Project Group 1.DsnWrk), or one you have created or opened.
- To save the currently opened set of projects as a group select File » Save Project Group As from the main menu, or right-click in the Projects panel and select Save Project Group As from the context menu.
- To open an existing group, select File » Open Project Group from the main menu, or right-click in the panel and select Open Project Group from the context menu. Use the same access for the Save Project Group command.
- To close a Project Group, select Window » Close All from the main menus.
- To close all documents in a Project Group, select Window » Close Documents from the main menus.
- To create a new Project Group, select File » New » Design Project Group from the main menu – this will load the default (blank) Project Group (
Project Group 1.DsnWrk). The same method can be used to close the current Project Group file.
- When opening a different Project Group the current group will close. You will be prompted to save any unsaved documents, projects or changes to the current group first.
- To add another project to a Project Group, open or create a project and then save the current Project Group. Alternatively, right-click in the panel and select the Add Existing Project option.
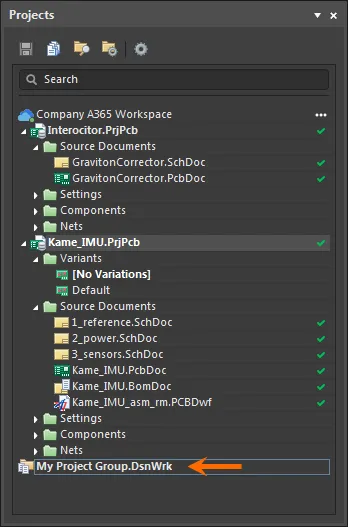
Work with a set of related projects as a Project Group.
Create a New Project
A new Altium Designer project is created through the Create Project dialog, which can be accessed from the main menu (File » New » Project) or from the Projects panel right-click options (Add New Project).
The dialog offers three storage target options (Locations) for the new project structure:
Use the dialog's options to specify the project creation options, such as the template used, the project name, the local file path, and any associated Parameters. Other options, such as the target repository, are available for server-based (managed) and VCS projects.
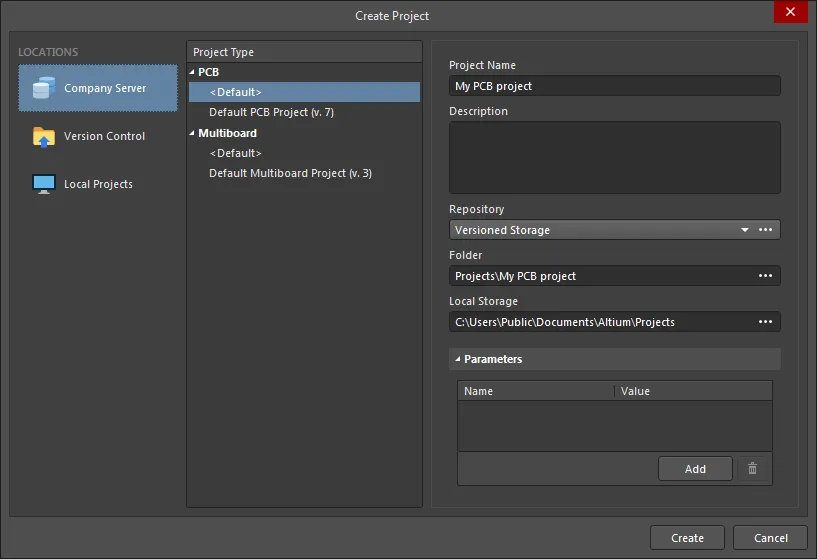
► See Create Project for details on the dialog options.
When you create a new project its corresponding project entry will appear in the Projects panel, with any documents that are part of that project shown in the structure hierarchy and/or grouped in sub-folders according to their purpose or type. The panel will include a single project document where a Project Template has not been used or all of the documents specified by a template that has been applied during the project creation stage.
Create a Project in the Server Interface
A new Managed Project can be created directly through the browser interface of an Altium Server and subsequently opened for editing and addition in Altium Designer.
- The documents included in the new Managed Project are as defined by the Project Template option that was selected during the project creation process.
- When first created, the project documents are instances of the applied templates (essentially blank) and are not yet fully committed to version control, which will be indicated by the
 icon associated with each document.
Share a Design Project
Altium Designer offers a comprehensive range of integrated design collaboration features when used in conjunction with an Altium Server, where the fundamental collaboration mechanism is the sharing of design projects between users. Design project sharing is implemented on a permission basis (read-only or editing rights) for members of your design team, and when hosted in an Altium 365 Workspace, can be shared with users outside your design team as well.
Projects are shared from within Altium Designer via the Share dialog, which is accessed from the  button in the software's top border. Enter a user's name or email address in the dialog and then select their entry from the drop-down list, which is populated with AltiumLive users from within your organization – including team members assigned to your Workspace, and defined user Role Groups. Use the
  menu to set the project sharing permissions for the added user(s).

If the targeted user is a member of your Workspace, the newly shared project will become available under the connected server entry (location) in the Open Project dialog. Alternatively, if the project has been shared with a user that is outside of your Workspace – is not a team member – then it will be available under the dialog's Shared With Me entry.
The latter condition allows for controlled access to a work-in-progress view (for managers and other stakeholders) or editing rights to the design itself (for external contract collaborators, etc). Projects shared in this way enable access to the invited user on an exclusive basis, without any exposure of the hosting Workspace. Note that the user is required to be registered with AltiumLive.
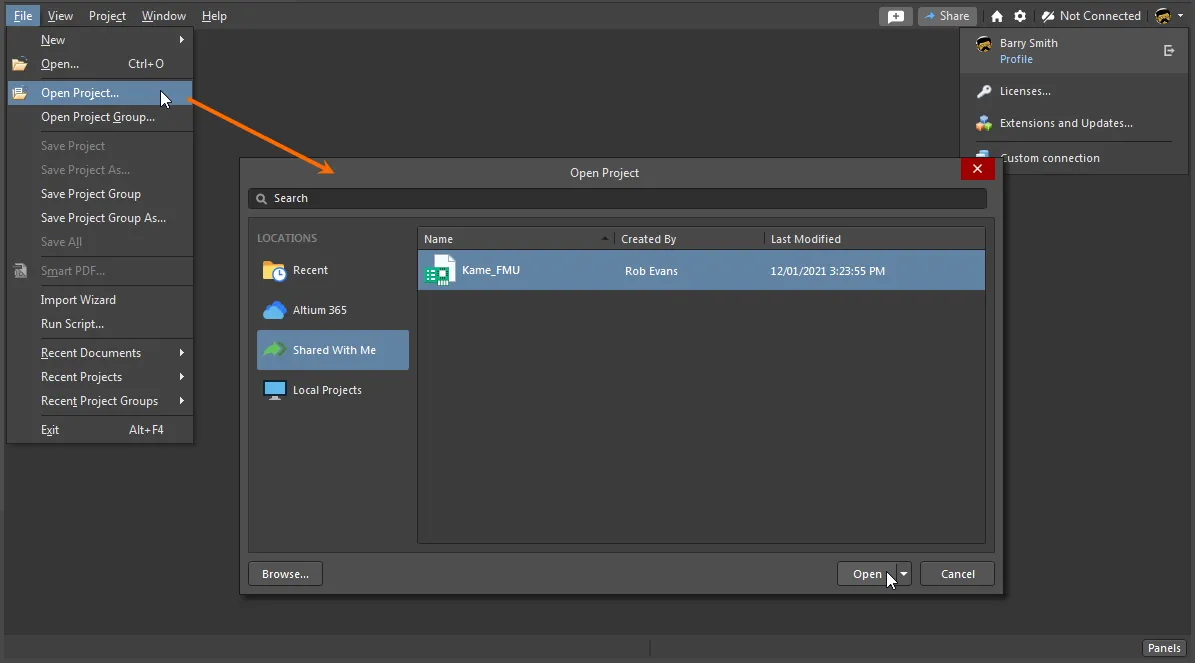
In the Projects panel, a project that has been opened from shared access is indicated by an associated Shared with me label. The project can be saved and committed back to the server if editing rights have been granted for the shared project, or saved/committed locally if the project has been shared with view-only permissions. To open the project the Altium Web Viewer, select the Show in Web Browser option from the project entry's right-click context menu in the Projects panel.
Note that
design document Commenting is available for a shared project opened in Altium Designer, which allows for direct WIP communication between the user that has shared the project and those it has been shared with.
► See Sharing a Design from within Altium Designer for more detailed information.
► See Global Sharing for an overview of sharing project designs and data hosted in an Altium 365 Workspace.
Delete a Managed Project
When design projects are hosted on an Altium Server, deleting the local copy of the project does not affect the project source stored in the server – the local copy simply will be recreated from that data when the project is next opened from the server. On the server side, the stored project files and data may be removed through the server's browser interface, or perhaps more conveniently from the Explorer panel in Altium Designer.
To do so, selected the project's folder in the Explorer panel and choose the Delete Folder option from the right-click context menu. You must be a server administrator or the project owner to perform this action.
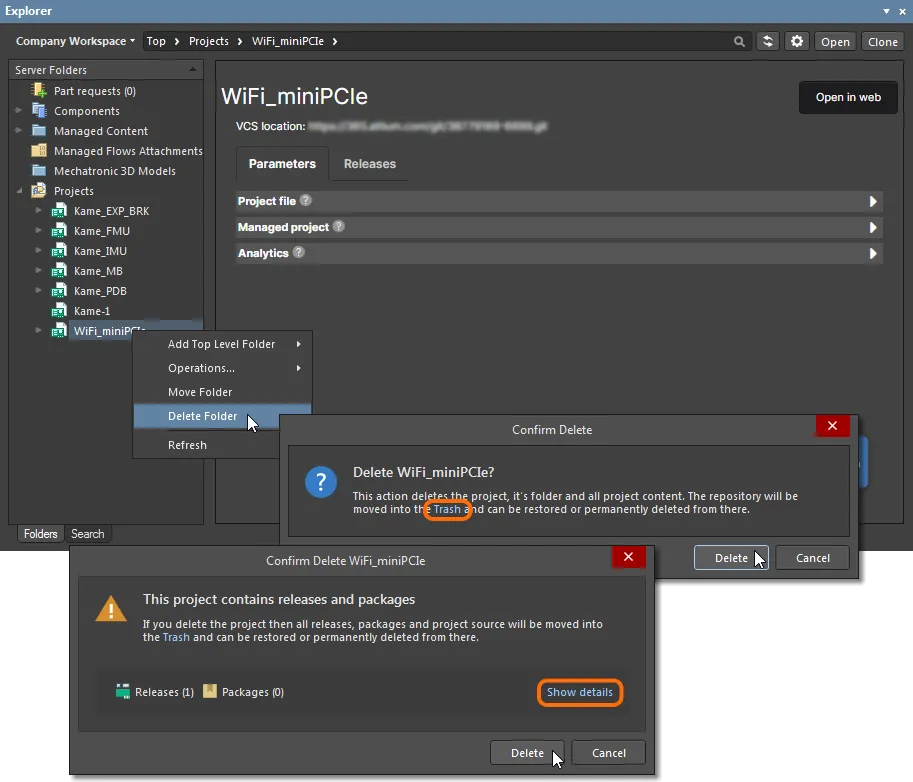
When the project is hosted on an Altium 365 Workspace, as shown in the above image, the project removal process functions as a 'soft delete' by moving the server-based project data to the Workspace Trash folder, where it may then be restored or permanently deleted.
► See Deleting a Managed Project for information on removing a project through the Workspace browser interface.
► See Deleting a Managed Project for information on removing a project through the Concord Pro server browser interface.
► See Soft Delete for information on removing a managed project through the Altium Designer Explorer panel.
Working with Project Documents
Once you have created a project and saved it to the required location, design documents can be added, edited or removed from the active project.
These operations can be performed within the Projects panel, which provides an organized view of the project structure and its constituent design documents. The panel's right-click context menus offer the majority of commands required for working with design documents.
► See the Projects panel page for more information.
Note that the presentation of documents in the Projects panel does not reflect how they are stored on the hard drive or elsewhere. The panel's contents can be considered as a logical representation of the project, whereas the physical location and organization of the document file storage (and its type) are up to you – the documents might be stored in a folder on your local machine or a LAN, in a local, remote or vault-based version-controlled repository, or as a fully managed project within an Altium Server.
► See the Storage Manager panel for information on the management of project documents from a file storage perspective.
As you work with project documents in Altium Designer, the Projects panel provides a visual summary of which document files are modified, saved or hidden through status icons that are associated with each design document, and the main project file. The basic document icons and their status meaning are listed below:
| [blank] |
Closed – The document is not open. |
 |
Open – The document is open as a tabbed document in the design editor window. |
 |
Hidden – The document is hidden (open, but not displayed in the workspace). |
 |
Modified – The document is open and has been modified (yet to be saved). |
 |
Modified (project) – This icon appears next to the main project document to show that its structure has been modified (yet to be saved). |
► See the Document Display Icons section in the Projects panel page for more information about document status icons.
A modified document or project that has yet to be saved is also distinguished by an asterisk next to its entry in the panel. Modified documents are also indicated by an asterisk inside their tab in the design editor window.
Add or Remove a Design Document
The simplest way to add new or existing design documents to a project is to right-click on the project name in the Projects panel and select Add New to Project or Add Existing to Project from the context menu options.
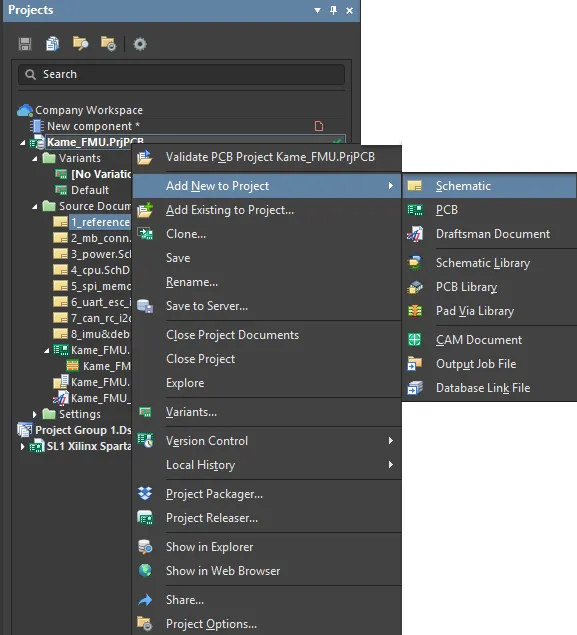
Add a specific or another type of document to a project.
Other types of project-relevant documents can also be added to a project, such as text files, PDFs, spreadsheets, etc. To do so, use the Add Existing to Project option and set the File Type drop-down list in the Choose Document to Add browser dialog to All Files (*.*) so all file types can be accessed.
To remove a document from the project structure, right-click on its name in the Projects panel and select the Remove from Project menu option. Note that this process removes the project's link to that document, and does not delete the source document file itself.
Change Project Document Order
Documents in the Projects panel are automatically arranged in logical groups or 'folders', such as Source documents (Schematic, PCB, etc.), Settings documents (Harness, Outjob, etc.,) and in the case of a hierarchical design, top-level schematic documents. The documents within each folder group are displayed, by default, in the order they were added, but can be dragged and dropped to a new order position within the group.
In the case of a new hierarchical design, the parent-child relationship between documents will be displayed in the Projects panel. Note that the connectivity relationships cannot be defined by dragging and dropping schematic documents since the inter-sheet connections and design hierarchy are in fact defined by Sheet Symbols and Port definitions.
► For more information about project hierarchy, see Creating Connectivity and the Net Identifier Scope section in the Options tab of the Project Options dialog.
Share Documents Between Projects
Because an Altium Designer project defines and saves links to stored document files, any number of projects can be created that link to those same documents files.
While this may be a convenient way to re-use established design documents – say, including a standard power supply schematic in several projects – it is not recommended practice because a change in the document will affect all projects it is linked to. A far better approach for design reuse is to establish and apply Managed Sheets.
► For more information about design document reuse and Managed Sheets, see the Managed Sheets page in the Design Reuse area.
Save Design documents with a New Name
An open project document can be saved under a new name using the File » Save As command, which creates a copy of the document file under the nominated new name. This process automatically adds (links) the new document copy to the active project in place of the existing (source) document, which remains intact in the source folder. If the open document is not part of a project – a free document – the new copy is simply opened in the editor in place of the original document.
If the intention is to just make a back-up copy of a document, use the Save Copy As option. This creates a named copy of the document file without affecting its host project.
Direct Project and Design File Renaming
Use the Rename command from the right-click context menu in the Projects panel to directly change the name of a PCB project (*.PrjPcb) or any of its constituent design files (*.PcbDoc, *.SchDoc, etc). You can then save these updates locally (Save), or to remote storage using the File » Save to Server command. Note that a design file also can be renamed from the Storage Manager panel right-click options.

For managed (server-based) projects, file rename synchronization is automatically maintained between local storage and remote server-based storage. Additionally, a renamed project file will invoke an alignment with the project Name on the server side, as outlined below.
Managed Project Renaming
Direct project file renaming (*.PrjPcb) on the design side is supported by automated project Name alignment on the server side. In practice, when an updated project file name has been synchronized to the server, the server automatically changes the managed project's Name parameter to match.
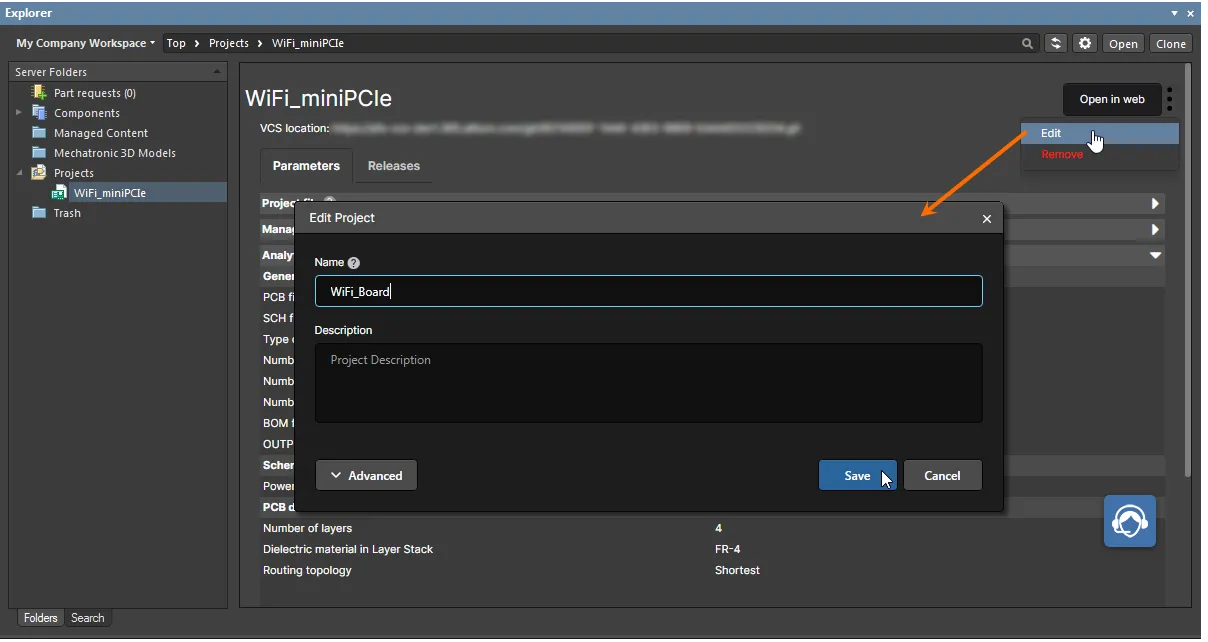
Conversely, when the name of a managed project is updated in the server space – via the
Edit mode on the server
Projects page or the design client's
Explorer panel – the change is propagated to client side when the project is next opened.
When the updated managed project is opened from the server (File » Open Project), an initial dialog provides options to align the project file name with the new project Name, or force the project Name to match the existing project file name, or allow the two names to be different.

Managed Project History
When working with server-based managed projects, Altium Designer provides direct access to Project History tracking features in an Altium 365 Workspace.
The graphical-based interactive timeline presents the project's file history as a series of chronological event-based versions, which depending on the type of event, can be viewed, reverted to, or the data accessed. The full capabilities of the History timeline are available for server projects under the Workspace's native (internal) Git version control.
► See Workspace Project History for more information.
To access the server-based Project History from within Altium Designer, select the History command from the Projects menu, or in the Projects panel, right-click on the project's name and select the History option from the context menu.
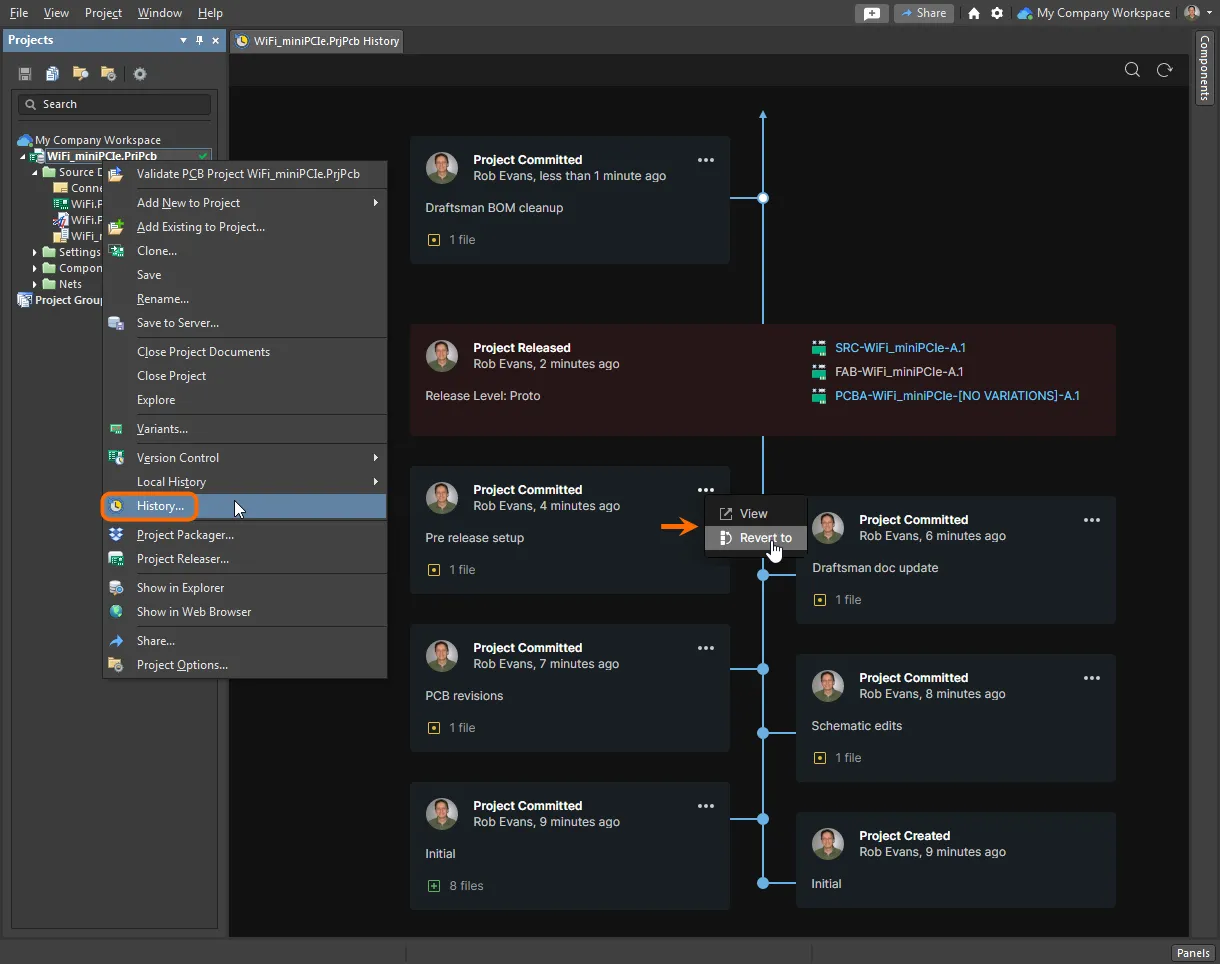
To access Project History directly in the Workspace browser interface, open a project from the
Projects Management page (
Projects) then select the
History option from the side menu.
Document Storage
Altium Designer stores all design documents and generated output files on your hard disk as individual files. You can use Windows Explorer to search for them, and can also locate the folder by using the Explore command in the Projects panel right-click menu. Design documents will typically be encapsulated into projects, both for management and to access certain design features, such as design verification, comparison and synchronization. A project file contains links to design documents as well as any other project-level definitions.
The Storage Manager Panel
To allow control over the management of document files in projects from a file storage perspective, Altium Designer features a dedicated Storage Manager panel. The Storage Manager panel presents a folder/file view of the active project's documents and includes details of each document including its Version Control status and (when selected) its incremental history.
Open the Storage Manager panel by clicking the  button at the bottom right of the application window then select the Storage Manager menu option, or select View » Panels » Storage Manager from the main menus.
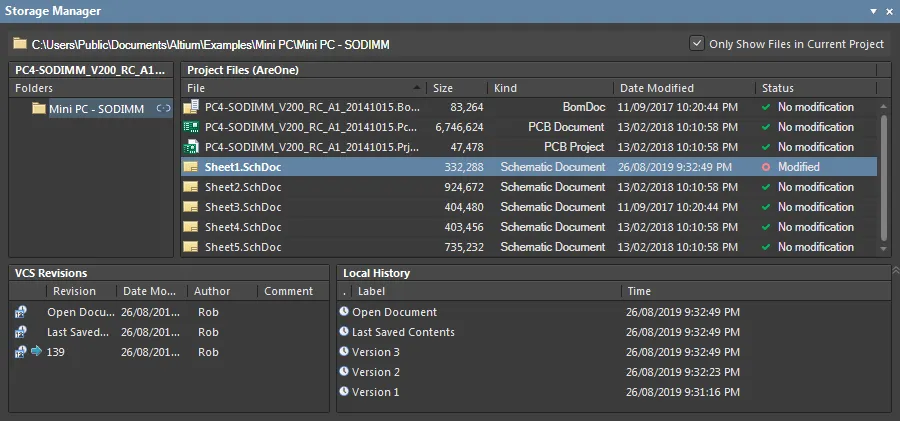
The Storage Manager provides a range of commands and options for managing project documents from a single location. Use the right-click menus to perform both Version Control operations (Commit, Update, etc.,) and standard file management actions (Open, Copy, Rename, etc.). The panel's lower section displays the timeline for a selected document and provides right-click options for advanced actions such as comparing historical file versions and reverting to a previous document version.
Some of the capabilities offered by the Storage Manager are also available in other panels, such as the Projects panel (file and version control management) and via the Local History dialog (Compare version) – Project » Local History » Show Local History. However, the Storage Manager panel brings these features and many more into a single convenient location for managing project document files.
► Read more information about the Storage Manager.
The Project Packager
The Project Packager is provided for situations where an entire project needs to be backed up or transferred to another location.
The wizard-based packager archives a complete Altium Designer project, tree of projects or Design Workspace (and its constituent projects) to a nominated location as a single time-stamped zip file. The wizard is accessed from the main menu (Project » Project Packager) or by right-clicking on a project then selecting Project Packager from the context menu.
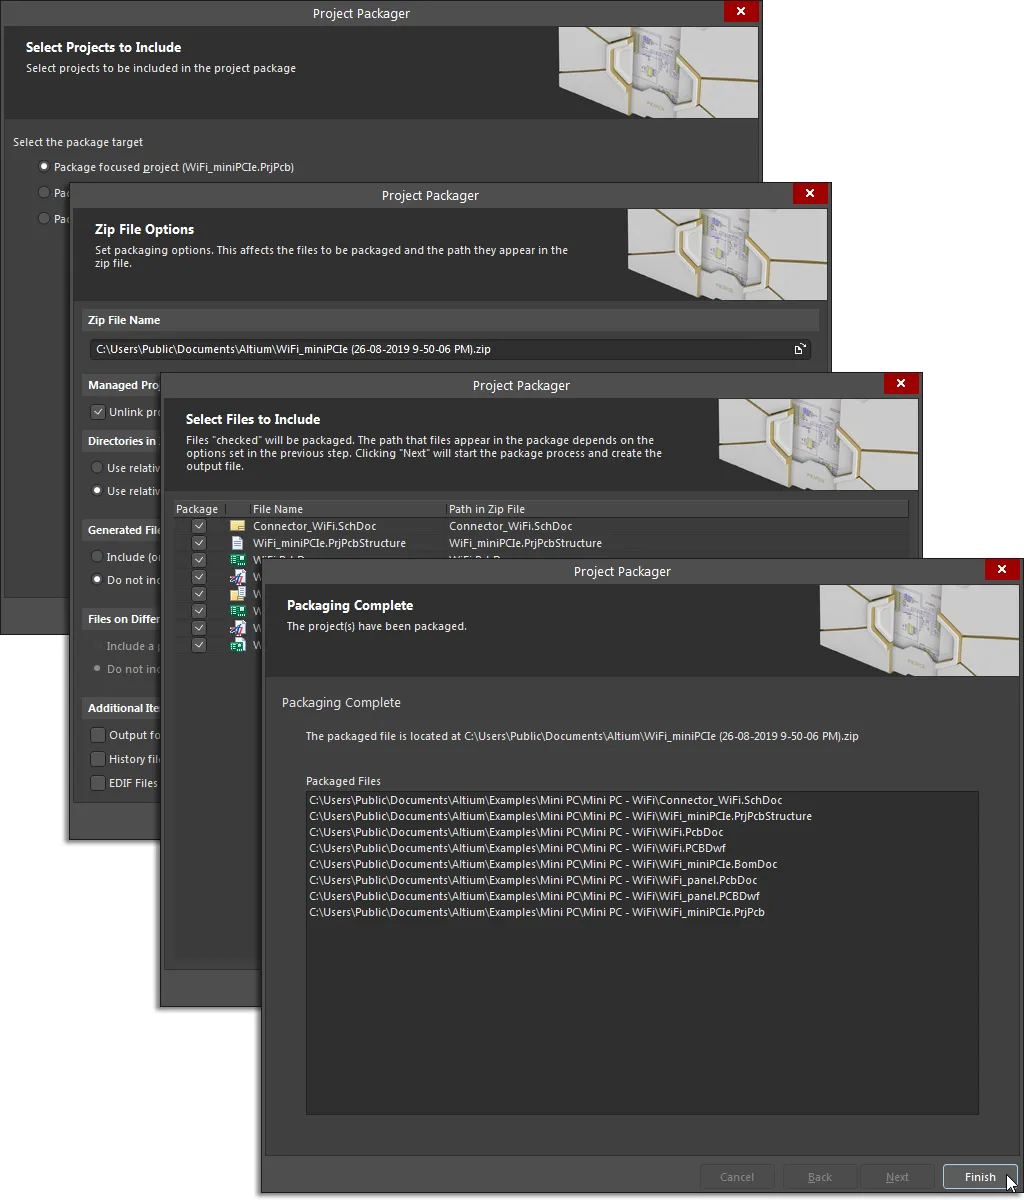
Use the Project Packager to transfer an entire project (or tree of projects) and its linked documents to a timestamped zip file.
The wizard provides options for determining:
- Where the archive is to be stored.
- How file directory paths are handled.
- Whether any generated, system or external files are included.
- If the project history is included.
- Which of a project's linked documents are included in the final archive.
- and more...
See Also
► Project Navigation
► Auto save and Local History
► Version Control and Design Repositories
► Design Variants