Parent page: Working with Tables
A Draftsman document allows a generic Table to be placed on the drawing and subsequently configured in the Properties panel, and in the table cells themselves. The layout and content of the custom Table is free to be defined as required by its intended purpose, and offers a flexible way to include additional information in any Draftsman document. The table's visual style is configurable in the Properties panel.

A placed Table with a range of cell formatting.
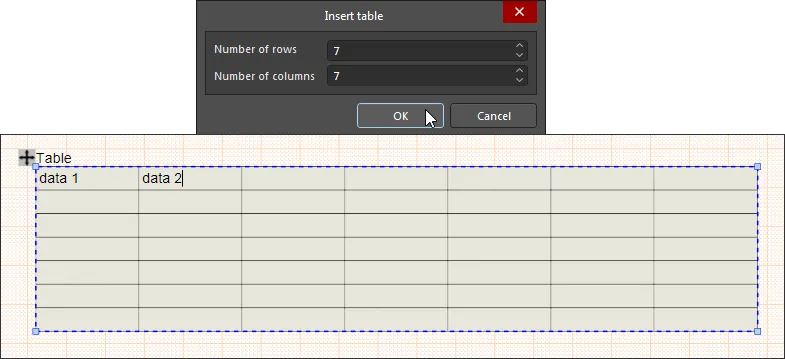
A Table is placed from the main menu (Place » Table), or from the Table icon ( ) on the table drop-down of the Active Bar. Launching the Table command will open the Insert table dialog, where the number of rows and columns for the new table can be specified. After clicking OK in the Insert table dialog, the new table is attached to the cursor and can be placed in the desired location with an additional click.

Nominate the number of cells in the Table's rows and columns – these can be modified later via a cell's right-click Table commands.
The position of a placed Table may be graphically changed by selecting the table object in the design space then dragging it to a new location using its Move handle, i.e. the  icon at the top-left corner. Note that the table cannot be graphically resized, but will automatically scale to accommodate the font and cell/column properties as specified in the Properties panel.
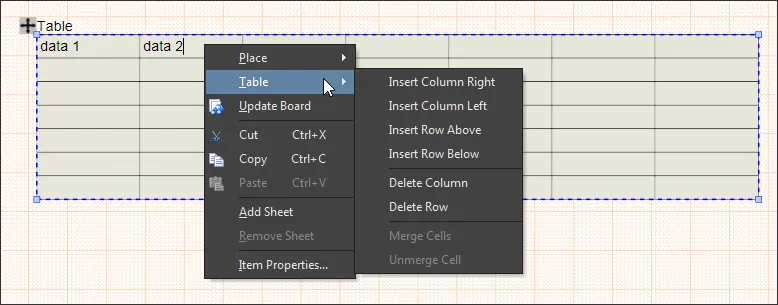
 Drag a selected table's Move icon to reposition it in the design space. Right-click in a cell to access row/column manipulation options.
A Table object is selected when a cell or its title is clicked, however, the Delete command will apply to the specific element that is clicked.
Content is added to a Table by typing or pasting it into a cell. Use Ctrl+Enter to add a new line within a cell.
Data is entered by typing (or pasting) directly into the cells, while the Table's graphics and text attributes are defined in the Properties panel. The Table object offers a wide range of text and structure editing features, which can be implemented on a cell row or column basis using standard Shift/Ctrl or drag selection techniques.
Special Strings in Table Cells
A Table supports the inclusion of document Parameters as Special Strings. Project, System, PCB and User Parameters will be converted to their Values when entered as a Special String in the Table cells. Draftsman document Parameters are accessible under the Parameters tab in the Properties panel, when in Document Options mode.

The table's handling of Parameter strings also includes the ability correctly transfer Special String data to and from a spreadsheet, by using standard copy/paste techniques.
- When pasting Special Strings into a spreadsheet from Draftsman, the target spreadsheet cells will be populated with the string’s interpreted Value.
![]() ► Demonstration video.
► Demonstration video.
- When pasting Special String data from a spreadsheet into Draftsman, the pasted text will be interpreted as a Special String Value – providing the Special String is matched to an available System, Project or User parameter.
![]() ► Demonstration video.
► Demonstration video.
When preparing Special String entries in a spreadsheet you will need to prefix each Value entry with an apostrophe, so the cell content will be treated as text data. For example, the special string for the Units parameter would be entered as: ‘=DocumentUnits
Alternatively, all spreadsheet cells could be set to Text format.
Table Structure
Right-click in a cell and select the Table menu from the context menu to access the cell configuration commands. These provide a full set of Table manipulation functions for adding and removing Columns/Rows and Merging Cells.

The right-click Table commands offer a range of standard table manipulation functions.
- When merging cells and the cells in the selection have text within them, after the merge, only the text in the left-most/top-most cell (as applicable) will remain in the merged cell.
- When unmerging cells and multiple merged cells are included in a selection of cells, note that using this command will apply (unmerge) only the left-most/top-most merged cell.
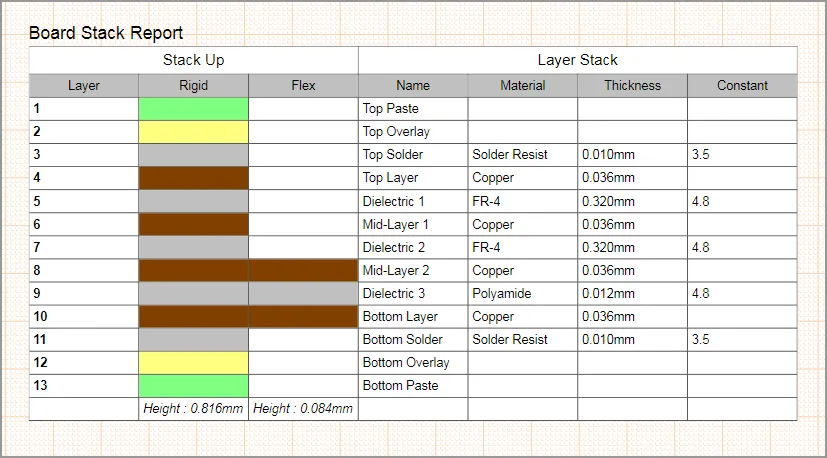
By using both the Table commands and the options available in the Table's properties, a custom Table can be created to suit a wide range of information needs in a Draftsman document. The Table shown below, for example, has been constructed to show the information taken from a board Stack Report.

A Custom Table can be constructed to host a wide range of different PCB assembly and fabrication information.
Table Properties

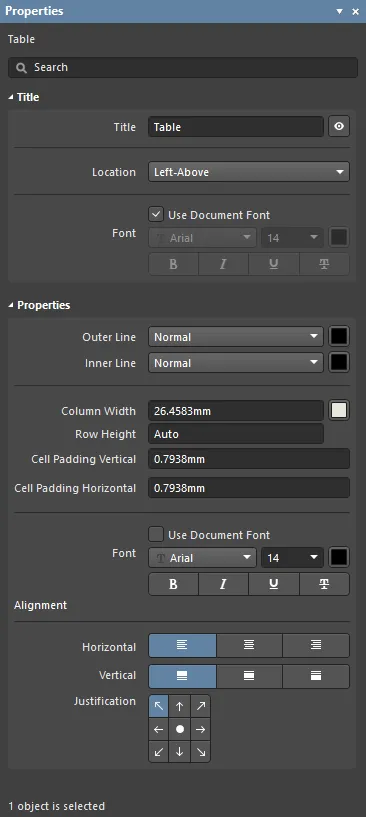
The Table mode of the Properties panel.
Title
- Title – the title name string that will be displayed (if enabled) with the Table object. Use the associated
 button to toggle its visibility. Enter the title name and any desired system/custom parameters to create a meaningful name. See the Parameters section in the Properties panel's Document Options mode for a list of the currently available parameters.
- Location – select the drop-down to choose from a range of relative locations for the title. The Manual option is automatically selected if the title is manually moved (dragged and dropped to a new location).
- Font – sets the displayed font used for the object's title string.
- Use Document Font checkbox selected – the title font used is that defined by the document options. See the Document Font entry in General section of the Properties panel when in Document Options mode.
- Use Document Font not selected – use the drop-down menus to choose the desired font type and size, and select the lower buttons to enable text attributes. The associated color button (
 ) opens the color selector where the font color can be specified by RGB or HEX value, by freeform selection, or from a range of presets. Note that the slider control sets the color Opacity level, where 0% represents full transparency.
Properties
- Outer Line – the thickness and style of the Table's border/outline. Use the line weight drop-down menu to choose from a range of line thickness presets and the line pattern menu to choose from a range of line styles. The associated color button (
 ) opens the color selector where the font color can be specified by RGB or HEX value, by freeform selection, or from a range of presets. Note that the slider control sets the color Opacity level, where 0% represents full transparency.
- Inner Line – the thickness and style of the Table's inner lines that divide the cells. Use the line weight drop-down menu to choose from a range of line thickness presets and the line pattern menu to choose from a range of line styles. The associated color button (
 ) opens the line color selector where the font color can be specified by RGB or HEX value, by freeform selection, or from a range of presets. Note that the slider control sets the color Opacity level, where 0% represents full transparency.
- Column Width – sets the width of the selected cell(s) and therefore the width the containing column. If the entire table is selected (by clicking on its outline or title), the width setting will be applied to all cells. Use the associated color button (
 ) to specify the color of the currently selected cells.
- Row Height - use this field to adjust the height of a row selected in the design space. Enter the desired height, followed by the imperial or metric unit.
- Cell Padding Vertical – sets the spacing below and above the text in the selected cell(s).
- Cell Padding Horizontal – sets the spacing to left and right of the text in the selected cell(s).
- Font – sets the font used for the text in the selected cell(s) to a specific style or to the default document font. See the Title Font information above.
- Use Document Font checkbox selected – the title font used is that defined by the document options. See the Document Font entry in General section of the Properties panel when in Document Options mode.
- Use Document Font not selected – use the drop-down menus to choose the desired font type and size, and select the lower buttons to enable text attributes. The associated color button (
 ) opens the color selector where the font color can be specified by RGB or HEX value, by freeform selection, or from a range of presets. Note that the slider control sets the color Opacity level, where 0% represents full transparency.
Alignment
- Horizontal – use the left, center and right buttons to set the text alignment and positioning in the selected cell(s).
- Vertical – use the left, center and right buttons to set the text alignment and positioning in the selected cell(s).
- Justification - select the desired justification by clicking on an arrow that corresponds with the desired justification or the circle to center.
