Text objects are non-electrical primitives that can be used to add additional information to a schematic, place user notes, layout a schematic template, etc. These text objects can be placed as user-defined text on a schematic sheet or act as placeholders for design or system information – so called special strings.
Text Strings, Text Frames, and Notes
Altium Designer supports text strings, text frames, and notes.

Placed text string, text frame, and note (in its expanded and collapsed modes).
| Text Object |
Description |
| Text String |
A single line of free text that can be placed on a schematic sheet. Uses might include section headings, revision history, timing information,or some other descriptive or instructive text. Available for placement in both the Schematic and Schematic Symbol editors. |
| Text Frame |
Used to define an area on a schematic to contain textual information. The frame is a re-sizeable rectangular area that can contain multiple lines of text and can automatically wrap and clip text to keep it within the bounds of the frame. Available for placement in both the Schematic and Schematic Symbol editors. |
| Note |
Used to add informational or instructional text to a specific area within a schematic similar to that of commenting a program's source code. The note is a resizable rectangular area that can contain multiple lines of text and can automatically wrap and clip text to keep it within the bounds of the note. Unlike from a text frame, a note can be displayed in either expanded or collapsed modes. Available for placement in the Schematic Symbol editor.
Note that for Workspace projects, Altium Designer supports a document commenting system to enhance the design collaboration process. Refer to the Document Commenting page to learn more.
|
Placing a Text Object
Text strings, text frames, and notes are available for placement by using the Place » Text String, Place » Text Frame, and Place » Note commands of the corresponding editor's main menus, respectively.
After launching the command, the cursor will change to a cross-hair and you will enter text object placement mode.
-
For the text string, it will appear floating on the cursor. Position the object then click or press Enter to effect placement.
-
For the text frame or note, position the cursor and click or press Enter to anchor the first corner of the object. Move the cursor to adjust the size of the object, then click or press Enter to complete placement.
Continue placing further text objects or right-click or press Esc to exit placement mode.
Additional actions that can be performed during placement while the text object is still floating on the cursor (and, for a text frame or note, before its first corner is anchored) are:
-
Press the Alt key to constrain the direction of movement to the horizontal or vertical axis depending on the initial direction of movement.
-
Press the Spacebar to rotate the text object counterclockwise or Shift+Spacebar for clockwise rotation. Rotation is in increments of 90°.
-
Press the X or Y keys to mirror the text object along the X-axis or Y-axis.
While text frames and notes can be rotated or mirrored along the X or Y axis, this has no effect on the orientation of the text within.
Toggling the Display Mode of a Note
A placed note can be displayed in either expanded (fully expanded) or collapsed (small triangle) modes. Toggle the display mode by clicking on the top left corner of a placed note.
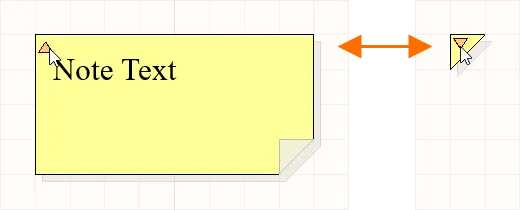
Click the triangle in the top-left corner to collapse a note.
When a note is in collapsed mode, hover the cursor over it to access a pop-up containing the name of the note's author and the actual text content of the note.

Hover over a collapsed note to display information.
Graphical Editing of Text Objects
When a text object is selected in the design space, you can change its location and orientation graphically. For a text frame and note (when fully expanded), you can also graphically change its size or shape using the available editing handles.

Selected text objects
-
Click anywhere inside the dashed box (for a text frame or note, away from editing handles) and drag to reposition the text object as required. While dragging, the text object can be rotated (Spacebar/Shift+Spacebar) or mirrored (X or Y keys to mirror along the X-axis or Y-axis).
-
Click and drag A to resize the text frame / note in the vertical and horizontal directions simultaneously.
-
Click and drag B to resize the text frame / note in the vertical and horizontal directions separately.
The textual content of a text string, text frame or note (fully expanded) can be edited in-place, which enables you to edit text entries directly in the design space rather than having to edit through the Properties panel – refer to the Schematic Placement & Editing Techniques page to learn more. Note that if the Word Wrap option is disabled in the Properties panel for the selected text frame / note, a horizontal scroll bar will also be available when editing the text in place – show image .
.
Properties of Text Objects
Schematic text objects have a range of configuration options. Open the Properties panel for one or more selected text objects to edit their properties.
| Property |
Applies To Objects |
Description |
Location
|
| (X/Y) |
Text String
Text Frame
Note
|
The current X (horizontal) and Y (vertical) coordinates of the object's reference point relative to the current design space origin. |
| Rotation |
Text String |
Use the drop-down to select the rotation. |
Properties
|
| Text |
Text string
Text frame
Note
|
Enter the desired text.
-
To add a new line of text to a text frame or note, use Ctrl+Enter, Shift+Enter, or Alt+Enter.
-
Special strings and formulas are supported. Special strings and formulas are delineated by opening with the "
=" character and closing with a space character. For a text string object, a special string can be selected from the drop-down. Learn more about special strings.
-
Component designators and net names can function as Active Links in a text frame or note, precede the designator or net name with the
@ symbol to invoke linking mode, then select the required designator/net object. Learn more about Active Links.
|
| URL |
Text string |
The URL for the text string, if desired. Learn more about hyperlink text strings. |
| Word Wrap |
Text frame
Note
|
Enable this option to have text contained within the text object area automatically wrap to fit the width of the object. |
| Clip to Area |
Text frame
Note
|
This option comes into play if word wrapping is disabled. Enable this option to have text only appear within the area of the text object. If the text is too long to fit entirely within the object, then the complete contents of the text box will not be shown. The text will be clipped so that it fits neatly within the object area. If this option is disabled, all text contained in the object will be displayed. If the text is too long to fit within the object, then the text will "spill" out of the object area – show example of word wrapping and the effect of clipping . .
|
| Font |
Text string
Text frame
Note
|
Use the controls to select the desired font, font size, color, and attributes to bold, italicize, etc., if desired. |
| Justification |
Text string |
Select the justification by clicking on an arrow that corresponds with the desired justification or the circle (to center). |
| Alignment |
Text frame
Note
|
Click the desired alignment setting. |
| Text Margin |
Text frame
Note
|
Specify a single value to apply equally to left, top, right, and bottom margins for the selected text object – show example text frame with a text margin setting of 100 mil . .
-
To benefit from the text margin functionality within the area of the object's frame, ensure that the Clip to Area option is enabled. Ideally, the Word Wrap option should also be enabled.
-
Negative margins are also possible by using the minus prefix (-).
-
When editing text in place (as opposed to using the Properties panel), the defined margins are not present. They will be reapplied after editing is complete and the text changes are applied. Show image
 . .
|
| Width |
Text frame
Note
|
Enter the desired width. |
| Height |
Text frame
Note
|
Enter the desired height. |
| Border |
Text frame
Note
|
Use the drop-down to select the default from the available choices: Smallest, Small, Medium, and Large. Click on the color box to access a drop-down from which you can select the default color. The border cannot be hidden on a note object, but can on the text frame object. |
| Fill Color |
Text frame
Note
|
Check to enable fills. Click on the color box to access a drop-down from which you can select the default fill color. Fill cannot be disabled for a note object, but it can be disabled for the text frame object. |
| Author |
Note |
Enter the desired author. The author is shown when the cursor hovers over the collapsed note. |
| Collapsed |
Note |
Enable to collapse the note. The note can also be collapsed/expanded directly in the design space by clicking on the top left corner of the placed note. |
Special Strings
While text objects can be used to place user-defined text on a schematic sheet, it is not just user-defined text that can be placed. To assist in producing documentation, the concept of "special strings" is used. These act as placeholders for design or system information that is to be displayed on the schematic at the time of output generation.
Default sets of predefined special strings are provided for use with new schematic documents. You also can add your own custom special strings by defining additional parameters at the document level (for use on current schematic only) or project-level (available for use across all schematic sheets and PCB documents in the project). Parameters can also be added to a variant in the Edit Project Variant dialog.
Parameters have a hierarchy, which means you can create a parameter with the same name at different levels of the project, each having different values. Altium Designer resolves this in the following way:
-
Variant (highest priority)
-
Schematic document
-
Project
This means that the parameter value defined in the schematic document overrides the value defined in the project options, and the value defined in the variant overrides the value defined in the schematic document. Note that schematic-level parameters are not available on the PCB or in the BOM. For these types of output, you should use project or variant parameters.
Parameters can also be added to a Sheet Symbol object. If parameters with the same name are created at different levels of the project, including the Sheet Symbol placed on the parent schematic sheet, this situation will be resolved on the child schematic in the following way:
-
Variant (highest priority)
-
Schematic document
-
Sheet Symbol
-
Project
To see the value of the parameter of the sheet symbol above, select a compiled tab at the bottom of the design space.
► Learn more about Multi-sheet & Hierarchical Designs
Placing a Special String
To use a special string on a schematic, place a text object and include a special string name in its text.
On a schematic sheet, special strings are characterized by the prefix '=' (e.g., =CurrentTime, =CurrentDate, etc.). The list of available special strings – both predefined and user-defined document-level and project-level parameters – can be seen when a Text String is selected, by clicking the drop-down arrow associated with the Text field in the Text mode of the Properties panel.
Parameters defined at the variant level are not listed. Such a parameter can be referenced using the special string notation (i.e. =<VariantParameterName>). The value of the parameter will be displayed only when the associated variant for which it is defined is made the current variant.
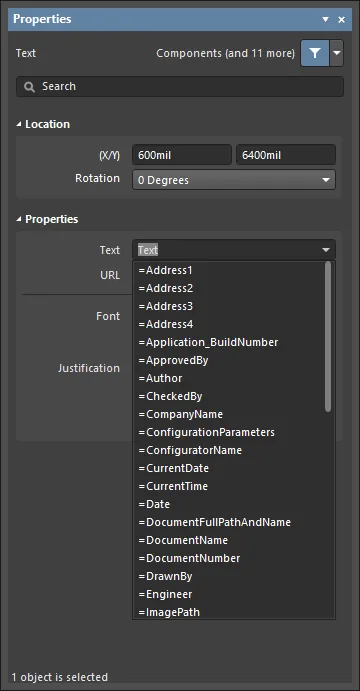
Accessing special strings for a placed text string object.
To assist in identifying Text String objects that are using special strings, the names of the special string can be shown on the schematic sheet. When the Display Name of Special String option is enabled on the Schematic – Graphical Editing page of the Preferences dialog, each special string has its name displayed as a faint superscript (note that these superscripts will not be printed).

Schematic Predefined Special Strings
The following are the predefined special strings available for use on a schematic document. The majority of these link to default parameter information defined for the active document on the Parameters tab of the Properties panel in Document Options mode (no objects selected).
-
=Address1 – displays the value specified for the default document-level parameter Address1.
-
=Address2 – displays the value specified for the default document-level parameter Address2.
-
=Address3 – displays the value specified for the default document-level parameter Address3.
-
=Address4 – displays the value specified for the default document-level parameter Address4.
-
=Application_BuildNumber – displays the version and build for the current Altium Designer installation.
-
=ApprovedBy – displays the value specified for the default document-level parameter ApprovedBy.
-
=Author – displays the value specified for the default document-level parameter Author.
-
=CheckedBy – displays the value specified for the default document-level parameter CheckedBy.
-
=CompanyName – displays the value specified for the default document-level parameter CompanyName.
-
=CurrentDate – the current date, presented in the current Windows Regional Settings Short Date format, updated upon editing the schematic or on refresh/redraw. Example: 22/09/2015.
-
=CurrentTime – the current time, presented in the current Windows Regional Settings Long Time format, updated upon editing the schematic or on refresh/redraw. Example: 2:39:47 PM.
-
=Date – used to display static, user-defined date information. Displays the value specified for the default document-level parameter Date. Unlike the =CurrentDate special string, which is automatically calculated and presented in a set format, you can enter static date information in any format you prefer.
-
=DocumentFullPathAndName – used to display the full path and name of the document into which the string is placed. Example: C:\MyTestDesign\PSU.SchDoc.
-
=DocumentName – used to display the schematic's file name only (without the file path). Example: PSU.SchDoc.
-
=DocumentNumber – displays the value specified for the default document-level parameter DocumentNumber. The source parameter can also be updated through the Sheet Numbering For Project dialog when using the Tools » Annotation » Number Schematic Sheets command.
-
=DrawnBy – displays the value specified for the default document-level parameter DrawnBy.
-
=Engineer – displays the value specified for the default document-level parameter Engineer.
-
=ImagePath – displays the value specified for the default document-level parameter ImagePath.
-
=Item – the Item that the generated data relates to (e.g., D-810-2000). The data will be used to build that Item.
-
=ItemAndRevision – the Item and specific revision of that Item to which the generated data relates in the format <Item ID>-<Revision ID> (e.g. D-810-2000-01.A.1). The data will be used to build that specific revision of that particular Item.
-
=ItemRevision – the specific revision of the Item to which the generated data relates (e.g., 01.A.1). The data is stored in that Item Revision within the target Workspace.
-
=ItemRevisionBase – the Base Level portion of an Item Revision's naming scheme (e.g., 1).
-
=ItemRevisionLevel1 – the Level 1 portion of an Item Revision's naming scheme (e.g., A).
-
=ItemRevisionLevel1AndBase – the Level 1 and Base Level portions of an Item Revision's naming scheme (e.g., A.1).
-
=ItemRevisionLevel2 – the Level 2 portion of an Item Revision's naming scheme (e.g., 01).
-
=ItemRevisionLevel2AndLevel1 – the Level 2 and Level 1 portions of an Item Revision's naming scheme (e.g., 01.A).
-
=ModifiedDate – the modified date stamp of the schematic; it is automatically populated. Example: 23/09/2015.
-
=Organization – displays the value specified for the default document-level parameter Organization.
-
=PCBConfigurationName – the name of the data set from which the output has been generated as defined in the Release view (Project Releaser).
-
=ProjectName – displays the actual name of the project (including extension). For example, for a project with filename MyPCB.PrjPcb, this special string will display MyPCB.PrjPcb.
-
=Revision – displays the value specified for the default document-level parameter Revision.
-
=SheetNumber – the sheet number of the current schematic. This value is calculated when using the following commands from the Tools menu:
-
Number Schematic Sheets – the assigned sheet number in the Sheet Numbering For Project dialog will be entered into the value for the default document-level parameter
SheetNumber. The special string, when used on the Editor tab view of the schematic sheet, will source its information from here.
-
Annotate Compiled Sheets – the assigned compiled sheet number in the Annotate Compiled Sheets dialog will be displayed when viewing the string on the Compiled tab view of the schematic. The option to display the expanded compiled names of the Sheet Number object must be enabled in the Compiled Names Expansion region on the Schematic – Compiler page of the Preferences dialog.
-
=SheetSymbolDesignator – the designator of the associated Sheet Symbol object that is placed on the parent schematic sheet. This special string can also be used in a multi-channel design. Select a compiled tab of the child schematic sheet to display the converted value of the special string.
-
=SheetTotal – the sheet total for the project. This value is calculated when using the following commands from the Tools menu:
-
Number Schematic Sheets – the sheet total in the Sheet Numbering For Project dialog will be entered into the value for the default document-level parameter
SheetTotal. The special string, when used on the Editor tab view of the schematic sheet, will source its information from here.
-
Annotate Compiled Sheets – the sheet total, sourced from the number of sheets listed in the Annotate Compiled Sheets dialog, will be displayed when viewing the string on the Compiled tab view of the schematic. The option to display the expanded compiled names of the Sheet Number object must be enabled in the Compiled Names Expansion region on the Schematic – Compiler page of the Preferences dialog.
-
=Time – used to display user-defined static time information. Displays the value specified for the default document-level parameter Time. Unlike the =CurrentTime special string, which is automatically calculated and presented in a set format, you can enter static time information in any format you prefer.
-
=Title – displays the value specified for the default document-level parameter Title.
-
=VariantName - displays the variant from which output has been generated. This follows the entry for the current variant (presented and changed through the Variants toolbar). If the base design is used to generate the output, the value will be [No Variations].
-
=VersionControl_ProjFolderRevNumber – the current revision number of the Project, which is incremented whenever a full commit of the project (i.e. including the project file) is performed. Version control must be used for this string to contain any information.
-
=VersionControl_ProjFolderRevNumberShort – a short Git hash format (the first eight characters) of the Project. Version control must be used for this string to contain any information.
-
=VersionControl_RevNumber – the current revision number of the document. Version control must be used for this string to contain any information.
-
=VersionControl_RevNumberShort – a short Git hash format (the first eight characters) of the current revision number of the document. Version control must be used for this string to contain any information.
Special Strings for use with Component Parameters
Several additional special strings (or special interpretations of existing ones) are available when defining component parameters using Text Strings. In each case, the special string is entered as the value for a parameter.
-
=CurrentFootprint – displays the name of the currently assigned footprint for the component.
-
=Comment – displays the value appearing in the component's Comment field.
-
=Description – displays the value appearing in the component's Description field.
-
=<ParameterName> – displays the value defined for a specified component parameter. Enter the actual name of a component parameter as the special string name. For example, for a component parameter named PowerRating, enter =PowerRating. When defining the Comment property for a component, use of such a special string will enable quick use of any defined parameters' value for the Comment.
Concatenating Special Strings
Multiple special strings, along with regular text (fixed strings), can be concatenated into a single text string, according to the following rules:
| Element |
Function |
Example |
Returns |
| = (equals) |
Indicates that the following string is an expression that must be interpreted. |
=Project |
Kame_FMU for the example project named Kame_FMU.PrjPcb |
| + (plus) |
Used to concatenate the special string and fixed string elements required in the string. |
=Project + VariantName |
Kame_FMUDefault for the Default variant in the example project |
| ' ' (single quotes) |
Used to include a fixed string anywhere within the required string. |
='Project: ' + Project + ', Variant: ' + VariantName |
Project: Kame_FMU, Variant: Default for the Default variant in the example project |
 Special strings can be concatenated with text and other special strings.
If a parameter is a number (which might start with the + or - character), and you would like not to interpret this parameter as a number so it does not participate in arithmetic operations, the parameter value must be included in single quotes (' '). Also, it is highly recommended to include the parameter name in double quotes (" ") when defining the special string. 
Truncating Special Strings
Special strings can also be truncated using the Copy() and Length() functions. The example below shows how to remove the file extension from a schematic document:
| Special String |
Behavior |
Result when Placed on the Document
Bluetooth_Sentinel.SchDoc |
=DocumentName |
Returns the document's filename, including the file extension. |
Bluetooth_Sentinel.SchDoc |
=Copy(DocumentName,1,length(DocumentName)-7) |
Return the string DocumentName, from the first character, for a length of DocumentName characters - 7 (truncate the last 7 characters) |
Bluetooth_Sentinel |
Active Links from Designators and Net Names
Component designators and net names can be included in Text Frames and Notes and function as Active Links, providing cross-probing capabilities within the schematic and also in generated PDFs.
The link is defined as active in the Properties region of the Text Frame or Note in the Properties dialog, by typing the @ character followed by the Designator or Net name. A selection list will appear as you type, use it to select the desired object.
 Type the @ character to display a list of designators and net names, continue to type to search the list.
Active Links are highlighted by a box in the Text Frame or Note, click to cross probe to that component or net. Changes to a Designator value or a Net name are automatically applied to existing Active Links.
 Each live link is highlighted by a box, click on a link to cross probe to that component or net.
The Zoom and Dimming levels used when you click on a link in the schematic editor are configured in the System - Navigation page of the Preferences dialog.
The Zoom level used in the PDF is defined in the Schematic PDF Settings dialog (PDF from an OutputJob), or the Smart PDF Wizard.
Hyperlink Text Strings
A text string can be turned into a hyperlink to a website page, or to a document on a local or shared drive by entering a target URL into the URL field in the selected Text String object's Properties panel. This offers a fast, convenient alternative when providing access to datasheets for components used in a design. Such text strings can also provide a beneficial link to your own organization's website, within the title blocks of your schematic source documents.
Once a URL has been configured as required, it can be used from within the design space. To do so, hover the cursor over the text string. After a short delay, a pop-up with the URL will appear. Click this to open the URL either within Altium Designer or in an external browser, in accordance with your defined preference.
The target URL will open either as a tabbed document inside Altium Designer, or in an external browser, depending on the state of the option to
Open internet links in external Web browser. This option can be found on the
System – View page of the
Preferences dialog.
-
When configuring the hyperlink, you don't need to enter the full URL with
http:// prefix. Entering the short-form address for a website will also work, for example, www.altium.com. However, the http:// prefix is required if you want to open the URL in an external browser.
-
When targeting a local document on your hard drive or a shared drive, use the prefix
file:/// – for example file:///C:\Datasheets\ExampleDatasheet.pdf.
-
You can also use a URL targeting a document on your file server (e.g.,
\\myserver\share\manual.pdf) but note that such links are not currently supported in a PDF generated from the schematic, either using the Smart PDF Wizard or an OutputJob file. You can map the file server into a network drive and then use the absolute path. In this case, your teammates should also map the network drive with the same drive letter so they can use these URLs in generated PDF documents.
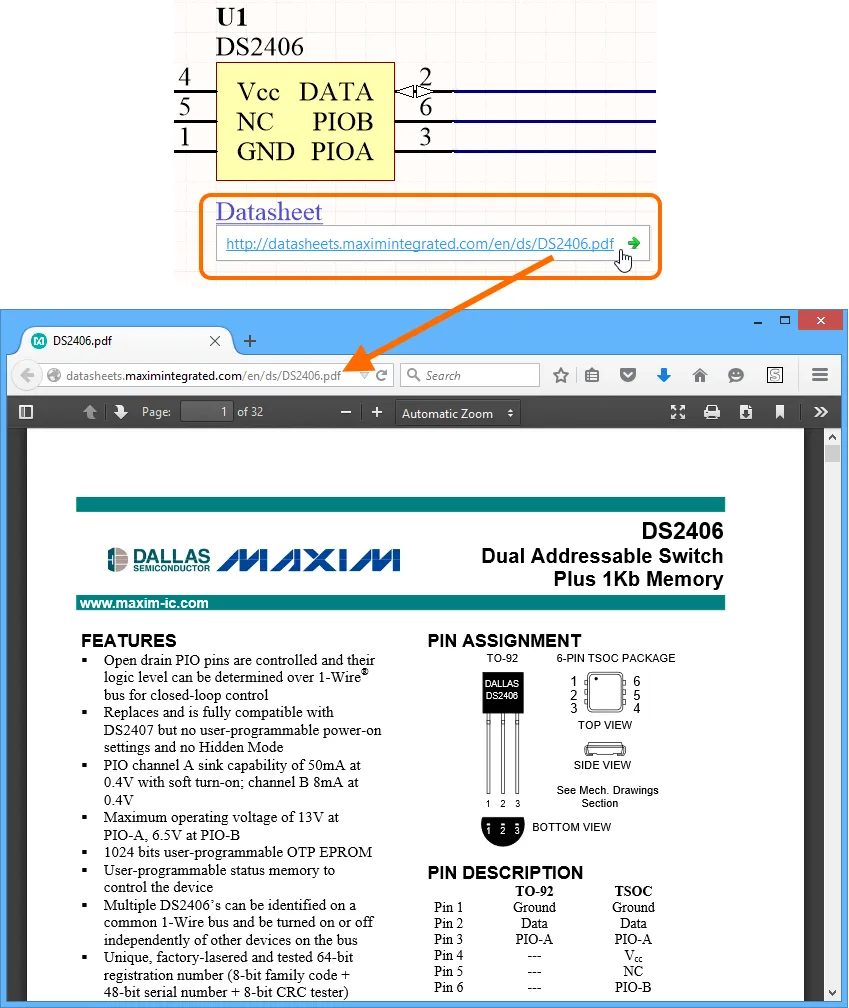
Following an example hyperlink to its target URL.
The pop-up containing the URL is a feature of the software's Design Insight System. Specifically, it is obtained by enabling the Hyperlink Insight aspect of the system. This is done on the System – Design Insight page of the Preferences dialog. As with other elements of the system, you can configure the launch style for the pop-up – Mouse Hover and/or Alt+Double Click.
The delay for the appearance of the pop-up when using the Mouse Hover launch style can be controlled using the Mouse Hover Delay slider. Bear in mind that this affects the pop-ups for all aspects of the insight system.
Alternatively, a link can be followed by right-clicking over it and accessing the URL from the Hyperlink sub-menu. This would be the way to follow a link if Hyperlink Insight is disabled.
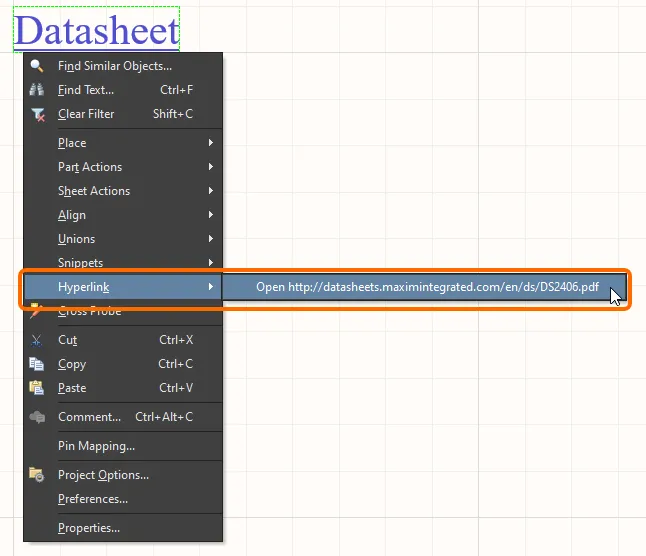
Access the URL for a text string from the right-click menu.
