Parent page: Streamlining Board Design Documentation with Draftsman
The Altium Draftsman application creates and saves PCB drawing files (*.PCBDwf) and uses specific template formats for defining Sheet (page) properties (*.DwsDot) and Document content (*.DwfDot). The 'smart' document templates can be configured to automatically populate the document with nominated PCB drawing views and information text. When initially created, Document templates can use current Sheet templates to define the page properties (size, style, margins, etc.).
Create a New Document
A new Draftsman document is created in Altium Designer using the File » New » Draftsman Document command. The New Document dialog opens.
The dialog allows for the selection of a predefined Document Template or a Default option that creates a blank A4 document – note that a Sheet Template can be applied once the new document has been created.
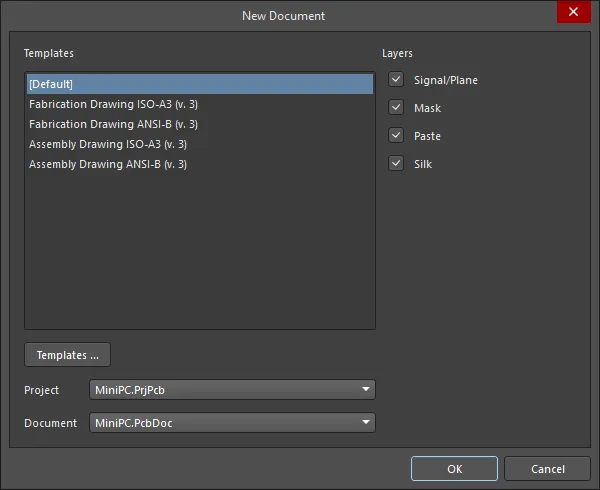
Create a blank or template-based Draftsman document from a specified project and PCB.
The list of available templates (Workspace-based and local file-based templates or only Workspace-based templates) depends on the Templates visibility option on the Data Management - Templates page of the Preferences dialog. For the Workspace-based templates, the latest revision of each available template will be used. In addition, the templates are listed in the format <TemplateName> (v.<Revision>).
Along with the desired Draftsman template, a specific Project and board Source Document can be selected where multiple files are open in Altium Designer. The new document will be associated with, and therefore draw data from, the nominated project, which will become the active project. The newly created document will be added to the nominated project.
The dialog's Layers checkboxes determine which board layers (as defined by the Layer Stack) are used to generate Fabrication drawings in the document (at one per sheet) when a Fabrication document template is used.
Document Sheets
Draftsman files are a multi-sheet format, which allows documents to contain individual pages (sheets) that are assigned to particular types of board project production information. Sheets can be added to and removed from the current document with the Tools » Add New Sheet and Tools » Remove Sheet commands (the commands are also available on the right-click context menu). A new sheet is inserted after the sheet on which the cursor is located when the command is run and will present in accordance with the Draftsman Sheet Template (*.DwsDot) currently applied to the sheet immediately before it.
The currently active sheet number and the total number of sheets in a document are shown in the Status bar at the bottom of the design space.

Page Options
The settings for individual pages (sheets) in a Draftsman document can be defined in the Properties panel, under the Page Options tab.
Open the Properties panel from the system  button, or select View » Panels » Properties from the main menu. The panel’s Document Options mode is active when no object is selected in the design space.
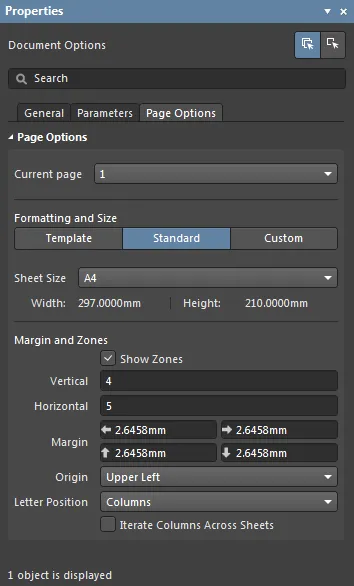
The settings under the Page Options tab determine the base structure (size, margins, etc.) of the current page or all pages in the document. Alternatively, the page format can be defined as a custom size, or by loading a sheet Template document.
Changes made to the Page Options properties can be applied to the current page ( ), or all pages in the document (
 ). For settings that apply to the overall Draftsman document and its constituent pages, see Document Options below.
► See the Properties panel Page Options section for more information.
Document Options
The settings for the overall Draftsman document (potentially composed of multiple sheets/pages) are defined in the Properties panel, under the General tab.
If not already active, open the Properties panel from the system  button, or select View » Panels » Properties from the main menu. The panel’s Document Options mode is active when no object is selected in the design space.

The Draftsman Document Options apply to all pages of a drawing document.
The Document Options settings determine the document’s source design data, graphic styling, drawing behavior, and applied units. Changes to the settings override the panel’s default property settings, which are defined by current document template – such as the default template (Default.PCBDwf).
Note that the Document Options apply to the entire drawing document, however the
Page Options apply to individual document pages (sheets). Both the Document Options and Sheet Properties are saved with the current Draftsman document, and/or in a saved document Template.
Draftsman’s Document Options are available under three selectable tabs in the Properties panel, with the main graphical options arranged under the General tab.
Under the General tab, the Properties panel content is arranged in collapsible sections that are opened and closed using the ► icon associated with each section heading. The General property control information included below is arranged by matching sections, and each collapsible section is opened/closed in the same manner:
General
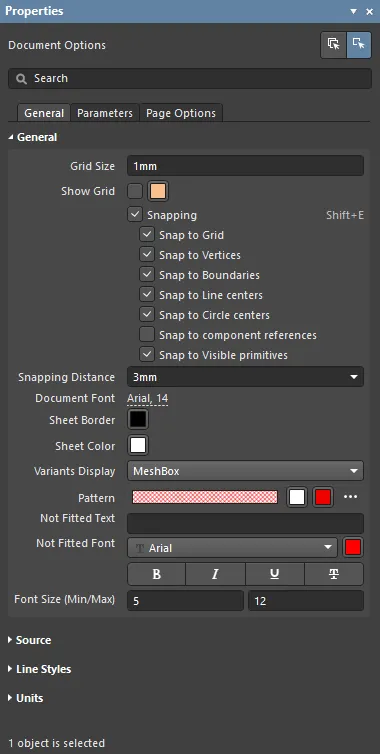
-
Grid Size – set the measured distance between each sheet grid line. Each tenth grid is rendered as a thicker line. Change the zoom level to update the grid display after editing.
The grid can also be set using the View » Set Grid Size command from the main menus (shortcut: G). After launching the command, the Snap Grid (1..1000) dialog opens. Enter a value to be used for both the grid size then click OK. The grid will update accordingly in the design space.
If you enter a grid size value without specifying units, the entry will be in the default measurement units employed for the design. Specifying units when entering the value (mil or mm) will change the default measurement units for the document to those specified if not currently the default.
-
Show Grid – check to display grid lines in the document sheet(s). Note that the Snap to Grid function is disabled when the grid is not displayed.
-
Snapping – when unchecked, all snapping is disabled.
Snapping is an aid when placing and moving objects on the sheets of a Draftsman document, and pulls a primitive to points or guides generated by existing objects, or by the defined grid for the document. This allows you to quickly and easily align the various elements on the page(s) of your document, to arrive at the layout for your documented board exactly the way you want it. Snapping can also be enabled/disabled using the View » Toggle Snapping command from the main menus (shortcut: Shift+E).
You can quickly verify the status of the snapping feature from the Status Bar, which will either display Snapping: Enabled, or Snapping: Disabled.
-
-
Snap to Grid – when checked, the ghost/preview cursor will snap (jump) to grid line intersections while the editor is in object placement mode.
-
Snap to Vertices – when checked, the preview cursor will snap to an angle corner (vertex) of an object while the editor is in object placement mode. A vertex is highlighted with an orange-colored dot when the ghost cursor has snapped to it.
-
Snap to Boundaries – when checked, the preview cursor will snap to an object perimeter line (or an extension of that edge) while the editor is in object placement mode. Object perimeter extensions are displayed as a fine dashed line.
-
Snap to Line centers – when checked, the preview cursor will snap to the mid-point of an object perimeter line while the editor is in object placement mode. A line mid-point is highlighted with an orange-colored dot when the ghost cursor has snapped to it.
-
Snap to Circle centers – when checked, the preview cursor will snap to the radius center of a Circle object while the editor is in object placement mode. A circle center point is highlighted with an orange-colored dot when the ghost cursor has snapped to it.
-
Snap to component references - when checked, the preview cursor will snap dimensions to component references.
-
Snap to Visible primitives – when checked, the preview cursor will snap (as determined by the other snap options) to object primitives that are visible in the current view of the sheet. When unchecked the cursor will snap to all objects that are present on the sheet.
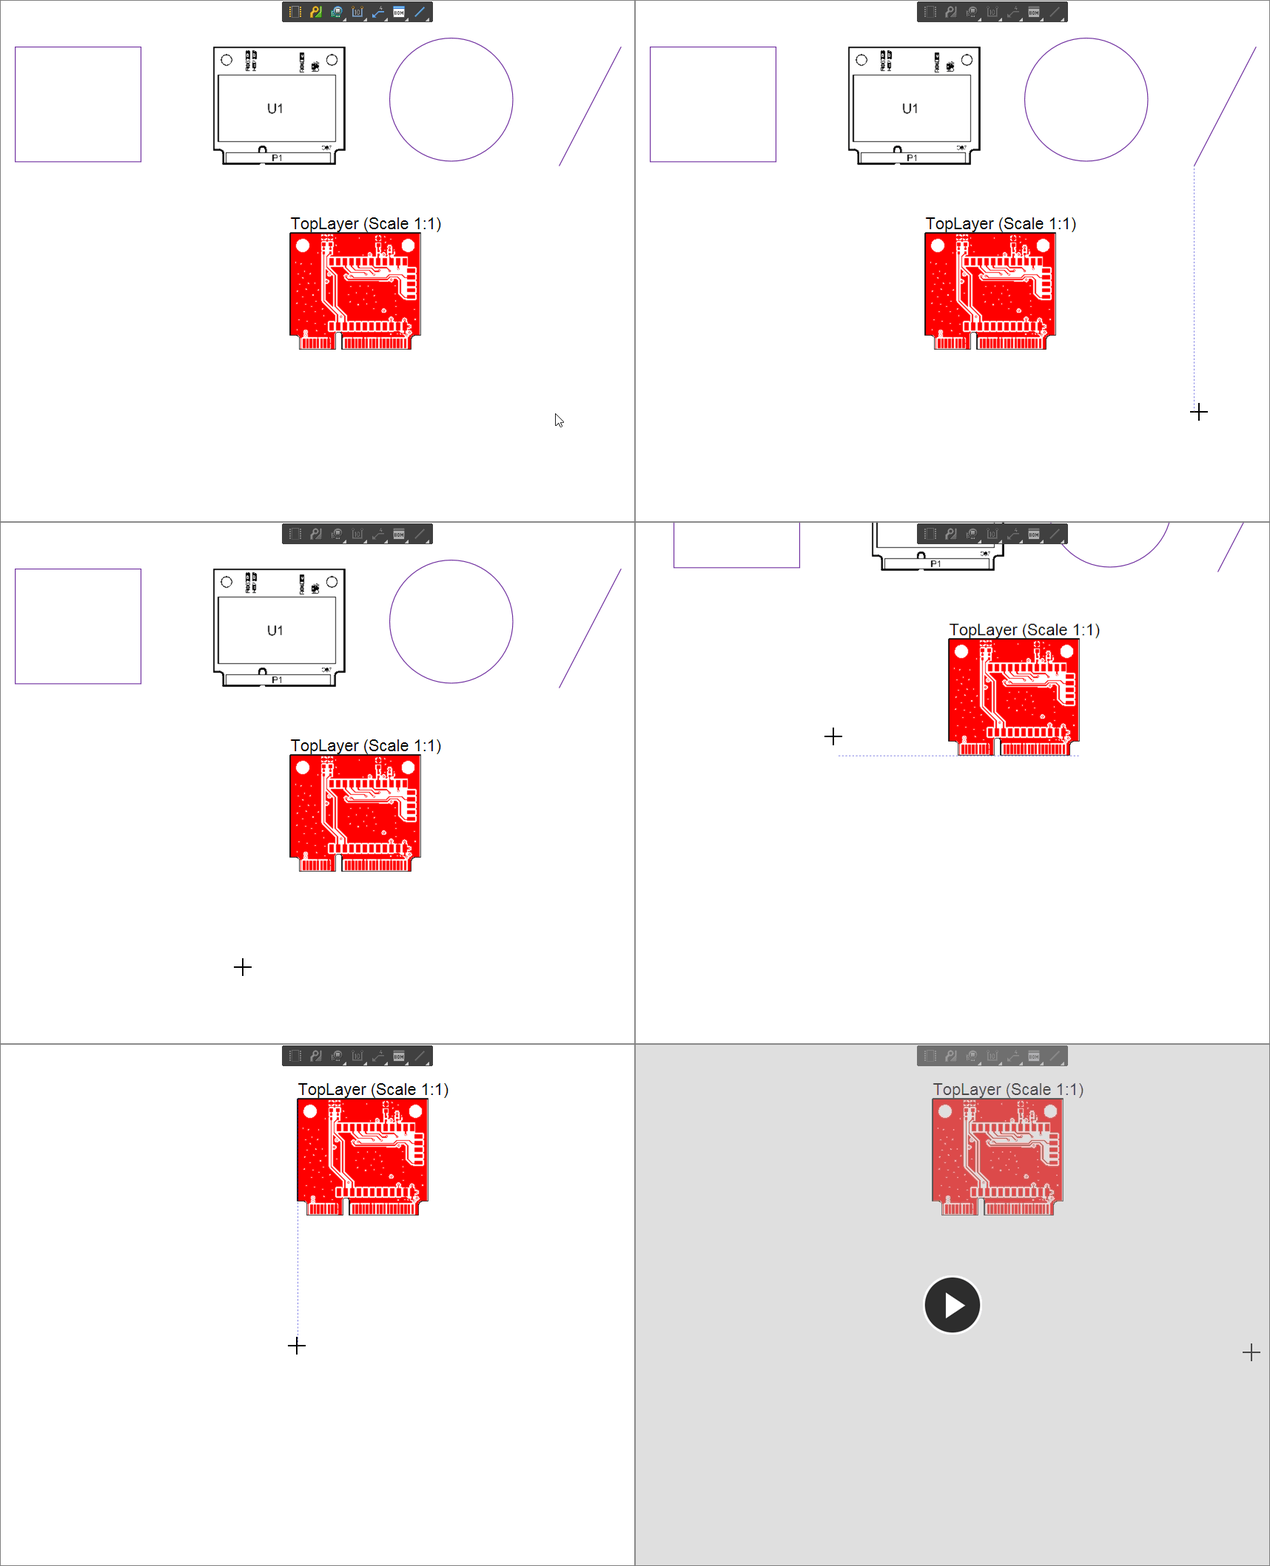
Demonstration of the Snap to Visible primitives feature.
-
Snapping Distance – enter the distance at which the preview cursor will snap on to elements specified as snap targets, or use the drop-down to select the relative value.
-
Document Font – set the base font style and any additional attributes used in document sheet(s). This defines the document-level font that is applied to drawing objects, such as the Title of an Assembly View. In the Properties panel mode for that object, deselect the Use Document Font option to override the font setting.
-
Sheet Border – set the zone border line and character color for the document sheet(s).
-
Sheet Color – set the background color for the document sheet(s).
-
Variants Display – sets how components that are not fitted in the currently selected board assembly Variant are shown (hidden, with a red cross, or as a definable mesh fill style). Specify the board design variation that will be used as a data source for the document from the Variants menu in the Source section of the panel.
-
Pattern – previews and sets the fill pattern and color that will be applied to rendered components that are defined as not-fitted in the currently selected board Variant. Use the associated color buttons (
 ) to specify colors for the fill and/or hatch pattern, and the
  button to set the fill pattern attributes in the drop-down options menu.
-
Pattern – the graphic pattern for the component variant fill. Select Solid fill or an ANSI pattern from the drop-down menu.
-
Scale – the relative line spacing of the applied ANSI hatch pattern.
-
Rotation – the angle of the ANSI hatching lines, where a value of
0 is equivalent to 45°.
-
Hatch Thickness – the line weight of the ANSI pattern lines.
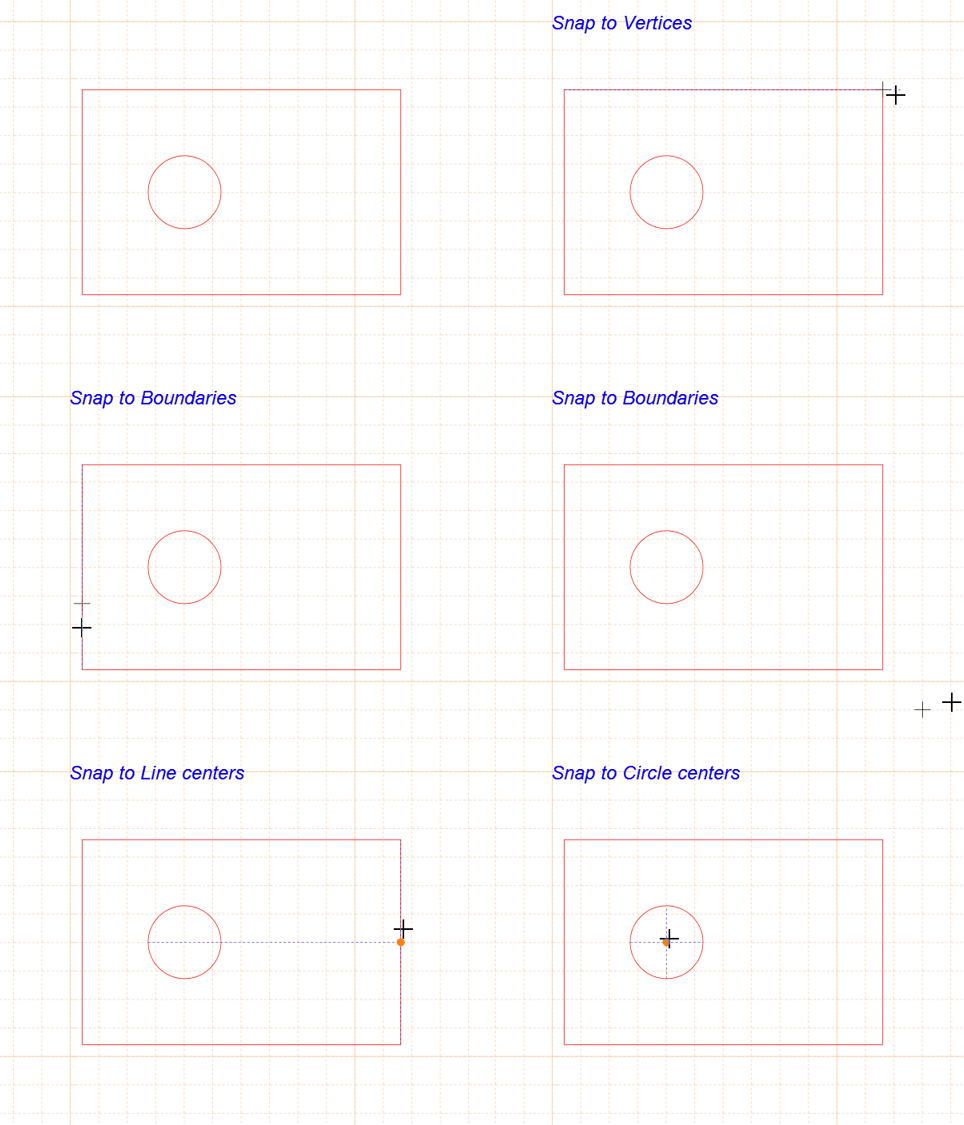
Demonstration of various Snapping options.
Source

-
PCB Document – set the board design that is used as the data source for the Draftsman document. Use the drop-down menu to choose from the available PCB documents in the current project.
-
Variants – use the drop-down menu to select a board design variation (Variant) that will be used as the data source for the Draftsman document. Components that are not fitted in the design variation will be displayed with the fill pattern specified in the panel's General section.
-
Scale – set the size of newly placed full board views (such as Assembly, Fabrication and Drill Drawing Views) in the current document.
Line Styles
Units
-
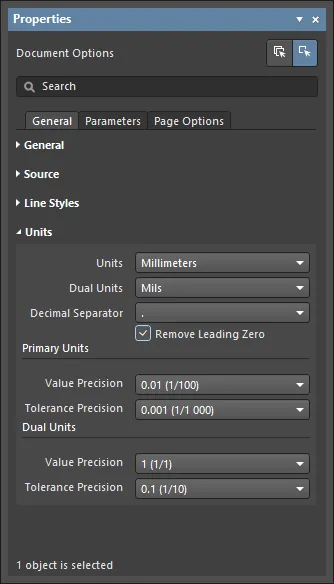
Units – set the document primary measurement unit type.
You can quickly verify the active units from the Status Bar, by looking at the entry for the coordinates, at the left-hand end of the bar.
-
Dual Units – set the document secondary (dual) measurement unit type. The additional dual units are enabled for a drawing object in its Default Preferences or for a placed object in its related Properties panel mode.
-
Decimal Separator – select the character to be used as the decimal separator from the drop-down menu.
-
Remove Leading Zero - enable to automatically remove leading zero when using values less than "1". For example, "0.5" would display as ".5" with this option enabled. Dimensioning and Tolerancing, ASME Y14.5, specifies that for values less than 1, leading zeros should be omitted when using inch units.
Primary Units
-
Value Precision – set the standard measurement precision accuracy definition (up to five digits to the right of the decimal point, with the last digit rounded) for drawing documents.
-
Tolerance Precision – set the precision accuracy definition (number of significant digits to the right of the decimal point, with the last digit rounded) for the measurement tolerance, where enabled. The tolerance display for a selected measurement (such as a Linear Dimension) can be enabled in the Draftsman Properties panel by choosing a Tolerance Type option in the panel's Tolerance section.
Dual Units
-
Value Precision – set the dual unit measurement precision accuracy definition (number of significant digits to the right of the decimal point, with the last digit rounded) for drawing documents.
-
Tolerance Precision – set the precision accuracy definition (number of significant digits to the right of the decimal point, with the last digit rounded) for the dual unit measurement tolerance, where enabled.
The following collapsible section contains information about the options and controls available under the panel's Parameters tab:
Parameters
The following collapsible section contains information about the options and controls available under the panel's Page Options tab:
Page Options
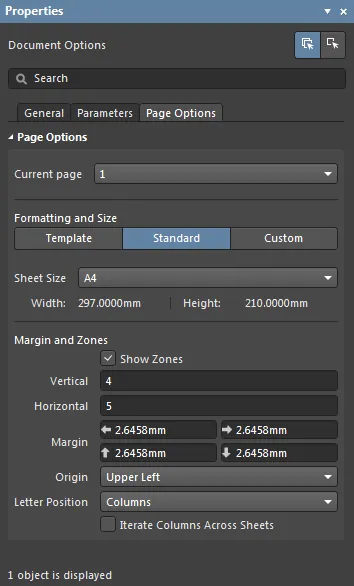
Changes in the
Page Options settings can be applied to the currently active sheet or to all sheets in a Draftsman document. Select the

button at the top of the
Properties panel to apply changed property settings to the current sheet, or the

button to apply changes to all document sheets.
-
Current page – select and view the drawing page (sheet) for the Page Options settings. By default, any change made to an option will apply to all document sheets. Use the
 button as outlined above to constrain a change to the current page.
Formatting and Size
-
Template mode – set the page size and format by selecting from a range of predefined Draftsman sheet templates. The list includes templates found in the location specified in the Draftsman - Templates page of the Preferences dialog. On this page, you can also define a default template to be used for new Draftsman documents.
-
Template – use the drop-down menu to select from a list of standardized page templates, and if required, use the  button to reload the template list.
For a Draftsman document, you can use an available Draftsman sheet template or schematic sheet template.
The list of available templates (Workspace-based and local file-based templates or only Workspace-based templates) depends on the Templates visibility option on the Data Management - Templates page of the Preferences dialog. For the Workspace-based templates, the latest revision of each available template will be used. In addition, the templates are listed in the format <TemplateName> (v.<Revision>).
-
Width/Height – the dimensions of the current page size shown in the current document units (see the Units section above).
-
Standard mode – set the sheet size to a standard page format.
-
Sheet Size – use the drop-down menu to select from a list of standard page dimensions.
-
Width/Height – the dimensions of the current page size in the current document units.
-
Custom mode – set the sheet size to specified custom dimensions.
-
Width – enter the required sheet width measurement.
-
Height – enter the required sheet height measurement.
Margin and Zones
Defines the size of the sheet border graphics and its zone divisions. Uncheck the Show Zones box to hide the zone divisions in the border graphics.
-
Vertical – set the number of divisions (rows) in the vertical sheet margin. The alpha-numeric zone labeling type is defined by the Origin and Letter Position settings in this section of the panel.
-
Horizontal – set the number of divisions (columns) in the horizontal sheet margin. The alpha-numeric zone labeling type is defined by the Origin and Letter Position settings in this section of the panel.
-
Margin – set the distance (in the current units) between the page edge and each of the four border lines.
-
Origin – sets which corner of the document sheet(s) the perimeter zone alpha-numeric indicators will begin from (zone position
A-1 or 1-A).
-
Letter Position – set where the letter zone indicators are placed on the document sheet(s): in the horizontal perimeter zones (columns) or the vertical zones (rows). Check the Iterate Columns Across Sheets option for the alpha-numeric indicators assigned to columns to sequentially increment across all document sheets (rather than starting at
A or 1 on each sheet).
Keeping Draftsman in Sync with the Board
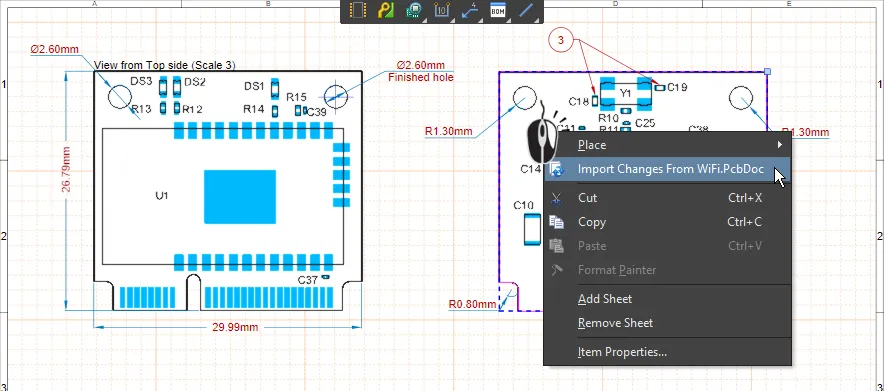
Draftsman extracts design data directly from the copper, component and mechanical layers in the PCB. When the PCB data has changed you can refresh the data in Draftsman by right-clicking anywhere on the document and selecting Import Changes From <BoardFileName>.PcbDoc from the context menu or by selecting the Tools » Import Changes From <BoardFileName>.PcbDoc command from the main menus (shortcut: T, I).
Bookmarks Panel
The Bookmarks panel offers a convenient way to navigate and manage multi-sheet Draftsman documents. The panel presents an expandable tree view of the complete document structure, similar to the Projects panel, and includes all document sheets and the primary view objects within those sheets.
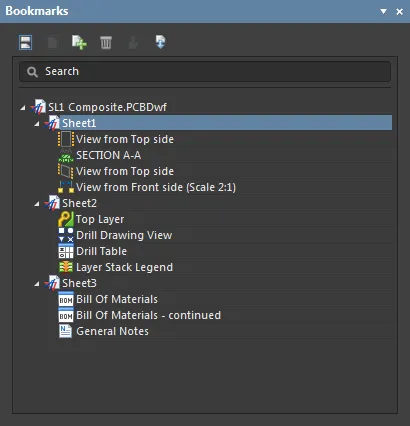
Use the Bookmarks panel to navigate through the Views on a multi-sheet Draftsman document.
The Bookmarks panel offers a structured tree view of the sheets and objects in a Draftsman document, where each sheet entry may be expanded and collapsed via its associated ► symbol. Sheet entries in the tree are automatically named by Draftsman in descending order.
The sub-contents of each sheet entry in the panel includes the Draftsman view type objects on that sheet but not secondary drawing objects such as Dimensions, Callouts, graphic shapes, etc.
Navigation
The Bookmarks panel provides active navigation capabilities, where the sheet or drawing object selected in the tree is brought into focus in the drawing workspace. An object selected in the tree is also selected in the drawing view, which zooms to fit that object.
The tree view navigation is bi-directional, therefore, its own selection will change in response to sheets or objects that have been selected in the workspace. When a sheet or object has been selected by either approach, the Properties panel (if open) will automatically offer the property and option settings that apply to the selected object.
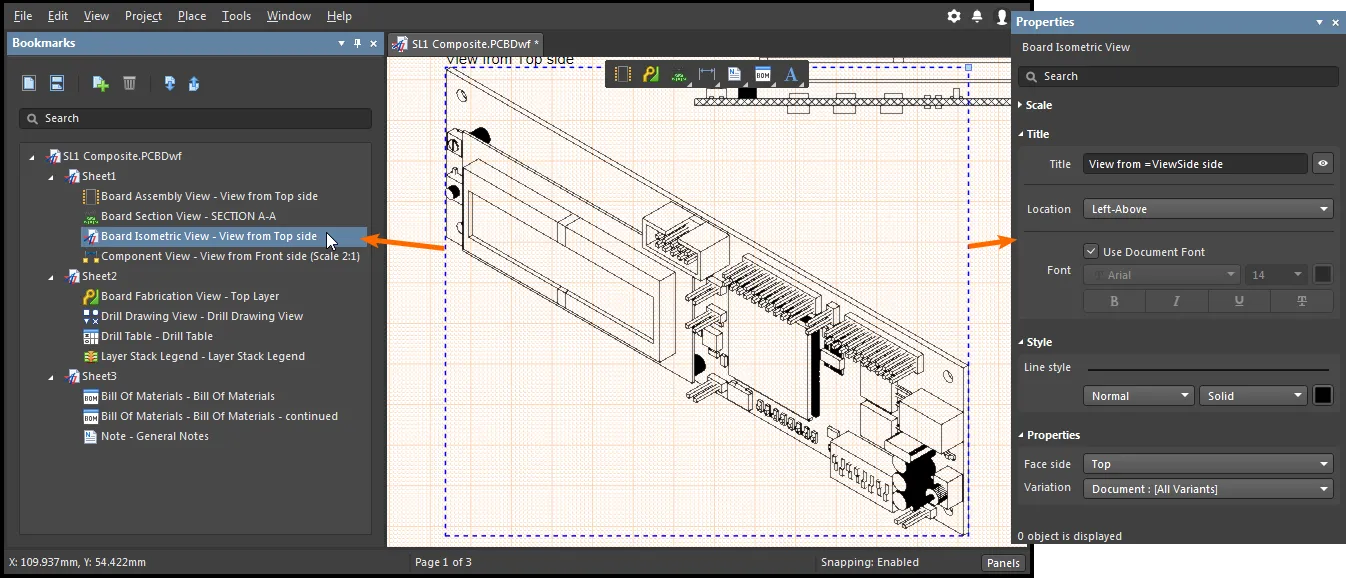
Panel Functions
Additional features for managing document sheets are included in the Bookmarks panel, such as the ability add and remove sheets and change their positional order in the Draftsman document structure.
The series of function buttons at the top of panel are used to manage the view and structure of the document sheets:
-
Set the style of document page view using the Single/Continuous buttons, where the
 option sets the workspace to show a single sheet at a time and the
  button enables a continuous display mode that shows all sheets in a scrollable sequence.
-
Click the Add button (
 ) to add a new document sheet to the end of the tree list. The Delete button (
 ) removes the currently selected sheet from the tree list, or if a drawing object is selected, removes that object from the sheet.
-
Use the Up (
 ) and Down (
 ) buttons to move the currently selected sheet up or down one level in the tree list order. The sheet and its object contents will change position accordingly and the sheet is renamed to match its new position in the tree.
Further options are available using the right-click context menu for a sheet or object in the tree.
-
Use the sheet right-click options to delete the selected sheet, add a new sheet to the document or access its properties in the Properties panel – which will open if not already active.
-
Use the object right-click options to delete the selected object or access its properties in the Properties panel – which will open if not already active.
The Bookmarks panel also supports drag and drop techniques for changing the sheet position order in a Draftsman document. Click, drag and drop a sheet entry to another location in the tree to move the sheet and its object contents to the new position.
When completed, the sheets are automatically renamed in the tree to match their altered order position and the drawing view will update to display the new sheet order.

The Structure shown in the
Bookmarks panel can be included as bookmarks in a PDF output, by enabling the
Generate Table of Contents option in the
PDF Settings dialog in the
OutputJob file.
