Parent page: Getting Familiar with the Altium Design Environment
To work on a project in Altium Designer, it should be opened first. This is performed directly from within Altium Designer using the Open Project dialog accessed by selecting the File » Open Project command from the main menus. The Open Project dialog provides a single location to open, search for and browse projects.
Opening a Project using the Open Project Dialog
Opening a Workspace Project
To work on a Workspace project, you effectively check it out as a local working copy. What happens once the File » Open Project command is selected depends on whether you are a member of the Workspace team or have been shared a project outside of the Workspace team.
Workspace Team Member
The Open Project dialog will open in which you can choose which Workspace project to open from your connected Workspace (when connected to a Workspace, that Workspace will appear in the Locations region of the dialog, distinguished by the  icon, and appear with the name given to the Workspace). Only those Workspace projects that have been shared with you (you have permission to access them) will be listed.

The Open Project dialog when the Workspace location is selected
For each project in the list, the following information is presented:
- Name – the name of the project; the location path of the project appears below the name.
-
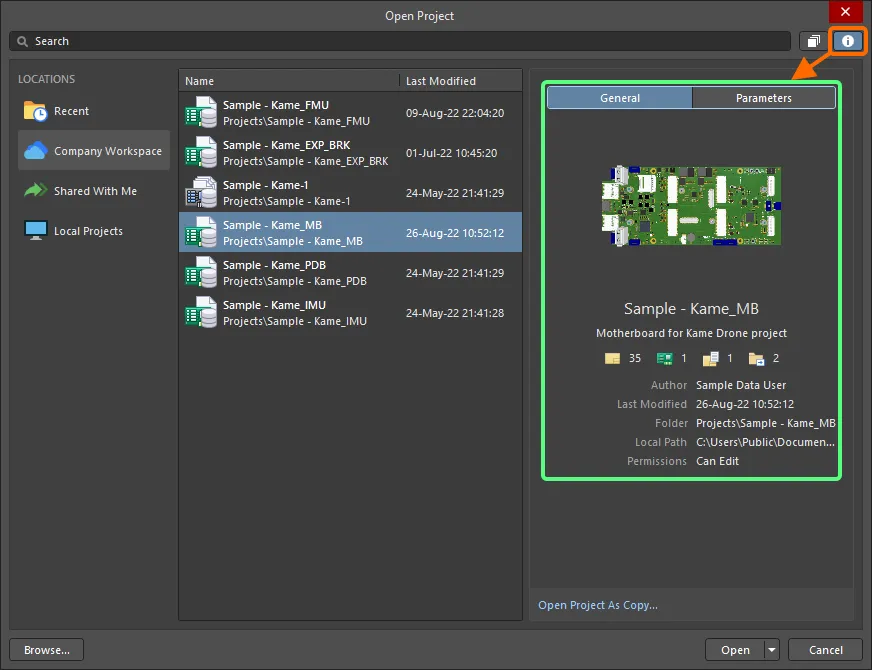
Last Modified – the date and time the project was last modified. The date and time display in accordance with your personal computer settings. To configure each project's modification dates and times in a specific format, you can do so in your computer's system Region settings.
The Name and Last Modified columns can be sorted in ascending or descending order by clicking (and toggling) the header for each column.
To view and navigate through the project folder hierarchy, select the folder view button ( ) to access project folders and the breadcrumb path in the dialog’s Search bar.
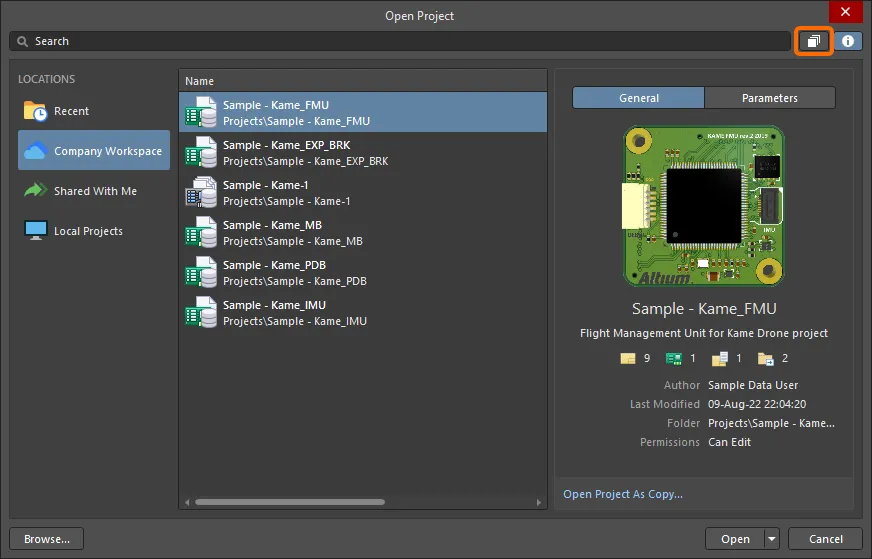
The project list view in the dialog. Hover the cursor over the image to see the folder structure view.
When the folder view is enabled in the dialog and if you have projects located in a folder, a folder entry (

) will appear, which you can double-click to view the existing projects located within.
When  is clicked, the right-hand side of the dialog displays additional details about the selected project, including the basic project information (the General tab of the details pane) and all project Parameters (the Parameters tab of the details pane).
Once opened by clicking the Open button, the project will appear under an entry for the Workspace, in the Projects panel.
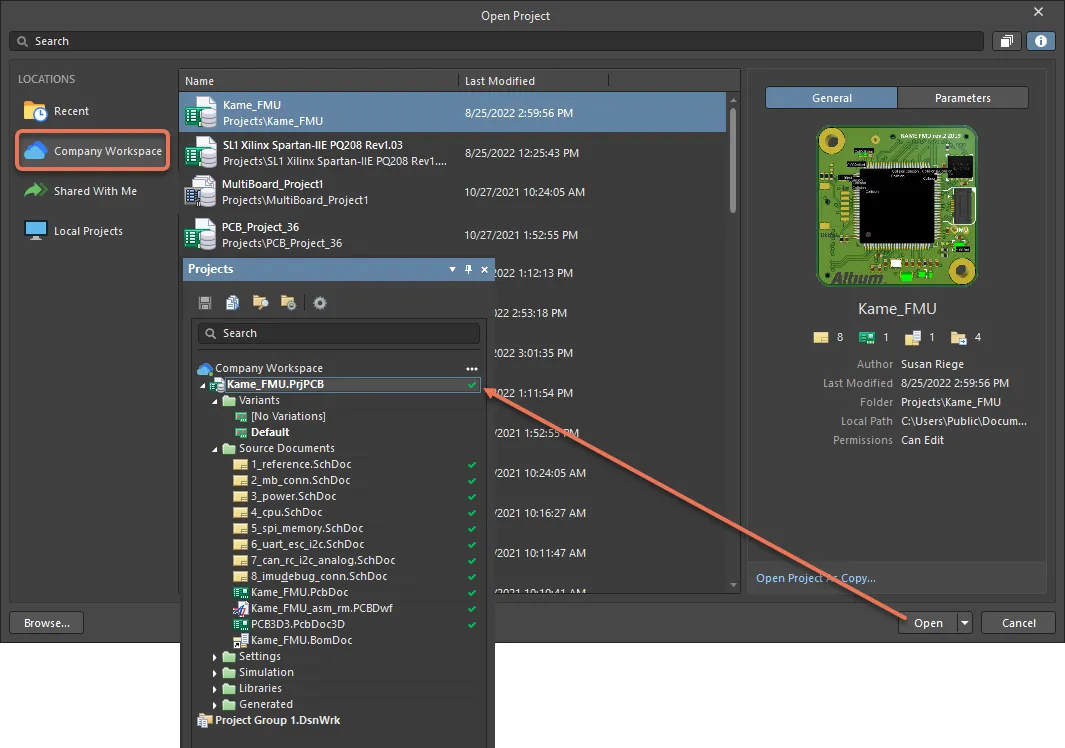
Choose which Workspace project to open from your connected Workspace within Altium Designer from those currently shared with you.
You have the option to open the project to the default checkout path or use the

drop-down menu to specify a custom path. The default checkout path is defined as a property of the design repository in which the project resides. For a Git repository (e.g. the
Versioned Storage repository that is native to the Workspace), this is the
Local Path field found in the
Git Repository dialog. For an SVN repository, this is the
Default Checkout Path field found in the
SVN Design Repository dialog. Access the properties dialog by selecting the entry for the repository on the
Data Management – Design Repositories page of the
Preferences dialog then clicking the

button.
Choose the
Open Project As Copy option to create a cloned version of the project under a different name. Learn more about
Cloning a Project.
When accessing the Altium 365 location of the Open Project dialog before signing in to your Altium account, connecting to a Workspace or activating a Workspace, the right-hand side of the dialog will display the relevant text and controls.
Invited Stakeholder Outside of the Workspace Team
The Open Project dialog will open in which you can access any Workspace project that has been shared with you from the Shared With Me location.
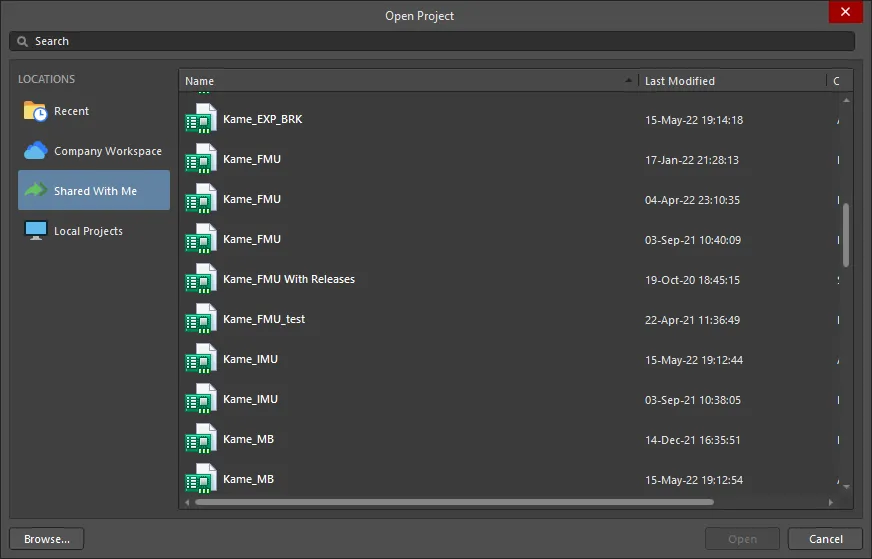
The Open Project dialog when the Shared With Me location is selected
For each project in the list, the following information is presented:
- Name – the name of the project.
- Created By – the name of the person who created the project.
-
Last Modified – the date and time the project was last modified. The date and time display in accordance with your personal computer's settings. To configure each project's modification dates and times in a specific format, you can do so in your computer's system Region settings.
The Name and Last Modified columns can be sorted in ascending or descending order by clicking (and toggling) the header for each column.
Once opened by clicking the Open button, the selected project will appear under the entry Shared with me, in the Projects panel. What you can do with the project depends on the access rights you have been given to it. If editing rights were assigned to you, you will be able to edit the design normally, which would typically be the case for an external contractor. If you have viewing rights only, you will be able to comment on the WIP design.
The projects that are available under Shared With Me are those that have been shared with your sign-in name (your Altium account) from an Altium 365 Workspace. Note that Altium Designer does not need to be connected to a Workspace to access shared projects.
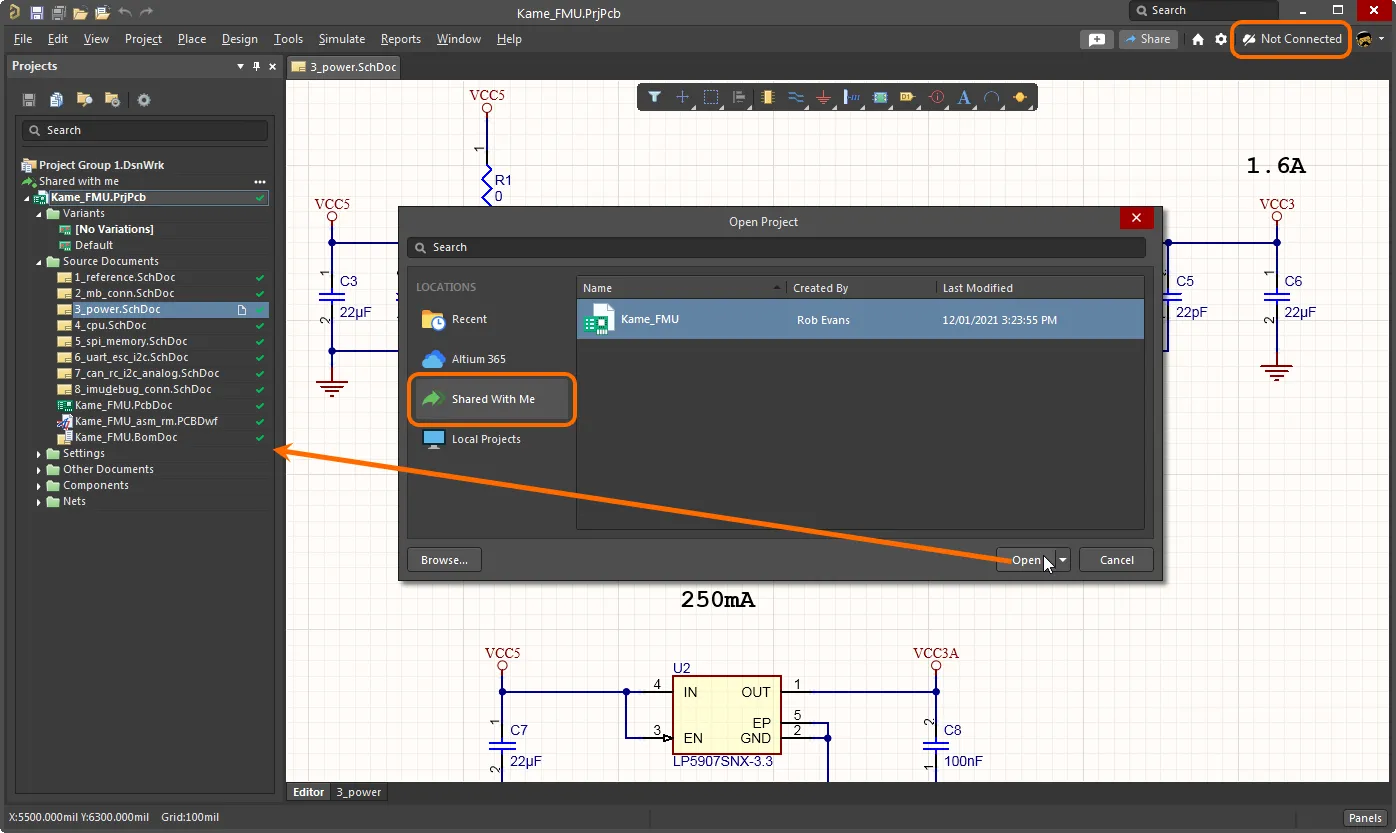
Choose which Workspace project to open, from within Altium Designer, from those currently shared with you as an external stakeholder. Note that access is made to such projects without having access to the Workspace.
You have the option to open the project to the default checkout path or use the

drop-down menu to specify a custom path. The default checkout path is taken from the
Document Path field on the
System – Default Locations page of the
Preferences dialog.
When an updated project file name has been synchronized to the Workspace, the Workspace automatically changes the Workspace project's Name parameter to match. Conversely, when the name of a Workspace project is updated in the Workspace (via the Edit mode on the Workspace Projects page or the design client's Explorer panel), the change is propagated to the client-side when the project is next opened. When the updated project is opened (File » Open Project), the Name of the project and project file name are different dialog will open, providing the option to align the project file name with the new project Name, force the project Name to match the existing project file name, or allow the two names to be different.
Opening a Local Project
Select the Local Projects location to see the list of projects stored in the current default location as specified in the System – Default Locations page of the Preferences dialog.
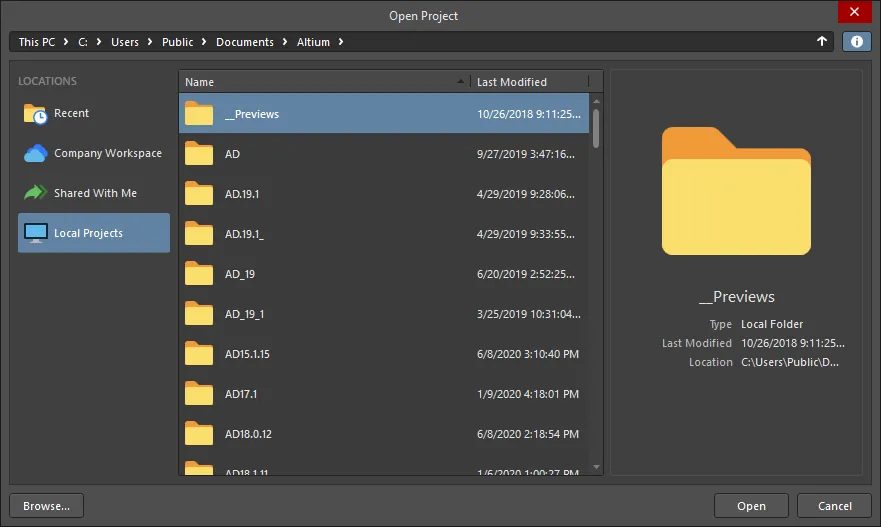
The Open Project dialog when the Local Projects location is selected
For each project in the list, the following information is presented:
- Name – the name of the project; the location path of the project appears below the name. You may double-click the folder icon (
 ) to view the existing contents located within.
-
Last Modified – the date and time the project was last modified. The date and time display in accordance with your personal computer's settings. To configure each project's modification dates and times in a specific format, you can do so in your computer's system Region settings.
The Name and Last Modified columns can be sorted in ascending or descending order by clicking (and toggling) the header for each column.
When  is clicked, the right-hand side of the dialog displays the name, last modified date/time and location of the project currently selected in the list.
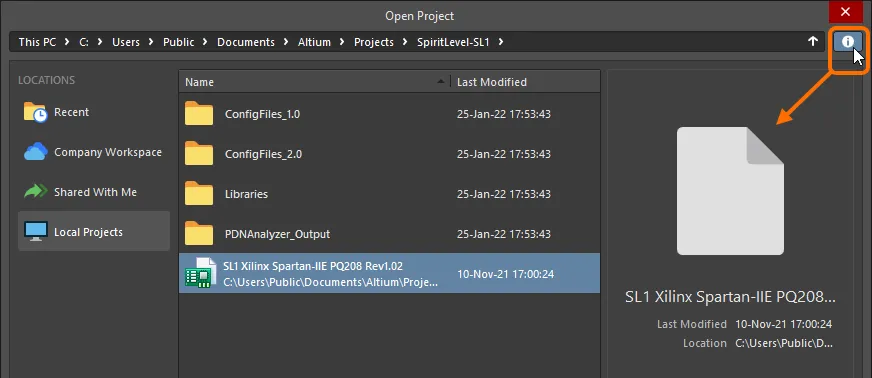
Once opened by clicking the Open button, the selected project will appear in the Projects panel.
Click the Browse button at the bottom left of the Open Project dialog to browse to and open a project through the Windows Open dialog.
Opening a Recent Project
Select the Recent location to see the list of recently opened projects from local or Workspace sources.
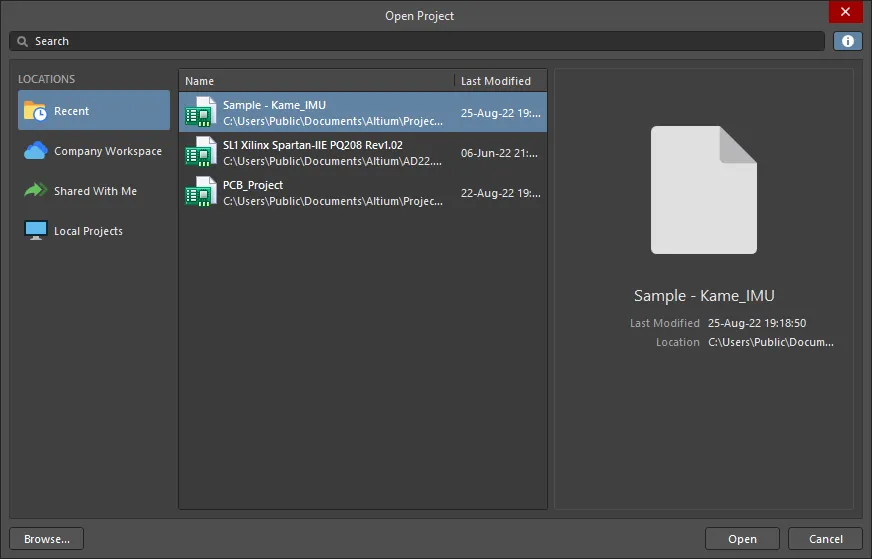
The Open Project dialog when the Local Projects location is selected
For each project in the list, the following information is presented:
- Name – the name of the project; the location path of the project appears below the name.
-
Last Modified – the date and time the project was last modified. The date and time display in accordance with your personal computer's settings. To configure each project's modification dates and times in a specific format, you can do so in your computer's system Region settings.
The Name and Last Modified columns can be sorted in ascending or descending order by clicking (and toggling) the header for each column.
When  is clicked, the right-hand side of the dialog displays the name, last modified date/time and location of the project currently selected in the list.
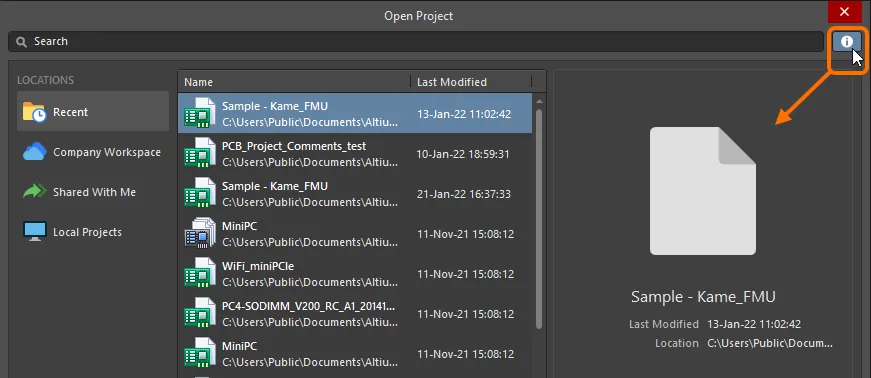
Recent projects, documents and project groups can also be opened through the
File main menu:
learn more.
Searching for a Project
Use the Search field at the top of the Open Project dialog to filter the project list by entering alpha/numeric characters. When opening Workspace projects, the Search filter will also respond to Parameters/Value pairs available from Workspace projects. These include Project and Workspace parameters, and the Analytics parameters generated by the Workspace.
Workspace parameter-based searches
The Workspace project search will return a list of projects based on simple or specific search strings. Parameter Value searches are case-insensitive, whereas Parameter names are referred to in full and are case-sensitive. A space in the search string indicates a boolean AND, and quoted (literal) searches are valid.
- Enter
abc to list projects that include a parameter value that contains the character string abc
- Enter
abc 123 to list projects that include a parameter value that contains abc AND 123
- Enter
“abc 123” to list projects that include a parameter value which (literally) contains abc 123
- Enter
MyParameter=123 to list projects that include the MyParameter parameter with a value that contains 123
- Enter
“My Other Parameter”=abc to list projects that include the My Other Parameter parameter with a value that contains 123. Most project parameter names include spaces, so a quoted (literal) name is needed.
- Enter
MyParameter=abc 123 to list projects that include the MyParameter parameter with a value that contains abc, and also have any parameter with a value containing 123.
- Enter
MyParameter= to list projects that include the MyParameter parameter, regardless of its value.
► ![]() View search examples
View search examples
Click the  icon at the right of the Search bar to remove the currently defined search string.
When viewing the list of Workspace projects (in the folder structure view) or the list of local projects, the path to the currently selected folder will be shown in the Search bar. Click on a folder name to show the content of this folder in the dialog. Click the  button at the right of the bar or use the Alt + Up Arrow shortcut to show the content of the folder one level higher.
Project Groups
In Altium Designer, you can open and edit multiple projects, and if desired, save the collective set of projects as a Project Group (*.DsnWrk). In the Projects panel, the entry of the current Project Group – either the default one (Project Group 1.DsnWrk), or one you have created or opened – is shown with the  icon.
icon.
This can be of particular advantage when the set of projects is related or linked, such as a product design that is composed of multiple PCBs. Creating a Project Group that includes all the relevant projects allows you to open, manipulate, and save multiple projects as a single entity.
A default design Project Group (ProjectGroup1.DsnWrk) is assigned to the Projects panel when:
- No specific design Project Group has been opened.
- The creation of a new design Project Group is specified.
- When all open projects and documents - part of a specific design Project Group or not - are closed.
This default design Project Group is initially unsaved. Its name is used as the default entry in the Save As dialog, when you proceed to save the design Project Group.
Notes on Using Project Groups
- The current Project Group is listed along with open projects in the Projects panel – either the default one (
Project Group 1.DsnWrk), or one you have created or opened.
- To save the currently opened set of projects as a group, select File » Save Project Group As from the main menu.
-
To open an existing group, select File » Open Project Group from the main menu, or right-click in the panel and select Open Project Group from the context menu. Use the same access for the Save Project Group command.
Attempting to open a Design Project Group that is already open will result in the Design Project Group being closed and reopened. You will be prompted to save any changes made to open documents.
- To save a project group, right-click on its entry in the Projects panel and choose the Save Project Group command, from the context menu.
- To save a copy of the currently active design Project Group in the Projects panel, with a new name (if required), and to a specified location on the hard disk, choose the File » Save Project Group As command from the main menus or right-click on its entry in the Projects panel and choose the Save Project Group As command from the context menu.
- To create a new Project Group, select File » New » Design Project Group from the main menu – this will load the default (blank) Project Group (
Project Group 1.DsnWrk). The same method can be used to close the current Project Group file.
- Only one Project Group can be open at a time, so when opening a different Project Group the current group will close. You will be prompted to save any unsaved documents, projects or changes to the current group first.
- To add another project to a Project Group, open or create a project and then save the current Project Group. Alternatively, right-click in the panel and select the Add Existing Project option.

A set of related local projects as a Project Group
Opening a Document
To open a document, double-click it in the Projects panel or right-click its entry and select Open command from the context menu. Multiple documents may be opened simultaneously and each open document has its own tab on the Documents Bar at the top of the design window.
If you have enabled the
Opens and shows documents/objects option in the
Single Click region on the
System - Projects Panel page of the
Preferences dialog, then a single click on a document's entry in the panel will open it in the main design window.
You can also open documents as follows:
- By choosing the File » Open command from an editor's main menus (the
 button on the Quick Access Bar; shortcut: Ctrl+O). Any document that is opened this way will be opened as a free document (appearing in the relevant sub-folder of the Free Documents folder in the Projects panel) and made the active document in the main design window. Any project file that is opened will be added to the Projects panel and made the focused project.
- All documents within the focused category (sub-folder) in the Projects panel can be opened by right-clicking on the entry for the required category, then choosing the Open All command from the context menu.
- All schematic documents of the focused project can be opened by right-clicking on a Source Document folder that contains schematic documents, then selecting the Open All Schematic Documents command from the context menus.
-
One or more documents, either in the currently focused project or all open projects in the active design project groups, can be opened by choosing the Project » Project Documents command from the main menus (shortcut: Alt+Ctrl+O).
After launching the command, the Open Project Documents dialog will open. Use this dialog to select the documents that you want to open. You can restrict the view to only list documents in the project that is currently focused in the Projects panel or all projects open in the active design project groups. Use the standard Windows shortcuts (Ctrl+Click and Shift+Click) to select multiple items from the list. With the required document(s) selected, clicking OK will cause those documents to be opened.
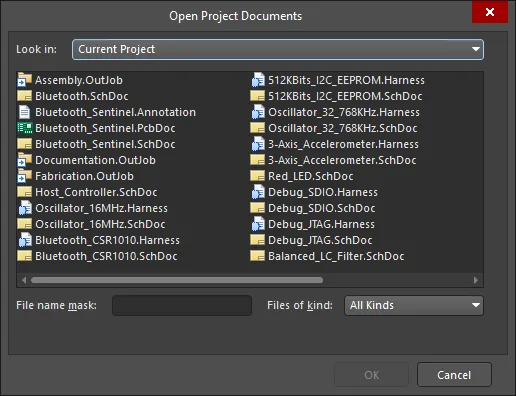
The Open Project Documents dialog
- You can also double-click on the document name in the dialog to open it.
- All selected documents will be opened as tabbed document views in the main design window. The last document selected will be the last document opened, with its parent project becoming the active project (and also the focused project) in the Projects panel.
- To display the current status of documents in the Projects panel, click the
 button at the top of the panel, then enable the Open/modified status option within the Sorting grouping of pop-up controls. Alternatively, enable this option on the System - Projects Panel page of the Preferences dialog.
Active Versus Focused Projects
In the Projects panel's main tree, the active project is highlighted. When there are no documents open in the design editor window, a project is made active by selecting it from a list of all currently open (loaded) projects in the panel. As soon as a project document is opened (in an editor/viewer), the parent project of that document automatically becomes the active project. The active document in the design editor window will also be highlighted in the panel.
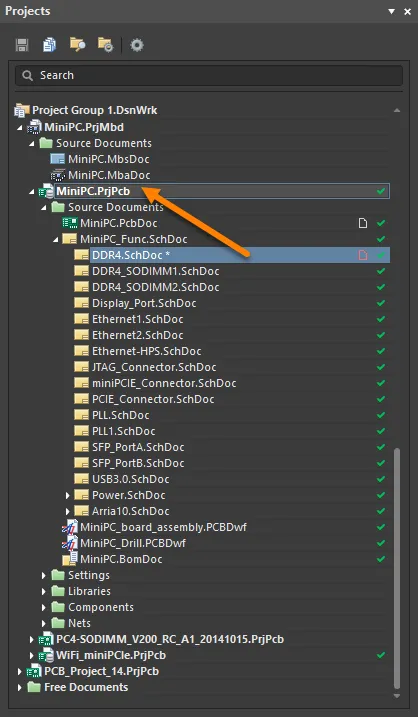
The highlighting of an open active document and its active parent project.
If no project documents are open in the design editor window, opening an additional project will automatically make it the active project in the panel.
The ability to search for a particular document is made possible with the Search function featured near the top of the panel. You may enter keywords to narrow down a search, or to find a particular document.
With numerous documents open in the design editor window, changing the active document using the editor's document tabs will cause the Projects panel to update accordingly, i.e. to reflect both the active document and the active project (if the document made active does not reside in the same project as the previously active document). Conversely, clicking on the entry for a document that is already open (and that belongs to a non-active project) will make the parent project of that document the active project.
Only one project and document may be active at any given time, however, the panel allows you to focus and perform actions on any project or document. Right-clicking on the entry for a non-active project or a non-active document will bring up an associated menu with commands targeting the focused project or focused document, respectively.
In the case of focusing a document, the document will only become focused if it is closed, otherwise, it will become the active document and its parent project will become the active project. For example, in the image below, the active project is MiniPC.PrjPcb and the active document DDR4.SchDoc. The focused document is Ethernet-HPS.SchDoc (distinguished in the panel by a dotted outline box).
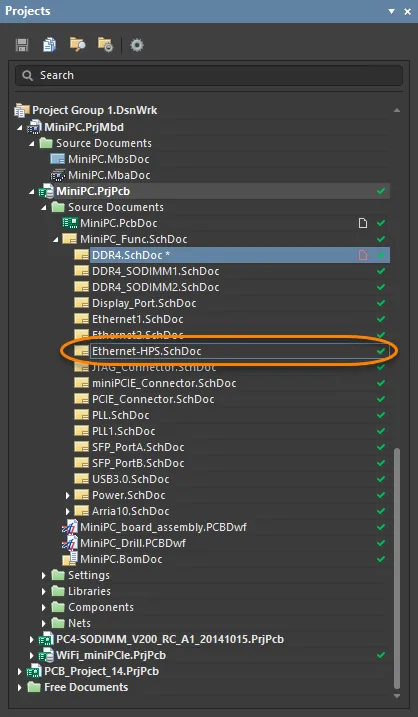
An opened active document (blue) and a selected focused document are indicated by the dotted outline.
Open Versus Active Documents
When you open a document, it becomes the active document. In Altium Designer, you are allowed to have as many documents open as you wish, however, only one document can be the 'active' document. The active document is open in the design space allowing you to make any required updates. The tab of the currently active document displays with a medium gray background; documents that are open and not currently active display with a charcoal gray/black background.

To make another open document the active document, click on its tab. Alternatively, use the Ctrl+Tab or Ctrl+Shift+Tab keys to cycle forward or backward (respectively) through all open documents, in accordance with the order in which they were originally opened.
If the
Ctrl+Tab switches to the last active document option is enabled, on the
System - View page of the
Preferences dialog, the functionality of this shortcut is overridden, and using it will simply switch between the currently active document and the previously active document.
The list of currently open documents is also available from most editors, at the bottom of the main Window menu (the documents are listed in the order that they were opened). Up to a maximum of nine documents can be accessed in this manner. Use a command to make the indicated, open document, the active document in the main design window.
If you have a large number of documents open, you can choose to group them by enabling the Group documents if need option in the Documents Bar options on the System - View page of the Preferences dialog. Documents can be grouped by document kind or by project. Documents grouped by document kind are sorted alphabetically in a grouped tab. Documents grouped by project are sorted alphabetically within each document kind sub-group in a grouped tab.
You can also toggle the display of the current document's editor (in the schematic editor, schematic symbol editor, PCB editor, PCB footprint editor, CAMtastic editor, and SimView editor) between maximized and not maximized by choosing the
View » Full Screen command, from the main menus or using the
Alt+F5 keyboard shortcut. Using this command, any docked panels will be hidden from display, as well as the application's main banner. Literally, all you see is the editor for the document itself.
Document Window Management
With Altium Designer, you are not limited to viewing and working with a single design document at a time. Documents can occupy the entire design space, or the design space can be shared between multiple open documents. Various commands are provided that allow you to effectively manage the open documents and tailor their display to your preferred working habits.
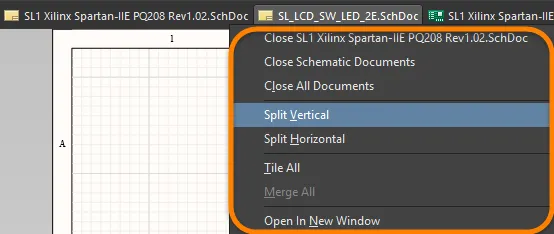
Right-click on a document tab to access various commands for managing the document. These commands include those affecting the display of all open documents within the main design window, as shown below. Commands for splitting the main design window vertically (Split Vertical) or horizontally (Split Horizontal) are invaluable when performing cross-document tasks, such as cross-probing between a schematic and its PCB.
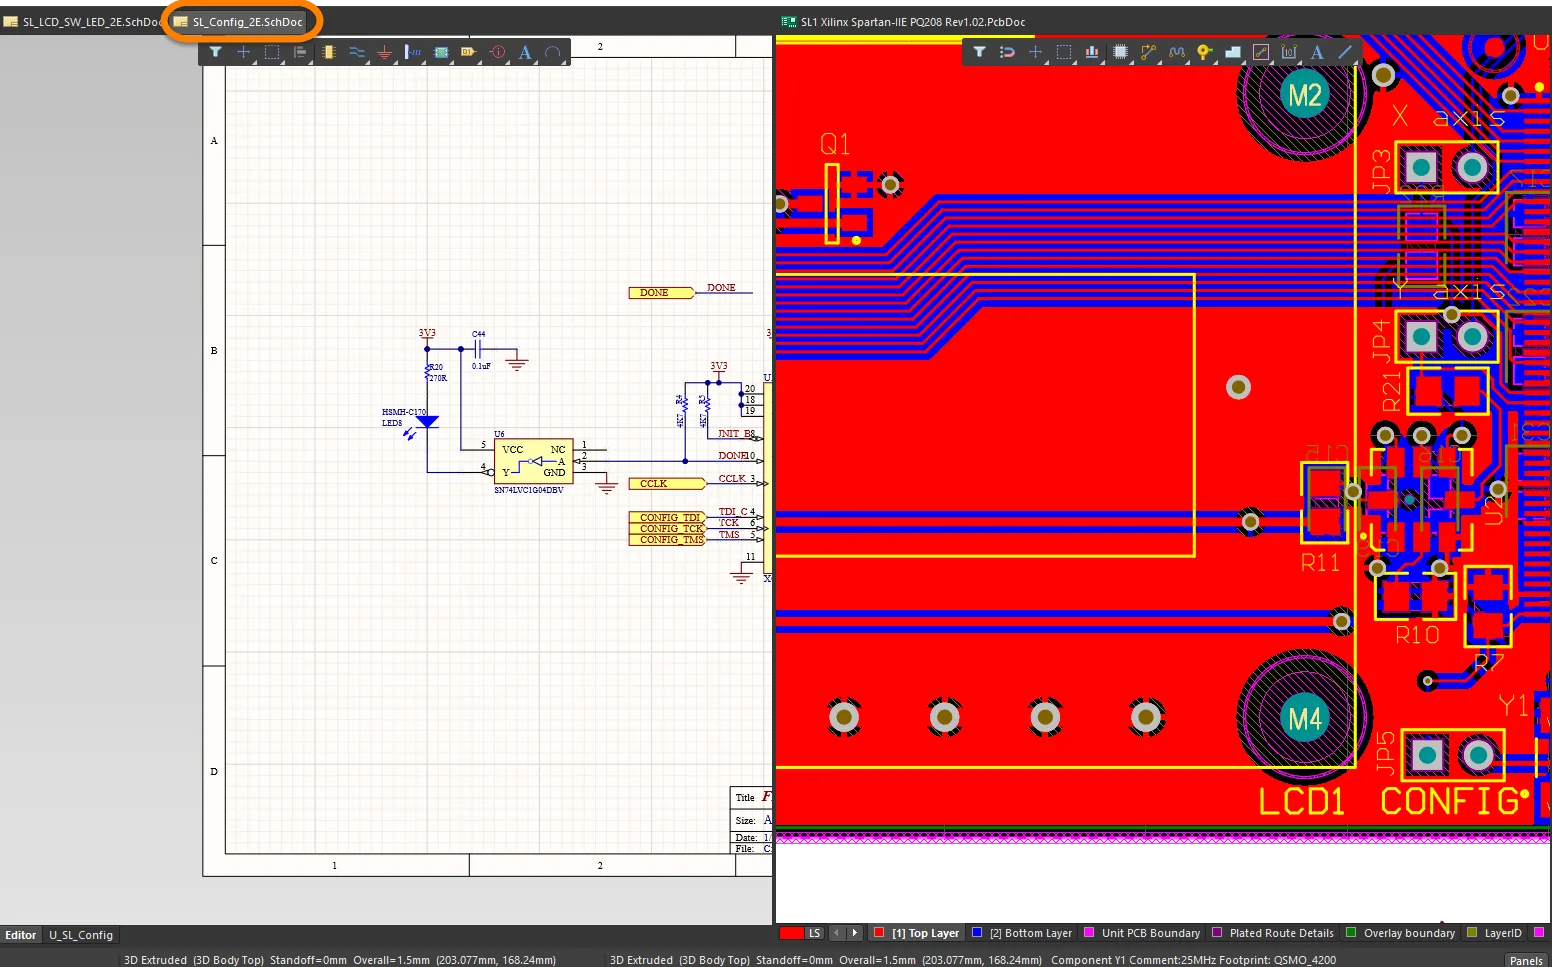
When split, the regions are treated as though they are individual windows. One document may be active in each region, but only one document, across all regions, can have the focus at any given time. When a new document is added, or an existing document is opened, it will be opened as part of the region in which the currently focused document resides. The image below shows the design space split vertically; the highlighted schematic document is the currently active document.
The right-click commands also allow you to tile the documents (Tile All, shortcut: Shift+F4), which opens each document in the design space as shown in the below image. In the image, the highlighted PCB document is the currently active document.
- Opening a subsequent document after using this command, will place it as a new tab in the currently active region. Run the command again in order to place this newly-opened document in its own tiled region.
- You can also use the Window » Tile Horizontally and Window » Tile Vertically commands accessed from the main menus of most editors to present all open design documents in their own individually, horizontally- or vertically-tiled regions, within the main application design window.
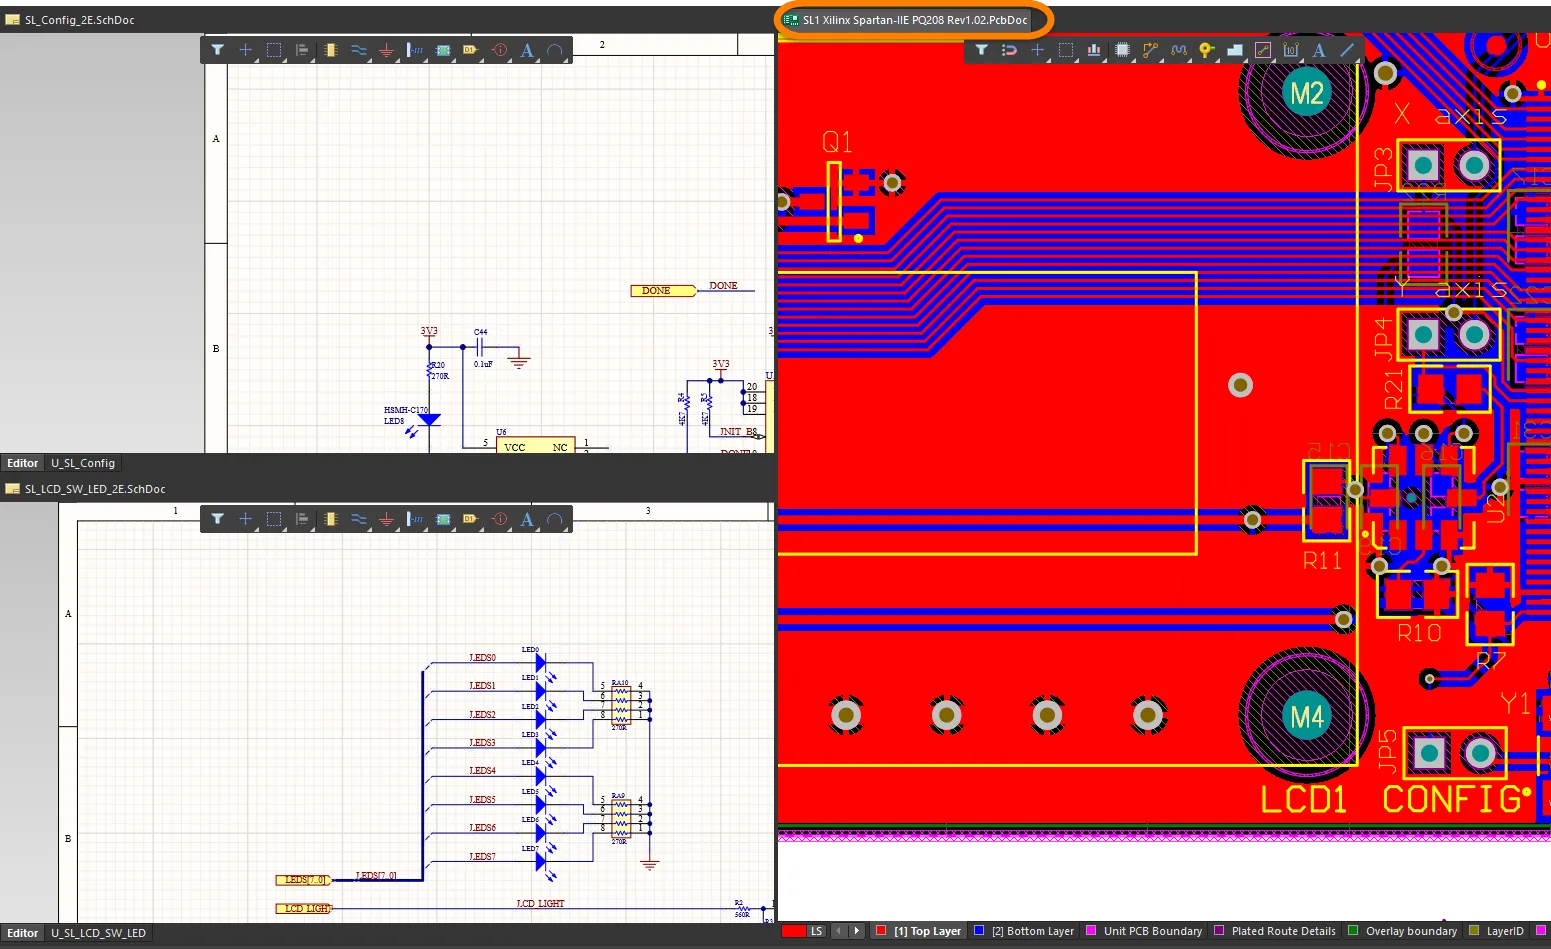
When documents are split or tiled, you can drag and drop them to another region.
Use the Merge All command to 'merge' all documents back into a single design window.
You can also open a document in its own separate design window by right-clicking on its tab then choosing Open In New Window from the menu or by clicking on its tab and dragging it to a point outside of the current Altium Designer window.
Altium Designer also provides a visually orientated project navigation aid –
Design Insight – that applies to individual document entries in the
Projects panel – as a
Document Insight. Refer to the
Document Insight section of the
Design Insight page to learn more.
Altium Designer Window Management
When multiple Altium Designer windows are opened, you can use the Window » Arrange All Windows Horizontally or Window » Arrange All Windows Vertically command from the main menus to arrange all Altium Designer windows on the desktop horizontally or vertically, respectively, so that they are all visible and do not overlap. After launching the command, all Altium Designer windows that exist on the desktop and are not minimized will be tiled horizontally/vertically, allowing you to see all windows at once.
- If you have multiple Altium Designer windows displayed across multiple monitors, all windows will be moved to the monitor displaying the Altium Designer window in which this command is launched.
- If you restore a currently minimized Altium Designer window, immediately after running this command, it will be tiled horizontally or vertically accordingly.
Opening Recent Documents, Projects and Project Groups
Recently closed documents, projects and project groups can be opened from any editor by using indexed commands of the File » Recent Documents, File » Recent Projects, or File » Recent Project Groups sub-menu, respectively. A list shows the most recently closed entities (up to a maximum of nine entities). Position 1 (at the top) reflects the last entity closed.
- If a recent document is opened that does not currently reside in an opened project in the Projects panel, it will be opened as a free document.
- When opening a recent project group, any open projects (and documents thereof) of the previously active project group will be closed. You will be prompted to save any changes.
You can also choose the All Recent Documents and Projects command from any of these menus to open the Recent Documents, Projects and Project Groups dialog. The dialog lists all recently closed documents, projects, and design project groups conveniently within one location. Information listed includes:
- Document Name - name of the opened document.
- Document Type - type of opened document (PCB, schematic, etc.).
- Location - location path of the opened document.
- Modified - date and time document was last modified.
Select what you want to open then either click OK to close the dialog and open your selection or Open Selected Documents to open your selection - keeping the dialog open for further selection. Use the standard Windows shortcuts (Ctrl+click and Shift+click) to select multiple items from the list.
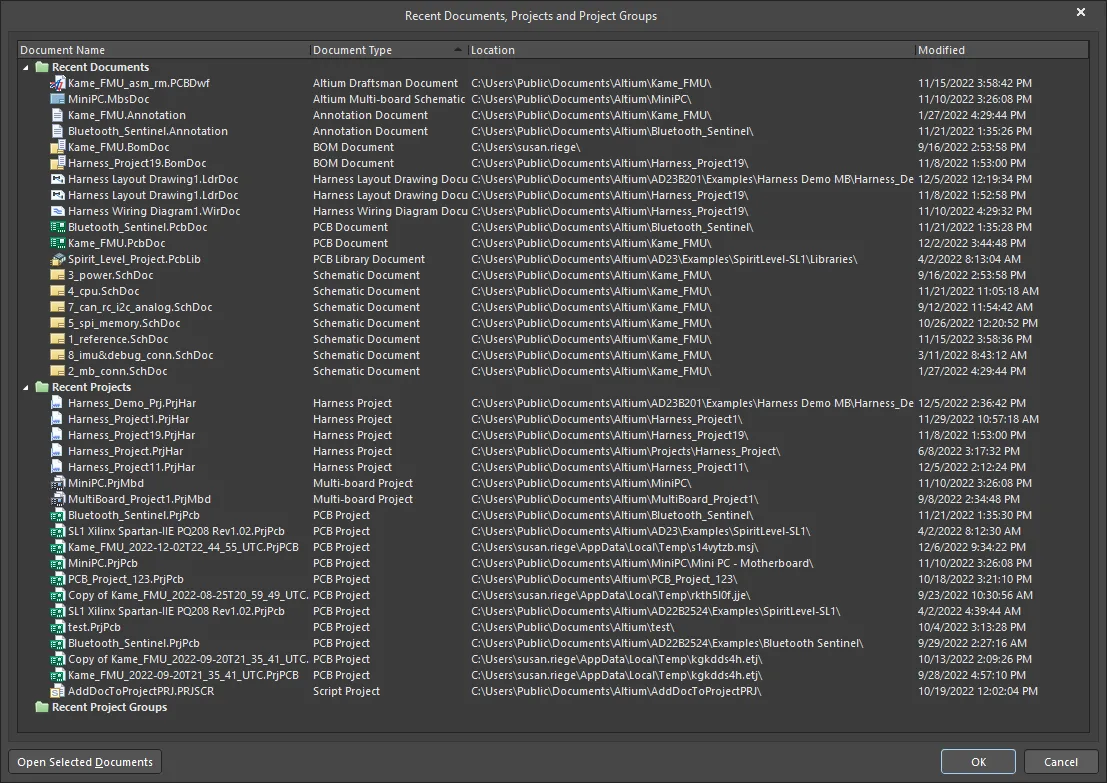
The Recent Documents, Projects and Project Groups dialog
- Double-clicking on an entry in the dialog also will open the associated document, project or project groups.
- If your selection includes documents and/or projects AND project groups, only the project groups will be opened (and their constituent projects/documents).
Alternatively, you can drag and drop a document, project file, or project group file directly into Altium Designer to open it.
Closing Projects and Documents
To close the currently focused project in the Projects panel, right-click on its entry and choose the Close Project command, from the context menu. The active project can be closed by choosing the Project » Close Project command, from the main menus.
Right-click on any document tab to access a drop-down of commands to close the document on which you right-clicked, close all documents of the same editor (e.g., all PcbDoc, all SchLib, or all PcbLib documents) as the one on which you right-clicked, or close all open documents.
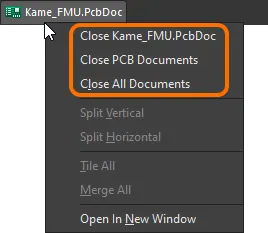
Open documents can also be closed from the following locations:
- an open document can be closed by right-clicking on its entry in the Projects panel and choosing the Close command from the context menu.
- the active document can be closed by choosing the File » Close command from the main menus (shortcut: Ctrl+F4).
- all currently open documents associated with the active project can be closed by choosing the Project » Close Project Documents command from the main menus.
- all currently open documents associated with the focused project in the Projects panel can be closed by right-clicking on the entry for the required project and choosing the Close Project Documents command from the context menu.
- all open documents within the focused sub-folder in the Projects panel can be closed by right-clicking on the entry for the required category (sub-folder) and choosing the Close All command from the context menu.
- all currently open documents can be closed by choosing the Window » Close Documents command from the main menus.
- all currently open documents and projects in the current Design Project Group can be closed by choosing the Window » Close All or File » New » Design Project Group command from the main menus.
The entry of a free document will be removed from the Projects panel upon closure.
