Parent page: BOM Management with ActiveBOM
Creating the BOM Document
ActiveBOM's working BOM document is referred to as a BomDoc. Add a new BomDoc to the project via the File » New sub-menu, or right-click on the project in the Projects panel. When there is at least one component in the project, a new BomDoc can be created by clicking the + Create control next to the ActiveBOM entry within the project structure in the Projects panel. Note that each PCB project can only include one BomDoc.
When you add a new BomDoc to your project, the schematic is automatically compiled and all of the existing components are listed in the BomDoc. For Workspace Library components that include Part Choices, Solutions will be detailed in the lower region of the interface, as explained in the Understanding the Solution section below.
As additional components are placed on the schematic they are automatically added into the BomDoc. Additional BOM Items and additional parameters can also be manually added directly in ActiveBOM, via the Add new button, located above the component list. Refer to the Custom BOM Items and Columns section to learn more.
- When the BomDoc is opened the project is automatically compiled, and the list of design parts and their supply chain details refreshed. This can take some time when a large design is initially opened and can result in the BomDoc being flagged as a modified file, even though it was just opened.
- Each PCB project can only include one BomDoc.
The BOM Items List
The upper region of the BomDoc is a tabular list of all of the components detected in the PCB design project, as well as additional BOM Items you have added directly into the BomDoc. This region is referred to as the BOM Items list.
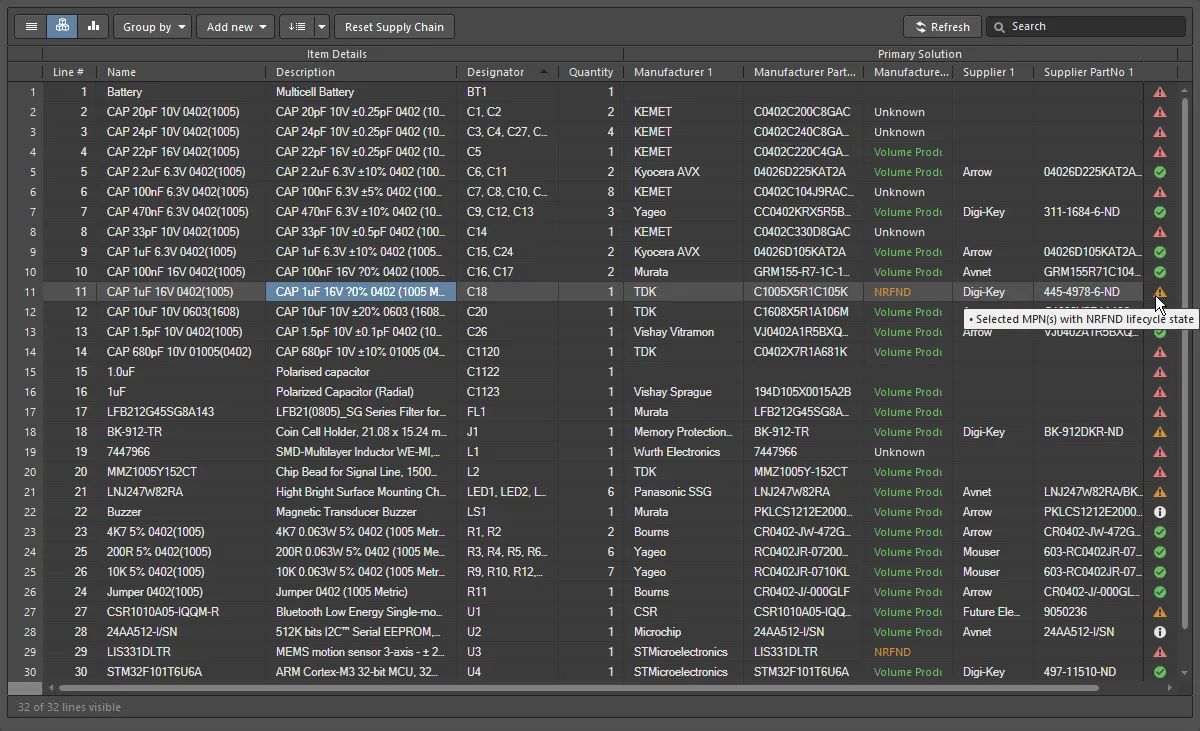
The components, or BOM Items list, displayed in the Base view.
There are 3 view modes available to display the BOM Items. Select the required mode using the buttons located above the list:
 Flat view - a row for every component.
 Base view - a row for each unique component in the project, the Designator column lists the designators of all components of this type. Multiple presentation options are available for grouped designators. Select the required Designator Grouping mode in the Properties panel.
 Consolidated view - used when the project includes variants, to display a consolidated BOM for all variants.
BOM Items List Editing Features
The component list supports a number of spreadsheet-like editing features, including:
- Use the Column tab of the Properties panel to display/hide a column, and define a name Alias for a column. An alias can also be defined using the
![]() Enter Column Properties dialog, accessed by right-clicking on a column name in the column header region of the BomDoc, then selecting the Rename Column command from the context menu. Note that the alias is used as the column name in generated BOM outputs.
Enter Column Properties dialog, accessed by right-clicking on a column name in the column header region of the BomDoc, then selecting the Rename Column command from the context menu. Note that the alias is used as the column name in generated BOM outputs.
- Drag and drop to change the order of columns.
- Sort by any column, hold Shift to sub-sort on subsequent column(s).
- Click the Filter icon to filter by column values

- Select cells using standard Windows selection techniques.
- Copy cell contents from ActiveBOM, and paste values from an external spreadsheet editor into custom ActiveBOM columns.
- User-configurable line numbers can be defined when the BOM is in Base view. When in Base view, click the Set line numbers button (
 ) to add a line number to each row. Click the dropdown icon on the right of the button to open the Line # Options dialog, where the start and increment values can be defined. Refer to the Line Number Column section to learn more.
- Click the Add New drop-down (
 ) to add additional rows or columns. Refer to the Custom BOM Items and Columns section to learn more.
- Click the Group by button (
 ) to group the grid by the enabled column. Multiple Group By columns can be enabled (show image
![]() ), and their order changed using drag and drop. This is a grid display feature, the grouping is not transferred to the Report Manager dialog when the Bill of Materials command is run.
), and their order changed using drag and drop. This is a grid display feature, the grouping is not transferred to the Report Manager dialog when the Bill of Materials command is run.
- Click the Reset Supply Chain button (
 ) to remove user-defined solution ranking and manually assigned SPN priorities from the selected BOM Items.
- The current configuration of the BOM Items grid can be saved as a BOM Set. Refer to the Configuring and Saving the Display of the BOM Items Grid section to learn more.
- Use the standard Windows shortcuts to scroll through the list of BOM Items:
- Vertical scroll = MouseWheel Roll
- Horizontal scroll = Shift + MouseWheel Roll
Many of the configuration and BOM display options are set in the ActiveBOM Properties panel.
Identifying Identical Components
To be able to group identical components in the Base and Consolidated views, ActiveBOM uses the following mechanisms:
- For Workspace Library components - by
DesignItemID.
- For non-Workspace Library components - by
DesignItemID and Library Name, and also by the component parameters enabled in the Component Grouping dialog. This approach allows designers to create generic non-Workspace Library components in the library, and then populate them with specific component detail once they have been placed. The default parameters enabled in the Component Grouping dialog are Comment, Description, and Value. Click the Component Grouping Edit button in the ActiveBOM Properties panel to open the dialog. Note that this button is only available when there are non-Workspace Library components in the design.
Notes about Component Grouping:
- The Component Grouping dialog is used to identify identical components so they can be grouped. Although other parameters/properties, such as PCB component properties, can be listed in the Component Grouping dialog, only component parameters can be used to define identical components.
- If you want to group components in the BomDoc or in a custom BOM for some other purpose, for example to group top-side components and bottom-side components, switch to the List view and then use the Group by button in ActiveBOM (show image
![]() ), or use the Column grouping feature in the Report Manager (show image
), or use the Column grouping feature in the Report Manager (show image![]() ). The parameters available in the ActiveBOM Group by dropdown list are those parameters that are currently set to visible in the Columns tab of the Properties panel.
). The parameters available in the ActiveBOM Group by dropdown list are those parameters that are currently set to visible in the Columns tab of the Properties panel.
The Column Groups
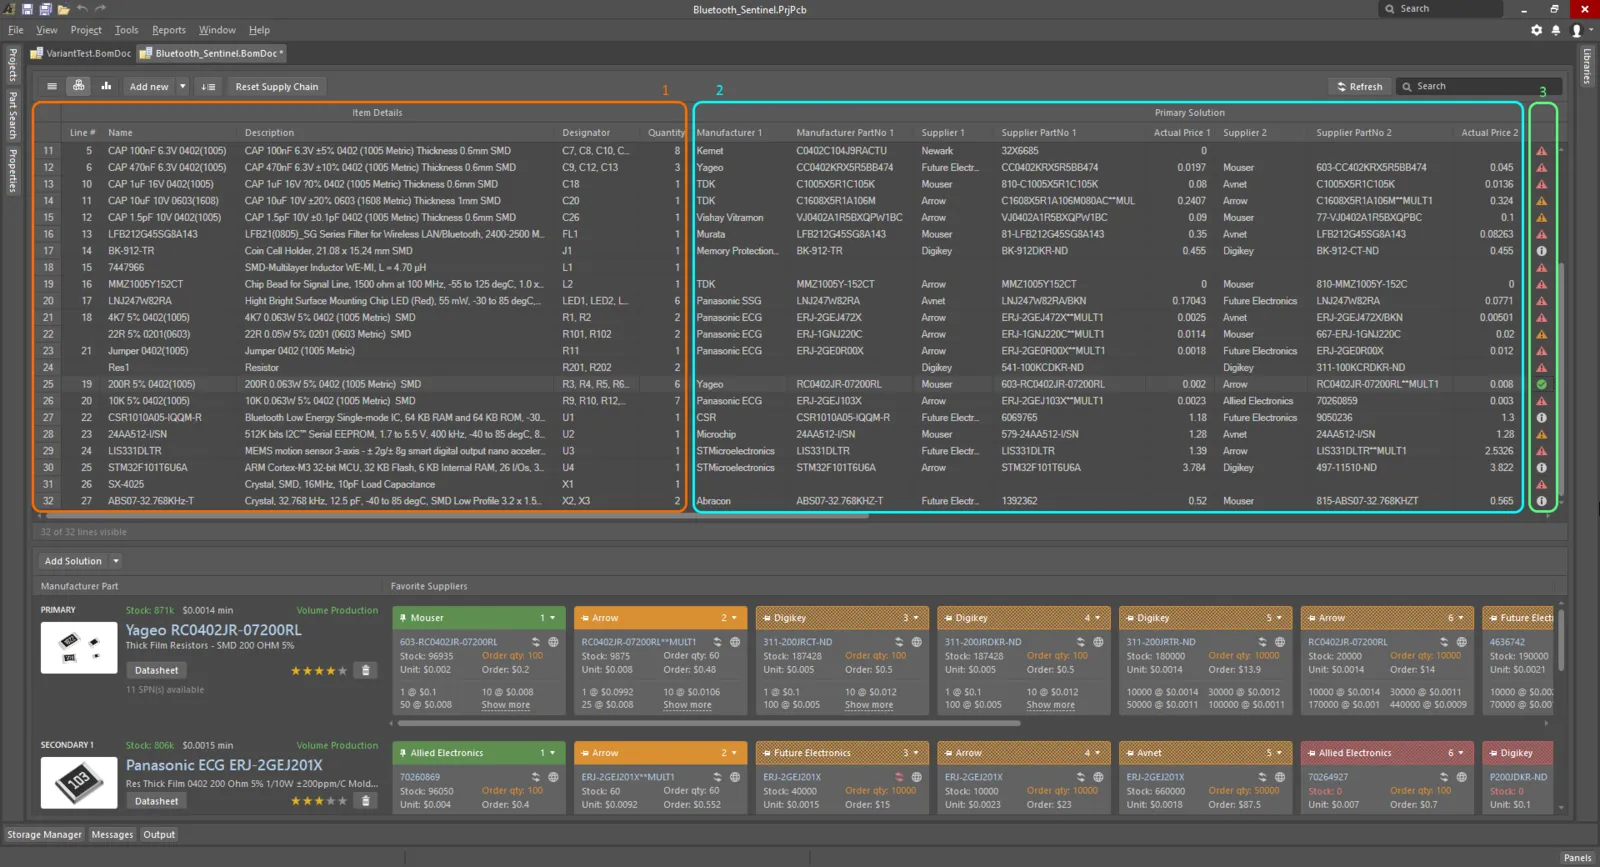
The ActiveBOM components list has distinct groups of columns that present in each view mode, the image above shows the Base view.
The BOM Items grid is clustered into the following major groups:
- Item Details (orange highlight in the image) - these columns display parametric component details, such as the Designator, Description, Library Reference, and other component parameters.
- Solutions (cyan highlight in the image) - the highest-ranked manufacturer + supplier(s) from the Supply Chain. The number of solutions (manufacturer parts), and the number of suppliers of each solution, are configured in the ActiveBOM Properties panel - these are indicated by a solid, colored banner in the supplier tile. Ranking is automatic, and can also be manually defined, as discussed in the Understanding the Solution section below.
- BOM Status (green highlight in the image) - an indication of the current risk associated with each component. Hover over an icon for a description, or alternatively, enable the detailed BOM Status column in the Properties panel to display the description.
- Variant Details - in Consolidated View, an additional Group, titled Variants, is added just before the BOM Status column. This group includes a column for the base design, and one for each variant, displaying the quantity (per unit) of each component. Refer to the Working with Variants section for more information.
The display of columns and the definition of Aliases can be managed in the Columns section of the ActiveBOM Properties panel. To add a custom row, component, or column, click the Add new button above the component list.
Custom BOM Items and Columns

BOM management for a PCB design project requires the management of components and BOM Items beyond those placed in the schematic and PCB. There are many cases when custom BOM Items or parameters will be used in the PCB design project. For these situations, ActiveBOM supports adding additional BOM Items and columns (parameters), which can then be included in the generated BOM:
- Custom row - an easy way to add a custom BOM Item that needs to be accounted for in the design (bare board, glue, etc). All fields in a custom row are user-defined. Custom rows are not managed by ActiveBOM, for example, if the quantity is set to 3, there will not be 3 separate items displayed in Flat view. Supply chain searching is also not supported for custom rows.
- Custom column - additional BOM column, managed in ActiveBOM, that can contain any user-defined text.
- Custom Item - an additional BOM Item, this is typically for those items that will be needed but are as yet not fully known or do not yet exist in the library. This allows these items to have their cost included in the overall board cost estimation.
- Managed Component - an additional BOM Item, that is managed manually in the BOM document. The Component Search dialog will open, listing the components in the currently connected Workspace.
The
Component Search dialog uses the basic search engine functionality and view that is applied in the
Manufacturer Part Search panel. While the
Manufacturer Part Search panel harnesses the
Altium Parts Provider service and focuses on component manufacturer and supplier data searches, the
Component Search dialog
is populated with ready-to-place components from your Workspace library and file-based library sources.
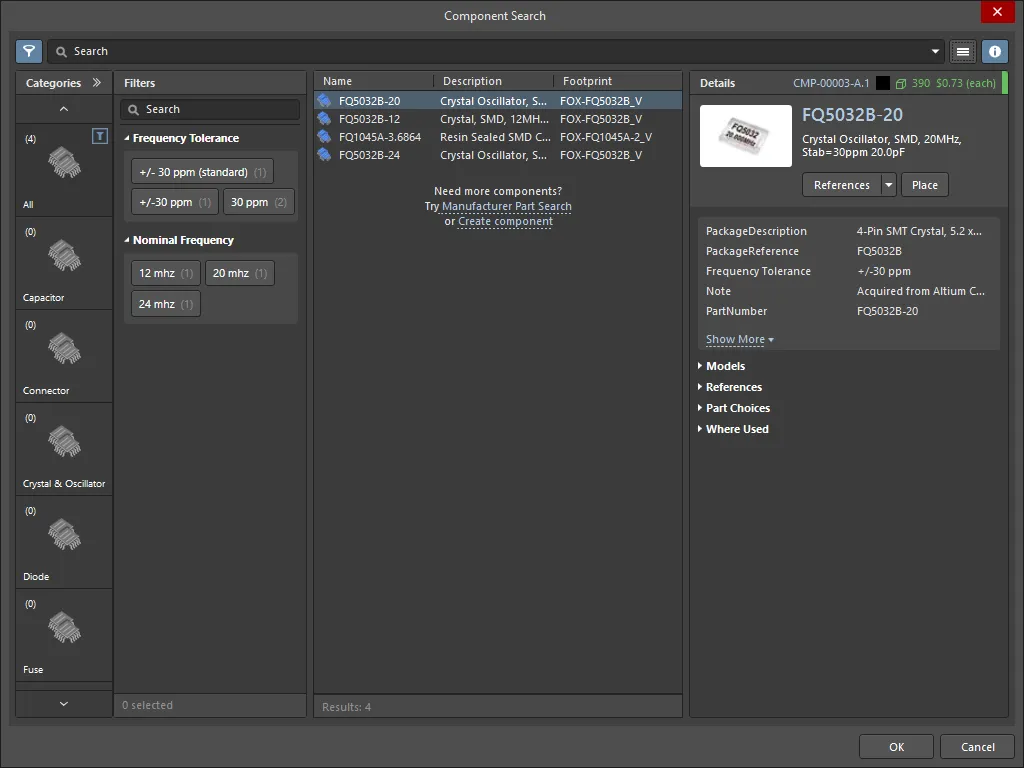
Options and Controls of the Component Search Dialog
- Search - use the search text box to manually search for a specific component.
-
 - click to access a menu and select from:
-
 - click to open/close the Details region of the dialog (described below).
Categories
Use this filter to show certain types of components, or to display all available components. Use  to access the Categories search bar, which allows you to manually search for a specific component or .IntLib file.
Filters
Click the Filters icon ( ) to open the Filters region, where you can further filter the categories that are selected in the Components list.
Filters may only be used for Managed Components.
Components
- Name - the name of the component.
- Description - the description of each component.
- Footprint - the footprint of the component.
- Operating Temperature Range - the appropriate temperature range in which these components operate.
- Package Description - the package description of the component.
- Manufacturer Part Search - click to open the Manufacturer Part Search panel to search for and choose the most suitable component part.
- Create component - click to open the Create new component dialog to select the type of component.
- Results - lists the total number of components found/listed in the search.
Details
Click

to display the
Details region for the selected component.
- Component Revision ID - lists the Revision ID and price of a given component. Click the Revision ID to open the Explorer panel for further information regarding a component.
- References - click to open reference information in a web browser for the component. Use the drop-down to access the Manufacturer URL or Datasheet.
- Place - click to place the selected component on a schematic document.
- Component information - lists relevant information about the component, including manufacturer, release date, and descriptive information. Click the Show More link to view all information; click Show Less to collapse the information.
- Models - expand to view the provided models. Use the available links to display various parts of a single model.
- References - expand to access the Manufacturer URL or Datasheet.
- Part Choices - expand to view the part choices. A name, price, and description is provided. The Datasheet of the component also will be listed.
- Where Used - expand to view the projects that utilize the component.
Right-Click Menu
- Place <component> - click to place the component in the appropriate document.
- Edit - click to open the selected component's Component Library Documents.
- Navigate to <revision> - click to open the selected component within the Explorer panel.
- Operations - hover to access the ability to Submit Request, Create, Download, Clone, Change Component Type, Create / Edit PCL, and Full Item History.
- Refresh - click to refresh to view recent updates or edits. You may also refresh by using the F5 shortcut.
The chosen additional BOM Item can be changed at any time via the right-click Operations sub-menu.
- Use the Column tab of the Properties panel to quickly find, view and manage column visibility, name or aliases. When there is an alias defined for a column name, this is displayed in the BOM Items grid.
- All additional BOM Items and parameters added in ActiveBOM are available for other BOM-outputs, and also via the software API.
Adding Instances of a Managed Component or Custom Item
After adding a Managed Component or a Custom Item, right-click on it and select the Operations » Add Instances of command to access the Add to BOM Components dialog. Use this dialog to define the number of instances of the component to the BOM.
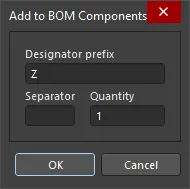
Specify the Designator prefix, optional Separator (which can be defined to give results such as X-1, or X:1) and the Quantity of components required (this value is used to define the designator range and will also appear in the ActiveBOM Quantity column). All other parameters, such as the Description, can be edited directly in the BOM Items grid.
Changing/Removing a Managed Component or Custom Item
To edit the designator, or to remove an instance of a managed component or a Custom Item, right-click on it and select the Operations » Edit item command. The Change / Remove dialog will open.
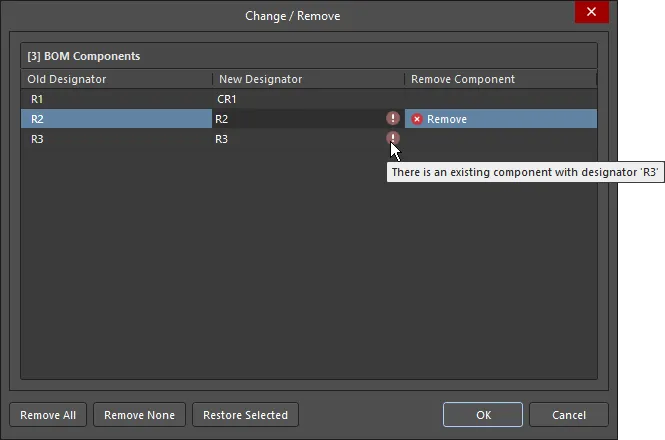
Options and Controls of the Change/Remove Dialog
- BOM Components - the grid region of the dialog lists each Instance of the new item. To edit the designator prefix or value, click in the appropriate New Designator cell and edit it as required.
- Remove All - clicking this button will select all Instances of the additional BOM Item listed in the dialog and flag them to be removed. When the dialog's OK button is clicked, all items flagged Remove will be removed from ActiveBOM's BOM Items grid. Note that as there are no longer any instances of that new item; the item is also removed. This action cannot be undone.
- Remove None - click this button to clear all Remove flags.
- Remove Selected - when an instance is selected that is not flagged to be removed, the third button can be used to set the Remove flag for the currently selected instance(s).
- Restore Selected - when an instance is selected that is currently flagged for removal, the third button can be used to clear the Remove flag from the currently selected instance(s).
Data Sources
The default data sources available in ActiveBOM are the schematic component parameters (  ), the Workspace component parameters for Workspace content (
  ), and data provided by ActiveBOM (
  ). From these sources, ActiveBOM generates the main project BOM Item grid. Data sources are enabled and their display controlled in the Columns tab of the ActiveBOM Properties panel.
By enabling the relevant Sources button (above the Columns list), the BOM can also include information taken from the following additional data sources:
 The PCB - enable these to include PCB location/rotation/side of board data in the available Columns, for each of the components. If the project contains multiple PCB documents, the
 ![]() Choose PCB to Use dialog will open, from which to select the required PCB.
Choose PCB to Use dialog will open, from which to select the required PCB.
 Database - to load additional component parameters from an external database (via *.DbLib, *.SVNDbLib, or *.DbLink).
 Altium Cloud Services - enable this to access a broad range of additional component data, for those BOM Items that have been identified by the Altium Parts Provider and show a supply chain solution.
 Document Parameters - enable this to include all detected schematic document parameters, across all schematics in the PCB project in the available Columns.

The source of each parameter is indicated by the icon in the list of columns.
Data Source Parameter Priority
If the same parameter is present in more than one data source, the following priorities are applied in ActiveBOM (highest to lowest):
- BOM
- PCB
- Documents
- Server
- Database
- Cloud
- Schematic
- Manual
- The buttons above the Columns list enable/remove that data source, if a source is disabled then all data from that source is removed from the grid.
- The checkboxes below the Columns list are convenient filters for the Columns list, use these to add/remove a data source from the Columns list, without removing the data from the grid.
As well as using the Altium Par ts Provider it is also possible to connect to an existing company database via an ODBC connection. This is achieved by enabling the Custom Parts Provider Synchronization feature in Altium Designer (select the Custom Data Synchronization option in the Configure Platform page (under Importers\Exporters)) and enabling it as a provider in the Data Management - Parts Providers page of the Preferences dialog. This feature effectively allows the company database to behave as a Workspace parts provider.
Line Number Column
For PCB designs with assembly drawings, or for BOM data exchange between design engineers, cost engineers or purchasing specialists, the BOM line number (BOM Item position No) is a simple method used to individually distinguish BOM lines, which can then be used to explicitly identify or find the corresponding callout, component and depiction in the design.
As the project BOM data source, ActiveBOM supports user-defined Line #’s for the project BOM and has both manual and automatic Line # (BOM Item position No) management features.
- To automatically set the position number for all project BOM Items (in Base view), click the Set Line #
 button. Line numbers are displayed in the Line # column, in the Item Details group of columns. Click the dropdown icon on the right of the button to open the Line # Options dialog, where the start and increment values can be defined.
- To manually change Line #'s, switch to Base view mode then select the required cell(s) in the Line # column and:
- Press Delete on the keyboard to clear the cells, then
- manually type in new values, or
- paste a range of values from the Windows clipboard.
- To renumber or continue numbering from a custom-added number, click on the required item Line # cell, then click the Set Line #
 button. The Line Numbering dialog will open, where you can Continue numbering or Renumber all. The base and increment values last defined in the Line # Options dialog are used to calculate the numbers added, if required you can enter a seed value in the selected Line # cell to define the start number.
The Continue numbering variation of the Line numbering dialog opens when SOME of the line numbers in an ActiveBOM document (*BomDoc) have already been defined.
The Renumber all variation of the Line numbering dialog opens when ALL of the line numbers in an ActiveBOM document (*BomDoc) have already been defined.
The Line # management features are only available in Base view mode.
Configuring and Saving the Display of the BOM Items Grid
Like any good spreadsheet application, the BOM Items grid can be configured to suit your requirements. As well as the traditional column ordering and sorting features, the current configuration can be saved as a BOM Set.
Grid configuration features
- Display / hide any column - via the Columns feature in the Properties panel. Use the Search field at the top of the panel to quickly locate a column.
- Change the order of columns - click and hold on the column title and drag and drop.
- Change the width of a column - hover over the column edge in the title region and click and drag (look for the
 cursor), or double click at that location to auto-size to suit the column's contents.
- Sort the entire grid by a column:
- Click the column title to alpha-numerically sort the grid by that column's contents.
- Click a second time to sort in the reverse direction.
- Hold Shift and click on another column title to sub-sort by that column's contents.
- Filter the grid by a specific value - click the Filter icon
 to filter the grid by a value used in that column.
- Store the configuration as a BOM Set - more on this below.
Working with BOM Sets
Any number of BOM Item grid configurations can be saved - each of these is referred to as a BOM Set. After configuring the grid to your requirements, click the Add button in the BOM Sets region of the ActiveBOM Properties panel to add a BOM Set to the list.
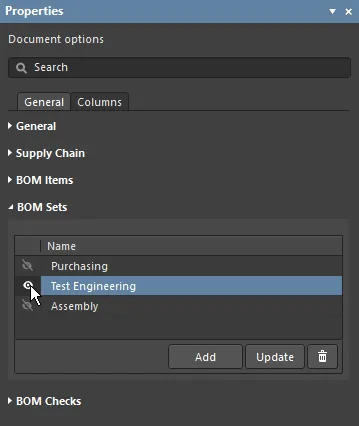
Click the eye icon to enable a BOM Set.
BOM Sets are configured in the ActiveBOM Properties panel.
The preferred BOM Set can be selected during BOM generation in the Report Manager.
Replacing a Component
It's not uncommon to identify an issue with a component when the BomDoc is being checked and made ready for ordering the parts. For example, the designer may have forgotten to finalize the selection of a component, or a component has gone EOL and the designer wants to explore the price and availability of potential replacements. Previously the only way to resolve this was to return to the schematic and edit the component, select a suitable part, then refresh the BomDoc.
Alternatively, you can change a component in the BomDoc, and then pushing that change back to the schematic via an Engineering Change Order. Right-click on the selected component(s) and select the Operations » Change <ComponentName> command. The Replace Component dialog will open, where the replacement component can be searched for.

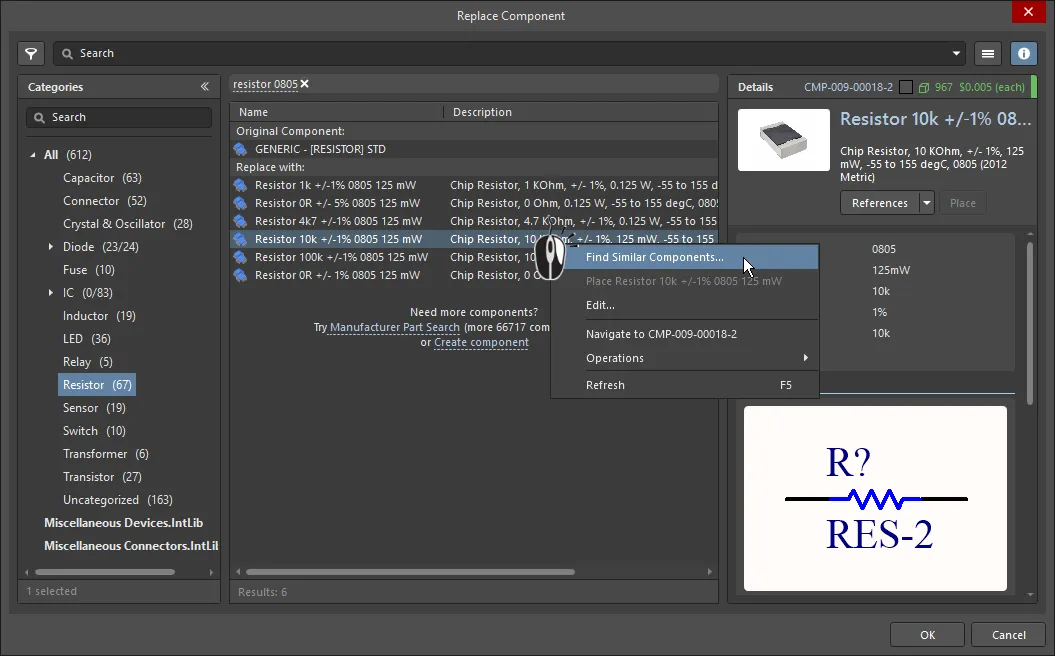
When the Replace Component OK button is clicked the Engineering Change Order dialog will open, detailing the changes needed to synchronize the schematic with the BomDoc.
- The Replace Component feature searches for a new component in the currently connected Workspace. If a suitable component is not returned by your search, the dialog will display a link to open the Manufacturer Part Search panel, where you can right-click and either: Acquire the component to your own Workspace (via the Create New Component dialog and Component Editor); or Download the component locally as an Integrated Library Package in a zip archive. These commands will only be available if the part you choose in the Manufacturer Part Search panel includes Altium Designer models (look for the
 icon).
- As an alternative to using the Search, Categories and Filters features in the Replace Component dialog, you can also right-click on a result and access the Find Similar Components dialog. The power of this dialog is that it takes the values of the component you right-clicked on and based on that, you can quickly locate multiple components that share common properties and parameters, over a range of values (show image
![]() ).
).
- If the component change also affects the board design, an Update PCB should also be performed from the schematic.
► Learn more about Applying the ECOs
Working with Variants
ActiveBOM supports PCB projects that include Design Variants. The Design Variants feature allows a single base PCB design to be created, which is then populated (loaded) in different ways. Each different loading of the assembled board is called a design variant.
Working with Design Variants:
- Design variants are configured in the Variant Management dialog (Project » Variants).
- To examine a variant, double-click on its name in the project's Variants folder in the Projects panel, as shown in the image below.

ActiveBOM supports variants in the following ways:
- Display the BOM for a specific variant in Base view mode or Flat view mode
- Option to include the Not Fitted items in the BOM Items list
- Display a consolidated list of all parts used in all variants, in Consolidated view mode
- Define manual solutions for both base components and varied components
Variants in Base View Mode
For the selected variant, enable the Show Not Fitted option in the Properties panel to include these parts in the BOM Items grid. When this option is enabled, the Fitted column is automatically displayed in the Item Details.
In Base view mode the Fitted column will display either Fitted or Not Fitted. If a part is varied (an alternate part was chosen in this variant), the details of the alternate part are automatically displayed for that BOM Item.

Note that the current variant is displayed in the ActiveBOM status line.
Variants in Consolidated View Mode
The Consolidated view mode displays all components used in all variants. The Consolidated view offers the following features:
- If a component is varied, there will be a BOM Item for each alternate component that is used, with each of these BOM Items having the same designator. For example, in the image below, components DS1 and DS2 are each list twice, as the BGA variant uses a different colored LED from the TSOP variant. Component R1 appears three times because both the BGA and TSOP variants use a different resistor than the original in the base design.
- In Consolidated view mode, when the Show Not Fitted option is enabled the Fitted column will display
Fitted or Varied. Because the Consolidated view shows all components used in all variants, every component displayed is fitted in either the base or a variant.
- For each variant, there is a <VariantName> - Qty column (indicating how many of this component are used in this variant) and a <VariantName> - Price column, which is the unit price times the value in the quantity column.
- Because some designers create build documentation off the base design as well as the variants, there is also a Quantity column, reflecting the number of instances of this component used in a build of the base design. Hide this column if you do not generate build documentation off the base design.
- The grid in Consolidated view mode uses color to indicate a cell whose value is different from that cell's value in the base design, as shown below.

Color in a cell indicates that the value in this cell is different from the value for that cell in the base design.
To learn more about variants, refer to the Design Variants page.
Working Between the BomDoc, the Schematic and the PCB
There are two features available to help you work between the BomDoc, the schematic and the PCB design: Cross Select and Cross Probe. The behavior of these features is configured in the System - Navigation page of the Preferences dialog.
Both of these features can be used to locate the same component in other documents. The difference between Cross Select and Cross Probe is that Cross Select Mode selects the component in the target document but does not actively present that document, whereas Cross Probe actively presents the target document, and can also switch and make the target document's editor the active editor.
You can Cross Select or Cross Probe from the BomDoc to the schematic and PCB, you can not Cross Select or Cross Probe from the schematic or PCB, to the BomDoc.
Cross Select Mode
Cross Select Mode must be enabled in each editor in which you wish to use it. Select the Tools » Cross Select Mode command (Shift+Ctrl+X). When Cross Select Mode is enabled the menu icon will be highlighted with an outline  .
.
Cross Select Mode requires the target document to be open. When you select a component in the BOM Items list of the BomDoc, that component will be selected and centered in the target schematic and PCB documents (if Zooming is enabled in the Cross Select Mode options on the System - Navigation page of the Preferences dialog). Note that the target document will not present as the active document.
If the BomDoc is in Base view mode, then all instances of that part are selected on the schematic and PCB, as shown in the image below.
Cross Select Mode display behavior is controlled using the Cross Select Mode options on the System - Navigation page of the Preferences dialog.
The target document will not be made the active document. It is therefore a good idea to have both source and target documents open side-by-side.
Cross selection from the schematic (or PCB) to the BomDoc is also supported.

Use the Cross Select feature to locate and select the component chosen in the BOM Item list, in the schematic and on the PCB.
Cross Probing
Where Cross Select is simply a mode, which when enabled, displays the result each time you click in the BOM Items list, Cross Probe is a deliberate action.
Choose the Tools » Cross Probe command from the main menus or right-click on a BOM Item and select Cross Probe from the context menu to cross probe to that component on the schematic, the PCB component will also be cross probed to if the board file is open.
A key feature of Cross Probe is the ability to switch to the target document's editor. To Cross Probe and switch editors, hold the Ctrl key as you select the Cross Probe command.
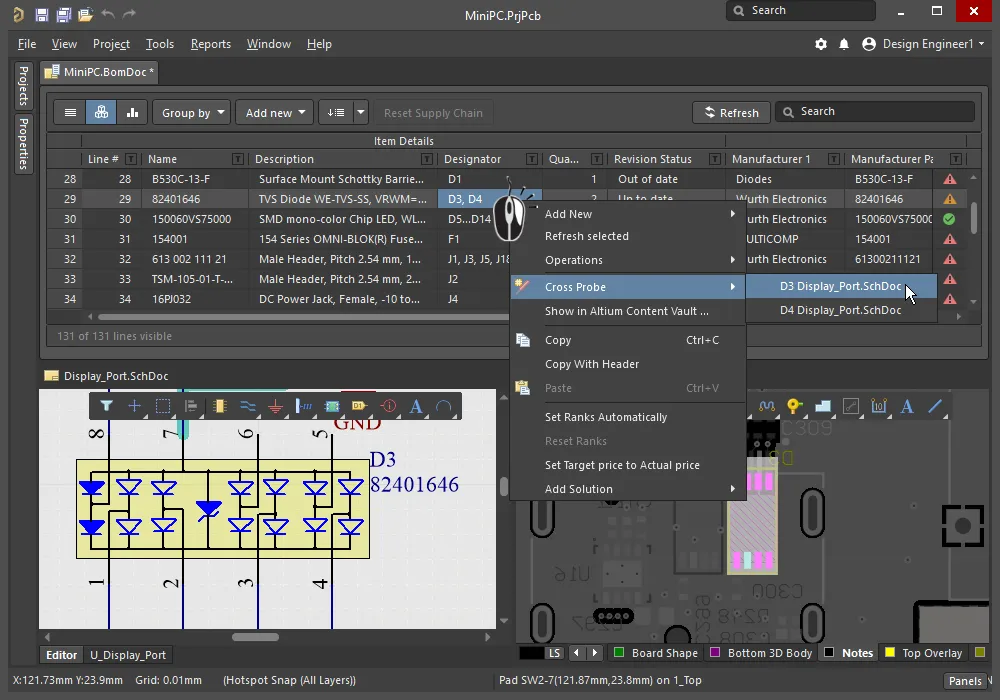
Right-click to access the Cross Probe command, there will be an entry for the designator of each component present in that BOM Item.
During Cross Probing, it is more efficient to have the BomDoc (source) and schematic (target) documents displayed side-by-side, either by splitting the main design window, or opening the schematic in a new window. Commands for both of these are available in the document tab right-click menu.
Properties Panel
When the active document is a BOM document (*.BomDoc), the Properties panel presents the Document Options.
The following collapsible sections contain information about the options and controls available:
General
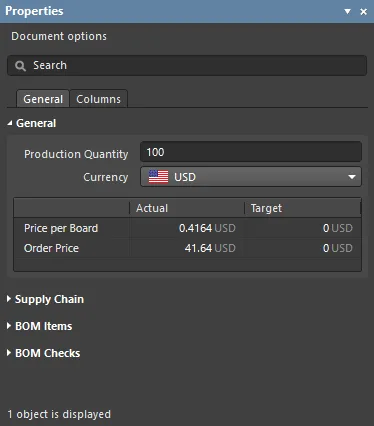
- Production Quantity – the number of boards to be built. It is important to define this field as this is used during supply chain searching to check component availability from the suppliers.
- Currency – the preferred currency to display component prices. Exchange rates for currency conversion are refreshed daily provided you are signed in to your Altium account. When you disconnect from Altium (on the System – Account Management page of the Preferences dialog), access to these updated rates is lost. In this situation, there is an option in the BOM reports dialog to use cached data.
- Price Per Board – derived from the supplier-based data, this is the sum of Supplier Subtotals per Board, as described below. Note that the Price Per Board does not consider any Minimum Order Quantities (MOQs).
- Order Price – Sum of Supplier Subtotals. Note that the Order Price factors in any MOQs, this is what the supplier is paid.
The following supplier-based data is used to derive the Price Per Board and the Order Price. This data can be included in a Bill of Materials by enabling the checkbox of each desired item in the Columns region:
- Manufacturer n - name of the manufacturer.
- Manufacturer Lifecycle n - manufacturer lifecycle status, if available.
- Manufacturer Part Number n - manufacturer part number.
- Supplier n - name of the Supplier.
- Supplier Currency n – alphabetic code for the chosen currency used for pricing data.
- Supplier Order Qty n – the higher value of either: (Item Quantity * Production Qty), or; Minimum Order Qty (MOQ)
- Supplier Part Number n – part number for the Supplier Item.
- Supplier Stock n – how many units of the item the Supplier has in stock.
- Supplier Subtotal per Board n – Supplier Unit Price multiplied by the Item Quantity, resulting in the subtotal for that item. Note that this value does not consider MOQ.
- Supplier Subtotal n – Supplier Unit Price multiplied by the Supplier Order Quantity, resulting in the subtotal for that item with MOQ taken into consideration.
- Supplier Unit Price n – cost per unit of the Supplier Item (without regard to any MOQ).
If target prices have been defined for each BOM Item, the Target column reflects these. To enter a target price for each BOM Item, enable the TargetPrice column on the Columns tab of the panel, then enter the price of each item in the Item grid.
Supply Chain
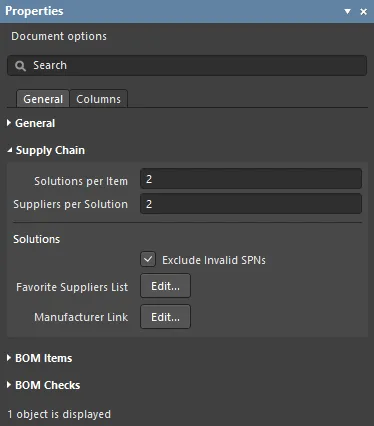
Supply Chain information is presented in the lower region of the ActiveBOM interface, showing a manufacturer component on the left with one or more colored supplier tiles to the right of it. This region displays data when valid supply chain information can be identified for a BOM Item. Each of these Manufacturer & Supplier(s) Details rows is referred to as a Solution. The manufacturer details are abbreviated to MPNs (Manufacturer Part Numbers) and the supplier details are abbreviated to SPNs (Supplier Part Numbers).
- Solutions per Item – the number of manufacturer parts you would like to be located for each BOM Item.
- Suppliers per Solution – the number of suppliers you would like to be located for each manufacturer part.
- Solutions
- Exclude Invalid SPNs – select to exclude invalid SPNs.
- Favorite Suppliers List – opens the Favorite Suppliers dialog in which the overall list of Suppliers can be configured for this BomDoc.
- Manufacturer Link – opens the
![]() Define Manufacturer Link Fields dialog in which the schematic component parameters that hold the Manufacturer Name and Manufacturer Part Number are identified. If there are non-Workspace library parts present in the design (parts not placed from a Workspace that also do not have supplier details), ActiveBOM can query the Altium Parts Provider to identify suitable supply chain solutions. Multiple Name / Part Number parameter pairs can be defined. In the dialog, click the Detect fields button to automatically add all parameter pairs that include the term
Define Manufacturer Link Fields dialog in which the schematic component parameters that hold the Manufacturer Name and Manufacturer Part Number are identified. If there are non-Workspace library parts present in the design (parts not placed from a Workspace that also do not have supplier details), ActiveBOM can query the Altium Parts Provider to identify suitable supply chain solutions. Multiple Name / Part Number parameter pairs can be defined. In the dialog, click the Detect fields button to automatically add all parameter pairs that include the term manufacturer in their name and can be logically paired.
BOM Items
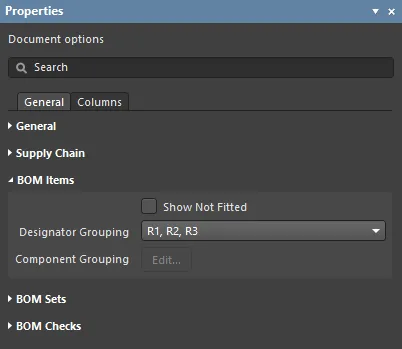
This region is used to configure how the BOM Items should be grouped in the BOM Items grid.
- Items
- Show not Fitted – if the PCB project includes variants and the chosen variant has parts set to
Not Fitted, enable this to display the Not Fitted items in the BOM Items grid.
- Designator Grouping – the Base and Consolidated view modes show common parts on a single row in the BOM Items grid. Use this option to configure if the designators are displayed individually or in ranges when a row displays multiple parts.
- Component Grouping – clicking the Edit button opens the Component Grouping dialog. In Base view or Consolidated view, ActiveBOM identifies components as being the same when they share the same ItemID (Workspace library) or LibRef (file-based or database library). Enable parameters in the dialog to further refine how components are to be grouped. Note that if the project only includes managed components the Edit button will not be accessible, as managed components are always grouped by ItemID.

When adding an additional parameter, after clicking the Add button the text Select parameter will appear in the list. Double-click on the text to display a list of all parameters detected across all current BOM Items then select the required parameter from the list. Return to the default parameters (as shown in the image above) at any time by clicking the Defaults button.
BOM Sets
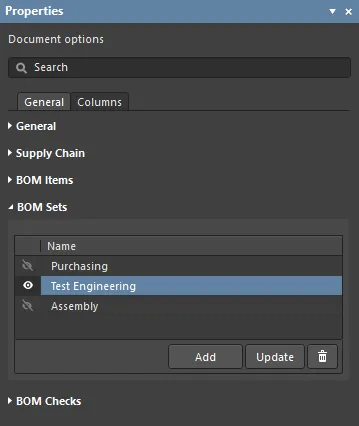
BOM Sets provide a way of capturing the layout and configuration of the BOM Items grid and saving it as a named Set. Any number of BOM Sets can be defined.
- Current BOM Set – click the eye icon to apply that BOM Set to the BOM Items grid.
- Add – configure the visibility, order, and width of the columns, then click Add to capture that configuration as a BOM Set. To edit the BOM Set name click once to select it, then click a second time to edit the string.
- Update – if the configuration of the BOM Items grid is changed, click Update to re-save this configuration.
- Delete – click
 to remove the currently select BOM Set.
BOM Checks
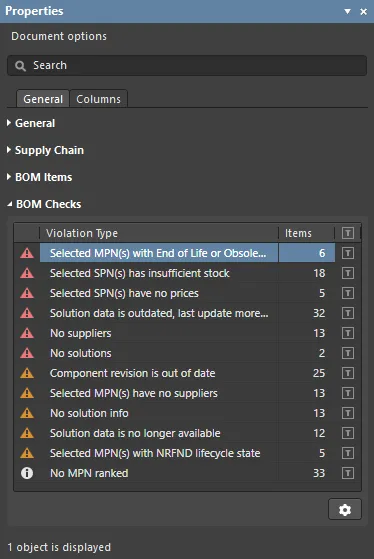
ActiveBOM performs comprehensive checking of each BOM Item and any supply chain data that has been detected for that item.
- Violation Type grid – displays a list of each type and quantity of violations currently present in the BomDoc. Click the filter icon to display only those BOM Items that fail that BOM Check. Note that a BOM Item can fail multiple BOM Checks.
- BOM Checks – click
 to open the BOM Checks dialog in which the Report Mode can be configured for each possible Violation Type.
Columns
