PCB 設計の回路図のキャプチャーを開始するには、PCB プロジェクトに新しい回路図ドキュメントを追加します。これを行うには、Projectsパネルでプロジェクトのエントリを右クリックし、コンテキストメニューからAdd New to Project » Schematicコマンドを選択します(または、メインメニューからFile » New » Schematicコマンドを使用)。
グリッドとカーソル
回路図エディタでオブジェクトを配置する前に、配置しやすいようにグリッドを設定します。グリッドには3つのタイプがあります:ナビゲーション用の可視グリッド、配置用のスナップグリッド、接続を作成する際に役立つエレクトリカルグリッドです。グリッドはドキュメントオプションであり、個々のデザインと共に保存されるため、グリッドの設定はデザインドキュメントによって異なる場合があります。グリッドの初期設定は、PropertiesパネルのGeneral 領域で行います(デザインスペースでオブジェクトが選択されていない時にアクセスします)。
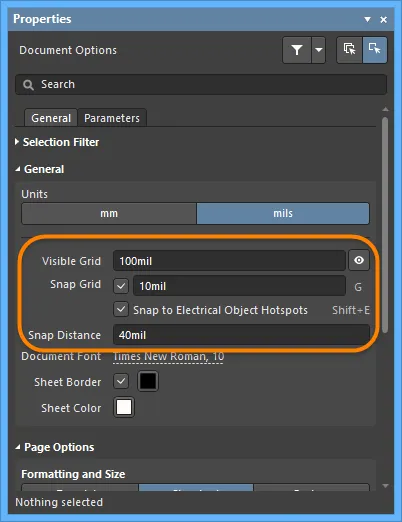
Visible Gridは、ズームレベルで十分な間隔が確保できる場合に表示され、線または点で表示されます。現在のドキュメントで可視グリッドのオン/オフを切り替えるには、パネルのVisible Grid切り替えボタン(  )をクリックするか、メインメニューからView » Grids » Toggle Visible Gridコマンドを選択するか、
Shift+Ctrl+Gキーボードショートカットを使用します。
Snap Gridとは、回路図デザインオブジェクトを配置または移動する際に、カーソルがロックされるグリッドのことです。スナップグリッドの現在の値はステータスバーの左側に表示されます。View » Grids » Set Snap Gridコマンドを使用して、 ![]() Choose a snap grid size ダイアログからスナップグリッドの特定の値を設定することもできます。
Choose a snap grid size ダイアログからスナップグリッドの特定の値を設定することもできます。
エレクトリカルグリッドは、オフグリッドパーツへの接続を可能にするため、スナップグリッドより優先されます。Snap to Electrical Object Hotspots(メインメニューのView » Grids » Toggle Electrical Gridコマンド、またはShift+Eショートカットで切り替え可能)を有効にすると、デザインスペース内で電気オブジェクトを移動する際、接続可能な他の電気オブジェクトの電気グリッド範囲内にある場合、固定オブジェクトにスナップし、ホットスポット(赤い十字)が表示されます。電気グリッドは、現在のスナップグリッドより少し低く設定する必要があります。そうしないと、電気オブジェクトをスナップグリッド1つ分離して配置することが難しくなります。
グリッドはキーボードやマウスのショートカットで素早く変更したり、有効/無効を切り替えることができます。例えば、G/Shift+G を押すと、Preferences ダイアログのSchematic - Gridsページで定義されているスナップグリッド設定を、現在有効になっている測定システム(Imperial または Metric)で循環させることができます。メインメニューのView » Grids » Cycle Snap GridとView » Grids » Cycle Snap Grid (Reverse)コマンドも使用できます。この方法でグリッドサイズを変更した場合、(Choose a snap grid sizeダイアログで)入力した設定は失われます。
Preferences ダイアログのSchematic - Graphical EditingページのCursor 領域で、必要に応じてカーソルタイプを変更できます。例えば、デザインウィンドウの端まで伸びる90度の大きな十字(Large Cursor 90 オプション)は、デザインオブジェクトの配置や位置合わせに便利です。
Altium コンポーネントはインペリアルグリッドで設計されます。メトリックグリッドを使用する場合は、ピンが論理的なグリッド単位に配置されないことに注意してください。MetricシートでImperialグリッドを使用することができます。シートの Template と Units は、Document Options Properties パネルで設定します。
回路図シートへの回路図テンプレートの適用
回路図テンプレートは、ユーザー定義のシートサイズ、ボーダー、タイトルブロックの説明を保持するドキュメントで、回路図シートから参照(リンク)することができ、これらの共通属性を何度も定義する必要がなくなります。利用可能な回路図テンプレートは、以下のようにアクティブな回路図シートドキュメントに適用することができます。
Workspace に接続していない場合でも、Altium Designer で作業することはできますが(有効な Altium Designer ライセンスの下で)、Workspace やその他のサービスにアクセスすることはできません。そのため、Workspace の回路図テンプレートを使用することはできません。ローカルで定義され、PreferencesダイアログのData Management - Templates ページで指定されたテンプレートフォルダから利用可能なファイルベースのテンプレートのみを使用できます(このページでTemplate visibilityオプションがServer & Localに設定されている場合)。
回路図テンプレートは、新しい回路図シートドキュメントのデフォルトテンプレートとして選択することができます。PreferencesダイアログのData Management - Templates ページで、Templatesタブのリストにある必要なテンプレートにカーソルを合わせ、Default列のSet as Defaultコントロールをクリックするか、DefaultsタブのAddボタンをクリックし、From Serverメニュー(接続されているワークスペースからワークスペース回路図テンプレートを選択する)またはFrom Fileメニュー(ハードドライブから回路図ドキュメントファイル(*.SchDoc)または回路図テンプレートファイル(*.SchDot)を選択する)からSchematicを選択します。デフォルトの回路図テンプレートは、ページのDefaultsタブのリストに表示されます。回路図テンプレートの作成については、回路図テンプレートの作成のページを参照してください。
プロパティパネルからのテンプレートの適用
デザインスペースでデザインオブジェクトが選択されていない状態で、アクティブな回路図ドキュメントのPropertiesパネルにアクセスすると、Document Options が表示されます。パネルのPage Optionsセクション(Generalタブ)のFormatting and Size領域でTemplateを選択し、Templateフィールドでシートに使用するテンプレートを選択します。リストは、ワークスペースのテンプレート(ワークスペースで共有されているもの)とローカルのファイルベースのテンプレートにグループ化されています。

アクティブな回路図シートのパネルをブラウズしていると、Propertiesパネルは回路図テンプレートで選択されたリビジョンを反映します。テンプレートを選択すると(またはテンプレートを更新すると)、現在のテンプレートに更新できるUpdate Templateダイアログが開きます。その後、テンプレートが更新されたことを表示するInformationダイアログが開きます。
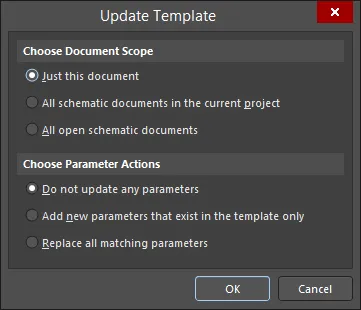
Update Templateダイアログ
テンプレート更新ダイアログのオプションとコントロール
テンプレートが回路図シートに適用されている場合、回路図テンプレートで定義されたテキストやグラフィカルオブジェクトは選択・編集できないことに注意してください - これらのオブジェクトは一種の透かしになります。
適用されたテンプレートが変更できる唯一の点は、ドキュメント、プロジェクト、バリアントパラメータの値を変更することで、特別な文字列として設定されたプレースホルダーText Stringsを更新することです:Documents Options PropertiesパネルのParametersタブ、Project OptionsダイアログのParametersタブ、Edit Project Variantダイアログ。
デザインメニューからのテンプレートの適用
回路図エディタのメインDesign » Sheet Templatesサブメニューで、異なるワークスペースまたはローカルテンプレートを選択できます。
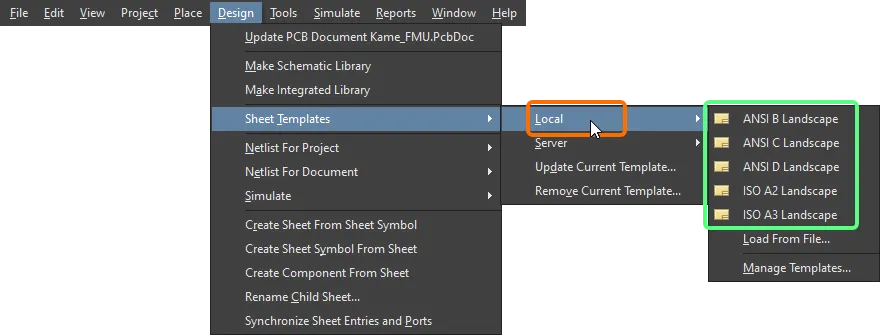
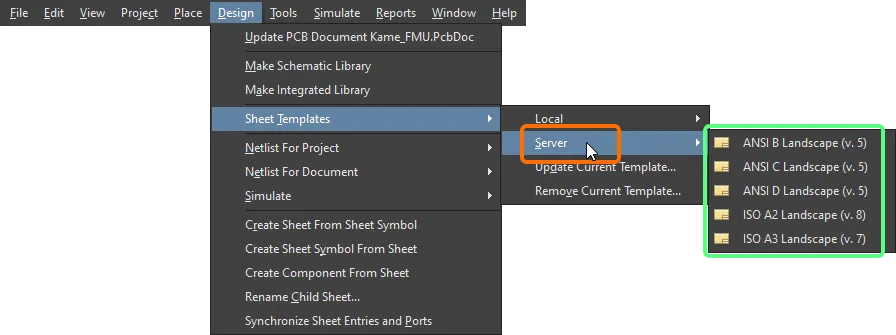
Design » Sheet Templates » LocalサブメニューからLoad From Fileコマンドを選択し、ハードドライブ上の回路図テンプレートファイルをブラウズして選択します。Manage Templatesコマンドを選択し、PreferencesダイアログのData Management - Templates ページを開きます。
環境設定使用時のワークスペーステンプレートの適用
さらに、ワークスペースの回路図 テンプレートは、1 つまたは複数の定義された環境コンフィグレーションのコンフィギュレーション データ アイテムとして使用できます。ワークスペースに接続し、回路図テンプレートの使用を制御しない環境設定を使用している場合、回路図テンプレートのリビジョンを手動で自由に選択できます。これを行うには、Design » Sheet Templates » Set Template from serverコマンドを使用します。Choose Templateダイアログが表示され、ワークスペースで必要なテンプレートをブラウズして選択することができます。

Set Template from serverコマンドを使用して、利用可能な回路図テンプレートを手動で再利用(および切り替え)します。
また、ワークスペースのテンプレートだけでなく、ローカルの回路図テンプレートを使用することもできます。
テンプレートの更新
アクティブな回路図シートで使用中の Workspace の回路図テンプレートを、関連する回路図テンプレートアイテムの最新リビジョンに更新するには(または、何らかの方法で情報が変更されたローカルテンプレートを更新するには)、Document Options PropertiesパネルのTemplateドロップダウンの隣にある ボタンを使用するか、メインメニューからDesign » Sheet Templates » Update Current Templateコマンドを選択します。
回路図シートからのテンプレートの削除
現在使用している回路図テンプレートを削除するには、メインメニューからDesign » Sheet Templates » Remove Current Templateコマンドを選択します。コマンドを起動すると、Remove Template Graphicsダイアログが開きます。
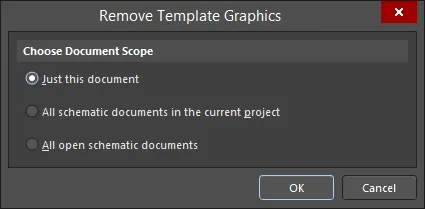
Remove Template Graphicsダイアログ
このダイアログを使用して、現在のテンプレートがどのドキュメントから削除されるかを定義します。現在のドキュメントのみ、現在の(アクティブな)プロジェクトのすべての回路図ドキュメント(現在閉じている回路図は開きます)、または開いているすべての回路図ドキュメント(親プロジェクトに関係なく)のいずれかです。このコマンドを使用すると、現在使用しているテンプレートの項目は空白になります。
現在のプロジェクト内のすべての回路図ドキュメントから現在のテンプレートを削除する場合、削除が実行されると同時に、現在閉じているすべてのドキュメントが開かれます。開いているすべての回路図ドキュメントから現在のテンプレートを削除する場合、ドキュメントが属するプロジェクトに関係なく削除されます。
また、Propertiesパネルで異なるFormatting and Sizeモード(StandardまたはCustom)に切り替えることで、テンプレートを使用しないようにすることもできます。
ドキュメントレベルのパラメータ
ドキュメントレベルのパラメータは、それぞれの回路図ドキュメントに対して設定することができます。ドキュメントパラメータは、Properties パネルで定義され、回路図でオブジェクトが選択されていない時にアクセスします。パネルのParametersタブでは、回路図のパラメータを追加、編集、削除します。下図のように、パラメータリストの上にあるボタンを使用して、リスト内のパラメータのみを表示します。
パラメータを追加するには、Add ボタンをクリックし、Parameter を選択します。Parameter nという新しいパラメータがリストに表示されます。名前をクリックし、希望するパラメータ名を入力します。Value 列をクリックし、希望するパラメータの値を入力する。

パラメータの値を編集するには、Value 列のセルをクリックし、必要に応じて編集する。
パラメータを削除するには、リストでパラメータを選択し、 をクリックします。パネル内で、Yes を クリックして削除を確定するか、No を クリックして削除をキャンセルするかを尋ねられます。一度に削除するパラメータは、リスト内で1つ以上選択することができます。
プロパティパネル
アクティブなドキュメントが回路図ドキュメント(*.SchDoc)で、デザインスペースでデザインオブジェクトが選択されていない場合、PropertiesパネルにDocument Options が表示されます。
Document Options Propertiesパネルは、シートの境界をダブルクリックしても表示されます。
このパネルのオプションやコントロールの多くは簡単で、これ以上の説明は必要ありません。説明が必要なものについては、次のセクションで説明します。
全般タブ
セレクション・フィルター
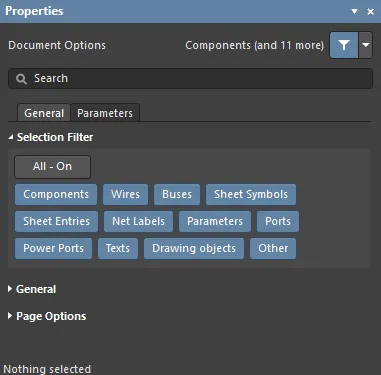
パネルのこのセクションのオプションは、デザインスペースで選択できる回路図オブジェクトを決定します。
一般

-
Units- ステータスバーの左端にあるGrid エントリを見て、アクティブな単位を確認できます。アクティブな回路図シートの測定単位を mils と mm に切り替えるには、メインメニューのView » Toggle Unitsコマンドを使用します。
-
Visible Grid- 目のアイコンを使って、デザインスペースにグリッドを表示/非表示できます。
-
Snap Grid- テキストボックスに希望のグリッドを入力するか、Gショートカットを使用して異なるグリッドを循環させます。
-
Snap Distance- カーソルが有効なオブジェクトスナップポイントから入力した距離内にある場合(アクティブレイヤーでスナップが有効な場合)、そのポイントにスナップします。
ページオプション
パラメータタブ
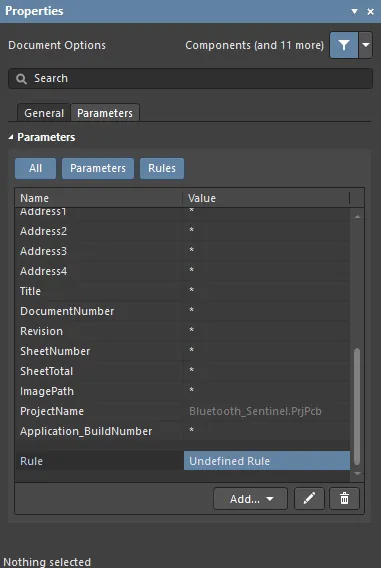
PropertiesパネルのParametersタブには、現在のプロジェクト・ドキュメントで利用可能なすべてのParametersと Rulesが一覧表示されます。
Constraint Manager機能を使用する場合、回路図から PCB を更新する時、
Propertiesパネルで追加されたルールは検出されず、転送されないことに注意してください。
Constraint Managerで定義されたデザインルールだけが転送されます。
-
Allボタン -Parametersと Rulesの両方を表示する場合に選択します。
-
Parametersボタン -Parametersのみを表示します。
-
Rulesボタン -Rulesだけを表示します。
-
Parameters
同じパラメータが複数の場所(Variant、Document、Project)に存在し、Document パラメータに値がない場合、パラメータの値は、値を持つ最も優先順位の高いパラメータから継承されます(回路図ドキュメントで定義されたパラメータ値は、プロジェクトオプションで定義された値を上書きし、Variant で定義された値は、回路図ドキュメントで定義された値を上書きします)。Document パラメータ値が継承されている(同じ名前の Variant または Project パラメータから取得されている)場合、その値はPropertiesパネルにグレーのイタリック体で表示され、パラメータ値が継承されていることを示します。ドキュメントパラメータ値は、必要に応じて編集することができます。
以下のパラメータは内部用に予約されています:
-
ConfigurationParameters
-
IsUserConfigurable
これらのパラメータはリストに表示されませんが、これらの名前でユーザー定義パラメータを追加することはできません。
-
ルール
-
Name列とValue列 - これらは現在指定されているルールとその値をリストアップします。
-
Add- ドロップダウンメニューを使用して、ParameterまたはRule の追加を選択します。新しいRuleの追加を選択すると、Choose Design Rule Typeダイアログが開き、回路図ドメインまたは回路図ドキュメントでサポートされているデザインオブジェクトにルールとしてパラメータを追加する際に使用するルールのタイプを指定します。
-
 - ルールが選択されている時のみアクセスできます。選択したルールを編集するためにEdit PCB Ruleダイアログを開きます。
-
 - クリックすると、現在選択されているパラメータまたはルールを削除します。
[/collapse]
デザインオブジェクトを選択すると、そのオブジェクトタイプに特有のオプションがパネルに表示されます。以下の表は、回路図シート上に配置可能なオブジェクトタイプの一覧です。リンクをクリックすると、そのオブジェクトのプロパティページにアクセスできます。