リジッドフレキのデザイン
リジッドフレックスとは何か?

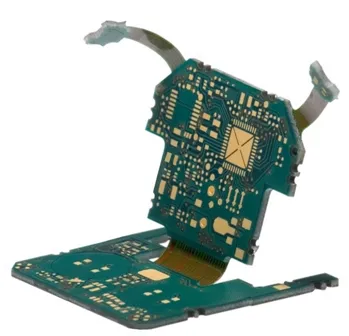
名前が示すように、フレキシブルプリント回路は、柔軟な絶縁フィルムに印刷された導体のパターンです。リジッドフレックスは、画像に示されているように、フレキシブル回路とリジッド回路の両方の組み合わせであるプリント回路です。
フレキシブル回路技術は、宇宙用途で、空間と重量を節約する目的で最初に開発されました。今日では、空間と重量を節約するだけでなく、携帯電話やタブレットなどの携帯機器に理想的であること、パッケージングの複雑さを減らし、製品の信頼性を向上させ、コストを削減できるため、人気があります。
フレキシブル回路は通常、静的フレキシブル回路と動的フレキシブル回路の2つの使用クラスに分けられます。静的フレキシブル回路(使用Aとも呼ばれる)は、組み立てやサービス中に最小限の曲げが行われるものです。動的フレキシブル回路(使用Bとも呼ばれる)は、ディスクドライブヘッド、プリンターヘッド、またはラップトップ画面のヒンジ部分など、頻繁に曲げられるように設計されたものです。この区別は、材料選択と構造方法論の両方に影響を与えるため、重要です。リジッドフレックスとして製造できる多数のレイヤースタックアップ構成があり、それぞれに独自の電気的、物理的、およびコストの利点があります。
機械的なリジッドフレックス設計
フレックス回路またはリジッドフレックス回路の設計は、非常に電気機械的なプロセスです。どんなPCBを設計するにしても、それは三次元の設計プロセスですが、フレックスまたはリジッドフレックス設計の場合、三次元の要件はより重要です。なぜでしょうか?リジッドフレックス基板は製品のエンクロージャ内の複数の表面に取り付けられる可能性があり、取り付けや折りたたみプロセスはしばしば製品組み立て中に行われるからです。機能する電気機械設計を提供するには、機械工学チームと電気工学チーム間で密接で常時の協力が必要です。折りたたまれた基板がそのエンクロージャ内に収まることを確認する従来のアプローチは、機械的なモックアップを作成することでした - これはペーパードールカットアウトとして知られています。その性質上、このアプローチで必要な精度とリアリズムを達成することは難しいです。
 ECAD PCBエディターとMCADの中で、2つの硬い領域が柔軟な領域によって接続されたボード。
Altiumは、CoDesignerという洗練された機械から電子への設計インターフェース技術を使って、この課題を解決するのに役立っています。CoDesignerは、エンジニアがボードの形状とコンポーネントの変更をECADとMCADの設計領域間で直接、ECADおよびMCADの設計ソフトウェア内から行き来させることを可能にします。
- AltiumのMCAD CoDesigner技術の概要
- 技術参考資料、ECAD-MCAD CoDesignについてもっと学ぶ
- リジッドフレックス設計をMCADに転送する方法についてもっと学ぶ
リジッドフレックスPCBの設計
プリント基板は、一つ上の別の層のシリーズとして設計されています。従来の硬質プリント基板の場合、基板の形状はX-Y平面で基板を定義し、層のスタックはZ平面で基板を定義します。X-Y基板の形状は、メインのPCB編集ウィンドウで定義され、層はレイヤースタックマネージャーで設定されます。リジッドフレックスPCBでは、完成したプリント基板には1つ以上のゾーンまたはリージョンがあり、それぞれのリージョンで異なる層のセットを使用できます。
リジッドフレックスボードを設計するには、以下のことが必要です:
- 必要なリジッドフレックスモードを有効にする(レイヤースタックマネージャー、Tools » Features » Rigid-Flex、またはTools » Features » Rigid-Flex (Advanced)コマンド)
- ボードの各領域に必要なサブスタックを定義し、それらのサブスタックがZ平面でどのように整列するかを設定します。
- X-Y平面で各リジッドおよびフレックス領域の形状を定義し、各領域に正しいサブスタックを割り当てます。
リジッドフレックス設計の有効化
現代のリジッドフレックスプリント基板に存在する複雑な構造をサポートするために、Zプレーンエディターであるレイヤースタックマネージャーは、基板の構造を編集するための異なる表示モードを提供します。Design » Layer Stack Managerコマンドを選択してレイヤースタックマネージャーを開き、必要なリジッドフレックスモードを有効にし、リジッドフレックス設計に必要なサブスタックを作成して配置できます。
レイヤースタックマネージャーを開くと、現在のボードレイヤースタックアップが表示されます。新しいPCBの場合、これはシンプルな2層ボードになります。リジッドフレックスボードを設計するために必要な機能を有効にするには、Tools » Featuresサブメニューを開くか、機能ボタン( ![]() )をクリックして、リジッドフレックスコマンド、またはリジッドフレックス(アドバンスド)コマンドを選択します。
)をクリックして、リジッドフレックスコマンド、またはリジッドフレックス(アドバンスド)コマンドを選択します。
 必要なリジッドフレックスモードを有効にするコマンドを選択します。
基板領域の操作
基板領域とは、ユーザーが定義した基板の各エリアのことで、それぞれに固有のレイヤースタックを割り当てる必要がある領域のことを指します。これは、リジッドフレックスPCBにとって標準的な要件です。下の画像では、基板の形状が上部の円形領域、中央の細いストリップ、および下部の円形領域の3つの異なる基板領域に分割されています。

リジッドフレックス基板がボードプランニングモードで表示されています。基板の形状が3つの異なるボード領域に分割され、各領域名と割り当てられたレイヤースタックが表示されていることに注目してください。
新しい基板が作成されると、デフォルトで単一のボード領域を持っています。もし基板設計が複数の領域を必要とする場合、以下の方法で行うことができます:
- 単一のボード領域を複数の領域に分割する(標準リジッドフレックスモードまたはアドバンスドリジッドフレックスモード)、または
- 全体の形状を構築するために複数のボード領域を配置する(アドバンスドリジッドフレックスモード)。
ボード領域は、ボードプランニングモードで定義および編集されます(表示メニュー)。
曲げ線の操作
曲げ線はボード計画モード(表示メニュー)で定義および編集されます。
曲げ線の特性
曲げ線には、以下の相互関連する特性があります:
- 曲げ角度 (a) - フレックス領域の表面が曲がる角度。
- 半径 (
r) - 曲げ面から曲げ中心点までの距離。 - 幅 (
w) - 指定された半径と曲げ角度に対して曲げられる表面領域の幅。
曲げ角度、半径、そして幅の関係は以下のように表現できます:
w = a/360 * 2*Pi*r- 言葉で表すと、
幅 = 曲げられる円周の割合 * 円周

レイヤースタック領域と曲げ線の閲覧
PCBパネルのレイヤースタック領域モードでは、その3つの主要な領域は次のように変更されます(上から順に):
- 利用可能なレイヤースタックの名前。
- ボード上で定義されたスタックアップ領域、または選択されたレイヤースタックに割り当てられたもの。
- 選択されたスタックアップ領域の曲げ線のリスト
PCBパネルのレイヤースタック領域モードを使用する際には、View » Board Planning Modeメニューを通じてボード計画モードビューに切り替えるか、1のショートカットを使用します。

基板は、特定のレイヤースタックアップ配置(レイヤースタック)が割り当てられた異なる領域(スタックアップ領域)に分割することができます。基板のフレキシブルな領域には、折り曲げ領域(ベンディングライン)が定義されています。
PCBパネルのレイヤースタックエリアで特定のレイヤースタック名が選択されると、フィルターがレイヤースタックをフィルターの範囲として使用して適用されます。そのため、そのスタックアップに割り当てられたボード領域は、パネルのスタックアップ領域にリストされます。さらに、選択されたスタックアップ領域で定義された任意の曲げ線は、曲げ線リストエリアにリストされます。
リスト内のスタックアップ領域(またはデザインスペース内のボード領域自体)をダブルクリックすると、ボード領域ダイアログ(標準リジッドフレックスモード)またはプロパティパネルのボード領域モード(アドバンスドリジッドフレックスモード)が開きます。このダイアログ/パネルを使用して、領域の名前を変更したり、レイヤースタックに割り当てたり、3Dプロパティをロックすることができます。
パネルの曲げ線エリアリスト内の曲げ線をダブルクリックすると、曲げ線ダイアログが開き、その線のプロパティを詳細に編集できます。
リジッドフレックス設計の3D表示と折りたたみ
PCBエディタには、強力な3Dレンダリングエンジンが含まれており、ロードされた回路基板の非常にリアルな三次元表現を提示することができます。このエンジンはリジッドフレックス回路にも対応しており、Fold StateスライダーをPCBパネルと組み合わせて使用することで、設計者はリジッドフレックス設計を平らな状態(曲げ線設定が適用されていない状態)、完全に折りたたまれた状態(すべての曲げ線設定が適用された状態)、およびその中間の状態を調べることができます。
3D表示モードに切り替えるには、3のショートカットキーを押します(2Dに戻るには2を、ボードプランニングモードに戻るには1を押します)。ボードは3Dで表示されます。コンポーネントのフットプリントに、取り付けられたコンポーネントを定義する3Dボディオブジェクトが含まれている場合、これらも表示されます。下の画像では、ボードにバッテリーとバッテリークリップが含まれていることがわかります。
すべての曲げ線を適用するには、下の画像で強調表示されているように、レイヤースタック領域モードに設定されたPCBパネルで折りたたみ状態スライダーをスライドします。曲げられる順序は、それらのシーケンス番号によって定義されます。曲げ線は同じシーケンス番号を共有することができます。これは、折りたたみ状態スライダーを使用するときに、それらの曲げが同時に折りたたまれることを意味します。ボードは、View » Fold/Unfoldコマンドを実行するか(または5のショートカットを押すことによって)折りたたんだり展開したりすることもできます。

折りたたみ状態スライダー(または5のショートカットキー)を使用して、シーケンス値(折り目インデックス)で定義された順序で全ての折り目線を適用します。
リジッドフレックス設計のための3Dムービーメーカーサポート
リジッドフレックス設計を折りたたむ機能は、3Dムービーとしても捉えることができます。これを行うのは非常に簡単で、折りたたみシーケンス中にムービーキーフレームを使用する必要はありません。
3Dムービーの作成方法の詳細については、3D PCBビデオの準備ページを参照してください。基本的なガイドとして:
- PCBエディタを3Dモードに切り替えます。
- PCB 3Dムービーエディタパネルを開き、新規ボタンをクリックして新しいビデオを作成します。作成されたビデオをムービータイトル領域でクリックし、適切な名前を付けます。
- ボードが展開された状態を示す初期キーフレームを作成します。
- 折りたたみ状態スライダーを動かして、リジッドフレックスデザインを折りたたんだ状態を表示し、必要に応じて折りたたまれたボードを配置します。
- このビューのために2つ目のキーフレームを作成し、時間を設定します。リジッドフレックスデザインを折りたたむのにかかる時間(期間設定)を考えます。通常、これは数秒です。
-
ビデオが折りたたみプロセスを正しくキャプチャしているか確認するには、パネルの下部にあるプレイヤーコントロールにある再生ボタンをクリックします。

- ムービーファイルを生成するには、出力ジョブファイルにPCB 3Dビデオドキュメント出力を追加します。ビデオフォーマットオプションをビデオ設定ダイアログで設定することを忘れないでください。
- 出力ジョブファイルのコンテンツ生成リンクをクリックして、ムービーファイルを作成します。
下の動画は、このプロセスを使用して作成されました。上記の2つのキーフレームに加えて、最後の位置を1秒間保持するために最後に追加された追加のキーフレームがあります。  3つのキーフレームから作成されたシンプルな3Dムービー;折りたたみ動作は曲げ線列の値によって定義されます。 ► 3D PCBビデオの準備についてもっと学ぶ
設計上の考慮事項
以下は、リジッドフレックスPCBを設計する際に考慮しなければならない主要な設計領域の要約です:
- 導体の配線 - フレックス領域を越えるルートのコーナースタイルの選択が重要です。鋭いコーナーは避け、最小のストレスになるようにカーブを使用してください。
- パッドの形状と面積 - シングルサイドフレックスには、フィレット(涙滴形)とラビットイヤー(アンカースパー)を使用します。目的は、カバーレイヤーでパッドの形状の一部を捕捉することです。
- スルーホール - 曲げ領域でのスルーホールは、特に動的なアプリケーションでは避けてください。
- カバーレイヤー - ストレスライザー(入ってくるトラックを露出させること)を避け、カバーレイヤーの開口部を250μmに減らしてください。
- プレーン - 可能であれば、クロスハッチングされたもの。
- 段階的な長さ - 屈曲時の層のバックリングを避けるために、層の厚さの約1.5倍に層の長さを段階的にします(ブックバインディング)。
- サービスループ - 組み立て/分解を容易にし、製品の寸法変動に対応するために、フレックス領域を少し長くします(余分な長さはサービスループと呼ばれます)。
- 銅の節約 - フレックス回路がどのようにパネル化されるかを考慮し、最適な材料使用を確保するために設計を調整することが良いかもしれません。
- パネル化 - 材料の粒を考慮してフレックス領域を向ける(粒に沿って曲げる)。
- 引き裂き抵抗 - 曲がったコーナー;コーナーに穴を開ける;スリットに穴;コーナーに金属を残す。
- ルーティング - 2層ボード上でルートをスタガーしてIビーミングを避け、曲げゾーンを通るルートを広げます(これは特に永久的な曲げにとって重要です)。
- 静的曲げ比率 - 曲げ半径と回路の厚さの比率を設定します。理想的には、多層回路は少なくとも15:1の曲げ比率を持つべきです。両面回路の場合、最小比率は少なくとも10:1であるべきです。単層回路の場合、最小比率も少なくとも5:1であるべきです。動的なアプリケーションの場合、曲げ比率を20-40:1を目指してください。
- ロールドアニール銅はより延性があります。メッキ銅はフレキシブル領域に最適な選択ではありません。
ドキュメントと図面の要件
一般的に推奨されるドキュメント要件には以下が含まれます:
- フレックスPCBは、IPC-6013、クラス(ご要件をここに記入)の基準に従って製造されなければなりません。
- フレックスPCBは、最小限の燃焼性評価V-0(必要な場合)を満たすように構築されなければなりません。
- フレックスPCBは、RoHS準拠でなければなりません(必要な場合)。
- 剛性材料は、エポキシ材料を使用する場合、IPC-4101/24に従ってGFNでなければなりません。
- 剛性材料は、ポリイミド材料を使用する場合、IPC-4101/40に従ってGINでなければなりません。
- 柔軟な銅張り材料は、IPC 4204/11(柔軟な無接着剤銅張り絶縁材料)でなければなりません。
- カバーコート材料は、IPC 4203/1に従っていなければなりません。
- 最大基板厚さ(ここでの要件)を超えてはならず、これはすべての積層およびめっきプロセスの後に適用されます。これは、完成しためっき表面上で測定されます。
- パネルの剛性部分を通るアクリル接着剤の厚さは、全体の構造の10%を超えてはなりません。上記のコメントを参照してください。
- 製造の容易さのためにポーチ材料を使用でき、出荷前に基板の柔軟な部分から取り除かなければなりません。
- 柔軟なセクションの厚さ(ここでの要件)。この厚さが重要でない場合は、この注記を追加しないでください。
- めっきされたスルーホールの最小銅壁厚さは(ここでの要件;平均.001インチが推奨されます)で、最小アニュラリングは(ここでの要件;.002が推奨されます)でなければなりません。
- 緑色のLPIはんだマスク(必要な場合)を、ボードの固い部分の両面の裸銅の上にのみ塗布します。すべての金属が露出します(ここで表面仕上げの要件を指定します)。
- 必要な場合、白または黄色(最も一般的)の非導電性エポキシインクを使用して、基板の両面にシルクスクリーンを施します。
- マーキングおよび識別要件。
- 電気的テスト要件。
- 包装および出荷要件。
- インピーダンス要件。
追加の図面詳細
- 完成した穴のサイズ、関連する許容差、メッキの有無について詳述したドリル表。
- 基準データム、重要な寸法、リジッドとフレックスのインターフェース、曲げ位置および方向マーカーを含む寸法図。
- 必要に応じたパネル化の詳細。
- 各層に使用される材料、厚さ、および銅の重さを詳述した構造および層の詳細。
参考文献
フレックスおよびリジッドフレックス回路技術エンジニアリングガイド - Epec エンジニアリング テクノロジーズ
フレキシブル・サーキット・テクノロジー - ジョー・フィエルスタッド
フレックス・サーキット設計ガイド - ミンコ・プロダクツ社
マシンデザイン ウェブサイト:
- フレックス回路設計の基礎 - ロバート・レパス
- 柔軟性を保つ - マーク・フィンスタッド、アプリケーションエンジニア
