Altium Designerのインストールは、Altium Designerインストーラのおかげで直感的かつ迅速です。このウィザードベースのインストーラは、初期インストールプロセスを簡素化しながら、インストールされる機能の初期「フレーバー」を選択させてくれます。
このページでは、コンピューターにAltium Designerをインストールする手順を見ていきます。
インストーラの入手
Altium Designerインストーラ(一般にオンラインインストーラと呼ばれます)にアクセスするには、まず実行可能ファイルAltiumDesignerSetup_<バージョン>.exeをダウンロードして実行する必要があります。この実行可能ファイルは、Altium DesignerのAltiumダウンロードページセクションからダウンロードされ、ハードディスク上の任意の場所に保存できます。
Altium Designerの各バージョンには専用のインストーラがあります。既存のAltium Designerのインストールがある場合、新しいバージョンに更新するか、新しいバージョンを新たな独立したインスタンスとしてインストールすることができます。異なるインスタンスのソフトウェアを同時にインストールするシステムをサポートしています。異なるバージョンのインスタンスをインストールする利点は、以前のバージョンに直接かつ独立して迅速にアクセスできることですが、アップデートは以前のバージョンを後のバージョンで実質的に置き換えます。
オフラインインストールパッケージの入手
標準のAltium Designerインストーラは、インストールプロセスを完了するためにインターネット接続を必要とします。対象のPCからインストーラを実行できない場合は、オフラインインストールパッケージ(一般にオフラインインストーラと呼ばれます)を使用してAltium Designerをインストールできます。
まず、オフラインインストールパッケージを入手する必要があります。これは、必要なインストール可能ファイル(拡張機能を含む)と関連するAltium Designerインストーラの圧縮コレクションで、後者は標準のインターネットベースのインストーラと同様に実行されますが、必要なファイルをAltium Cloudリポジトリではなくローカルの解凍されたコンテンツ内の他の場所から取得します。
オフラインインストーラは、Altium DesignerのAltiumダウンロードページから直接入手でき、Need Offline Installer?リンクをクリックします。
リンクを表示するには、Altiumアカウントにサインインする必要があります。
プロンプトに従ってリクエストを送信します。リクエストが確認されたら、Downloadsページに戻ります。リンクは質問からダウンロードリンクに変わります。リンクが変わるためには、Altiumアカウントからサインアウトしてから再度サインインする必要があります。
オフラインインストーラを入手したら、ソフトウェアをインストールしたい対象のPCに解凍します。
オフラインインストーラを使用している場合、インストールされたAltium Designerのインスタンスをオフラインモードで動作させることを希望するかもしれません。これは、PreferencesダイアログのSystem – Account Managementページから、No, I wish to remain disconnected from Altiumオプション( )を選択することで行えます。このオプションを有効にすると、Altium DesignerのインストールはAltiumから完全に切断されます。切断されている間、Altiumとの接続を必要とするオンデマンドサービスにはアクセスしたり使用したりすることはできません。このオプションは「完全オフライン」スイッチです。
さらに、ソフトウェアのオフラインインストールを使用していることは、PreferencesダイアログのSystem – Installationページで確認できます。Offline installationオプションが有効になっており、解凍されたオフラインインストールパッケージフォルダへのパス( )が表示されます。
オフラインインストールでは、Offline installationの状態に関係なく、更新や新しい拡張機能のチェックは行われません。更新を行うには、後のバージョンのオフラインインストールパッケージが必要です。
Altiumから切断されている場合、オフラインインストールは、Altium On-Prem Enterprise ServerまたはAltium Infrastructure Serverの一部として利用可能なプライベートライセンスサービス、またはスタンドアロンライセンスファイルを使用してライセンスを取得できます。
インストーラの実行
Altium Designer インストーラのウェルカムページが開きます。
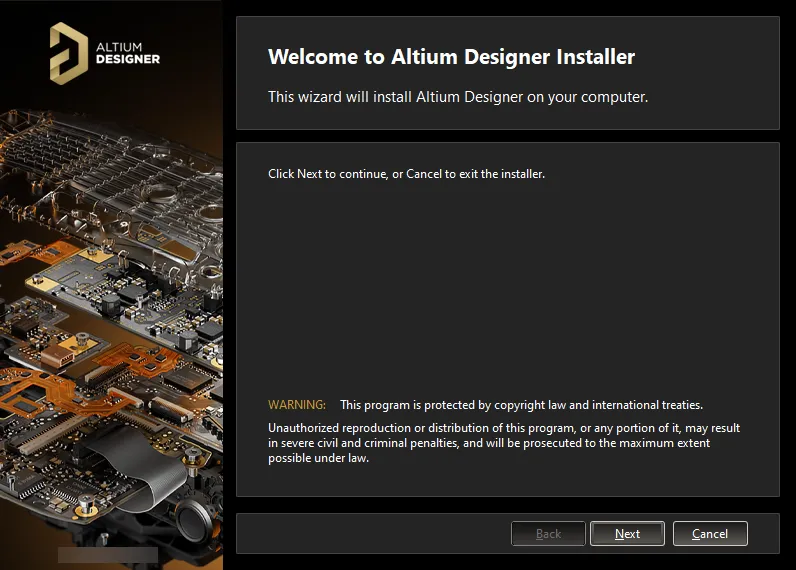
Altium Designer インストーラの初期ウェルカムページ。
インストーラはウィザードベースで、進行的(かつ直感的)なページのセットを提供し、必要に応じてソフトウェアのバージョンとその初期機能セットを効果的にインストールするために必要な情報を集めます。
続行するには をクリックします。以下のセクションでは、遭遇するさまざまなページの概要を提供します。
ライセンス契約
インストーラのこのページでは、Altium エンドユーザーライセンス契約(EULA)が提示されます。
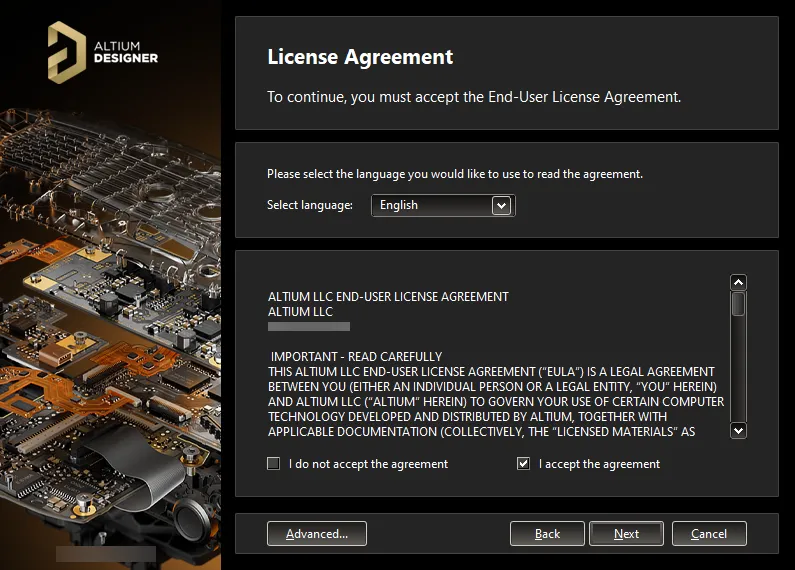
Altiumのエンドユーザーライセンス契約を読み、同意します。
ソフトウェアのインストールを続行する前に、この契約の条件を読み、同意する必要があります。契約は、英語(デフォルト)、ドイツ語、フランス語、中国語、日本語、イタリア語、スペイン語、韓国語を含むさまざまな言語で表示できます。
 ボタンをクリックすると、詳細設定ポップアップウィンドウが開きます。ここから、該当する場合はプロキシ設定を指定できます。Unified Sign In (Beta)オプションを使用して、インストールのサインイン段階で外部ブラウザを介した統合サインインプロセスを使用するかどうかを選択します。
 をクリックして変更を適用し、License Agreementページに戻ります。
これらの設定は、そのインストール環境に適用される場合にのみ、オンラインインストーラに必要です。オフラインインストールの一部としては無視できます。
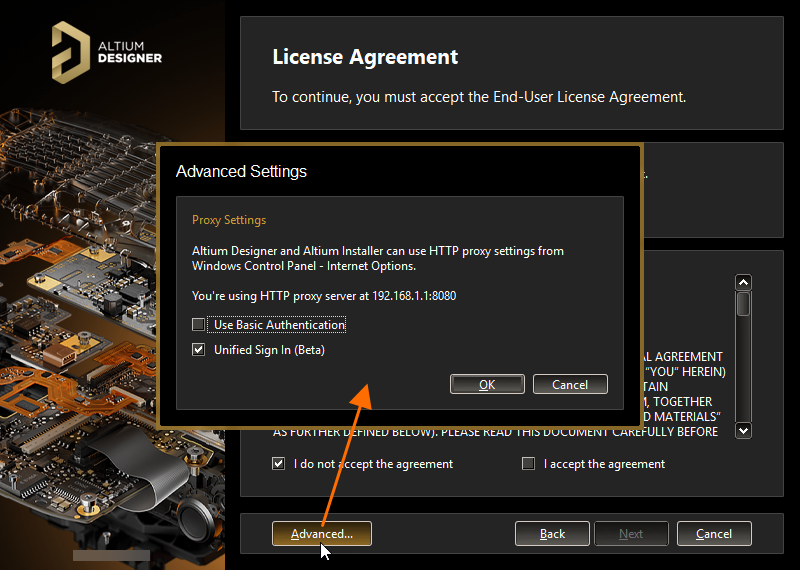
インストールの詳細オプションの一部として、プロキシ設定と統合サインインを使用する基本認証を指定します。
EULAを読んだ後、I accept the agreementボックスをチェックし、 ボタンをクリックしてインストールを続行します。
サインイン
この段階は、オンラインインストーラを使用する場合にのみ適用されます。
これで、サインインポップアップウィンドウが表示されます。これを使用して、有効なライセンスが関連付けられているAltiumアカウントにサインインします。これには2つの理由があります:
サインインはを使用してブラウザで行われます。 ボタンをクリックすると、任意の(アクセス可能な)方法でAltiumアカウントにサインインできるページがデフォルトのブラウザで開きます。サインインしたら、インストーラの次のページが自動的に開きます。
セキュリティ上の理由から、サインインプロセスを完了するための時間制限(5分)があります。この時間が経過するとエラーが発生し、サインインプロセスを再開する必要があります。
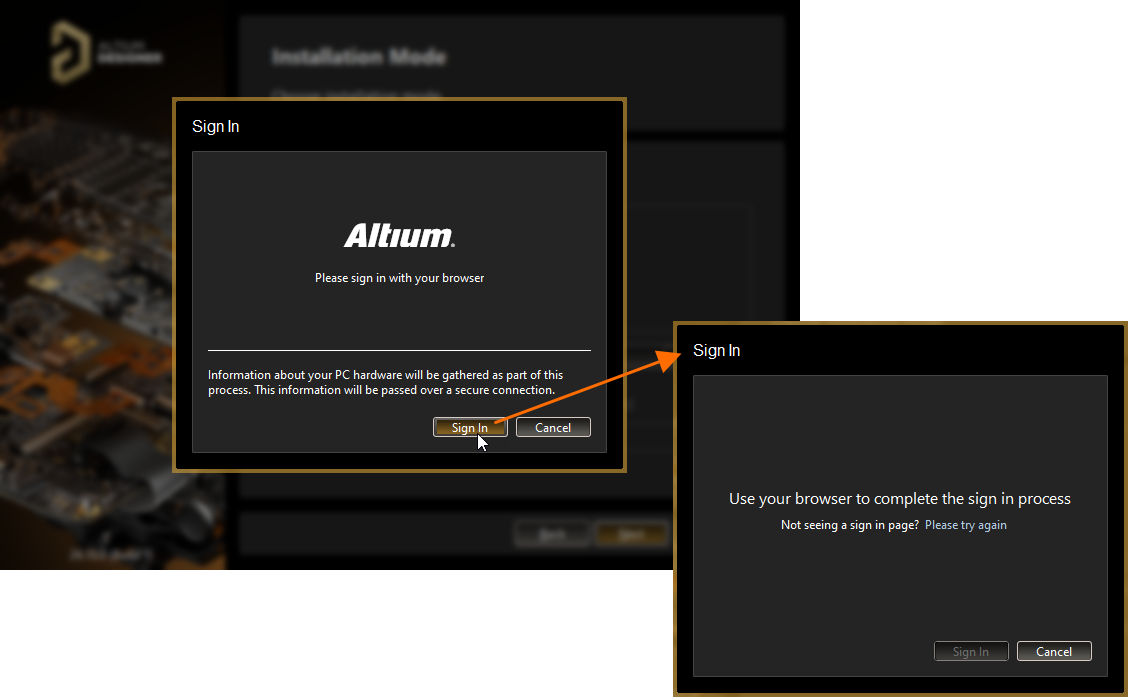
統合サインインプロセスを使用してAltiumアカウントにログインします。
詳細設定ポップアップウィンドウで統合サインインを使用しないことを以前に選択した場合、アカウントログインウィンドウが表示されます。これを使用して、Altiumアカウント資格情報、リンクされたGoogle®またはFacebook®アカウント、または組織のシングルサインオン(SSO)認証システムを使用してAltiumアカウントにサインインします。

資格情報、リンクされたGoogle®またはFacebook®アカウント、または組織のSSOを使用してAltiumアカウントにログインします。
設計機能の選択
この次のインストーラのページでは、初期にインストールされる機能を指定できます。PCB Designオプションは、PCBデザインを行うために必要な基本ソフトウェアとコア技術を提供します。これは常にインストールされ、選択解除することはできません。残りのオプションを使用して、インストールをニーズに合わせてカスタマイズしてください。これは初期インストール時間にも影響します!
サブ機能の詳細な指定をするためにエリアを展開するには「+」をクリックしてください。
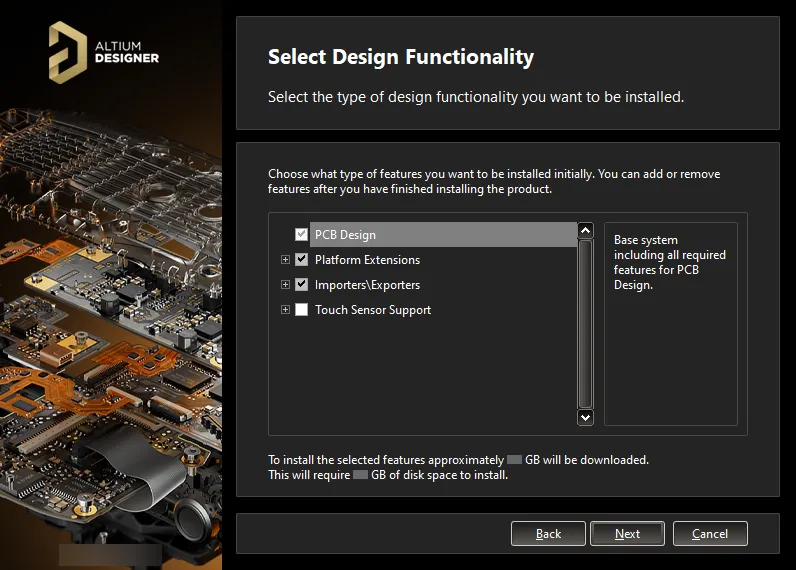
Altium Designerのインストールにどの初期機能が必要ですか?選択はあなた次第です!必要に応じて後で変更することができます。
プラットフォーム拡張機能は、コアプラットフォームに追加機能を提供します。各プラットフォーム拡張機能は、プラットフォームから「取り出され」拡張機能の形で提供されるコアプラットフォーム機能の専用パッケージです。この機能を拡張機能として提供することにより、Altiumはプラットフォーム全体にアップデートをリリースすることなく、そのコア機能に対するアップデートを提供できます。
必要な機能を有効にするにはクリックしてください。親レベルの機能を有効にして、その子機能もすべて迅速に有効にします。機能を選択および選択解除すると、ページの下部のテキストが動的に更新され、ダウンロードされたファイルがインストールされた後に必要なディスクスペースにどのように変換されるかを反映します。ダウンロードされたデータの量に関する数値は、オフラインインストーラには適用されないことに注意してください。
初期インストールでどのような決定を下しても、インストール後の任意の段階で機能を追加または削除できます。これにより、設計ニーズが変わる可能性がある中で、インストールを完全にカスタマイズするための主導権を握ることができます。インストール後のコア機能の変更セクションを参照して、詳細を学んでください。
必要な機能を定義した後、 をクリックして進んでください。
フォルダフォルダ
このインストーラの次のページでは、ソフトウェアのProgram Filesとソフトウェアによってアクセスおよび使用されるShared Documentsのインストール先フォルダを指定できます。
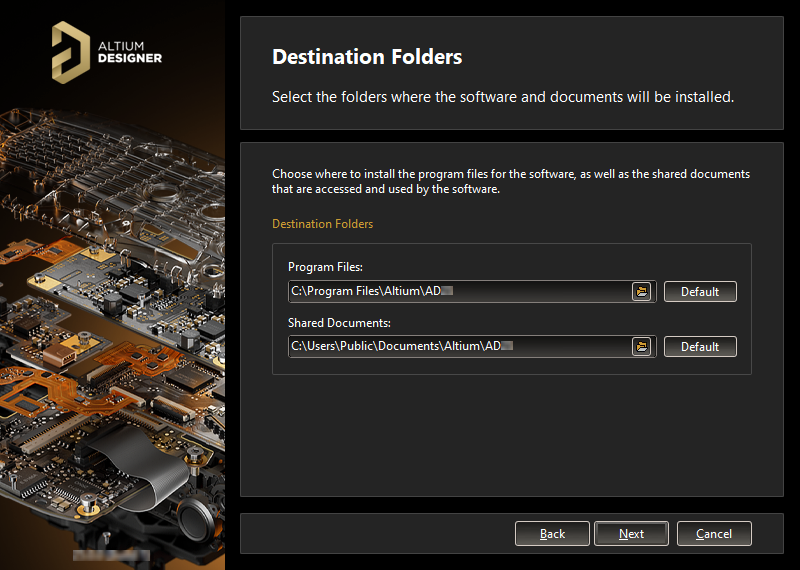
ソフトウェアと関連ドキュメントをインストールする場所を指定してください。
これらの場所は、Altium Designerの複数のインスタンスをインストールする場合に特に重要になります。これらのフォルダのいずれかが現在空のフォルダでない場合(つまり、内容がない場合)、代替の(そして空の)フォルダを指定するまでインストールを進めることができません。
デフォルトのフォルダは以下の通りです:
代替の場所を指定するには、適用されるフィールドに直接場所を入力するか、フィールドの右側にあるフォルダアイコンをクリックして必要なフォルダを参照してください。
インストール場所が指定されたら、 をクリックして続行してください。
顧客体験向上プログラム
このページは、顧客体験向上プログラムへの参加を選択するために使用されます。Altiumは、このプログラムを使用して、お客様がAltium製品およびサービスをどのように使用しているかについての理解を深めます。データは安全な接続を介して送信されるため、プライバシーは保護されます。何も送信する必要はありません。お使いのコンピューターが自動的に使用情報をAltiumサーバーに送信し、参加はソフトウェアのパフォーマンスに影響を与えず、作業の中断も引き起こしません。私たちが収集するデータは、お客様の作業、製品、または設計を再現するために使用することはできません。
プログラムに参加するには、Yes, I want to participateを有効にします。参加しない場合は、Don't Participateを有効にします。
このプログラムはAltiumとの接続を必要とするため、オフラインインストールの場合は必要ありません。したがって、Don't Participateオプションを選択できます。

顧客体験向上プログラムへの参加を選択してください。
このプログラムに参加しても、個人データや設計/IP情報は収集されませんのでご安心ください。このプログラムへの参加は完全に自発的かつ匿名であり、いつでもプログラムの参加を停止することができます。プログラムを管理する規則については、Altium Designer 改善プログラムページをご覧ください。
インストール準備完了
インストーラにはインストールを進めるために必要な情報がすべて揃っています。何かを変更する必要がある場合は、 ボタンをクリックしてください。インストールをキャンセルする場合は
 をクリックしてください。
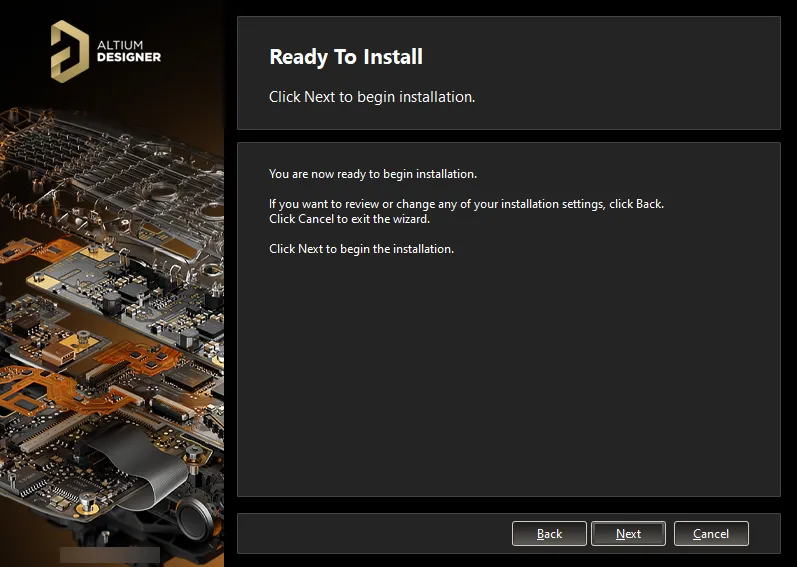
インストールを開始します!
インストールを進めるには、 をクリックしてください。
Altium Designer のインストール中
ページはReady to InstallからInstalling Altium Designerに変わり、必要なファイルが最初にダウンロード(オンラインインストーラを使用する場合はAltium Cloud Repositoryから)、または準備(オフラインインストーラを使用する場合は、解凍されたオフラインインストールパッケージ内のファイルセットから)されます。このダウンロード/準備の進行状況はインストーラ自体内で表示されます。
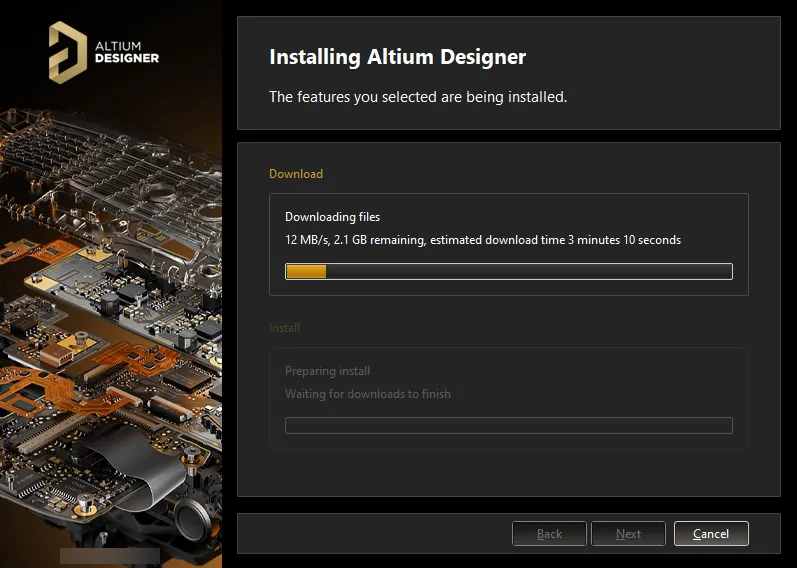
必要なインストールファイルセットのダウンロード/準備からインストールが開始されます。
ファイルのダウンロード/準備が完了すると、進行状況がインストーラに表示されながら再びインストールされます。
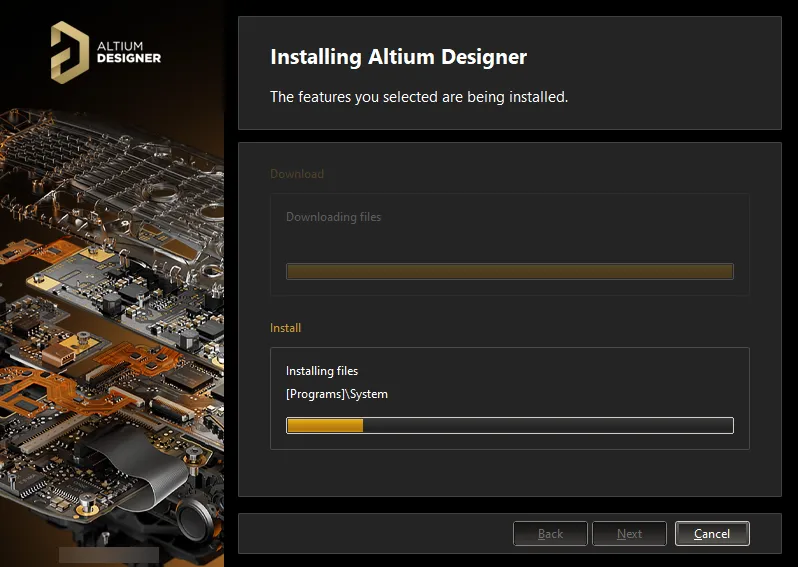
ダウンロード/準備が完了した後、ソフトウェアがインストールされます。
インストール完了
インストール自体が完了すると、インストーラウィザードの最後に到達します。

インストールが完了しました!
インストーラを終了するときにAltium Designerを起動するオプションがデフォルトで有効になっているRun Altium Designerオプションが提供されます。ウィザードを終了するには をクリックしてください。
Altium Designerをコンピューターにインストールし、設計ニーズに合わせてその機能を初期設定しました。これで、次の革新的で(できれば利益をもたらす)製品を作り出すために、あなたが最も得意とすることを行う時が来ました!
-
基板設計やAltium Designerが初めてで、どこから始めればいいか不思議に思っている場合、このチュートリアルは、シンプルな回路のPCBを製造するために必要なファイルを生成するまで、空白の回路図シートから始めて一連のプロセスを案内します:チュートリアル - Altium Designerを使用した完全な設計ウォークスルー。このチュートリアルは、日々の設計作業で慣れ親しむ必要があるAltium Designerの多くの領域に触れています。
-
Altium Designer内では、F1 ショートカットを覚える価値があります。Altium Designer内の何か(コマンド、ダイアログ、パネル、または設計オブジェクト)にマウスを合わせてF1を押すと、それに関するドキュメントにアクセスできます。また、コマンドを実行しているとき、例えば、コンポーネントを配置していて、それをどのように回転させるかわからない場合は、コマンド依存のショートカットリストを表示するためにShift+F1を押します。
ソフトウェアの複数インスタンスのインストール
Altium Designerの新しいバージョンのインストーラを実行すると、Altium Designer Installerウィザードに追加ページが表示されることがあります。Installation Modeと呼ばれるこのページでは、Altium Designerの既存のバージョンインスタンスを更新するか、新しいバージョンインスタンスとして別途インストールするかを選択できます。Installation Modeオプションを選択して、同じコンピューター上にソフトウェアの異なるバージョンインスタンスを個別に維持します。ウィザードの後半で新しいインスタンスの異なるフォルダを指定することを忘れないでください。

同じバージョンストリーム内に既にAltium Designerの以前のインストールがある場合、New installationオプションをインストールモードとして選択することで、独立したユニークなインスタンスとしてインストールできます。
インストールフォルダ
ソフトウェアの複数の個別バージョンインスタンスをインストールする上で重要な2つの要素があります:
-
インストール中にProgram FilesおよびShared Documentsのインストール場所の両方で異なるフォルダフォルダを指定できる能力。
-
システムが独立したインスタンスごとにグローバル一意識別子(GUID)を使用すること。この識別子は、標準の128ビットURNモデルを使用し、32文字の16進数として表示され、アプリケーションデータフォルダやレジストリエントリを特定のインスタンスに固有のものとして区別するために使用されます。特定のAltium Designerインスタンスを実行するとき、システムはこの識別子を使用して(そのインスタンスに固有の)ファイルとレジストリエントリのみを扱います。
Altium Designerのデフォルトのインストールフォルダの概要は以下の通りです:
\Users\Public\Documents\Altium\AD<Version>
-
特定のインスタンスのシステムアプリケーションデータ(拡張機能、ポータルキャッシュを含む)およびセキュリティファイル(ライセンスALF)は、以下の2つのディレクトリにあります:
\ProgramData\Altium\Altium Designer <GUID>
\ProgramData\Altium\Altium Designer <GUID>_Security
2つの例のインスタンスのパスは、例のGUIDを挿入すると、以下のようになります:
\ProgramData\Altium\Altium Designer {7DF7280E-CD03-40A9-A6A4-DDD057140F70}
\ProgramData\Altium\Altium Designer {7DF7280E-CD03-40A9-A6A4-DDD057140F70}_Security
\ProgramData\Altium\Altium Designer {566C1AFA-49CA-4B17-B7CB-70A2042D8DAC}
\ProgramData\Altium\Altium Designer {566C1AFA-49CA-4B17-B7CB-70A2042D8DAC}_Security
-
特定のインスタンスのユーザーアプリケーションデータファイル(以下を含む:DXP.rcs、UserTools.tlt、AdvPCB.dft、AdvSch.dft、最後のデザインスペース)は、以下のディレクトリにあります:
\Users\<ProfileName>\AppData\Roaming\Altium\Altium Designer <GUID>
2つの例のインスタンスとユーザープロファイルDes.Ignerの場合、パスは以下のようになります:
\Users\Des.Igner\AppData\Roaming\Altium\Altium Designer {7DF7280E-CD03-40A9-A6A4-DDD057140F70}
\Users\Des.Igner\AppData\Roaming\Altium\Altium Designer {566C1AFA-49CA-4B17-B7CB-70A2042D8DAC}
-
特定のインスタンスのユーザーローカルアプリケーションデータは、以下のディレクトリにあります:
\Users\<ProfileName>\AppData\Local\Altium\Altium Designer <GUID>
2つの例のインスタンスとユーザープロファイルDes.Ignerの場合、パスは以下のようになります:
\Users\Des.Igner\AppData\Local\Altium\Altium Designer {7DF7280E-CD03-40A9-A6A4-DDD057140F70}
\Users\Des.Igner\AppData\Local\Altium\Altium Designer {566C1AFA-49CA-4B17-B7CB-70A2042D8DAC}
正しいフォルダの特定
メインプログラムのインストールと共有ドキュメントフォルダには、意味のある名前を付けることができ、ソフトウェアの異なるバージョンインスタンスが複数含まれるマシンにとって非常に便利です。しかし、他のフォルダはGUIDによってのみ区別されます。正しいバージョンインスタンスの正しいフォルダを特定することが突然難しくなります。しかし、助けがあります。Preferencesダイアログを使用することで、現在開いているソフトウェアのインスタンスに使用されているGUIDをすぐに特定できます。その知識を持っていれば、Windowsエクスプローラーを通じて正しいフォルダを選択できます。
Altium Designerの標準デフォルトインストールで、Preferencesダイアログの以下のページでGUIDを特定できます:
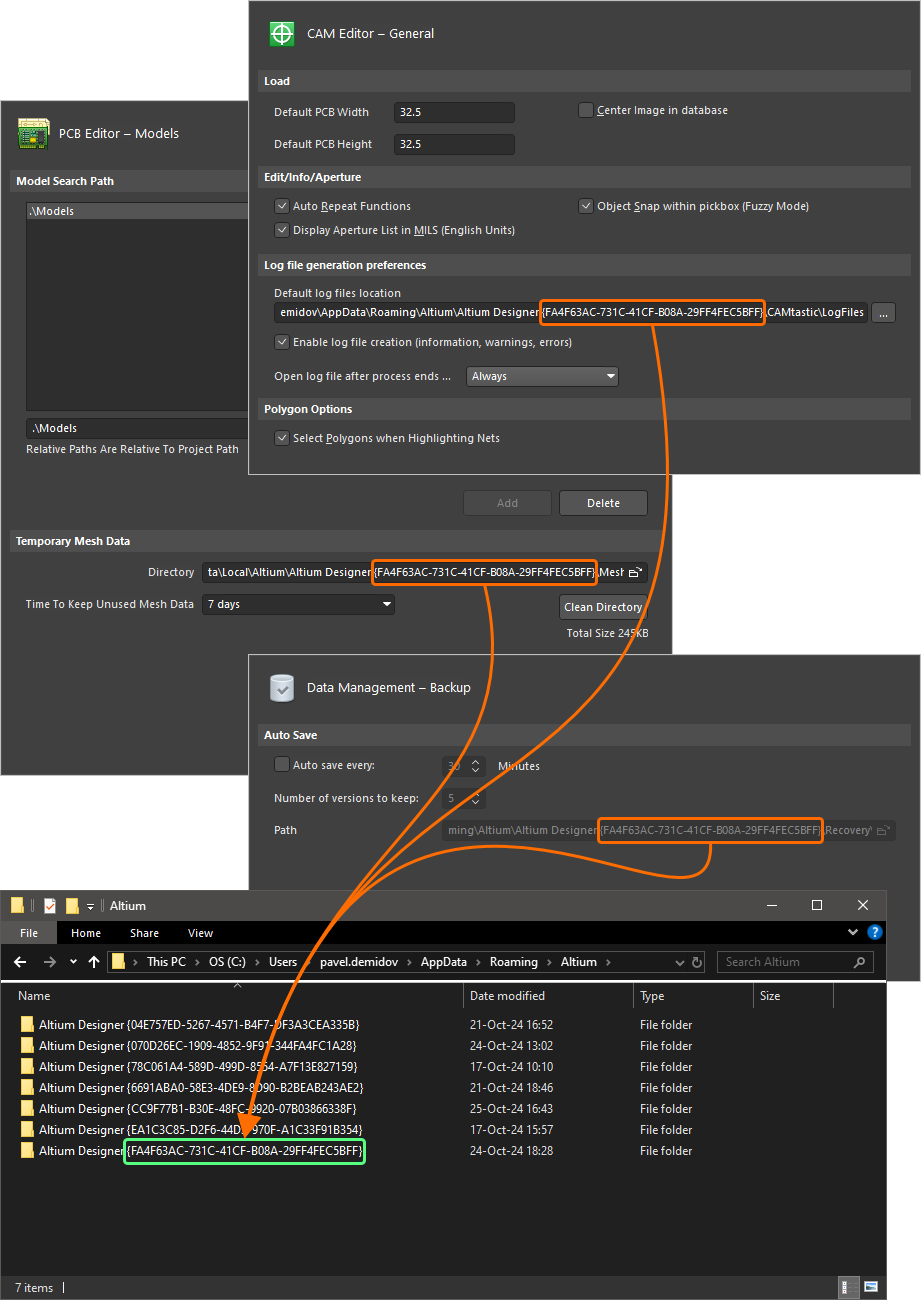
Altium Designerのアクティブバージョンインスタンスに使用されているGUIDの特定。
既存のAltium Designerのバージョンを更新するには、インストーラのInstallation ModeページのUpdate existing versionオプションを選択し、ドロップダウンフィールドを使用して更新したいソフトウェアの特定のインスタンスを選択します。Windowsからの更新セクションを参照して詳細を学びましょう。
以前のバージョンまたはメジャーリリースからの設定のインポート
新しいバージョンのAltium Designerをインストールして起動すると、Import settingsダイアログが開きます。このダイアログでは、起動時に最新の以前のインストールから設定をインポートすることを選択できます。
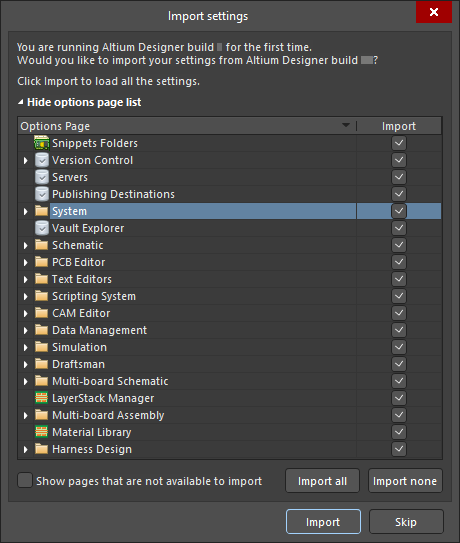
以前のバージョンのインストールから設定をインポートします。
設定だけでなく、ユーザー設定もコピーされるため、新しいバージョンは以前のバージョンで作成された同じ外観で開かれます。最後に開いたプロジェクトグループやパネルの位置まで含まれます!
初回起動時に設定をインポートするオプションを選択しなかった場合でも心配はいりません。設定は、Preferencesダイアログ内からいつでも迅速にインポートできます。システム設定のアクセス、定義、および管理ページを参照して、詳細を学んでください。
初回起動時にインポートする利点は、以前のインストールで設定された通りの作業環境をすぐに得られることです。後の段階で設定をインポートすると、この環境の一部分のみが「復元」されます。
設定は、Altium Designerの任意の個別にインストールされたバージョンインスタンス(AD10またはそれ以降のビルドインストール)、または以下の事前AD10メジャーリリースのソフトウェアからインポートできます:Summer 09、Winter 09、Summer 08、およびAltium Designer 6。
インストールされた機能の閲覧
現在のインストールに関する情報は、InstalledページのExtensions and Updatesビューから容易に確認できます。このページにアクセスするには、デザインスペースの右上にあるCurrent Userコントロールをクリックし、メニューから を選択し、次にビューの上部にあるInstalledをクリックします。
このページには、以下の情報が表示されます:
-
現在インストールされているAltium Designerのメインプラットフォームのバージョン、およびソフトウェアの有効なライセンスが使用されているユーザー(およびコンピュータ名)と会社アカウント。ライセンス/サブスクリプション通知情報もここに表示されます。ライセンス/サブスクリプションのステータスに注意が必要な場合、その概要テキストは赤く強調表示されます。これは、無効なライセンス、期限切れ(または間もなく期限切れになる)サブスクリプション、またはポータル接続の問題が原因である可能性があります。
-
現在インストールされているシステム拡張機能。
-
現在インストールされているソフトウェア拡張機能。
拡張機能について詳しくは、インストールの拡張ページを参照してください。
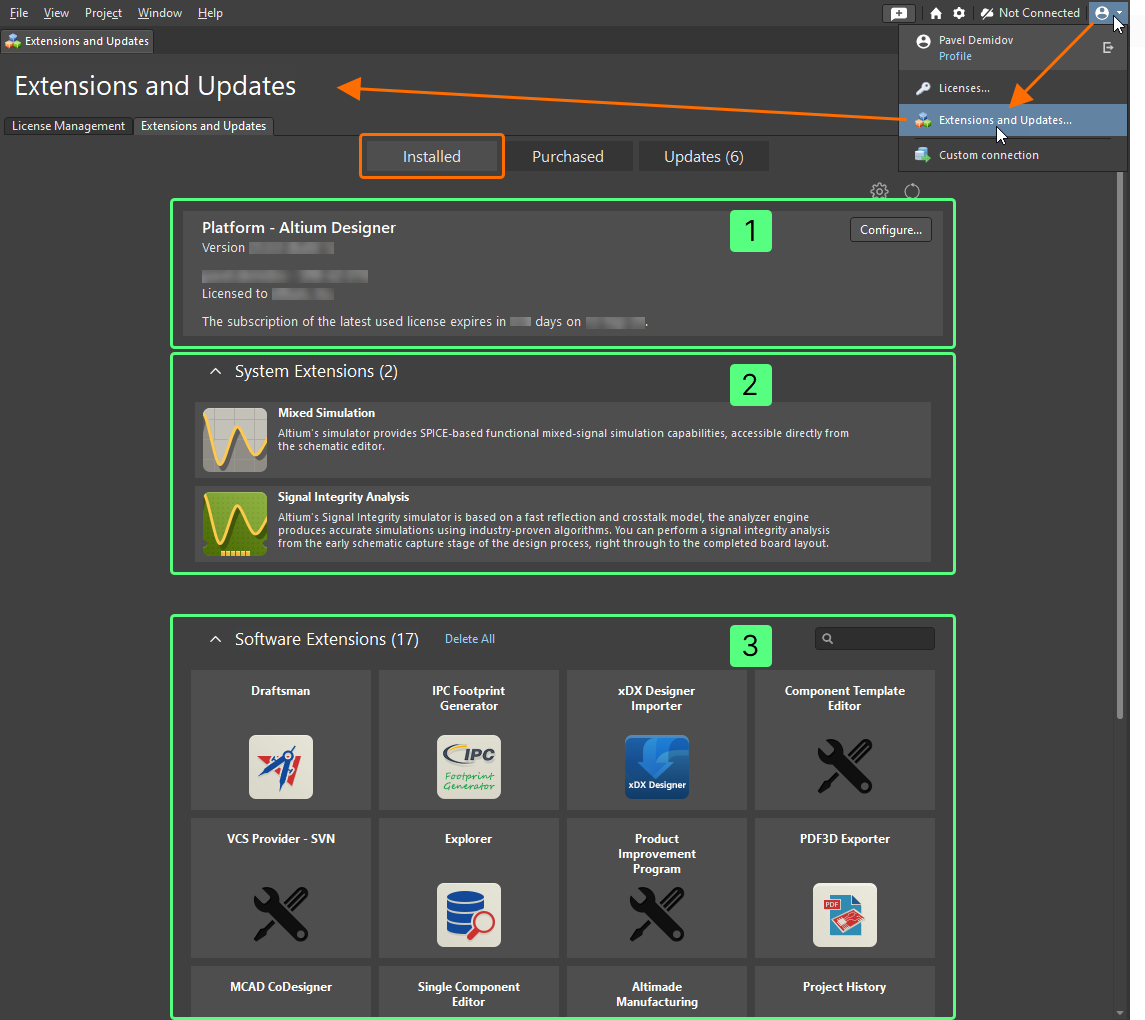
Extensions and UpdatesビューのInstalledページにアクセスして、Altium Designerのインスタンスに現在インストールされているものの要約を確認してください。
インストール後のコア機能の変更
Altium Designerの初期インストール中に、インストールしたいコアデザイン機能を選択する機会があります(デザイン機能の選択セクションを参照)。ただし、この選択は「固定されたものではなく」、インストール後のいつでも変更できます。これは2か所で実行できます:
Altium Designerからコア機能を変更する
-
Extensions and Updatesビューにアクセスし(デザインスペースの右上にあるCurrent Userコントロールをクリックしてメニューから を選択)、Installedタブに切り替えます。
-
 ボタンをクリックして、Platform領域の右上にアクセスします。これにより、Configure Platformページが表示され、Altium Designerのコア機能セット、プラットフォーム拡張機能を含むページの内容が、Select Design FunctionalityページのAltium Designer Installerに見つかる内容と同一になります。
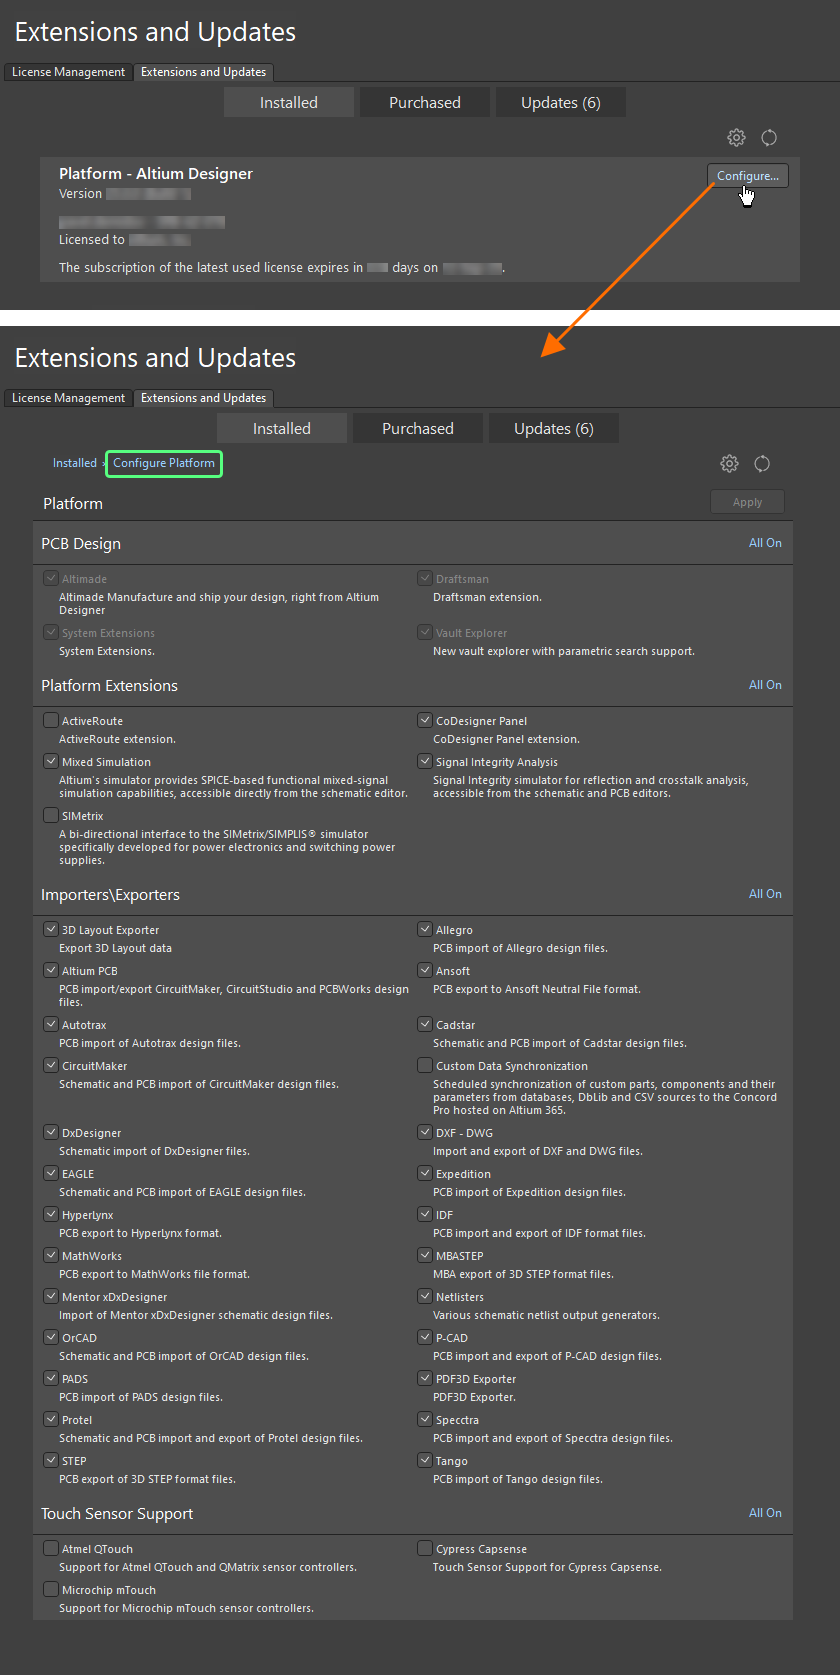
Altium Designer内部から直接、インストールのコア機能を設定します。
-
必要に応じて、インストールされたコア機能セットを変更してください。特定の機能の横にあるボックスをチェック/チェック解除することで変更します。変更は、該当するエントリが太字になることで区別されます。特定のセクションのすべての機能をインストールするために、そのセクションの右上にある対応するAll Onコントロールを迅速に有効にします。
-
変更が行われたら、ページの右上にある ボタンをクリックします。確認ダイアログが開きます。OKをクリックして変更を適用し、Altium Designerを再起動します。Altium Designerのインスタンスが閉じられ、変更を実装するために必要なファイルをダウンロードしてインストールする進行状況を示すウィンドウ(実質的にはインストーラウィザードのInstalling Altium Designerページ)が表示されます。
-
その後、Altium Designerが再起動されます。
Extensions and UpdatesビューのInstalledページのメインビューに戻るには、Installedタブをクリックするか、ページの左上にあるInstalled部分のパンくずリストをクリックします。
Windowsからコア機能を変更する
-
Programs and Featuresページにアクセスするには、Windows コントロールパネルを開き、Altium Designer <Version>のエントリを右クリックして、コンテキストメニューからChangeコマンドを使用します。
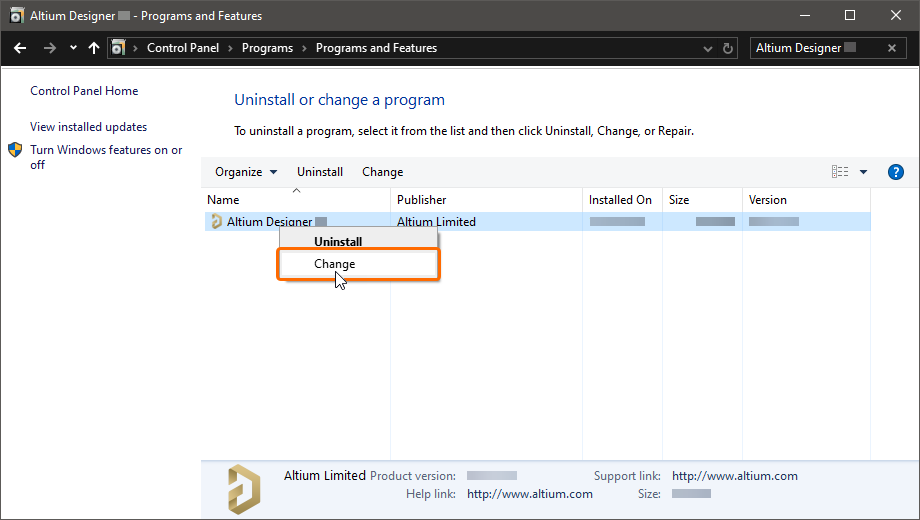
インストールされているコア機能を変更することで、いつでもインストールを修正できます。
複数のAltium Designerのインスタンスをインストールしている場合は、正しいインスタンスに変更が加えられていることを確認してください。正しいインスタンスをすばやく確認できるように、Version属性をPrograms and Features
-
Altium Designer Installerウィザードが表示されます。アカウントログインポップアップウィンドウを通じてログインし、Select Design Functionalityページに進みます(ページについて詳しくはデザイン機能の選択セクションを参照してください)。必要に応じてインストールされているコア機能セットを変更し、 をクリックします。
-
Ready To Modifyページが表示されます。この時点で、インストーラはインストールの修正を進めるために必要なすべての情報を持っています。何かを変更する必要がある場合は、 ボタンをクリックします。インストールをキャンセルしたい場合は、
 をクリックします。修正を進めるには、
 をクリックします。ページはModifying Altium Designerに変わり、変更を実装するために必要なファイルがダウンロードおよびインストールされます。
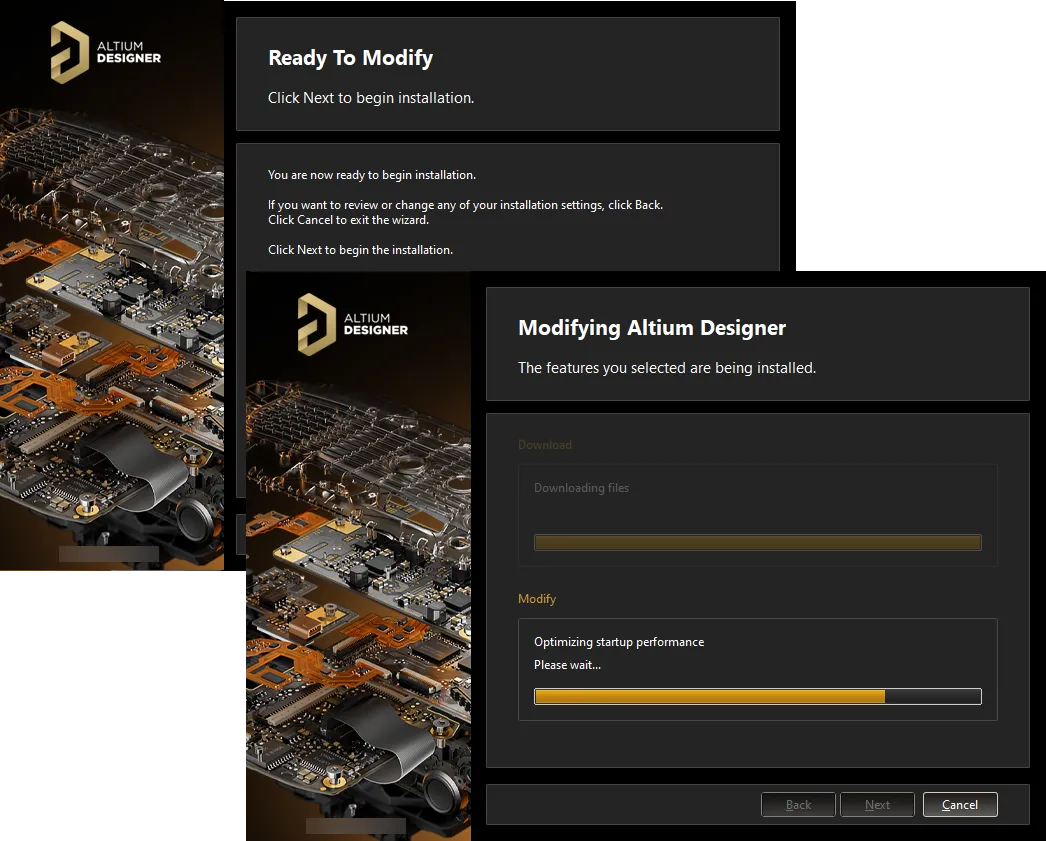
インストールの修正は、ソフトウェアに望ましい変更を実装するために必要なファイルをダウンロードしてインストールすることによって進行します。
-
インストールの修正が完了しました。インストーラを終了する際にAltium Designerを起動するオプションが提供され、デフォルトで有効になっています。 をクリックしてウィザードを終了します。
後のバージョンへの更新
Altium Designer、つまりプラットフォーム自体は、2か所から更新できます:
Altium Designerからの更新
Extensions and UpdatesビューのUpdatesページにアクセスして、更新があるAltium Designerのすべてのソフトウェア要素のリストを参照します。これにはPlatform Updatesも含まれます。
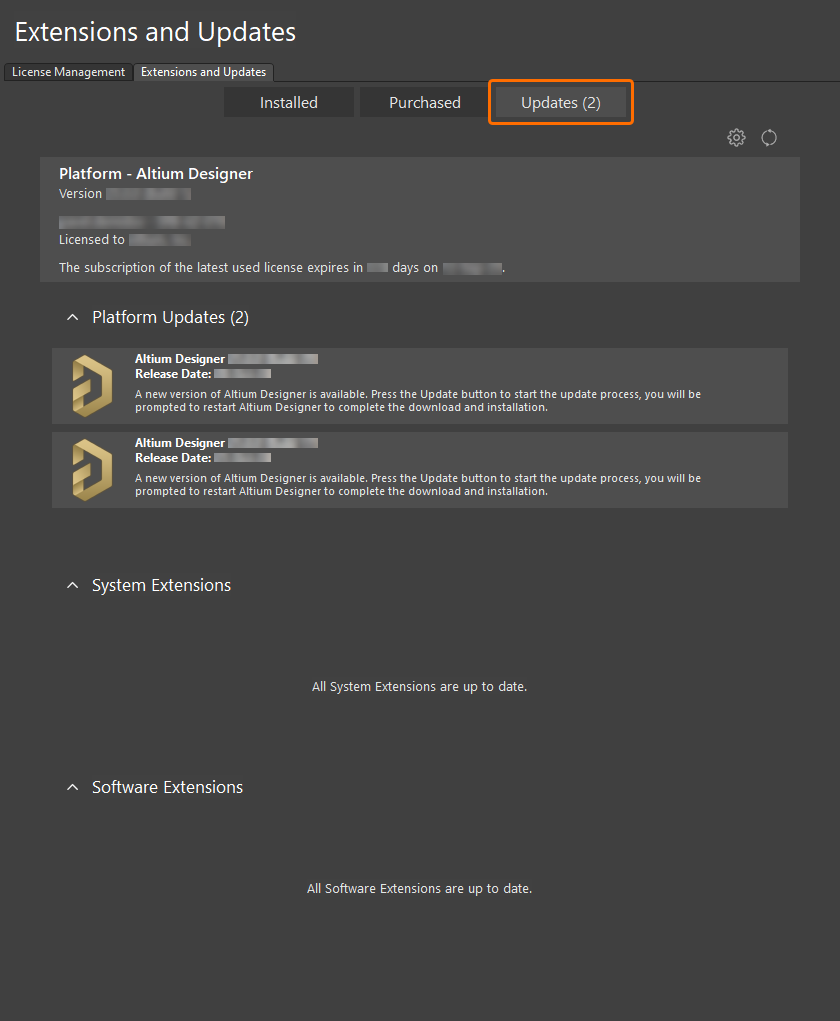
メインプラットフォームに更新が利用可能かどうかを確認します。
Updatesページのバナーエリアで、 をクリックして更新とライセンス情報をリフレッシュするか、
 をクリックしてAltium Designerのインストールと更新通知設定を構成します。後者は、PreferencesダイアログのSystem – Installationページを開き、Altium Designerがソフトウェア更新をチェックし、通知する頻度を構成できます(
 )。Altium Designerがアクティブ化されるたびに新しい更新をチェックするオプションがあります。これはOn Start-up設定で、Check Frequencyドロップダウンメニューにあります。
自動更新チェックをどのように設定しているかによって、Altium Designerを起動すると、ソフトウェアの新しいバージョンが利用可能であることを通知するポップアップダイアログが開きます。Yesをクリックすると、Extensions and UpdatesビューのUpdatesページに直接移動します。
プラットフォームの新しいバージョンをインストールすると、更新がある関連する拡張機能も自動的にインストールされます。逆に、コアプラットフォームの後のバージョンを必要とする拡張機能を更新すると、そのコアプラットフォームも更新されます。拡張機能の更新について詳しくは、インストールの拡張ページを参照してください。
スタンドアロン、プライベートサーバー、オンデマンドライセンス(ローミングモードで)を使用している方や、Altiumサブスクリプションが期限切れの方は、ログイン状態に関係なく、利用可能なソフトウェア更新を確認できます。更新をダウンロードしてインストールするには、ログインして有効なライセンス/サブスクリプションが必要です。
-
Extensions and Updatesビューにアクセスします(デザインスペースの右上にある現在のユーザーコントロールをクリックし、メニューから を選択)し、Updatesタブに切り替えます。
-
Platform Updatesの領域では、ページは利用可能なAltium Designerプラットフォームのアップデートを時系列順に整理して提示し、最後のアップデート以降のプラットフォーム変更の履歴のビューを提供します。最新バージョンのビルドは、以前のすべてのアップデートからの変更を組み込んでいます。プラットフォームアップデートの詳細情報を表示するには、名前をクリックして詳細ビューを開きます。ほとんどの場合、これによりアップデートの機能の拡張された説明と、前のバージョンに対する変更を要約したリリースノートが提供されます。
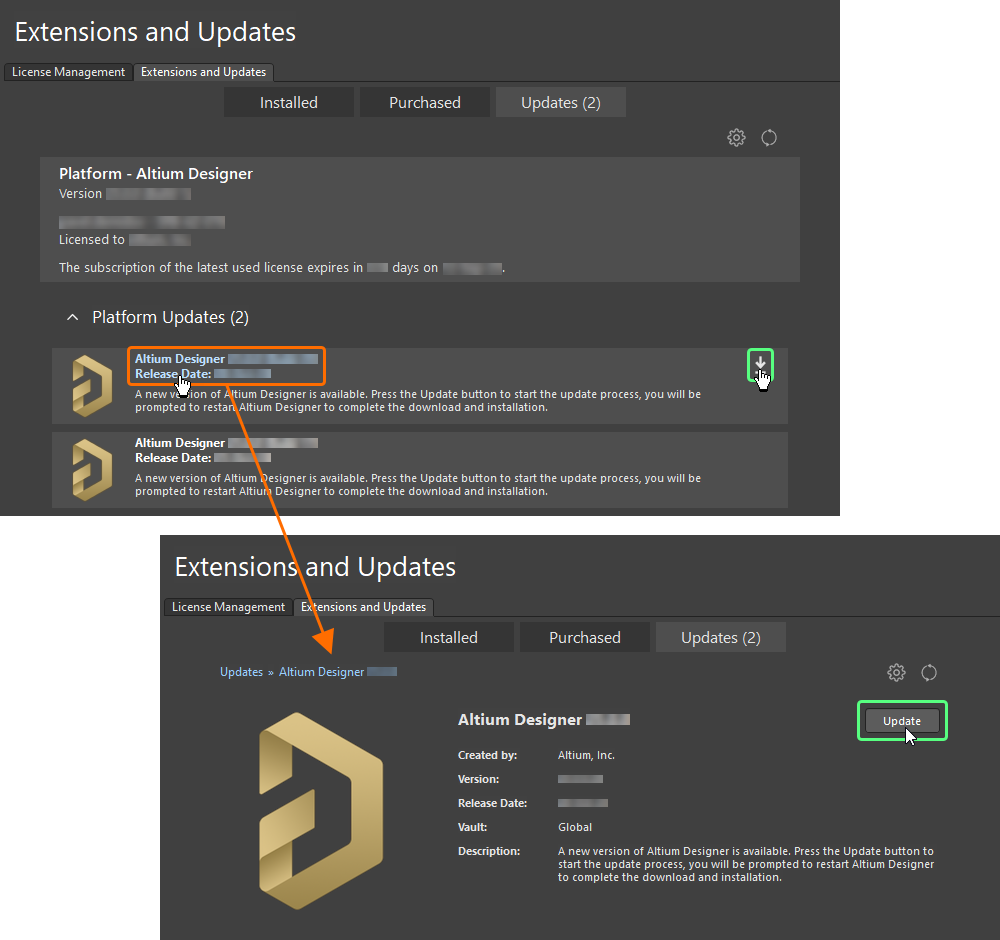
現在のバージョン内から直接Altium Designerの新しいバージョンにアップデートします。
-
要約レベルのUpdatesページにリストされているソフトウェアアップデートをダウンロードしてインストールするには、アップデートエントリ名の上にマウスカーソルを合わせると表示される アイコンをクリックします(アイコンの上にマウスカーソルを合わせると、新しいアップデートのバージョン番号も表示されます)。または、アップデートの詳細ビューを閲覧している場合は、
 ボタンをクリックします。ライセンスまたはサブスクリプションのステータスがアップデートを許可していない場合、またはAltiumアカウントにサインインしていない場合は、問題を示す警告メッセージが表示されます。
-
ダウンロードの進行状況を示すプログレスバーが表示されます(基本的には、ソースリポジトリから後のバージョンのインストーラを取得しています)。アップデートをキャンセルする必要がある場合は、関連するキャンセルアイコン( )をクリックします。
-
プラットフォームアップデートをインストールするために再起動が必要であることを警告する確認ダイアログが開きます。 Yesをクリックします。Altium Designerのインスタンスが閉じられ、ウィンドウが表示されます(基本的にはインストーラウィザードのUpdating Altium Designerページ)アップデートを実装するために必要なファイルのダウンロードとインストールの進行状況を示しています。
-
その後、Altium Designerが再起動されます。
Extensions and Updatesビューの任意のページまたはHelp » Aboutスプラッシュスクリーンから、プラットフォームの後のバージョンがインストールされていることを確認できます。
Windowsからの更新
Altium Designerの現在のインスタンスを後のバージョンに更新する作業は、その後のバージョンのインストール中に実行されます。
-
ソフトウェアの最新バージョンに関連付けられたAltiumDesignerSetup_.exeファイルをダウンロードして実行します。
-
新しいバージョンのAAltium Designer Installerを使用してインストールプロセスに従います。エンドユーザーライセンス契約に同意した後、Installation Modeページが表示されます。このページでは、Altium Designerの既存のバージョンインスタンスを更新するか、新しいバージョンインスタンスとしてインストールするかの選択肢が与えられます。Update existing versionオプションを選択し、更新したいソフトウェアの特定のインスタンスをドロップダウンフィールドから選択します。ProgramsとDocumentsのインストール場所は、選択したインスタンスに基づいて要約されます。
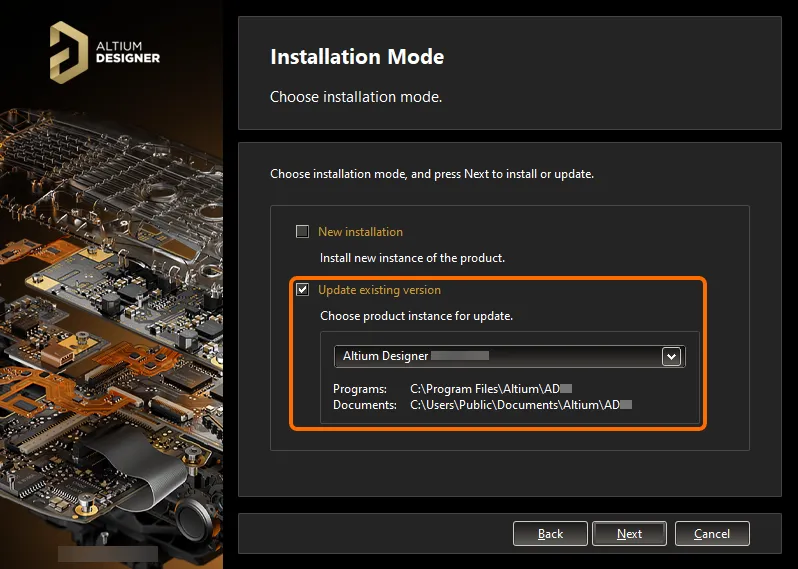
後のバージョンのソフトウェアのインストール中に、Altium Designerの既存のインスタンスを更新することを選択します。
-
クリック します。Ready To Updateページが表示されます。この時点で、インストーラは既存のインストールを更新するために必要なすべての情報を持っています。何かを変更する必要がある場合は、
 ボタンをクリックします。インストールからキャンセルする場合は、
 をクリックします。更新を進めるには、
 をクリックします。
-
Account Log Inポップアップウィンドウを通じてログインします。これが完了すると、ページはUpdating Altium Designerに変わり、アップデートを実装するために必要なファイルがダウンロードされ、その後インストールされます。
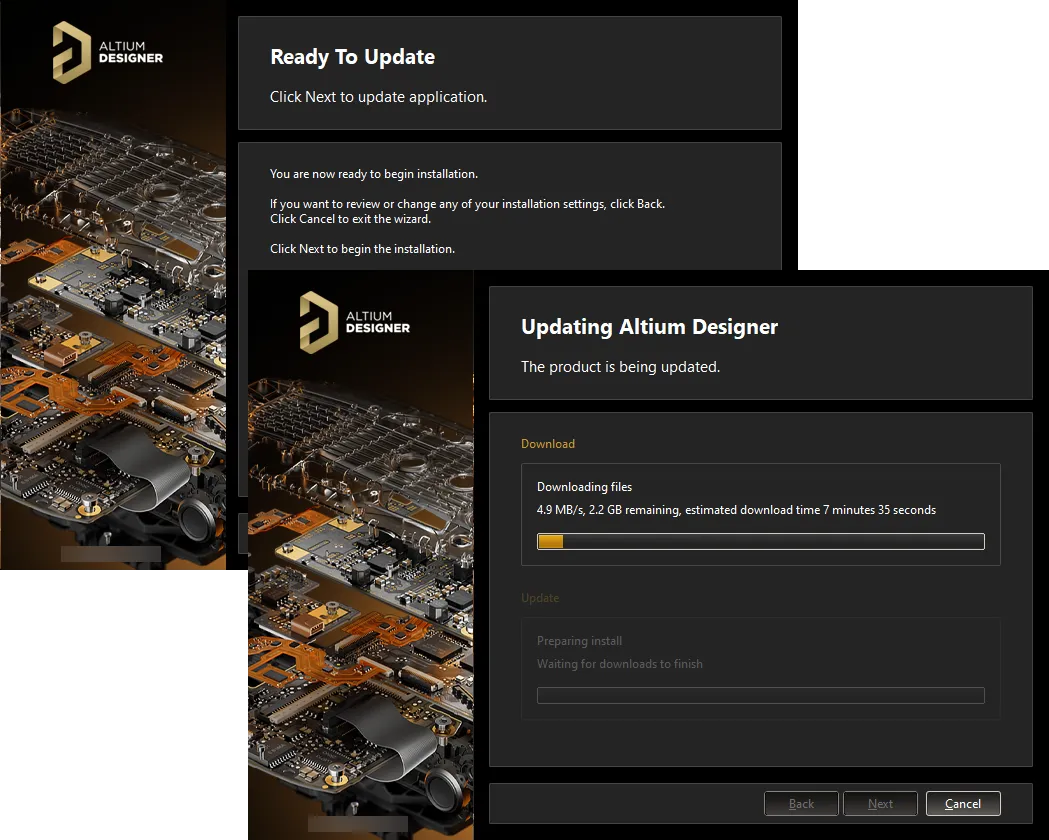
インストールのアップデートは、ソフトウェアに必要な変更を実装するために必要なファイルをダウンロードしてインストールすることによって進行します。
-
インストールのアップデートが完了しました。インストーラを終了するときにAltium Designerを起動するオプションがデフォルトで有効になっています。 をクリックしてウィザードを終了します。
アンインストール
Altium Designerのアンインストールは、Altium Designer Uninstallerを使用して実行されます。このウィザードベースのアンインストーラは、標準のPrograms and Featuresページ(コントロールパネルからアクセス)からアクセスされます。Altium Designer <Version>のエントリを右クリックし、コンテキストメニューからUninstallコマンドを使用します。

複数のAltium Designerのインスタンスをインストールしている場合は、正しいインスタンスがアンインストールされていることを確認してください。Programs and FeaturesページにVersion属性を追加の列として表示させることは、正しいインスタンスを迅速に確認するための良いアイデアです。
Altium Designer Uninstallerウィザードが表示されます。
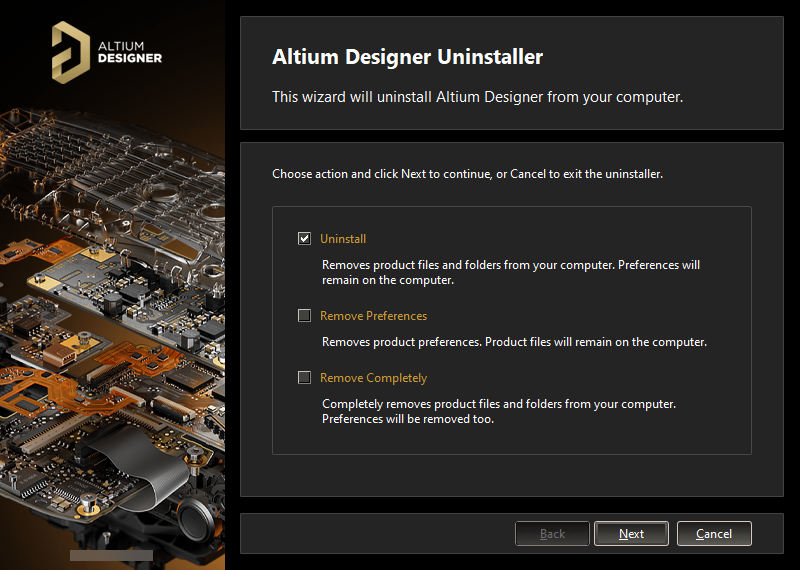
Altium Designer Uninstallerのおかげで、ソフトウェアのアンインストールが簡素化されています。
以下のように、異なる程度の「アンインストール」を行うための3つのアクションが提供されます:
-
Uninstall - インストールフォルダ(プログラムファイルと共有ドキュメントの場所)を削除しますが、設定ベースのフォルダはそのままにします。これにより、現在インストールされていないビルドを持つことができますが、その設定は別のインストールされたバージョンにインポートすることで再利用できます。
-
Remove Preferences - システムアプリケーションデータとセキュリティファイル、ユーザーアプリケーションデータファイル、ユーザーローカルアプリケーションデータを含む、設定ベースのフォルダのみを削除します。
-
Remove Completely - インストールフォルダと設定フォルダを含む、インストール全体の完全な削除。
必要なアンインストールアクションを選択してください。アンインストールをキャンセルしたい場合は、 をクリックしてください。アンインストールを進めるには、
 をクリックしてください。ページがUninstalling Altium Designerに変わり、選択したアクションが処理されます。アンインストールが完了したら、アンインストーラのUninstallation Completeページで
 をクリックしてください。

Altium Designer Uninstallerの実行中