
ボード設計の最も時間がかかるフェーズの一つがネットのルーティングです。ルールシステムは設計の制約、例えば幅、ビアのサイズ、クリアランスなどを扱いますが、ボードを完全にルーティングするために必要な数千のトラックセグメントを配置するのはデザイナーの仕事です。
オートルーターはこの苦痛を和らげることができますが、一般的に不十分と見なされています。なぜなら:
- 彼らは、ルーティングを行う際に人間の設計者が本能的に適用する細かな設計制約を正しく考慮できていません。
- 完全に設定するのに非常に時間がかかるため、しばしばインタラクティブにボードのルーティングを行う方が効率的です。
- クリーンアップが非常に長く難しいプロセスであるため、しばしばインタラクティブにボードをルーティングする方が効率的です。
PCBルーティングの究極の目標は、設計ルールを満たしながら、設計者のコントロールの下で、迅速に高品質な結果を生み出すことです。これがActiveRouteが達成しようとしている挑戦です。
完成したルートの改善
ActiveRouteに補完する形で、GlossingとRetraceの機能があります。これらは、どのように作成されたルートであっても、既存のルーティングの品質を向上させるために使用できます。
Glossingはデフォルトでオンになっており、ActiveRouteが完了すると実行されます - 必要に応じてPCB ActiveRouteパネルで無効にすることができます。Glossingには、ルーティングのコーナーをカーブさせる能力を含む、独自のオプションセットもあります。
► 既存のルートのGlossingとRetracingについてもっと学ぶ
ActiveRouteとは何ですか?
ActiveRouteは、選択した特定のネットや接続に適用される、効率的なマルチネットルーティングアルゴリズムを提供する自動インタラクティブルーティング技術です。ActiveRouteは、デザイナーがルートパスまたはガイドをインタラクティブに定義できるようにすることも可能で、それが新しいルートが流れる川を定義します。
従来のインタラクティブルーティングとオートルーティングの組み合わせよりも、このアプローチを大幅に優れたものにするActiveRouteの主な特徴には以下が含まれます:
- ピン/ビア配列からのエスケープルートの自動最適化 - 手動ルーティングの最も時間がかかる側面。
- 高性能 - 信号ネットが1秒未満でルーティングされます。
- 幅、クリアランス、レイヤー、トポロジー、ネットおよびネットクラスごとのルームに関する設計ルールを遵守し、優先順位を観察します。
- 複数のレイヤーで同時にルーティングし、それらのレイヤー全体にルートを分散させます。
- 設計者がルートの配置を指示するために使用できる直感的なルートガイド。
- ビアを必要とせずに高い完成率を実現するためにリバールートアプローチを使用します。
- ポリゴンプレーンを通してルーティングし、再注ぎオプションが有効になっている場合はそれらを再注ぎすることができます。
- シングルエンドネットと差動ペアネットの両方をサポートします。
- 角の数をさらに減らし、ルーティングを短縮する強力なグロッシングツールで仕上げます。
ActiveRouteがないもの
ActiveRouteはオートルーターではありません。選択されたネットのセットをクリーンで高品質なルーティングに焦点を当てたガイド付きインタラクティブルーターです。インタラクティブルーティングタスクに取り組むのと同じようにActiveRouteを使用してください:関心のあるネットを選択し、それらのネットをルーティングしたいレイヤーを有効にし、それらがたどるべきパスを考え、ルーティングしてください。
ボード上のすべてのネットを選択してActiveRouteを実行した場合、おそらく失望するでしょう。ActiveRouteはオートルーターではなく、ビアの配置ができず、電源ネットのルーティング戦略も含まれていません。
PCB ActiveRouteパネル
ActiveRouteは、PCB設計ルールで定義された基準と制限に従いますので、使用する際は関心のある接続やネットを選択して実行するだけです。特定の制御機能をいくつか持っており、それらはPCB ActiveRouteパネルで設定されます。PCB ActiveRouteパネルは、ActiveRouteによって提供されるさまざまな機能を設定および操作するために使用されます。これには、インタラクティブなActiveRouteの実行、ルートガイドの定義とその内のルートの間隔の設定、自動長さ調整の有効化、自動ピンスワップの有効化が含まれます。PCB ActiveRouteパネルは、ActiveRouteを開始する前に開くことを強くお勧めします。
PCBがアクティブなドキュメントの場合、PCB ActiveRouteパネルを開くには:
- ワークスペースの右下にある
 ボタンをクリックし、PCB ActiveRouteメニューオプションを選択します。
- 表示 » パネル » PCB ActiveRouteをクリックします。
このパネルにアクセスするには、
ActiveRoute 拡張機能がインストールされている必要があります。拡張機能のアイコンは、
購入済みタブの
拡張機能 & 更新ページにあります。このページは、

ドロップダウンをクリックして
拡張機能と更新を選択することで表示されます。

アイコンにマウスを合わせてから、

をクリックして拡張機能をダウンロードします。インストールを完了するには、Altium Designerを再起動する必要があります。
 ActiveRouteプロセスを制御するためにPCB ActiveRouteパネルを使用します。
PCB ActiveRouteパネルは以下の目的で使用されます:
- ActiveRouteが接続をルーティングできるシグナルレイヤーを有効にします。
- 選択した接続に対してActiveRouteを実行します。
- ActiveRoute後のグロッシングパスを有効にします。
- ルートガイドを定義する。
- ルートガイド内で使用されるトラック間隔を設定します。
- ActiveRouteによって配置されたルートの長さ調整を設定して有効にします。
- メアンダーオプションを設定し、ActiveRouteがより長いルーティングパスを定義できるようにします。これは完成率を高めるのに役立つかもしれません。
- ピンスワッピングを設定して有効にします。ActiveRouteはルーティング中にピンスワップを行い、ルーティング品質の向上に役立てることができます。
ActiveRouteは選択された接続に対して操作を行います。パネル内の一部のコントロールは、接続が選択されている場合にのみアクティブになります。
PCB ActiveRouteパネルの内容は、折りたたみ可能なセクションで構成されており、各セクションの見出しに関連付けられた►アイコンを使用して開閉します。以下に含まれるプロパティコントロール情報は、対応するセクションによって整理されており、各折りたたみセクションは同じ方法で開閉されます。
アクション
レイヤー
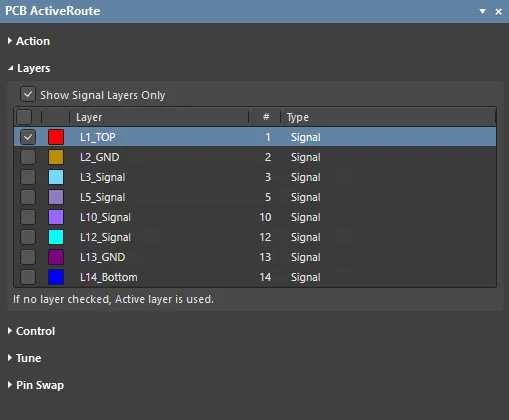
ActiveRouteは複数のレイヤーで同時にルーティングが可能です。レイヤー変更を行うビアを配置することはできませんが、利用可能なレイヤーにわたって接続とネットを分配することができます。利用可能なレイヤーはパネルのレイヤーセクションで設定されます。
- シグナルレイヤーのみ表示 – デフォルトでは、利用可能なすべてのシグナルレイヤーとプレーンレイヤーが表示されますが、このオプションを有効にするとシグナルレイヤーのみが表示されます。
- レイヤーリスト – ActiveRouteがシグナルをルーティングできるシグナルレイヤーを有効にします。ActiveRouteは、利用可能なシグナルレイヤー上で接続を分配します。ActiveRouteはレイヤー変更を行うビアを配置しないことに注意してください。
コントロール
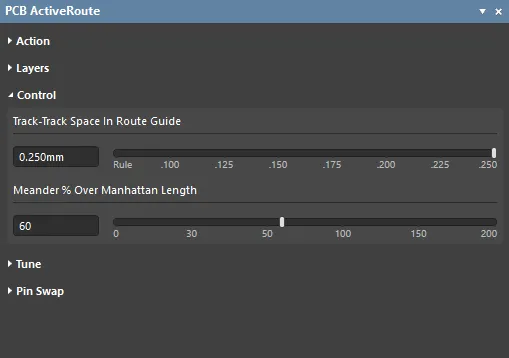
これらのコントロールは、ActiveRouteが適用可能なクリアランス設計ルールに従ってトラック間の間隔を保つことに集中するのを緩和し、接続を完了するためにより間接的なルートを使用することを許可するために使用されます。
- ルートガイド内のトラック間隔 – このコントロールは、ルートガイドに沿ってルーティングされる接続がどれだけ離れているか(トラック中心からトラック中心まで)をActiveRouteに指示するために使用されます。ガイド幅が間隔に適したように正確に計算されるためには、ルートガイドが定義される前に設定を行う必要があります。スライダーを使用して値を選択するか、編集ボックスに距離を入力してください。
- マンハッタン長さに対するメアンダー%オーバー – ActiveRouteは、選択された接続を可能な限り短い経路で、つまり最小限のメアンダリングを使用してルーティングしようと試みます。ActiveRouteの完了率が期待よりも低い場合、許可されるメアンダーの量を増やすことで完了率を上げることができるかもしれません。デフォルトの最大メアンダー設定は100%で、ルートの総長さが
マンハッタン長さ + マンハッタン長さの100%になることを許可しています。スライダーを使用して値を選択するか、編集ボックスにパーセンテージを入力してください。ルートガイドを使用する場合、メアンダー設定は無視されることに注意してください。なぜなら、ルートガイドはメアンダーを大幅に増加させる可能性のある経路を定義するために使用されるためです。
チューニング
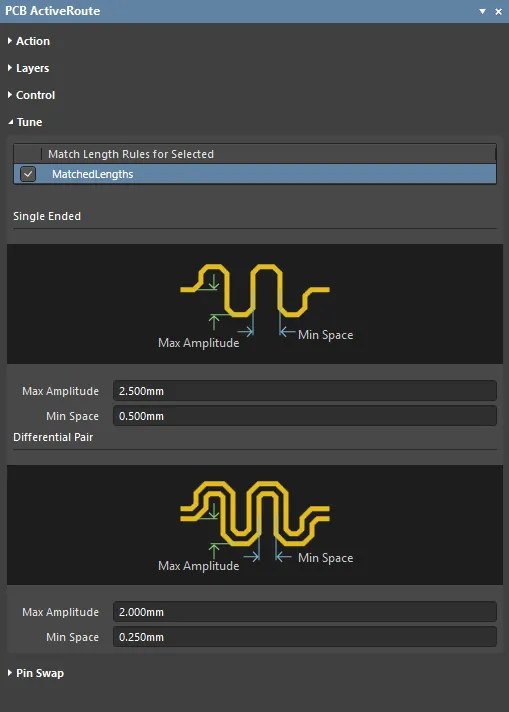
ActiveRouteは、現在ルーティング中の接続や選択された既存のルートに対して、長さチューニングを適用できます。
- 選択されたマッチ長ルール – 定義された全てのマッチ長設計ルールがここにリストされます。選択された接続に対してActiveRouteが使用するルールを有効にします。
- シングルエンド – シングルエンド信号をチューニングするために使用されるチューニングアコーディオンのプロパティ。
- 最大振幅 - チューニングアコーディオンの許可される最大振幅。既存のパッド、ビア、トラックなどの障害物がある場合、設計ルールのクリアランスが保持されるように自動的に振幅が減少します。
- 最小スペース - アコーディオン形状のゼロクロッシング間の最小エッジ間隔。
- 差動ペア - 差動ペアをチューニングするために使用されるチューニングアコーディオンのプロパティ。
- 最大振幅 - 外側の差動ペアメンバーのチューニングアコーディオンに許可される最大振幅。配置障害物がある場合、設計ルールのクリアランスが保持されるように自動的に振幅が減少します。
- 最小スペース - 内側の差動ペアメンバーのアコーディオン形状のゼロクロッシング間の最小エッジ間隔。
現在、約20%のコーナーミターを持つMitered Linesチューニングスタイルのみが利用可能です。ActiveRouteによって配置されるアコーディオンもUnionsではありません。ActiveRouteの長さチューニングサポートは、他のチューニングスタイルやアコーディオンUnionsの評価とともに、進行中の開発下にあります。
ピンスワップ

コンポーネント内の機能的に等価なピンはスワップ可能に設定できます。ツール » ピン/パーツスワッピング » 設定コマンドを選択してこれを行います。ピンスワップを実行する前に(インタラクティブにまたはActiveRouteによって)、プロジェクトは開かれるたびに(プロジェクトメニューから)コンパイルされなければなりません。
- ピンスワップが有効なコンポーネント – ピンスワップが有効になっているすべてのコンポーネントがここにリストされます。ActiveRoute中に自動的にスワップ可能にしたいものを有効にしてください。
ActiveRouteの追加機能
ActiveRouteは自動的なインタラクティブルーターで、その使用はシンプルで直感的です:接続を選択し、Shift+Aを押して、設計ルールに従ってActiveRouteします。ActiveRouteには、設計者が特定の機能や能力をより大きく制御できるようにする、他の多くの機能とコントロールが含まれています。
これには以下が含まれます:
- ルートガイドを配置して、ルーティングパスとトラック間隔を定義する。
- メアンダーコントロールでより長いルートパスを許可する。
- 長さ調整で自動的にルートの長さを一致させる。
- ルーティングの課題を簡素化するためにピンスワッピングを許可する。
これらをもっと詳しく見ていきましょう。
ルートガイドでパスを定義する
ActiveRouteの主な目的の一つは、最短の全体的なルート長を見つけることですが、それが全ての接続セットにとって望ましい経路であるとは限りません。ルートガイドは、設計者が選択した接続が流れるように特定の経路を描くために使用できるツールを提供します。たとえその経路が最短でなくてもです。
- ルートガイドの定義 - 最初にガイド内でルーティングされる接続を選択し、
 ボタンをPCB ActiveRouteパネルでクリックし、ガイドの開始位置を定義するためにクリックしてから、マウスを動かしてパスを定義し続けます。パスが定義されたら、そのパスに沿って選択された接続をルーティングするためにActiveRouteボタンをクリックします。詳細は、このページの後半にあるルートガイドを定義するセクションを参照してください。
ルートガイドの終点をルーティングしたいパッドの上に描画しないでください。ルートガイドの内部に含まれていない場合、パッドの出口の品質が向上します。
- ルートガイド幅の変更 - ルートガイド配置中に、ガイドを広げたり狭めたりするには、
 または
または キーを押します。デフォルト幅は、選択された接続に適用される幅+クリアランスの設計ルールの合計をレイヤー数で割り、1.3倍したものです。Backspaceキーを押して、異なるパスを定義する必要がある場合はガイドを巻き戻します。
- ルートガイドの色 - 選択された接続のActiveRouteに利用可能なレイヤーによって決定されます。単一のレイヤーが有効になっている場合は、そのレイヤーの色で描画されます。複数のレイヤーが有効になっている場合は、デフォルトのルートガイド色で描画されます。
- ルートガイド内のトラック間隔 - デフォルトの動作では、ActiveRouteは設計ルールに従ってルート間の間隔を設定しますが、ルートガイド内の利用可能なスペース全体を広げたり使用したりすることはありません。ルートガイド内でルートを広げるには、このページの後半で説明されているルートガイド内のトラック間隔機能を使用してください。

配置中に幅がインタラクティブに変更されるルートガイドが配置されている様子を示すビデオ。
ルートガイド幅
デフォルトの幅は、選択された接続に適用される幅+クリアランスの設計ルールの合計をレイヤー数で割り、1.3倍したものです。
RouteGuideWidth = ((W+C)/#Layers)*1.3)- ガイドはデフォルト値1.3で拡張され、ルートが収まるようにし、経路の途中にある障害物(ビアなど)を回避できるようにします。幅はルーティングのための厳格な境界であり、ルートが収まらない場合は配置されません。
- ガイド配置中に、キーボードの
 または
または キーを押すことで幅を増減できます。最小サイズは乗数が1.0を使用し、最大サイズは乗数が10.0を使用します。
ガイドの編集
ルートガイドは、機械レイヤーに配置された一連のトラックです。
- トラックセグメントはデフォルトでロックされています。ロックを解除すると、標準のトラックドラッグ技術を使用してガイドを再形成できます。
- ガイドを削除するには、任意のセグメントをダブルクリックして選択し、削除キーを押します。
ルートガイド内のトラック間隔
Route Guide機能のトラック間隔を使用すると、ActiveRouteにRoute Guideの幅全体にわたってルートを広げるよう指示できます。スライダーを使用して間隔の値を選択するか、編集ボックスに値を入力します。Route Guideは、この設定を考慮して自動的にサイズが設定されます。これを実現するには、Route Guideを配置する前にRoute Guide内のトラック間隔設定を構成する必要があります。さらに、配置中にRoute Guideの幅を調整することができます。そのためには、 キーと
キーと キーを押します。
 ルートガイド内でルートを広げるためにトラック間隔機能を使用します。
ルートが蛇行することを許可する
ActiveRouteは、選択された接続を可能な限り最短の経路で、つまり最小限の迂回を使ってルーティングしようと試みます。ActiveRouteの完了率が期待よりも低い場合、Meanderコントロールを使用してActiveRouteが許可する迂回の量を増やすことができ、これにより完了率を上げることができます。デフォルトの最大Meander設定は100%で、ルートがマンハッタン距離 + マンハッタン距離の100%の合計ルート長を持つことが許可されています。スライダーを使用して迂回値を選択するか、編集ボックスにパーセンテージを入力してください。
迂回設定は、Route Guideを使用する場合には無視されることに注意してください。なぜなら、Route Guideは迂回を大幅に増やす可能性のある経路を定義するために使用されることを意図しているからです。
ルート長の調整
ActiveRouteは、現在ルーティングされている接続や選択された既存のルートに対して長さ調整を適用することができます。ActiveRouteは、選択されたMatched Length設計ルールを満たすように試みます。
ActiveRouteに長さ調整を設定するには:
- パネルのアクション領域で選択されたチューンのチェックボックスを有効にします。
- パネルのチューン領域で必要なマッチドレングス設計ルールを有効にします。
- パネルのチューン領域で必要な最大振幅と最小スペースの設定(シングルエンドまたはディファレンシャルペア)を構成します。

現在、ミタードライン調整スタイルのみが利用可能で、コーナーミターは約20%です。ActiveRouteによって配置されたアコーディオンもユニオンではありません。ActiveRouteの長さ調整サポートは開発中で、他の調整スタイルやアコーディオンユニオンも評価中です。
► ActiveRoute長さ調整設定の詳細については、PCB ActiveRouteパネルページの長さ調整セクションを参照してください。
► 調整可能なアコーディオン形状を使用して既存のルートの長さを調整する方法については、長さ調整の記事を参照してください。
ピンスワッピング
このソフトウェアには、スキーマティックとPCBエディタ間でリンクされた強力なピンおよび部品の交換システムが含まれています。ActiveRouteはピン交換設定にアクセスでき、全体のルート長を短縮し、ルート品質を向上させる場合にルーティング中にピンを交換できます。
ピン交換を使用するには:
- ピンの入れ替えを行う前に(インタラクティブにもActiveRouteによっても)、プロジェクトは開かれるたびに(プロジェクトメニューから)コンパイルされなければなりません。
- コンポーネントのピン入れ替え設定を構成および管理するには、ツール » ピン/パーツ入れ替え » 設定 コマンドを実行して、コンポーネントの入れ替え情報を設定ダイアログを開きます。
- PCB ActiveRouteパネルのアクション領域でピンスワップルーティングオプションを有効にします。
- PCB ActiveRouteパネルのピンスワップ領域で、必要なコンポーネントを有効にします。
ActiveRouteの設定
[折りたたみ class="" title="1. ネットクラスの作成" id="1_create_net_classes"]
ActiveRouteでは、選択されたネットが必要です。ネットクラスを作成することで、アクティブルーティングするネットの数が多い場合の選択プロセスが大幅に容易になります。接続を選択する最良の方法については、後ほどこの記事の選択技術セクションを参照してください。
2. 既存のポリゴンを棚上げする
ActiveRouteは、変更後にポリゴンを再注ぎするオプションがPreferencesダイアログのPCBエディタ - 一般ページで有効になっている場合、既存のポリゴンを通過してルーティングすることができます。また、ツール » ポリゴンプール » ポリゴンを棚上げするコマンドを使用して、ポリゴンを棚上げ(見えなくするが、設計内に保持する)こともできます。
3. 設計ルールの設定
- クリアランス - ActiveRouteは適用可能なクリアランス設計ルールを優先順位に従って適用します。
- 配線幅 - 適用可能な幅ルールの推奨設定を使用します。インタラクティブ配線と同様に、例えば、ルートがBGAの下を通る場合にエリア内で幅を変更するには、より狭い推奨幅を持つ幅設計ルールを適用するルームを定義します。推奨幅で手動でルーティングできない場合、ActiveRouteもできません。
- 差動ペア - ActiveRouteは差動ペアのルーティングが可能です。差動ペアが正しく定義されていることを確認してください(PCBパネルの差動ペアエディタモードでチェック)、そして差動ペアルーティングルールが正しく設定されていることを確認してください(推奨値が使用されます)。
- パッドエントリ - ActiveRouteは、急角度を作成せずにルールを遵守するパッドの出入りに最も直接的な経路を使用しようとします。SMTからコーナーへのSMT to CornerおよびSMTパッドエントリルールは遵守しますが、SMT to Cornerルールが有効な場合にインタラクティブルーターが行うように、常にトラックをパッドの中央に配置するわけではありません。差動ペアパッドには、ペアの結合に焦点を当てつつ、整頓性を維持するための特別なアルゴリズムが含まれています。
4. ネットトポロジーの設定
ActiveRouteは接続ラインのパターンに従います。特定のトポロジーが必要なネットのセットがある場合、たとえばDDR3/4のフライバイのような場合、xSignalsを使用してfrom-toの順序を定義できます。xSignalsマルチチップウィザード(設計 » xSignals » xSignalsウィザードの実行)は、DDR3/4やUSB 3.0タイプのシグナリングを含む設計のためのxSignalsを作成できます。または、From-ToエディタモードのPCBパネルでFrom-Tosを作成することにより、ネットのためのポイントツーポイント接続ラインパターンを定義できます。
5. デザインのファンアウト
ActiveRouteはビアの配置を行いませんので、BGA、コネクタ、SMTピンを使用するディスクリートコンポーネントのファンアウトを作成する必要があります(外層でルーティングされるピンを除く)。
6. 電源とグラウンドのルーティング
ActiveRouteは信号ネット用です。電源プレーンに割り当てられたネットや20ピン以上を含むネット(これらは電源ネットと見なされます)は無視します。以前に完成したデザインでActiveRouteを使用したい場合は、信号ルートを削除して電源とグラウンドのルーティング、およびファンアウトを保持してください。
7. 必要なルーティングレイヤーを有効にする
PCB ActiveRouteパネルで必要なルーティングレイヤーを有効にします。詳細は以下の通りです。
ActiveRouteは、Gloss機能(Route » Gloss Selected)にアクセスでき、それがPCB ActiveRouteパネルで有効になっている場合、ActiveRouteプロセスの一部として自動的に実行されます。
ActiveRouteが失敗する最も一般的な理由は、トラックが収まるための十分なスペースがないことです。したがって、幅とクリアランスのルールが正しく設定されていることを確認することが重要です。
ActiveRouteの実行
アクティブルートを実行するには:
1. ルーティングする接続を選択する
ルーティング選択の戦略ページに記載されている技術を使用して、ルーティングする接続/ネットを選択します。接続は直接選択するか、またはピン、トラック、ビア、コンポーネントなどのルートオブジェクトを選択することによって選択できます。ステータスバーは、カーソルが別のオブジェクトに移動するまで、選択された接続の数を表示します。
- 接続が選択されると、適用可能なルーティング幅設計ルールで定義されている推奨幅でルーティングされます。
- 既存のルーティングが選択された場合、選択されたトラックに接続されている接続は、そのトラックの幅を使用してルーティングされます。
- コンポーネントのパッドが選択された場合、選択されたパッドからのすべての接続は、推奨ルール設定でルーティングされます。
2. アクティブルートにするレイヤーを有効にする
PCB ActiveRouteパネルで、選択した接続をルーティングするレイヤーを有効にします。ActiveRouteはこれらのレイヤーにわたってルートを分配します。
レイヤーが選択されていない場合、メインのPCBエディターウィンドウの下部にある選択されたタブであるアクティブレイヤー上でルーティングされます。
 PCB ActiveRouteパネルでは、どのレイヤー上でルーティングを行うかを選択し、ルートガイドを作成し、ActiveRouteを開始することができます。
PCB ActiveRouteパネルは、他のPCBパネルと同様に開いて、必要に応じてドッキングすることができます。
ルートガイドを定義する場合(必要な場合)
ルートガイドを配置するには:
1. ルートガイドに沿ってルーティングしたい接続を選択します。ステータスバーには、カーソルが別のオブジェクトに移動するまで、選択された接続の数が表示されます。
2.
PCB ActiveRouteパネルの
ルートガイドボタンをクリックします。
3. カーソルが選択した接続すべてを
保持しているように見え、この接続セットがガイドを通過しなければならないことを示します。適切な開始位置、定義したいパスのどちらかの端にカーソルを移動します。
4. ガイドの開始位置をクリックして定義し、接続がガイドの曲がった端に流れ込むためのスペースを確保します。
5. ガイドは非常に幅広いトラックのように配置されます。ガイドが最初に曲がるべき場所の位置にカーソルを移動し、その角を定義するためにクリックします。
6. 接続ラインが終了する場所からいくらか離れた場所でこのパス定義プロセスを続け、接続がガイドからターゲットのパッド/ビア/トラックエンドに流れ出るためのスペースを確保します。
7.
上矢印キーを押してガイドを広げたり、
下矢印キーを押してガイドを狭めたりします。
8.
バックスペースを押して最後のガイドコーナーを削除します。
9. 右クリックしてガイド配置モードから抜けます。
一度に定義できるルートガイドは1つだけです。
4. ActiveRouteの実行
ActiveRouteを実行するには、以下の方法があります:
- Route » ActiveRoute コマンドを選択します。
- Active Bar上のActiveRoute(
 )ボタンをクリックします。
- PCB ActiveRouteパネル内のActiveRouteボタンをクリックします。
- Shift+Aのショートカットを使用します。
5. 進捗状況を監視し、フィードバックを確認する
- PCBエディタのステータスバーでActiveRouteの進捗状況を表示します。
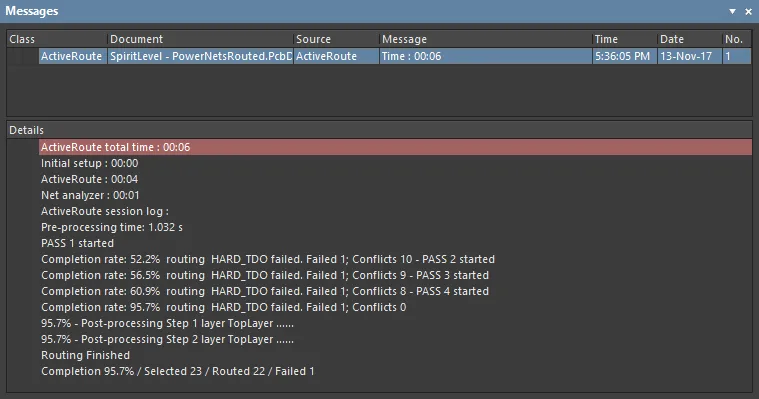
- メッセージパネルは完了率を報告します。
あなたのスキルを構築する
- ActiveRouteの習熟の鍵は、ショートカットに慣れることです。最も頻繁に使用するキーシーケンスは以下の通りです:
- Alt+クリック - 個別の接続線を選択する。
- Alt+クリック&ドラッグ - エリア内の接続を選択するには、右から左へドラッグして触れたすべての接続を選択するか、左から右へドラッグして選択範囲の四角形に収まるもののみを選択します。Tabを押して、同じネット内の他の接続を選択に含めます。ステータスバーは、カーソルが別のオブジェクトに移動するまで、選択された接続の数を表示します。
- Ctrl+クリック&ドラッグ - コンポーネント内のパッドを選択するには、右から左へドラッグして触れたすべてのパッドを選択するか、左から右へドラッグして選択範囲の四角形に収まるもののみを選択します。Tabを押して、同じネット内の他のルートオブジェクトを選択に含めます。Tabを押し続けると、すべての可能な選択状態を順に表示します。
- クリック&ドラッグ - 既存のトラックセグメントを選択するには、右から左へドラッグして触れたすべてのトラックを選択するか、左から右へドラッグして選択範囲の四角形に収まるもののみを選択します。Tabを押して、同じネット内の他のルートオブジェクトを選択に含めます。Tabを押し続けると、すべての可能な選択状態を順に表示します。
- 現在の選択を保持しながら別の選択を行うにはShiftを含めます。
- Shift+Aで現在の選択をActiveRouteします。
- Ctrl+Alt+G - 現在の選択をグロスします。
- 選択アクションは、表示されているオブジェクトにのみ実行されます(Ctrl+Aを除く):
- 興味のあるレイヤーのみが表示されるように、シングルレイヤーモードを切り替えるにはShift+Sを押します。
- 設計に配置ルームが使用されている場合、それらはデザインルールの一部として定義でクリック&ドラッグアクション中に選択/移動されるのを防ぐためにロックされるか、または非表示にすることができます。ルームはビュー設定パネルのビューオプションタブで非表示にできます。
- SMDパッドのファンアウト。ActiveRouteはレイヤーを変更しませんので、SMDパッドをファンアウトする必要があります。ファンアウトプロセスを加速するには:
- 接続をルーティング中に、ショートカット/(数値キーパッド)を押してビアを落とし、この接続を解放します。数値キーパッドがない場合は、ショートカット2を使用します(一時停止せずにビアを落とします)。
- 既存のファンアウトをコピー&ペーストすると、PCBエディターが自動的にネット名を更新します。これは複数のファンアウトに対して行うことができます。
- 既存のファンアウトを保持する。ActiveRouteはより良い解決策を見つけた場合にファンアウトを変更するか、変更されないようにロックします。ファンアウトのトラックとビアを選択する最も簡単な方法は(このプロセスを支援するためにプロパティパネルの上部にある選択フィルターを使用)、F11を押してプロパティパネルを開き、ロックチェックボックスを有効にすることです。これにより、選択されたすべてのオブジェクトが一度にロックされます。
- ルートガイドを使用していて完成率が低い場合、パスに沿って障害物が多すぎる可能性があり、ガイドを広げる必要があります。配置中に上矢印キーを押してガイドを広げます。
- ActiveRouteが終了すると、PCB ActiveRouteパネルで有効にされている場合はグロス処理が適用されます。ActiveRoutingの完了時にルートがどのように見えたかを調べるには、グロス処理を元に戻すためにCtrl+Zを一度押します。グロスコマンド(ルート » 選択したグロス)は、ActiveRoutesだけでなく、任意のルーティングのトラックを滑らかにし、パッドエントリを改善するために使用できます。特に、差動ペアの高品質なパッドエントリには特に注意が払われています。グロス処理について詳しくは、既存のルートのグロス処理&再トレースページを参照してください。
- ActiveRouteが機能しない場合、通常はルールが適切に設定されていないためです。ActiveRouteが失敗する最も一般的な理由は、トラックが収まるための十分なスペースがないことです。例えば、新しいPCBファイルに存在するデフォルトルールは、高密度BGAタイプの設計には大きすぎる可能性があります。
- ActiveRouteは、幅、