Tips & Tricks with the Explorer Panel

Now reading version 18.1. For the latest, read: Tips & Tricks with the Explorer Panel for version 21
 

Altium Designer's Explorer panel provides a direct interface to your managed content server. From the Explorer panel you can perform many activities, including:

  • Create and manage the organizational structure used in the Server.
  • Create any number of Items, each representative of a design object.
  • Review and manage the lifecycle of Item revisions.
  • Interrogate the usage of a particular Item revision (Where-Used).
  • Browse and manage supply chain information for Component Items.

This page pulls together some tips, tricks, and cool functionality that may otherwise be missed amongst the feature-rich environment of the panel. Think of this page more as a 'crib sheet', presenting a collection of features that can really enhance your productivity when working with the Explorer panel.

This page is by no means an exhaustive 'one-stop shop' of all that the Explorer panel has to offer. Many of its features are discussed elsewhere in the documentation, as part of dedicated documents pertaining to features and functionality relating to Working with a Managed Content Server, specifically Working with Managed Components, and Board Design Release.

The Explorer panel provides the user interface to a managed content server, directly from within Altium Designer.The Explorer panel provides the user interface to a managed content server, directly from within Altium Designer.

Changing the Working Server

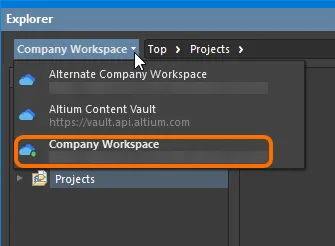
The Explorer panel can only interface to one managed content server at a time. The field at the top-left of the panel indicates the currently open Server - the Server whose content you will be able to browse and modify. To select a diffe rent Server, click the  icon to the right of the Server name (or on the Server name itself), and choose a different Server from those currently connected.

Access controls for changing the working Server. The current Server
appears in bold.

All currently connected Servers are presented on the Data Management - Servers page of the Preferences dialog. And while you can only be signed in to one managed content server at a time, you can of course also be connected to legacy Vault technologies (Satellite Vault, Personal Vault), and of course, the Altium Content Vault. The active Server - the one that you are currently signed in to - is distinguished by the  icon.

Folder Content Loading

When you click on any folder within the Server Folders structure region of the Explorer panel, only a portion of that folder content will be initially loaded, where applicable to do so. This greatly decreases the folder's initial load time. As you scroll to the end of the initial content, an additional portion of Items in that folder will be loaded.

Portion loading of folder content speeds access to that folder, especially if it contains a sizeable number of Items.Portion loading of folder content speeds access to that folder, especially if it contains a sizeable number of Items.

To have all content for the folder loaded, click the  button at the top of the panel, and use the Load all pages option on the associated menu to switch from portion loading of folder content (option disabled), to full loading of folder content (option enabled).

Moving Folders and Items

One or more Server folders, or Items within a folder, can be quickly moved using the drag and drop technique:

  • Folders - select the folder(s) to be moved (using standard Ctrl+click, or Shift+click techniques), then click, drag, and drop the selected folder(s) at the required place in the structure, as indicated by the horizontal indicator.
  • Items - select the Item(s) to be moved (using standard Ctrl+click, Shift+click, or Ctrl+A techniques), then click, drag, and drop the selected Item(s) onto a different folder in the structure.

Quickly organize your Server folders and Items using drag and drop functionality.Quickly organize your Server folders and Items using drag and drop functionality.

Folders and Items can also be moved using the corresponding command available from the right-click menu (the command will reflect whether one or multiple folders/Items are being moved). Launching a command will give access to a dialog in which to select the target folder under which the folder(s) should be moved under, or the Item(s) should be placed into, respectively.

Deleting a Folder

Server data is valuable and cannot be recovered once it is deleted. For this reason you must first delete all included Items before you can delete the parent folder. Once that is done, you can delete the empty folder using the right-click Delete Folder command.

Further streamlining the organization of your Server folder structure, support is provided for deleting multiple empty folders in a single action:

  • Selected Folder Deletion - select the empty folders (using standard Ctrl+click, or Shift+click techniques), then right-click on the selection and choose the Delete Folders command.
  • Recursive Folder Deletion - delete a tree of empty folders using the right-click Delete Folder command at the parent folder level. Both the parent and all descendant child sub-folders will be included in the deletion.

Drag & Drop Placement

Placement of certain Server Items into a PCB design project in Altium Designer is streamlined with the ability to drag & drop revisions of these Item types onto the active (and applicable) document, directly from the Explorer panel. Support is available to drag:

  • A revision of a Component Item onto the active schematic document (or PCB document). The applicable model for the chosen domain will appear floating on the cursor accordingly.
  • A revision of a Managed Schematic Sheet Item onto the active schematic document. A sheet symbol that references the sheet will float attached to the cursor.
  • A revision of a 3D Model Item onto a PCB or PCB Library document, creating a 3D Body object that references that Item Revision.

Browse your Server for the required Item to be placed. Placement involves a specific revision of that Item, so be sure to expand the main Item entry to list all of its available revisions. Then click on the required revision and drag an instance of it onto the design document.

Drag and drop the top-level entry for an Item itself, to place an instance of the latest revision of that Item.
Drag & Drop places a single instance of the Item Revision. If you need to place multiple instances, right-click on the required Item Revision (or top-level Item entry for the latest revision) and use the Place command.

In addition, Altium Designer supports access to, and placement of managed components from, the Libraries panel. For more information, see the section Placement from the Libraries Panel, on the page Working with Managed Components.

Batch Download of Items

The Explorer panel supports the ability to select multiple Items in a managed content server, and have the source entities for those Items downloaded, en masse, into a newly created single source library, or folder as applicable. The following Item types are supported by this feature:

  • Symbol Items - with the symbols for the selected Items downloaded into a Schematic Library (*.SchLib).
  • Footprint Items - with the 2D/3D component models for the selected Items downloaded into a PCB Library (*.PcbLib).
  • Component Items - with the selected Component Items downloaded into an Integrated Library (*.IntLib).
  • Simulation Model Items - with the released data applicable to each Item in the selection (*.SimModel, *.mdl, *.ckt, *.scb) downloaded to a separate sub-folder.

Batch Lifecycle State Changes

Related page: Managing Lifecycles for Items

All of the design Items stored in your managed content server have a Lifecycle State. The lifecycle state is used to reflect the readiness of that Item for use, for example an Item might be New From Design, In Production, or Deprecated. The lifecycle state of multiple Items can be changed in a single batch process.

To perform a batch change:

  1. Select the required Items in the Explorer panel.
  2. Right-click and choose the Operations » Change state command from the context menu.
  3. The Batch state change dialog will open. The Next State column will default to the next lifecycle state for each Item involved. This can be changed on an individual Item basis, but editing of multiple selected entries in the column is also supported, for quickly setting the required state across Items.
  4. Once the Next State has been set as required, click the Process button to effect the lifecycle state changes.
  5. A Confirm dialog will appear, enter a comment if required (this is stored as part of the Item History) and click Yes to complete the batch lifecycle state change.

An example of quickly changing the lifecycle state of two Component Items.An example of quickly changing the lifecycle state of two Component Items.

Clickable URLs

Further improving the usability of managed content servers, the Explorer panel supports clickable URLs. This functionality can be found in a variety of relevant areas, including:

  • Clicking on a Component Item's parameter whose value is a URL, opening the target page in an external Web Browser.
  • Clicking on a URL in the supply chain data for a Component Item, opening the target page in an external Web Browser.
  • Clicking on a document in the Released Documents region - from the Preview aspect view for a revision of a PCB Fabrication Data Item, PCB Assembly Data Item, or PCB Project Design Item - to open that document.
For Component Item parameters and Released Documents of a Project-related Item, this functionality is also available when viewing the full details for an Item, directly in Altium Designer. To access this view, right-click on the Item's entry in the Explorer panel, and choose Full Item History from the context menu.

Support for Multi-Part Components

When viewing the symbol for a multi-part Component Item, the Preview aspect view will present each part - each with its own distinct symbol graphic - as a separate tab. In addition, the Place menu will present a sub-menu of all applicable parts that can be placed for that Component Item.

Ability to Copy-Paste Server Folder Structure

Adding greater flexibility to the management of your Server content, the Explorer panel provides the ability to copy and paste a folder (and its descendant structure). This essentially allows you to quickly clone areas of your Server folder structure, which can prove a real time-saver when readying your Server for a deluge of component data, for example, where structure is similar, with a parent folder and sub-folders for the various domain models.

To use this feature:

  1. Select a folder in your existing folder structure, whose structure you wish to copy.
  2. Right-click and choose the Operations » Copy Folder Structure command from the context menu.
  3. Select the folder under which you want the cloned folder structure to be pasted.
  4. Right-click and choose the Operations » Paste Folder Structure command from the context menu.

Once pasted, you can make adjustments to the cloned folder structure as required.

You can only copy a single selected folder (and its descendant structure). The commands will be unavailable if multiple folders are selected.
Note that on paste, only the folder structure is pasted - Items within the copied folder structure are not copied.

Remember that when pasting, two folders cannot have the same name in the same area of the folder structure. Trying to do so will result in a Duplicate Folder HRID error. And while the parent folder will not be pasted, its descendant structure will be, and at the top level of the folder structure. So if you are trying to quickly create a set of cloned folders under the same parent area of the 'tree', what you can do is paste the folder structure to another temporary area of the main Server folder structure. Then rename the top level folder, make any other adjustments, then drag and drop back to where you really want the folder to be.

Quickly build your Server's folder structure with the ability to copy and paste branches of the structure.Quickly build your Server's folder structure with the ability to copy and paste branches of the structure.

Item Revision Comparison

Using the power of Altium Designer's native file format comparison technology, the managed content server supports the visual comparison of two revisions - of the same, or different Items - for a range of supported content types, directly from within the Explorer panel. Revisions of Items of the following content types can be compared:

  • Component Item
  • Symbol Item
  • Footprint Item
  • Managed Schematic Sheet Item
  • Schematic Template Item
  • PCB Fabrication Data Item
  • PCB Assembly Data Item
  • PCB Project Design Item

Within the Explorer panel, browse to the relevant folder, select the two Item-Revisions that you wish to compare, then right-click and choose Operations » Compare from the context menu.

Ability to Clone Server Items

The Explorer panel provides the ability to clone a variety of Server Items. So rather than creating that required component, domain model, schematic sheet, or template from scratch, you can simply clone it. Direct Editing ensures any required changes - to a copy of the source data from the original Item Revision - is a streamlined affair, with the resulting changes released into an initial revision of a new Item of the same type. Done and dusted in record time, you can quickly expand your managed content without facing a blank canvas.

The following Item types can be cloned:

  • Component Item
  • Footprint Item
  • Symbol Item
  • Simulation Model Item
  • Component Template Item
  • Managed Schematic Sheet Item
  • Schematic Template Item
  • Project Template Item
  • Draftsman Document Template Item
  • Draftsman Sheet Template Item
  • Layerstack Item
  • BOM Template Item
  • OutputJob Item
  • Script Item

The command to clone one of the supported Item types is accessed from the Explorer panel in the following ways:

  • By right-clicking over the entry for the source Item-Revision, and choosing the Operations » Clone command from the context menu.
  • By selecting the entry for the source Item-Revision and using the Ctrl+D keyboard shortcut.

The Clone command is available throughout the Explorer panel, wherever the applicable Item-Revision is presented, including:

  • The main Item listing within a folder.
  • Children aspect view (when viewing a Component Item, or Managed Schematic Sheet Item).
  • Where-used aspect view (when viewing a Component Item, Symbol Item, Footprint Item, Simulation Model Item, Component Template Item, or Schematic Template Item).
  • Preview aspect view (when viewing a Component Item, Managed Schematic Sheet Item, or Schematic Template Item).
When browsing the main listing of Items in a particular folder, access the Clone command from the top-level entry for an Item, to clone the latest revision of that Item.

Accessing a Parametric View of Your Components

The Components type folder supports two viewing modes - the Classic View and the Components View. The latter, which is the default view for this folder type, allows you to browse the parametric data associated with all Component Items in the current folder. What's more, you can set up the view exactly how you like it for different folders of components, and those configurations will remain between sessions.

To toggle between these two viewing modes, browse to a Components folder in the Explorer panel, click the  button at the top-right of the components listing, and choose either the View » Classic View, or View » Components View command from the associated menu.

Access the Components View for a Components-type folder, presenting the Component Items in terms of their parametric data. Hover over the image to see the result of
switching back to the Classic View.

Take a look at the following sections for more information on working with the Components View.

Showing only the Latest Item Revisions

Over time, managed Items in your Server may undergo changes as they evolve, with each change resulting in a new revision to accommodate the modified data. When browsing Items, it is typically only the latest revision that is required. All other previous revisions tend to become a level of noise, cluttering the designer's field of view. To alleviate this, the Explorer panel provides the ability to hide this clutter, leaving only the latest revisions 'on show'.

To display only the latest revisions of Items in the Explorer panel, click the  control, at the top-right of the Items region of the panel, and enable the Show only latest option from the associated menu.

This option is a global setting that applies to all Items in the Server, irrespective of type, and the visual folder in which they reside.

Declutter the Explorer panel by showing only the latest revisions of Items. Hover over the image to see the command applied.Declutter the Explorer panel by showing only the latest revisions of Items. Hover over the image to see the command applied.

To get at a previous revision of an Item, click on the option again to toggle it OFF.

Showing Hidden Revisions

Related page: Controlling Item Revision Visibility and Applicability

For an Item Revision entering a lifecycle state that has its Visible in Vault panels attribute disabled, that revision will, by default, not be displayed in the Explorer panel. And if it is the latest revision of the Item, then the entire entry for that Item will effectively be hidden from view. This visibility state - defined at the state level - can be overridden globally for all Items.

To display all Item Revisions that are currently not visible, click the  control, at the top-right of the Items region of the panel, and enable the Show Hidden Revisions option, on the associated menu.

Displaying hidden Item Revisions while browsing content in the Explorer panel. Hover over the image to see the result.Displaying hidden Item Revisions while browsing content in the Explorer panel. Hover over the image to see the result.

Controlling Parameter Visibility when Placing Managed Components

When placing components directly from the Explorer panel, control over the visibility of parameters associated to those components - or more specifically, their values - is performed from within the properties dialog for the parent folder.

The folder must be of type Components.

Right-click on the parent folder and choose the Properties command. The Edit Folder dialog will appear. Enable the Configure Parameters Visibility on Add option on the right-hand side. The parameters, taken from all components in the folder, will appear listed in the region. Use the Visible On Add checkbox associated with each parameter to control its visibility, when a component that has that parameter is placed on a schematic sheet.

The Name/Comment parameter is also included in the list. This is a system parameter.
Parametric visibility data is stored as part of the Server folder properties, in the Server itself, and is global to all users of the Server, and with whom the relevant folder(s) have been shared. Folder hierarchy is also taken into account, so parameter visibility configured for a parent folder will be passed down to (inherited by) all child folders below.

Determine, at the folder level, which parameters should be visible when components that use them are placed in a design.Determine, at the folder level, which parameters should be visible when components that use them are placed in a design.

When placing components directly from the Libraries panel, control over the visibility of parameters associated to those components is performed from within the Server Library dialog. This dialog is accessed when adding or editing a Server Library, as part of the set of Installed Libraries for Altium Designer.

Copying Component Parameter Information to the Clipboard

Parametric information for a revision of a Component Item can be copied to the clipboard, for subsequent use elsewhere in the design, or for pasting to an external application (such as Microsoft Excel). When browsing the Preview aspect view for a Component Item revision, select the required parameters - in the Parameters region of the view - and either use the Ctrl+C keyboard shortcut, or right-click in the region and use the Copy command on the context menu.

Select multiple parameters as required using standard multi-select techniques (Ctrl+click, Shift+click).

Copy a Component Item revision's parameteric information to the clipboard, for use elsewhere as required.Copy a Component Item revision's parameteric information to the clipboard, for use elsewhere as required.

Export of Grid Data

The Explorer panel supports the export of data from grid views, to a csv- or xls-formatted file. Examples of where this functionality is available, include:

  • Component Items grid (both Classic and Component views).
  • Items grid.
  • Linked models grid in the Preview aspect view (for a selected Component Item).
  • Search results grid.
  • Item grid in the Where-Used aspect view.
  • Item grid in the Children aspect view.

Right-click within a grid and choose the Operations » Export Data command from the context menu. The Select columns for data export dialog will appear. Use this to determine the data you wish to export. The dialog contains all possible columns for the grid, with those that are currently displayed in the panel enabled for export by default. After clicking OK, the standard Windows Save As dialog will appear. Use the dialog to define where, and with what name, the exported file is to be saved. Use the Save as type field to choose the format of file - either Comma-Separated Values Files (*.csv), or Excel Files (*.xls).

Progress of the export is displayed in the Export Data dialog. Once successfully exported, use the Explore button to quickly explore to the export folder. Alternatively, use the Open button to open the exported file directly.

An example of exporting data - the linked models for a selected Component Item revision - to an Excel-formatted file.An example of exporting data - the linked models for a selected Component Item revision - to an Excel-formatted file.

Changing a Released Component Type On-the-Fly

It is possible to change the component type for one or more components after release to a completely different type, on-the-fly. In the Explorer panel, select the component revision(s) that you want to change, then right-click and choose the Operations » Change component type command from the context menu. The Component Type dialog will appear from which you can select the new component type.

An example of changing the component type for selected revisions of Component Items that have already been released - with the wrong type to begin with, to underline the
feature!


If you find an issue, select the text/image and pressCtrl + Enterto send us your feedback.
Note

The features available depend on your Altium product access level. Compare features included in the various levels of Altium Designer Software Subscription and functionality delivered through applications provided by the Altium 365 platform.

If you don’t see a discussed feature in your software, contact Altium Sales to find out more.

Content