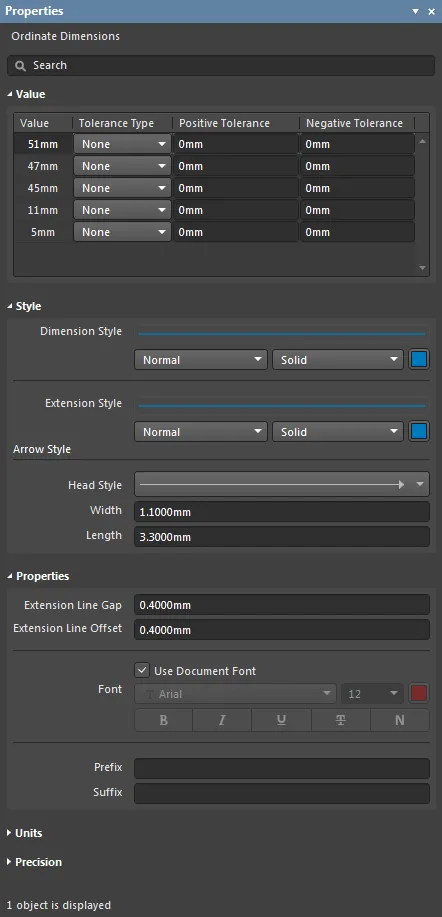
Ordinate Dimension Properties
Parent page: Ordinate Dimensions
Draftsman object properties are definable options that specify the visual style, content and behavior of the placed object. The property settings for each type of object are defined in two different ways:
- Pre-placement settings – most Ordinate Dimensions object properties, or those that can logically be pre-defined, are available as editable default settings on the Draftsman - Defaults page of the Preferences dialog (access from the
 button at the top-right of the design space). Select the object in the Primitive List to reveal its options on the right.
 - Post-placement settings – all Ordinate Dimensions object properties are available for editing in the Properties panel when a placed Ordinate Dimensions is selected in the design space.

 The Ordinate settings in the Preferences dialog and the Ordinate Dimensions mode of the Properties panel.
Value (Properties panel only)
This is a table that lists each dimension within the ordinate set, along with its associated tolerance settings.
- Value – the measurement of an individual dimension in the ordinate set as derived by Draftsman.
- Tolerance Type – use the drop-down menu to enable and set the type of displayed tolerance for the dimension (the expected or acceptable variation in the dimension):
Symmetric– sets the positive and negative tolerance to the same value, which is determined by the Positive Tolerance field entry.Bilateral– allows the specification of independent positive and negative tolerance values as defined by their respective Positive/Negative Tolerance field entries (see below).Limit– sets the tolerance display type to show the expected or acceptable value that the dimension may deviate.
- Positive Tolerance – enter a value for the acceptable or expected worst case increase of the dimension.
- Negative tolerance – enter a value for the acceptable or expected worst case decrease of the dimension.
Style
- Dimension Style – the thickness and style of the Dimension's arrowed lines. Use the line weight drop-down menu to choose from a range of line thickness presets and the line pattern menu to choose from a range of line styles. The associated color button (
 ) opens the color selector where the line color can be specified by RGB or HEX value, by freeform selection, or from a range of presets. Note that the slider control sets the color Opacity level where 0% represents full transparency.
 - Extension Style – the thickness and style of the Dimension extension lines. Use the line weight drop-down menu to choose from a range of line thickness presets and the line pattern menu to choose from a range of line styles as outlined above.
Arrow Style
- Head Style – select the drop-down to choose from a range of preset target pointer styles.
- Width – the width of the pointer head, such as an arrow. This setting also defines the diameter of a round head style.
- Length – the length of the pointer head, such as an arrow.
Properties
- Extension Line Gap – set the spacing between the dimension target points and the beginning of the extension lines.
- Extension Line Offset – set the distance that the extension lines will protrude beyond the arrowed dimension lines.
- Font – sets the displayed font used for the Dimension text strings.
- Use Document Font checkbox selected – the font used is that defined by the document options. See the Document Font entry in General section of the Properties panel when in Document Options mode.
- Use Document Font not selected – use the Font drop-down menus to choose the desired font type and size, and select the lower buttons to enable text attributes. The associated color button (
 ) opens the color selector where the font color can be specified by RGB or HEX value, by freeform selection, or from a range of presets. Note that the slider control sets the color Opacity level where 0% represents full transparency.
- Prefix – enter a text string that will be displayed before the dimension text.
- Suffix – enter a text string that will be displayed after the dimension text.
Units
- Primary Units – select the main dimension unit type that will be displayed. Use the associated
 button to toggle the unit's visibility.
 - Dual Units – set the secondary dimension unit type that will be displayed. Use the associated
 button to toggle the unit's visibility.
Precision
Specifies the numerical precision (number of significant digits to the right of the decimal point, with the last digit rounded) for the dimension text.
- Primary Units – use the Value and Tolerance Precision drop-down menus to choose the numerical rounding for the Primary (main) dimension Value/Tolerance text.
- Dual Units – use the Value and Tolerance Precision drop-down menus to choose the numerical rounding for the Dual (secondary) dimension Value/Tolerance text.
