A Drill Table can be placed in the PCB editor only by choosing Home | Board | Drill Table.

Note that the drill table must be placed on the Drill Drawing layer. It will be automatically placed on the Drill Drawing layer even if this is not the currently active layer.
After launching the command, a drill table will appear attached to the cursor. Position the table in a suitable location outside the board then click or press Enter to place it.
Additional actions that can be performed during placement while the drill table is still floating on the cursor and before the drill table is anchored are:
- Press the Tab key to pause the placement and access the Drill Table mode of the Inspector panel in which its properties can be changed on the fly. Click the design space pause button overlay (
 ) to resume placement.
- Press the Alt key to constrain the direction of movement to the horizontal or vertical axis depending on the initial direction of movement.
Graphical Editing
Moving a Drill Table
Click and hold anywhere within the drill table then move it to the desired location in the PCB editor design space.
Interactively Resizing a Drill Table
The drill table is automatically sized based on the specified Text Height setting in the Inspector panel, as well as the number of different hole sizes (rows) and the number of defined columns. To interactively resize the table, click once to select it then click and hold on a corner vertex and move to resize as required. Note that interactively resizing the table will also increase/decrease the font size.
Interactively Switching the Layer Pair to Preview
When the board includes layer pairs, the displayed layer pair is controlled by the Layers Pairs option in the Inspector panel.
This chosen layer-pair also can be switched using the:
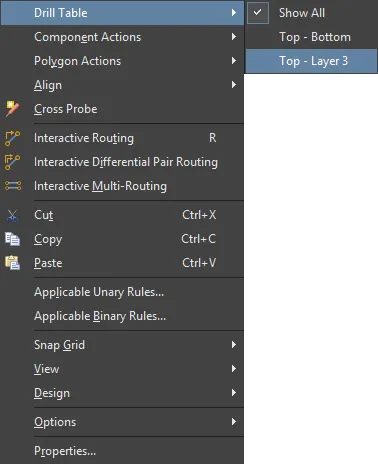
- PCB editor right-click menu - right-click on the Drill Table then select the required layer-pair in the Drill Table sub-menu as shown in the image below.

- Layer-pair selection menu accessed via the layer tab at the bottom of the design space as shown in the image below.

Non-Graphical Editing
The following methods of non-graphical editing are available.
The table size is automatically scaled to fit the included text; reducing the font size (Text Height) will shrink the table to match.
This method of editing uses the Inspector panel to modify the properties of a drill table object.

During placement, the Drill Table mode of the Inspector panel can be accessed by pressing the Tab key. Once the Drill Table is placed, all options appear.
After placement, the Drill Table mode of the Inspector panel can be accessed in one of the following ways:
- If the Inspector panel is already open, select the Drill Table object, right-click then choose Properties from the context menu.
- With the drill table selected, click View | PCB | Inspector from the main ribbons.
Press Ctrl+Q to toggle the units of measurement currently used in the panel between metric (mm) and imperial (mil). This only affects the display of measurements in the panel, it does not change the measurement unit specified for the board - this is configured in the Units setting in the Inspector panel when there are no objects selected in the editing design space.
Controlling the Assignment of Symbols or Characters
Drill Symbols Dialog
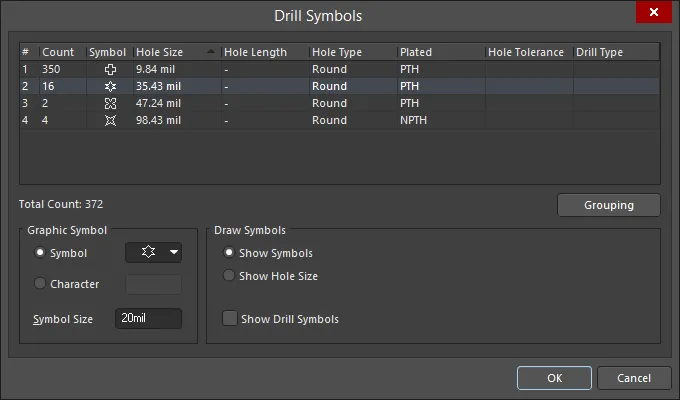
The software automatically assigns a symbol for each hole size. This automatic assignment can be overridden if required in the Drill Symbols dialog. Click the Drill Symbols button in the Properties region of the Inspector panel to open the dialog. Use the dialog to assign symbols/letters to hole sizes. The assignments remain consistent for a PCB.

The
Drill Symbols dialog also can be accessed in the following ways:
- From the PCB panel in Hole Size Editor mode, right-click in the Unique Holes region then select Configure Drill Symbols.
- From the Layer Properties dialog, click the Configure Drill Symbols button. The Layer Properties dialog is accessed by right-clicking a layer in the PCB Printout Properties dialog.
The grid area displays detailed information about the mapping of a symbol to a hole size. It can be customized by clicking and dragging a column header to change the order of columns and right-clicking on a column header then enabling/disabling the checkbox to show/hide the column.
To sort the drill symbols, click once on a column heading to sort by that column. A small triangle will appear indicating the current sort direction. Click a second time to reverse the sort direction.
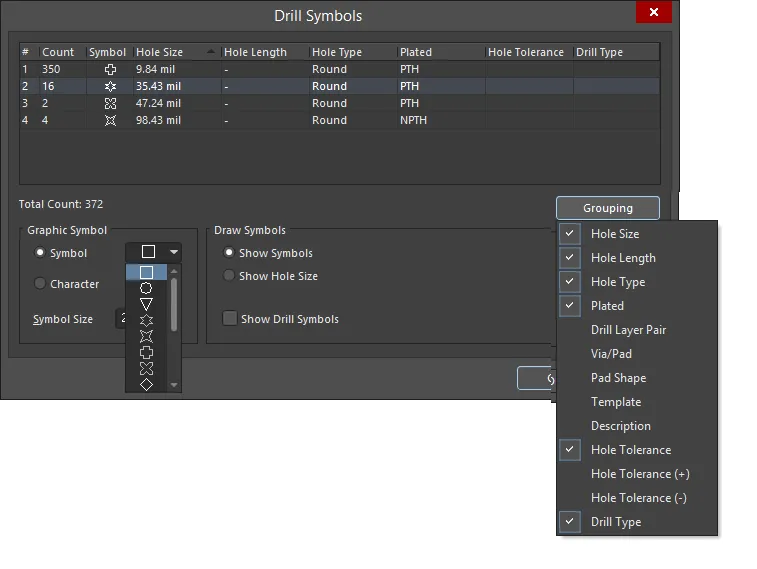
Click the Grouping button (displayed in the image below) to set which properties are to be used to control the assignment of symbol-to-drill events (holes). Holes are clustered initially by hole size then assigned separate symbols whenever a grouping option that uniquely identifies them is enabled. For example, the design could include a round pad with a 1mm hole and another square pad with a 1mm hole. If Pad Shape is not enabled in Grouping, they will be assigned the same symbol. But if Pad Shape is enabled in Grouping, they will be assigned separate symbols.
There are a total of 15 symbols available in the Symbol drop-down (displayed in the image below). If there are more than 15 different hole sizes in the PCB, letters are automatically assigned.

The 15 pre-defined graphical symbols that are available.

Updating the Drill Table
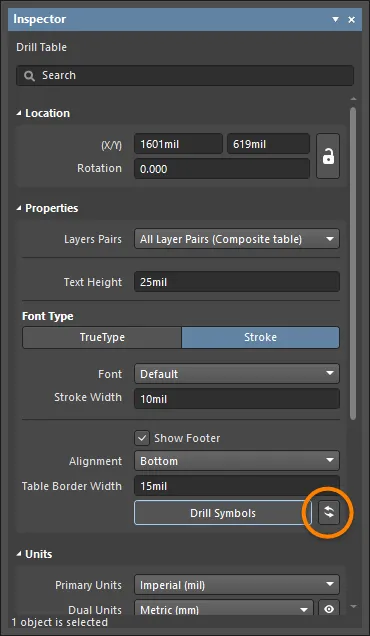
If there are design changes that introduce changes in the Drill Table, it can be refreshed by selecting it then clicking  in the Inspector panel, as shown below.

The Drill Table is automatically updated during output generation.
Note that this option can degrade the overall performance of the software.
Tips
The drill table will appear on all outputs that include the Drill Drawing layer. The image below shows an example of drill drawing output, showing each drill site marked by the symbol that has been assigned to that hole size. This example output also includes the Drill Guide layer, which adds a small cross at each hole site.

Example output of the Drill Drawing layer showing the Drill Table next to the board, with each drill site marked by the appropriate hole size symbol.