Parent page: Design Reuse
Being able to re-use design content is something that all product development companies want, and can greatly benefit from. Not only does reuse save time, being able to easily reuse a section of a previous design means that all the qualification and testing of that part of the design is done. Design reuse is much more than copy and paste, though, true reuse requires the content to be locked down so you're guaranteed that it is the same as before. No quick edits to change the color of a component or a tweak to a resistor value, working with reusable content must be like working with off-the-shelf components; place the content, wire it in, and it works just like it did last time.
Altium Designer, in conjunction with a managed content server, caters for the ability to create Managed Schematic Sheet Items in that server. Such items can be created:
- Through Direct Editing.
- Through release of the current schematic sheet.
- By uploading the relevant schematic document (*.SchDoc) to a revision of a target Item.
Once a Managed Schematic Sheet Item has been created (and data released into a revision of it), and its lifecycle state set to a level that the organization views as ready for use at the design level, it can be reused in future board-level design projects.
Just What is a Managed Sheet?
A managed sheet is a standard Altium Designer schematic sheet containing components and wiring, that has been stored in a managed content server, so it can be reused in other designs. It is edited like any other schematic sheet. The managed sheet concept is not limited to a single schematic sheet either, you can place a managed sheet in your design that is the top of a tree of other managed sheets.
Managed sheets differ from device sheets in that they are stored in a managed content server, where device sheets are stored in a folder on a hard drive. As such, they enjoy the benefits attributed to managed content, including revision and lifecycle management, and of course secured integrity.
The decision to move from device sheets to managed sheets comes when there is a desire to make the transition from reuseable content to managed reuseable content - that is, when there is a desire or need to be able to control the release, revision status and lifecycle state of that design content.
By making it managed content you can be sure that the revision of a managed sheet that you use in a design can be easily identified and traced back to its source whenever needed. And because it is managed content it can be revised and updated when needed, and the usage relationships can all be traced - both down to the components on that sheet, and up to the designs that use that sheet. This ensures you have all the information needed to decide if that revised sheet must be pushed through to existing designs, or if a particular design must continue to use the previous revision.
Folder Type
When creating the folder in which to store Managed Schematic Sheet Items, you can specify the folder's type. This has no bearing on the content of the folder - releasing a schematic sheet will always result in a corresponding Managed Schematic Sheet Item. It simply provides a visual 'clue' as to what is stored in a folder and can be beneficial when browsing a server for particular content. To nominate a folder's use as a container for Managed Schematic Sheet Items, set its Folder Type as Managed Schematic Sheets
, when defining the folder properties in the Edit Folder dialog.
Specifying the folder type - its intended use - gives a visual indication of the content of that folder when browsing the server.
Item Naming Scheme
Another important aspect of the parent folder is the Item Naming Scheme employed for it. This defines the format of the unique ID for each Item created in that particular folder. Several default example schemes are available, utilizing the short-form code for either the folder type (SSC - Schematic Sheet Collection) or the content type (SCH - Schematic Document):
- $CONTENT_TYPE_CODE-001-{0000} - for example, SCH-001-0001.
- $CONTENT_TYPE_CODE-001-{A00} - for example, SCH-001-A01.
- $FOLDER_TYPE_CODE-001-{0000} - for example, SSC-001-0001.
- $FOLDER_TYPE_CODE-001-{A000} - for example, SSC-001-A001.
Using a default naming scheme, the software will automatically assign the next available unique ID, based on that scheme, having scanned the entire server and identifiers of existing Items. This can be a great time-saver when manually creating Managed Schematic Sheet Items.
A custom scheme can also be defined for a folder, simply by typing it within the field, ensuring that the variable portion is enclosed in curly braces (e.g. SHEET
-001-{0000}
).
The Item Naming Scheme of the parent folder is applied to the Unique ID for each Item
created within that folder.
The Item Naming Scheme employed for the parent folder can be changed at any time. The modified scheme will then be applied to any subsequent newly-created Items within that folder.
Item Type
When creating a target Managed Schematic Sheet Item in which to store your schematic sheet, ensure that its Content Type is set to Managed Schematic Sheet, in the Create New Item dialog. If you are creating the Item in a Managed Schematic Sheets type folder, this Item type will be available from the right-click context menu when creating the Item.
Creating a Managed Schematic Sheet Item within a Managed Schematic Sheets folder - the correct Content Type is available on the context menu.
Item Lifecycle Definition and Revision Naming
When defining a Managed Schematic Sheet Item, be sure to specify the type of lifecycle management to be used for the Item, and the naming scheme employed for its revisions, respectively.
Control over which Item types can use a particular lifecycle definition or revision naming scheme can be defined and enabled at a global level from within the Content Types dialog when defining each schema. The default schemes assigned for use by a Managed Schematic Sheet Item are: Generic Lifecycle and 1-Level Revision Scheme, respectively.
Once a template definition has been released into the initial revision of a Managed Schematic Sheet Item, these schemes cannot be changed for that particular Item.
Specify the required schemes in the Create New Item dialog, using the Lifecycle Definition and Revision Naming Scheme fields respectively.
If the option to control use of lifecycle definitions and revision naming schemes per content type is enabled for any definitions/schemes, and the Managed Schematic Sheet Item type is not set to use a particular definition/scheme, then that definition/scheme will not be available in the applicable drop-down list.
Selecting the Lifecycle Definition and Revision Naming schemes for a manually created Item.
Observing standard revision naming schemes and lifecycle definitions, across the various types of design items in a managed content server ensures smooth, consistent management of those items.
It is a good idea to add a Name and Description as part of the Item's definition. This information is used when searching the server and enables quick identification of what a Managed Schematic Sheet Item offers.
Releasing a Schematic Sheet
Related page: Creating and Editing Items Directly through a Server
So far, we've discussed the support for a Managed Schematic Sheet Item in the server, in terms of related folder and item types. Releasing an actual defined schematic sheet into a revision of such an item can be performed in a couple of ways.
Direct Editing
A schematic sheet can be edited and released into the initial revision of a newly-created Managed Schematic Sheet Item, courtesy of the server's support for direct editing. Direct editing frees you from the shackles of separate version-controlled source data. You can simply edit a supported Item type using a temporary editor loaded with the latest source direct from the server itself. And once editing is complete, the entity is released (or re-released) into a subsequent planned revision of its parent Item, and the temporary editor closed. There are no files on your hard drive, no questioning whether you are working with the correct or latest source, and no having to maintain separate version control software. The managed content server handles it all, with great integrity, and in a manner that greatly expedites changes to your data.
When you create a Managed Schematic Sheet Item, you have the option to edit and release a schematic sheet into the initial revision of that item, after creation. To do so, enable the option Open for editing after creation, at the bottom of the Create New Item dialog (which is enabled by default). The Item will be created and the temporary Schematic Editor will open, presenting a .SchDoc document as the active document in the main design window. This document will be named according to the Item-Revision, in the format: <Item><Revision>.SchDoc (e.g. SCH-0007-1.SchDoc).
If your managed content server has at least one released
Schematic Template Item, the
Select configuration item (Schematic Templates) dialog will appear. Use this to choose which template is to be applied to the schematic document.
Example of editing the initial revision of a Managed Schematic Sheet Item, directly from the managed content server - the temporary Schematic Editor provides the document with which to define your schematic sheet.
Use the document to define the schematic sheet as required. Because managed sheets are stored in a managed content server, the components on them should also be stored in the server. That way, you get the full benefit of the managed content system that the server provides, including being able to identify and locate all the components used on the managed sheet (the children), and also being able to identify and locate which designs the managed sheet has been used in (where-used). For more information see Working with Managed Components.
The ability to use managed components to build larger design building blocks enables the design-flow to become ever-more streamlined, and at a higher level of abstraction. The designer, just like picking parts off a shelf, reuses these managed sheets of design functionality as constituent components of the bigger design project. And the more managed sheets of such circuitry that have been created and released into the server, the more functionality the designer has access to, which in turn boosts productivity for subsequent designs.
Considerations when Creating a Managed Sheet
When it comes to the design of a managed sheet, the application of tuned standards not only aid in readability of the sheet but bring a strong level of design consistency and uniformity. So not only a consistency presentation-wise but also adherence to certain best-practice design principles. The following sections take a closer look at a suggested naming convention for managed sheets, as well as some of the key standards that might be followed in their design.
Naming Convention
In terms of naming, one suggestion is that each managed sheet is named according to the primary, or key component that it features. This name is the part's order code (the code used when ordering it from a vendor). Example managed sheet file names might be:
MAX3062EEKA.SchDoc
- featuring a MAX3062EEKA 20Mbps RS-485 Transceiver, from Maxim.
BMP085.SchDoc
- featuring a BMP085 Digital Barometric Pressure Sensor, from Bosch.
RTL8201CL.SchDoc
- featuring an RTL8201CL Single-Port 10/100M Fast Ethernet PHYceiver, from Realtek.
The sheet title can be used to concisely describe the functionality of the circuit captured by the sheet. Typically, the key component name will also be included in this title.
Example managed sheet, featuring a BMP085 component.
Design Standards
When it comes to populating a blank schematic sheet, designers are rather chef-like in nature - each having their own signature way of doing things. Presentation-wise, for example, different designers will adopt different styles, layout preferences, use of color, and so on. After all, if all designers across the planet presented schematic circuitry in the exact same fashion, the design world would take on a mundane, monochromatic-like appearance! The key is to adopt a method of capture and presentation that is consistent across your own design teams.
Now, in saying that, there are some key design principals that, when adopted, really do aid not only the consistency of the managed sheets produced, but are fundamental to the concept of design for reuse itself. The following are some suggested principles:
- Each managed sheet features a single or small group of key components focusing on a specific function.
- All possible supporting circuitry will be included in the sheet.
- Parts of the design that can be configured in multiple ways can be refactored to parent or sub-sheet within reason, allowing the sub-sheet behavior to be configured from the parent without adding unnecessary structural overhead.
- Multi-purpose signals are passed to parent sheets using reasonable and generic signal naming, allowing them to be re-mapped to their specific purpose.
- Ensure readability of the single standalone managed sheet is preserved, while allowing a designer to easily understand how it would be implemented as an element in their design.
- Use of consistent naming, presentation and design standards.
In terms of designing for reuse, the following suggested items are particularly relevant and important to capture at the managed sheet level:
- The use of signal harnesses where possible, since the standard harness is itself a reusable design element.
- No labeling of local nets – so avoiding the use of Net Labels – since doing so actually makes it harder to manage connectivity through the design in which the managed sheet is used. The most common exception to this, however, is the requirement of such labeling when creating buses.
- All power ports connected to a port sheet interface and passed to the parent sheet – local power ports are avoided to prevent confusion.
- Port direction and I/O type is strictly set according to the signal direction with the exception of Power nets (these will be
unspecified
). Where signal direction is not specified, Bidirectional
is used.
- Using a standard set of signal names, using generic names where possible (e.g.
5V0
instead of 5.0V
/5V
/5Volts
). There is a certain degree of flexibility here as well, since connections are explicit through the use of strict hierarchy across all design projects. This allows names to be defined differently for any two connected objects, at different levels of the design hierarchy, because their connection is explicit.
- Using a standard set of sheet-level parameters.
Another suggested addition to a managed sheet is that of a section to highlight the key component on the sheet, in terms of its manufacturer, and an at-a-glance listing of its key features. This can prove invaluable to a designer when assessing its merit for inclusion into a new design.
Features of the key component listed alongside the design circuitry.
There are three relevant controls when direct editing, readily available from the Quick Access Bar (at the top-left of the main application window), or from the Schematic Standard toolbar:
- - Save Active Document. Use this button to save any changes made to the document. This allows you to save current changes, should you wish to come back at a later stage to make further changes before ultimately releasing to the managed content server.
- - Save to Server. Use this button to release (effectively save and release) the defined schematic sheet to the managed content server, storing it within the initial (planned) revision of the target Managed Schematic Sheet Item. The Edit Revision dialog will appear, in which you can change Name, Description, and add release notes as required. The document and editor will close after the release. The document containing the source schematic sheet (*.SchDoc) will be stored in the revision of the Item.
- - Cancel Editing. Use this button if you wish to cancel editing. The document and editor will close, and nothing will be released to the target Managed Schematic Sheet Item.
These controls are also available as commands - Save (Shortcut: Ctrl+S), Save to Server (Shortcut: Alt+Ctrl+S), and Cancel Edit - from the main File menu.
The released data stored in the server consists of the source schematic sheet, defined in the Schematic Document file (<Item><Revision>.SchDoc), as well as any associated harness definition files (*.Harness). In the Explorer panel, switch to the Preview aspect view tab to see a graphical representation of the sheet, along with a listing of its constituent components (and managed schematic sheet template if applicable).
Click on the hyperlink entry for a child Component Item Revision to cross-probe to it in the Explorer panel. The Child Items area also provides a right-click context menu with commands for working with a child Component Item Revision.
Browse the released revision of the Managed Schematic Sheet Item, back in the Explorer panel. Switch to the Preview aspect view tab to see a graphical representation, and a listing of the child Component Item Revisions.
The child components used on the sheet can also be browsed from the Children aspect view tab. Double-click an entry to cross-probe, right-click to access a set of component-related commands.
Browse the constituent components on the managed sheet, through the Children aspect view.
Saving an Existing Sheet to the Server
While direct editing is the preferred approach for most design Items that can be stored in a managed content server, when it comes to existing schematic sheets (or device sheets for that matter), you also have the ability to save a sheet directly to the server. This requires that you have a planned revision of an existing Managed Schematic Sheet Item, into which the sheet will be released. The process is as follows:
- Create a new Managed Schematic Sheet Item and initial planned revision, or have a planned revision of another existing Item, as required.
- Open the schematic sheet, or device sheet, within Altium Designer.
- Choose the File » Save to Server command from the main menus.
- The Choose Planned Item Revision dialog will appear. Use this to choose the target revision of the required Managed Schematic Sheet Item (which must be in the Planned state), then click OK.
If the target Managed Schematic Sheet Item doesn't exist, you can create it through the Choose Planned Item Revision dialog on-the-fly. If doing so, be sure to disable the Open for editing after creation option (in the Create New Item dialog), otherwise, you'll enter direct editing mode.
- The Edit Revision dialog will appear, in which you can change Name, Description, and add release notes as required.
- After clicking OK, the sheet will be released and stored in the revision of the Item.
Example of sending an existing device sheet to the managed content server to which you are actively signed in. The release must be to an existing revision of a Managed Schematic Sheet Item, and that revision must be in the Planned state.
Uploading a Schematic Sheet
You can also upload a schematic sheet into the revision of a Managed Schematic Sheet Item. This can be performed in a couple of ways.
Upload Menu
A schematic sheet can be uploaded by right-clicking on the required Managed Schematic Sheet Item in the Explorer panel, and choosing the Upload command from the context menu. The Create New Revision dialog will appear, in which you can change Name, Description, and add release notes as required. Use the Sources region of the dialog to load the required schematic sheet. This can be performed by dragging and dropping the file from Windows Explorer, onto the region. Alternatively, click the button - the Add Files dialog (a standard Windows open-type dialog) will appear. Use this to browse to, and open, the required file (*.SchDoc).
If the Item has no planned revision, upload will be to the next planned revision, created on-the-fly as part of the upload process.
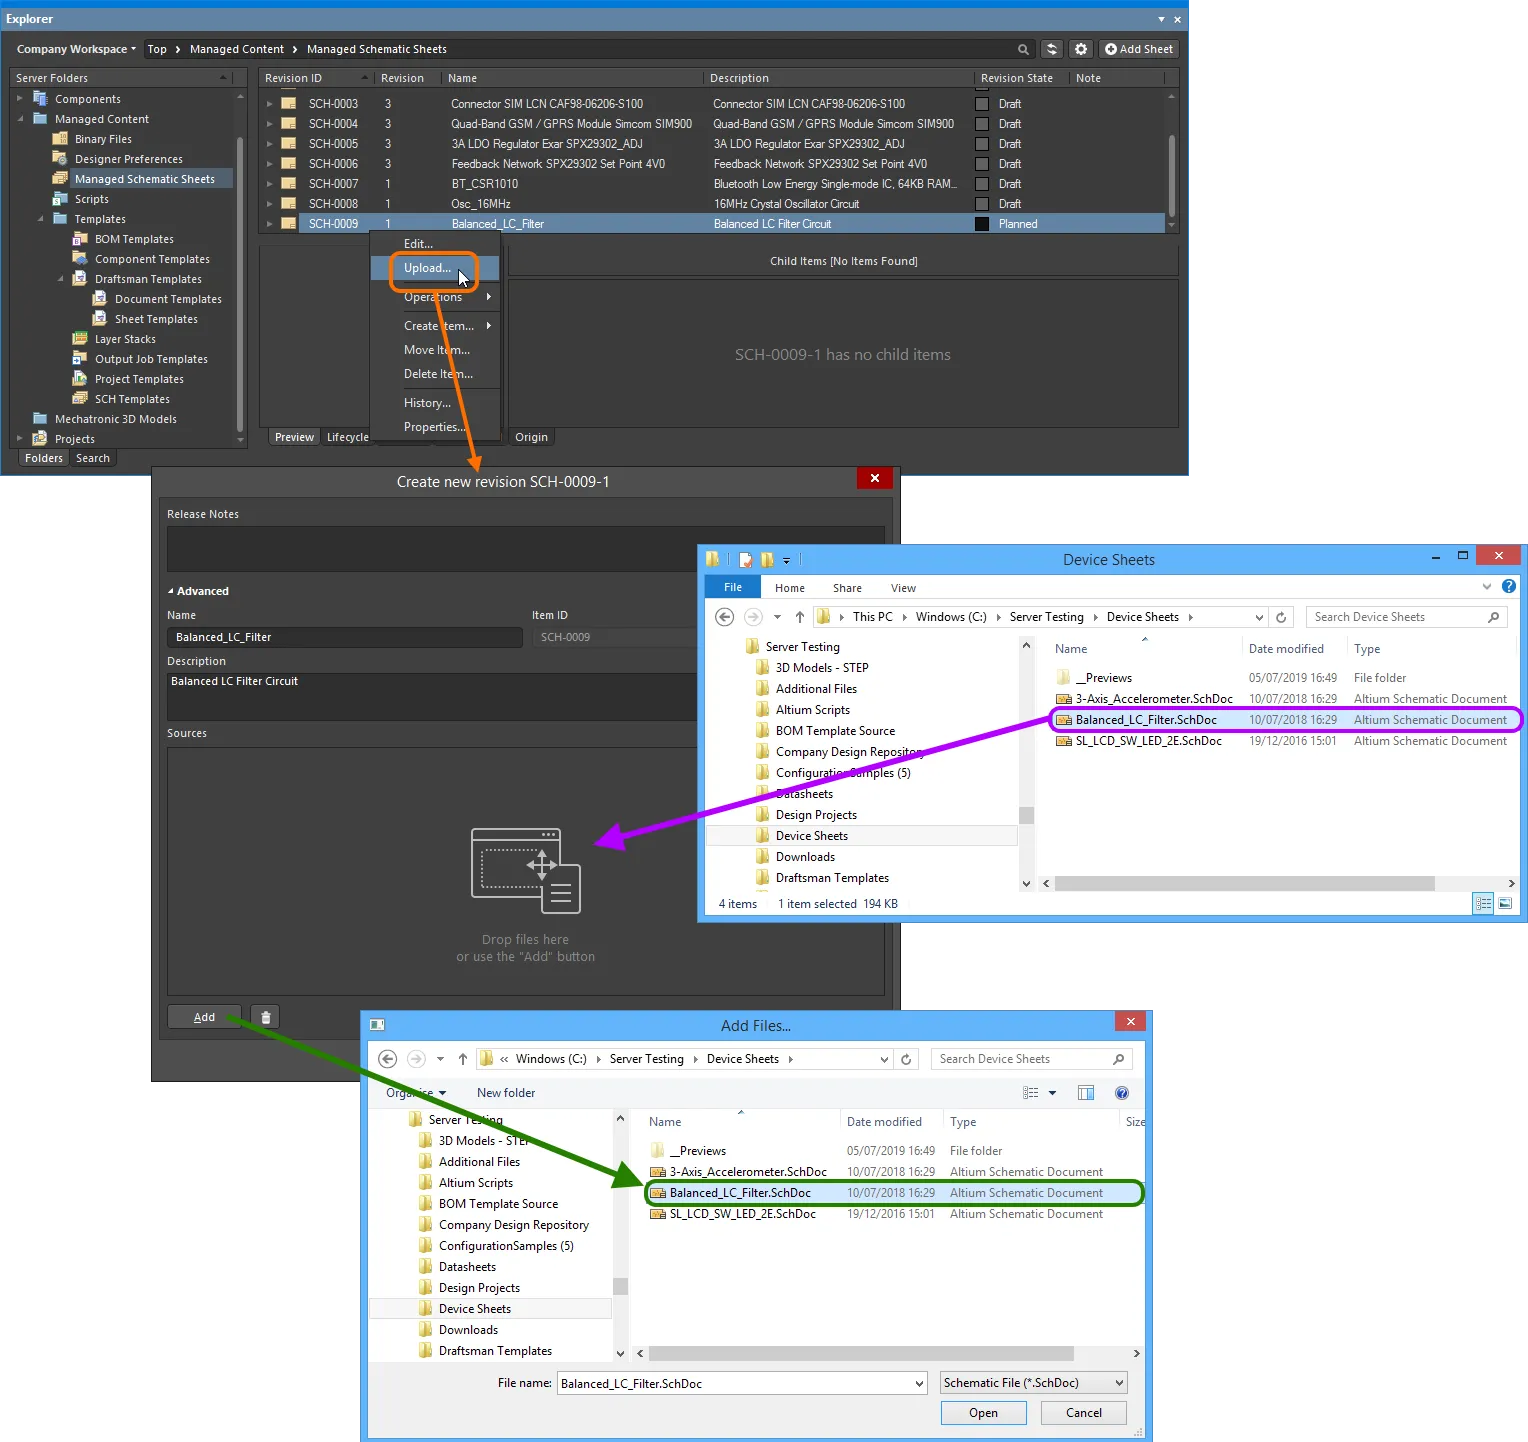
Manually specifying the schematic sheet to be uploaded to the target Managed Schematic Sheet Item.
Once the desired sheet is dropped in, or selected and the Open button clicked, an entry for it will appear back in the Sources region. Proceed with the upload by clicking the OK button. The uploaded sheet will be available on the Preview aspect view tab for the Item Revision, in the Explorer panel.
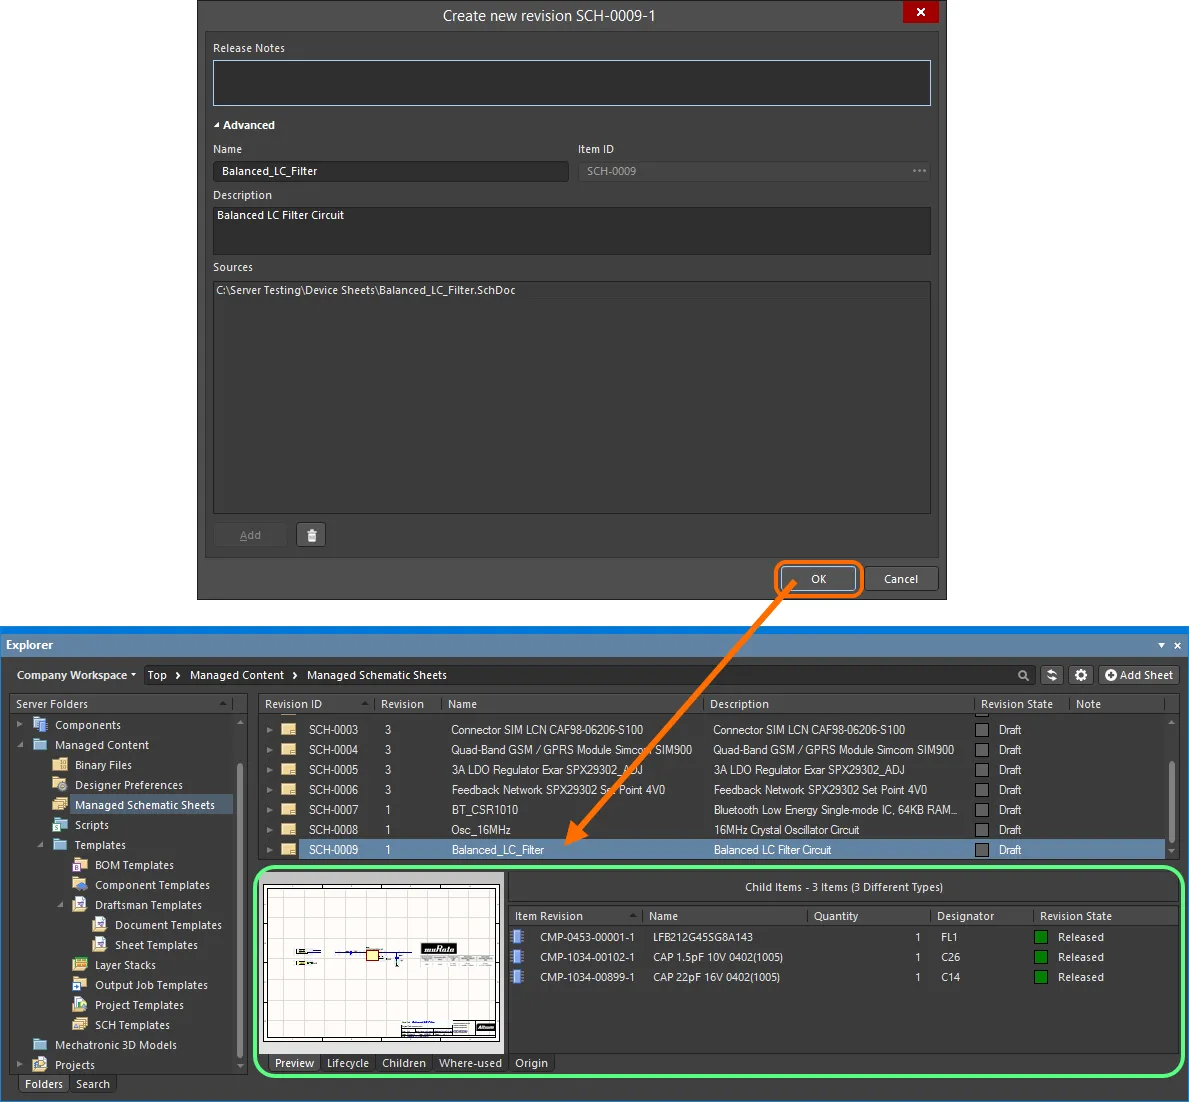
The uploaded sheet can be viewed on the Preview aspect view tab for the revision of the Managed Schematic Sheet Item, along with a listing of its child items.
Drag and Drop from Windows Explorer
A schematic sheet can also be uploaded by dragging the selected file from a source folder in your Windows Explorer, and dropping onto the required target Managed Schematic Sheet Item in the Explorer panel. The Create New Revision dialog will appear, with the dragged file listed in the Sources region. Modify Name (which will be the file name, including extension) and Description (which will be in the format Uploaded from <FileNameandPath>, Size <FileSize>, Created on <FileCreationDate>), and add any Release Notes as required, and then click the OK button.
If the existing Managed Schematic Sheet Item has no planned revision, upload will be to the next planned revision, created on-the-fly as part of the upload process. If you drop the dragged file away from an existing Item, a new Managed Schematic Sheet Item will be created. The
Create New Item dialog will appear. The
Name of the item will be the file name, including extension. The
Description will be in the format
Uploaded from <FileNameandPath>, Size <FileSize>, Created on <FileCreationDate>. Change these as required. The
Item ID will be in accordance with the Item Naming scheme defined at the folder level. If the folder has no naming scheme defined, naming will follow the
$CONTENT_TYPE_CODE-001-{0000} scheme.
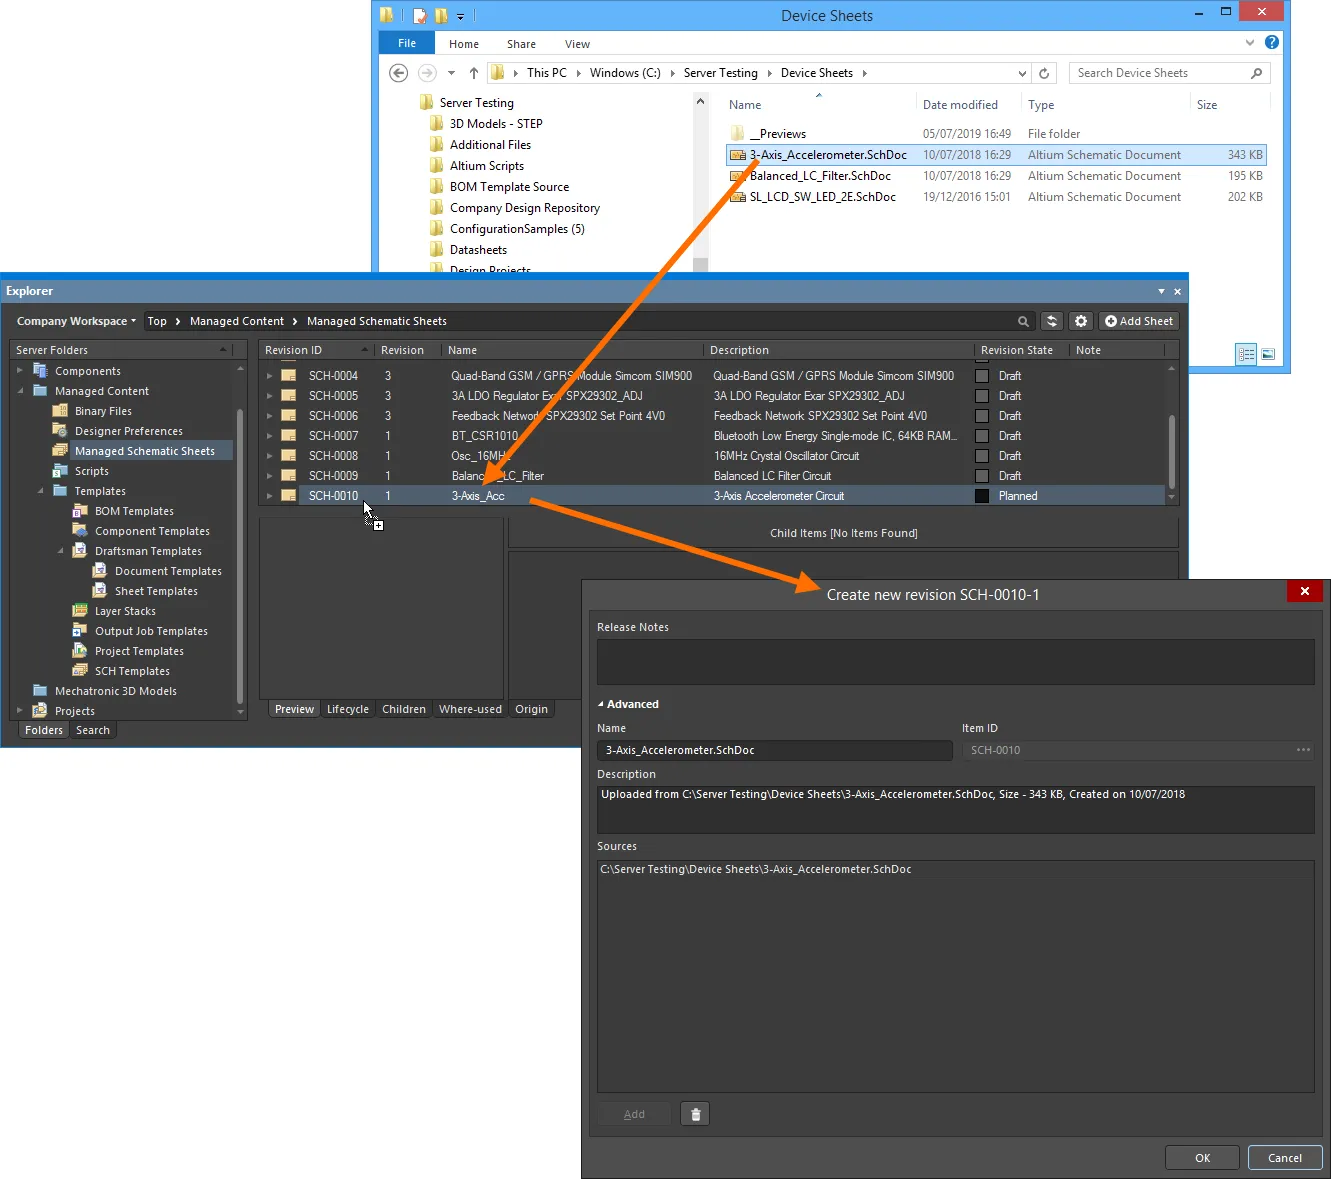
Uploading a schematic sheet using the drag and drop method.
Reusing a Managed Schematic Sheet Item
Related pages: Managed Projects and Releasing a Design, Controlling Access to Server Content
Once a schematic sheet has been released to a managed content server, and its lifecycle state set to a level that the organization views as ready for use at the design level, that sheet can be reused in future board-level design projects. And keeping to the use of the server as the source of all content in and for a design, it is good practice to reuse your managed sheet content in Managed Projects - which themselves are under the server's wing.
Using
controlled access to server content, in conjunction with suitable lifecycle schema, authorized personnel (librarians, senior design management) can ratify, and make available, only those managed sheets that are to be used in designs. This allows the designer to design-away, reassured that they are using only those sheets of reusable design circuitry authorized to be used.
It is the way you include a managed sheet in the current design that lets Altium Designer know it is not a regular schematic sheet. You add a regular schematic to your project via the File menu, whereas you add a managed sheet to your project by placing it from the server. Placement is performed from Altium Designer's Explorer panel.
Prior to Placement...
Placing a managed sheet truly is simplicity itself. But before you do anything, there are a couple of points to note:
- A managed sheet's sheet symbol cannot be placed onto a free schematic, the target sheet must be part of a project.
- Ensure that the schematic sheet that is to receive the associated sheet symbol is open in Altium Designer and is the active document. If documents are open across multiple windows, ensure also that the window containing that active schematic document has focus.
When working with Altium Designer across multiple windows, if the Explorer panel is docked in any mode to a window without the target schematic in it, the Place command will remain grayed-out. This is because clicking within a docked panel focuses the window to which that panel is attached. With the panel floating, however, the required Altium window can be focused (the one with the active target schematic), and that window will keep focus when working inside the panel.
Placement
To place from the Explorer panel:
- Browse or search for the Managed Schematic Sheet Item you wish to place.
- Right-click on the specific revision of the Managed Schematic Sheet required (typically the latest, in which case just right-click directly on the top-level Item entry).
- Choose the Place command.
A sheet symbol that references the sheet will float attached to the cursor - just pick a ball-park spot on the active schematic sheet and click to effect placement. You can fine-tune and nudge it into its final location at a later stage.
As you place the sheet symbol, Altium Designer copies the managed sheet that the symbol represents, from the server into the project folder, within a sub-folder called \Managed\Sheets
. A copy of each managed sheet is stored here, each within its own sub-folder identified by a system-generated unique identifier (GUID).
The GUID-named sub-folder in which the instance of the managed sheet is downloaded and stored must not be edited/renamed in any way.
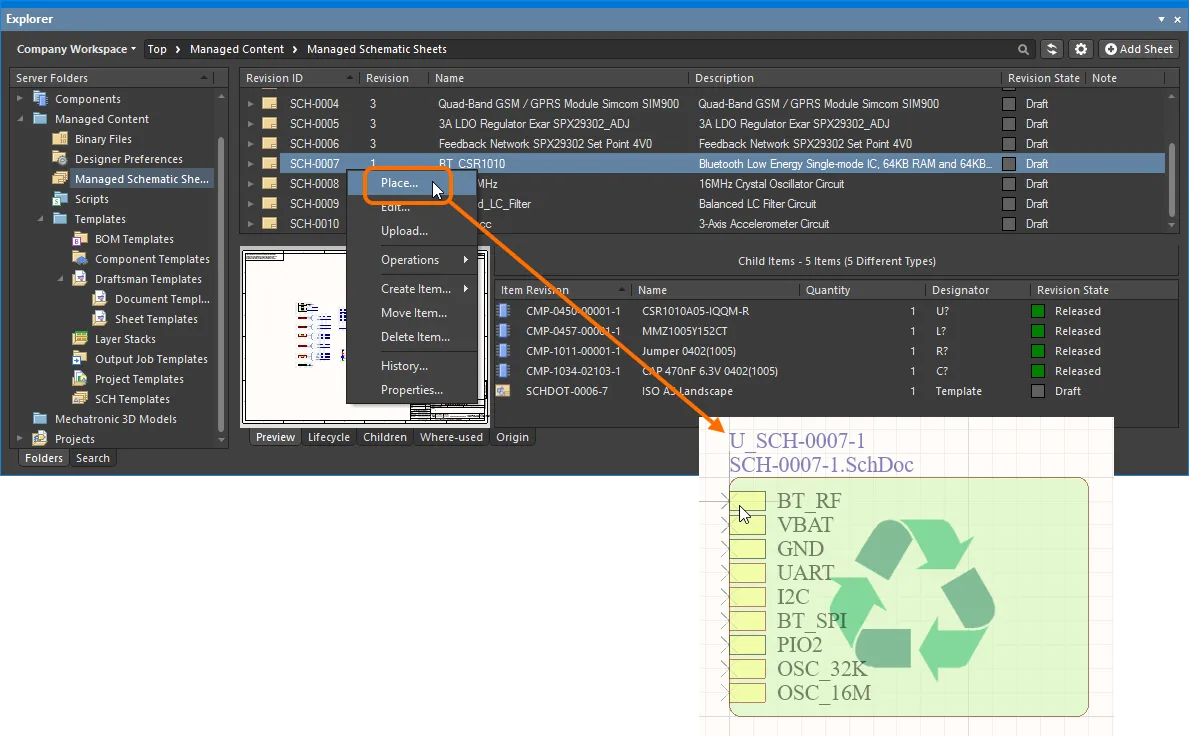
Placement of a managed sheet. Right-click on the desired Item Revision and choose the Place command - a sheet symbol representing the managed sheet is available on the cursor for placement into the design.
Drag and Drop from the Explorer Panel
For more express placement of your managed sheets from the Explorer panel, Altium Designer provides the ability to drag & drop revisions of Managed Schematic Sheet Items directly onto the active schematic document.
Browse your managed content server for the required Managed Schematic Sheet Item to be placed. Placement involves a specific revision of that Item, so be sure to expand the main Item entry to list all of its available revisions. Then click on the required revision and drag an instance of it onto the schematic sheet.
You may need to disable the
Show only latest option for the
Explorer panel's Items view. Click the
control (at the top-right of the panel) to access this option.
Drag and drop the top-level entry for a Managed Schematic Sheet Item itself, to place an instance of the latest revision of that Item.
Re-Releasing a Managed Schematic Sheet Item
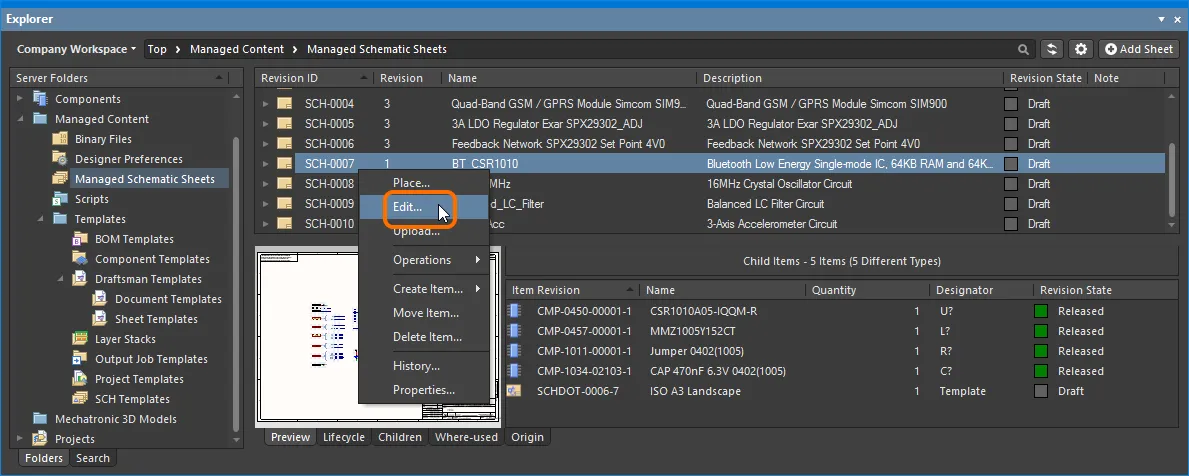
At any stage, you can come back to any revision of a Managed Schematic Sheet Item in the server, and edit it directly. Right-click on the revision and choose the Edit command from the context menu. Once again, the temporary editor will open, with the schematic sheet contained in the revision opened for editing. Make changes as required, then commit the release of the document into the next revision of the Item.
Right-clicking on the top-level entry for an Item itself will edit the latest revision of that Item.
Accessing the command to launch direct editing of an existing revision of a Managed Schematic Sheet Item.
Updating a Managed Schematic Sheet Item
If you need to change the schematic sheet stored in a Managed Schematic Sheet Item, and you have the updated sheet, you can upload that sheet to that Item - the new sheet will be stored in the next revision of that Item.
Downloading Released Data
Download the data stored in a revision of a Managed Schematic Sheet Item by right-clicking on that revision and choosing the Operations » Download command from the context menu. The applicable file(s) will be downloaded into a sub-folder under the chosen directory, named using the Item Revision ID. The file can be found in the Released folder therein.
Access the Download command from the top-level entry for a Managed Schematic Sheet Item itself, to download the applicable file(s) stored in the latest revision of that Item.
Click the Explore button in the Download from Server dialog, to quickly explore to the download folder.
Soft Deletion
When using an Altium 365 Workspace as your managed content server, flexible functionality is available for removing a Managed Schematic Sheet Item directly from within Altium Designer, from the Explorer panel. Right-click on the Item's entry in the panel and choose the Delete Item command from the context menu. The Delete Items dialog will appear, in which to confirm the deletion. The action is actually a 'soft delete', whereby the Item will be moved into the Trash area of the Workspace. The Trash is essentially a recycle bin into which any managed item within your Workspace can be moved (through a soft delete action). It is isolated from the rest of the Workspace.
With the soft-delete facility, you are able to delete an item that is currently being used.
Multiple Managed Schematic Sheet Items can be deleted in a single action. Select all required Items using standard multi-select controls (Shift+click, Ctrl+click), then right-click and choose the Delete Items command from the context menu.
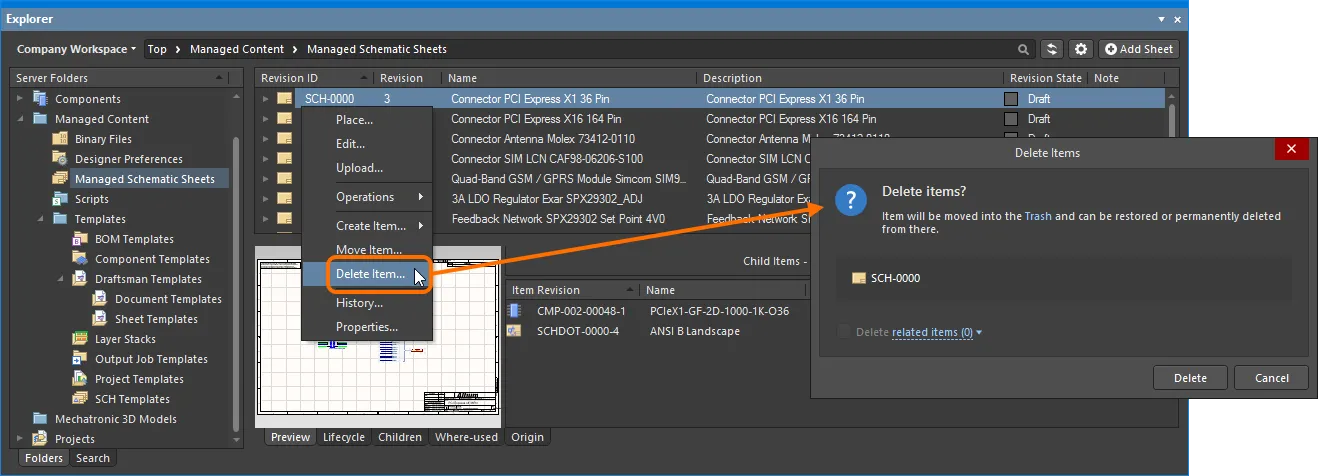
Soft deletion of a Managed Schematic Sheet Item. The Item will be moved to the Workspace's Trash area.
To proceed with the deletion, click the button. The item will be removed and a Deletion Summary dialog will confirm successful deletion. If there was an issue with deletion, this will be flagged to you.
All items deleted in this manner can be found on the Trash page of the Workspace's browser interface. Note that you can only view items that you have personally soft deleted. Administrators will be able to see the full content of the Trash page - so all items that have been soft deleted.
Things to consider in relation to a soft deleted item:
- The item will not be available from your design software, or from within the Web interface.
- Anywhere the item was being used will reflect that the item has been deleted.
- An item can be restored, or permanently deleted from the Trash page, provided you have editing rights. Permanent deletion is only possible provided it is not being used by a parent item.
Note that if you have soft deleted an item - moving it to the Trash - you can create a new item with that same name again. If you were to subsequently restore the original item, and the original name is taken, an integer suffix will be used, to keep its name unique within the Workspace.