Chinese - Translation is available for Altium Designer 23:
Go to the pageThe number of design components available to an engineer when capturing their next design can vary from a few hundred scattered across individual symbol and model libraries to hundreds of thousands, stored in a dedicated company parts database. But no matter how many components are available to hand, there will always be more that aren't, and that need to be created and added for reuse.
For a small design house, an engineer will simply change 'hats' and become the Librarian – whipping up required components that are missing from their design arsenal. However, for a larger organization that employs a dedicated library department to grow and maintain the design components – accessible to all engineers and designers in that organization – it makes sense to submit requests for new (missing) components to that department. Providing an elegant solution to this, Altium Designer, in conjunction with your connected Enterprise Server Workspace, offers the Part Requests feature.
An engineer can simply submit a request for one or more parts to be created and be notified when that request has been completed and the component(s) made available or rejected (and why). The requestor supplies as much key information to support their request as possible (manufacturer and part number(s), description(s), any relevant datasheet (PDF or URL)). Stub components can even be created that the librarian can then run with (and finish off).
This document takes a look at the Part Requests feature from within Altium Designer, including starting a request and viewing a request. For information on configuring the feature (nominating librarians, customizing states) and using it from your Workspace's browser interface, see Part Requests.
Creating Part Requests
Part Requests can be created and maintained within Altium Designer, through the Explorer panel.
Initially, a part request is visible to the original requestor, and all members of the nominated librarian role(s). Once the request has been assigned to a particular librarian, only the requestor and that librarian will see it, and receive notifications about it.
Adding a Request
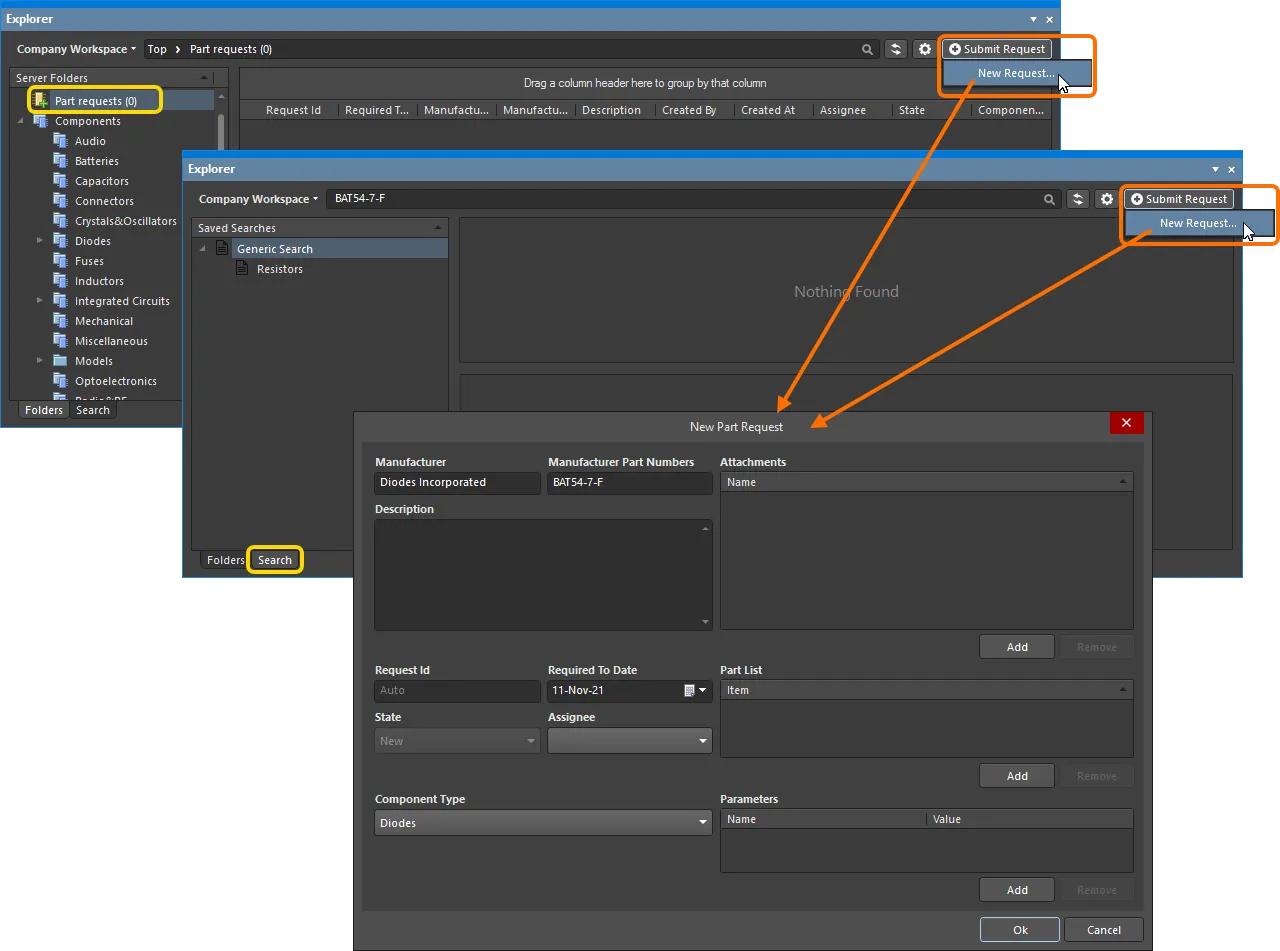
A new part request can be added from the Explorer panel's Part requests folder selected on the panel's Folders tab, using the  button at the top-right of the panel. Also, if the search for a component is unsuccessful, the
  button will become available, above the results window on the Search tab of the Explorer panel. To add a new part request, click this button and choose the New Request command from the subsequent menu. The New Part Request dialog will appear, in which you can define the request.

Adding a new part request directly from within Altium Designer using the Explorer panel.
Use the controls in the dialog to supply as much information as possible:
-
Manufacturer – this is a mandatory field to indicate to the librarian who actually makes the part.
-
Manufacturer Part Numbers – this is a mandatory field that indicates to the librarian the specific part number(s) of the parts you need them to make. Multiple part numbers must be separated by a comma (,).
The Manufacturer and Manufacturer Part Numbers fields are the two key pieces of information with which the assigned librarian can find the correct part(s) being requested. Hence the reason they are the only two mandatory fields. All other information is a bonus and/or allows your input on what certain attributes of the component should be (for example, parameters and component type).
-
Description – this field can be used to provide a rich description of the part (typically taken from the manufacturer datasheet).
-
Request ID – this is automatically generated and assigned to the request, enabling users to track the request's progress easily.
-
Required To Date – use this field to specify the date by which you need the component(s) to be ready. Either type the date directly (in the format dd/mm/yyyy) or click the  button to the right to access a pop-up calendar window, with which to specify the required date.
-
State – this read-only field is used to specify the status of the request. The default state for a new request is
New.
While a request has five default states, you can customize them or add more to suit company requirements through the Workspace's browser interface.
-
Assignee – this field shows which librarian is currently working on the request. The drop-down field lists all Workspace members who are part of the nominated librarian role(s), the latter of which is nominated through the relevant admin page of the Workspace's browser interface.
This field should typically be left unspecified unless a librarian is creating the request and knows who should work on the part from the outset. Initially, all librarians will see the request, and then one can step forward to assign the request to themselves. Librarians can also pass the request between each other, for example, if another has a little additional bandwidth to accommodate the request.
-
Component Type – this field can be used to specify the type of component being requested. The drop-down list will include all types currently defined on the Data Management – Component Types page of the Preferences dialog.
-
Attachments – this area can be used to attach any useful files related to the requested part. For example, a PDF datasheet, an image, or a document. Click the  button to locate the file(s) through a standard dialog.
Files of any format can be attached and can be up to 2GB in size.
-
Part List – use this area to specify any existing component(s) in the Workspace, which you have created as temporary stub components. Click the  button and browse for the required component accordingly. The librarian can then fulfill the request. If no stub part exists, the librarian will create a new component in the Workspace, along with requisite domain models (if they do not already exist).
-
Parameters – this area can be used to add a set of specific parameters required for the part(s). Click the  button and use the subsequent fields to provide a name and value for the parameter. If no parameters are specified, the librarian will likely fall back to the addition of the parameters in a related datasheet for that part, in accordance with organizational policy.
Once all information is defined as required – essentially the Manufacturer and Manufacturer Part Numbers (which are mandatory) – click OK to create the request.
Viewing Part Requests
At any time, you can view the part requests you initiated (requester), or are responsible for (librarian). This can be performed from the Explorer panel. For both the originator of a part request (Requester) and the user(s) defined in roles associated with the Librarian role (Librarians), requests are presented through the Explorer panel using a dedicated Part requests folder.

Example Part Requests in the Part requests folder. You see the parts you have requested; a librarian sees the parts that they have been assigned to work on, as well as those that have yet to be assigned.
The number next to the Part requests folder name indicates how many total requests exist.
The folder will present entries for only those parts a designer or engineer has actually requested. A librarian will see part requests specifically assigned to them and part requests that have yet to be assigned to a particular librarian.
Selecting a request in the upper region will display an information stream in the lower region. This information provides a running summary of any event occurring in relation to that request, including any comments made by the requestor or librarian. Each entry in the stream consists of the following elements:
-
Created At – the date and time at which the event took place.
-
Created By – the user responsible for the event (either the requestor or a librarian).
-
Description – an entry that consists of an auto-generated message, along with any comment included by the requestor/librarian.
Editing an Existing Part Request
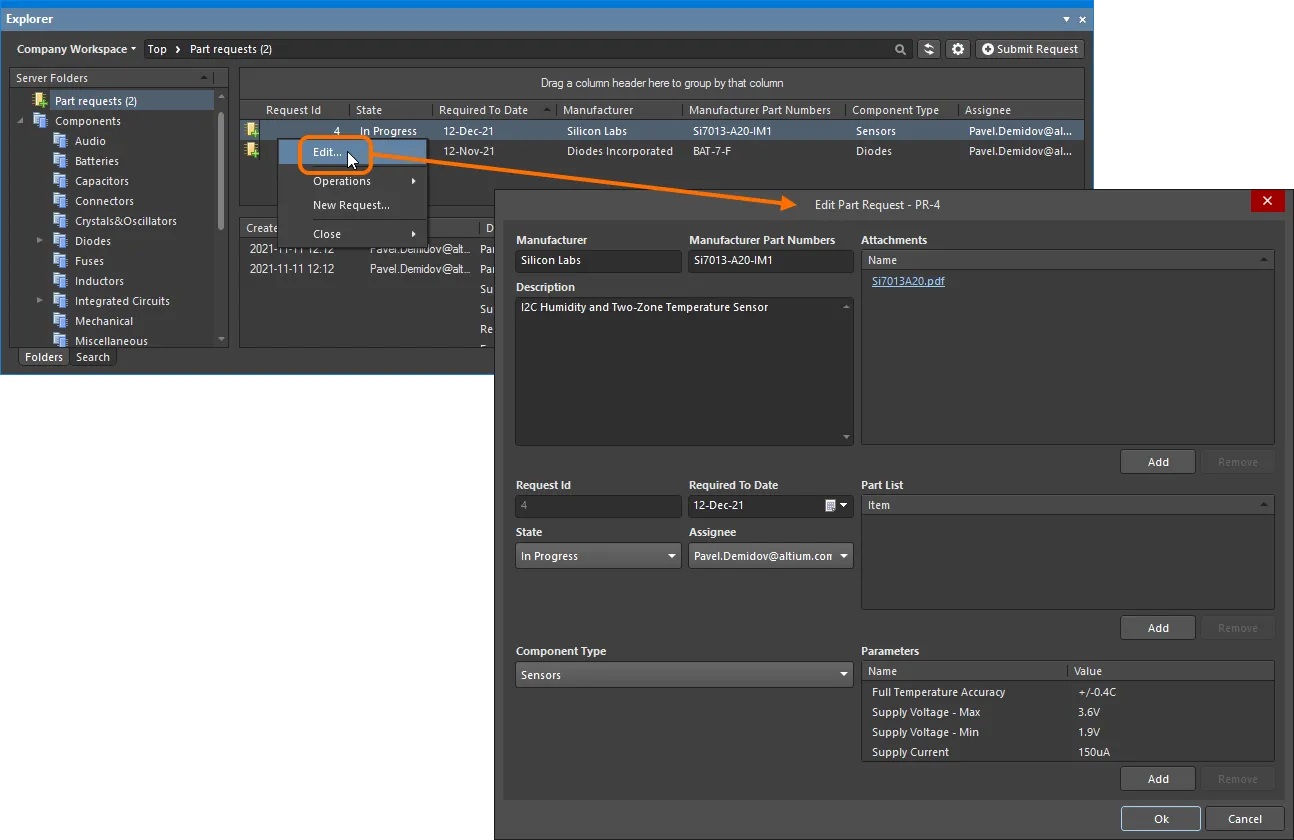
To edit an existing part request, either double-click its entry in the upper region or select it and choose the Edit command from the region's right-click context menu.

Accessing the dialog in which you can edit an existing part request.
Make changes as required, then click OK.
Controlling Data Display
The following sections provide more information on working with the data presented in the Part requests folder.
Controlling the Display of Columns
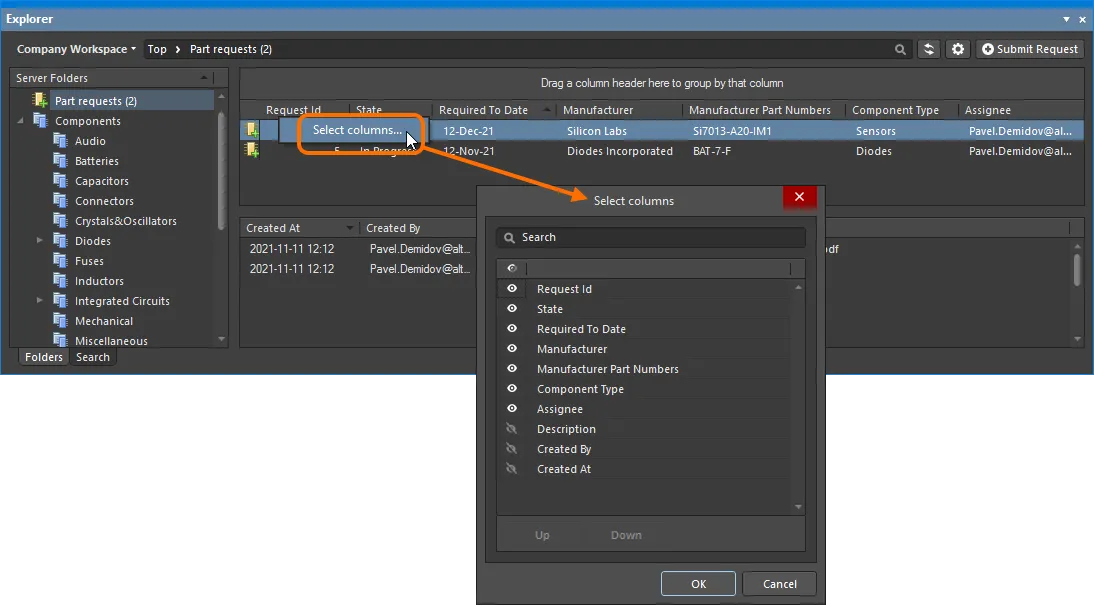
Each column in the view corresponds to a specific field of the part request. Configuring which columns are displayed is done using the Select Columns dialog, which is accessed by right-clicking within the column headers and choosing the Select Columns command from the context menu.

The Select Columns dialog is used to define which data is presented in the Part requests folder.
By default, all data is shown. Toggle the presentation of a data column by clicking the  control to hide it (the control will become
  ).
).
Column Ordering & Sizing
The order of the columns is customizable. Click on a column's header and drag it horizontally to the required new position. Valid positions are highlighted by vertical positional arrows.
Alternatively, change the ordering in the Select Columns dialog. Drag and drop an entry to the required new position within the list, or select it and use the  and
and  buttons. Note that only visibly enabled entries can be moved.
With the exception of the column containing the icon for the part request, the width of a column can be modified by clicking and dragging the right-hand separator (in that column's header).
Grouping Part Requests
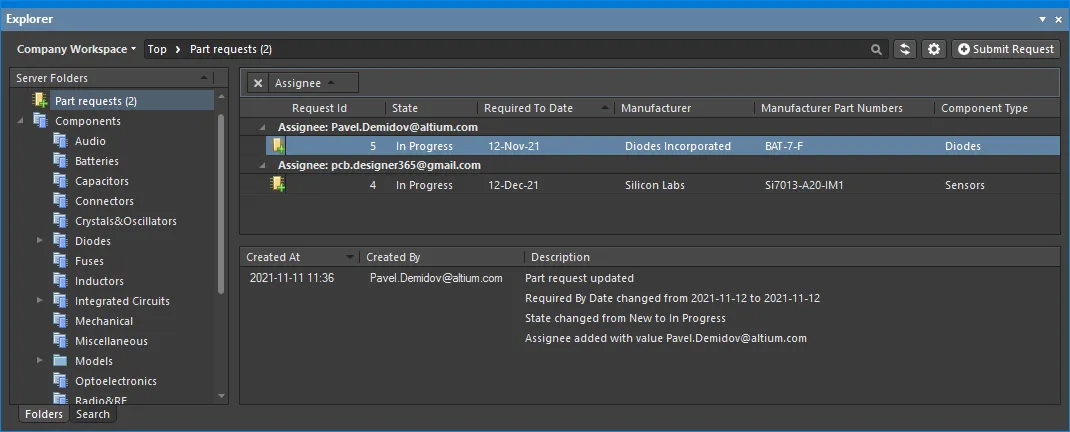
Part requests can be grouped based on any of the visible column headings by clicking and holding on a column header, then dragging and dropping it onto the text that says Drag a column header here to group by that column.
A hierarchy of groups can be created by nesting the column headers. Within the grouped columns region, drag and drop to redefine the grouping 'sort order' as required, with the left-most header entry being at the top of the hierarchy.
To clear grouping by a column, click the  control at the left of its name in the grouped column region.

An example of customized grouping (by the Assignee column).
Sorting
Part requests can be sorted by a specific column by clicking on that column's header. Click once to sort in ascending order (based on the content of that column). Click again to sort in descending order.
You can sort by multiple columns. With the part requests already sorted by a specific column, Shift+Click on another column to 'sub-sort' by its content.
To remove sorting for a column, Ctrl+Click on its header.
Column-based Filtering
Like an Excel spreadsheet, the part requests can be further filtered by the contents of each column by clicking the filter icon that appears on the right-hand side of a column header when hovering over the header ( ). A menu will open containing an entry for each value in that column. Click on an entry to reduce the list to only include part requests with that value.
When a column filter is applied, the filter icon is displayed in blue ( ) indicating that there is filtering applied based on that column. Filtering can be applied to multiple data columns. Each column filter becomes an ANDed condition in the overall filter. A textual representation of the filtering currently in effect will be presented at the bottom of the region.

An example of column filtering in action.
To clear filtering for a column, choose the (All) entry from the filtering drop-down. To clear filtering completely, click the  control at the far right of the textual representation of the filter. To disable the filter, uncheck the check box to the left of its textual representation. To enable it again, check the check box.
A history of filters that have just been used is available. To display the history, click the drop-down button to the right of the textual representation of the current filter. This button will display when at least one previous filter has been applied.
To customize the current filter further, click the  button to the far right of the textual representation of the filter to open the Filter Editor dialog. Use this dialog to create more sophisticated and complex filters as needed.
Additional Operations
The right-click context menu for the upper region also contains the following useful commands when working with part requests:
-
Operations » Create Component – this allows you to quickly create a shell component item from the part request, giving the assigned librarian a starting point for crafting the required component. The temporary Component editor will open in Single Component Editing mode – ready for direct editing of the component. Define the component, add domain models, and save to the Workspace.
-
Operations » Export Data – this allows you to export the data from the upper region. The Select columns for data export dialog will open in which you can specify the data you want to export. The dialog contains all possible columns for the grid, with those that are currently displayed in the panel, enabled for export by default. After clicking OK, the standard Windows Save As dialog will open in which you can name and save the exported file. Use the Save as type field to choose the file format, either Comma-Separated Values Files (*.csv), or Excel Files (*.xls).
-
Close » Completed – can be used (typically) by the librarian to quickly mark the part request as complete without having to open the request for editing.
-
Close » Rejected – can be used (typically) by the librarian to quickly reject the part request without having to open the request for editing.
-
Close » Cancelled – can be used by the librarian (or requestor) to quickly cancel the part request without having to open the request for editing.
The right-click menu also offers a command to create a new part request. This would typically be used by the designer/engineer requiring a missing part, but a librarian could also use it to initiate a new part directly.