掩膜规则类型
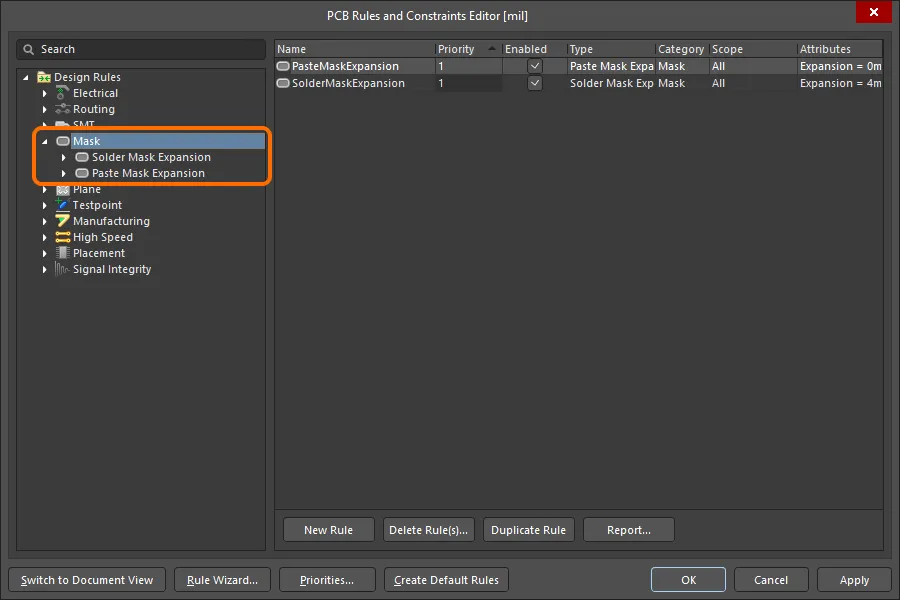
The design rules of the Mask category are described below.

The Mask category of design rules.
Solder Mask Expansion
Default Rule: required
The shape that is created on the solder mask layer at each pad and via site is the pad or via shape (or hole), expanded or contracted radially by the amount specified by this rule.
Constraints

Default constraints for the Solder Mask Expansion rule
-
Expansion top / Expansion bottom – this constraint is used to specify the value applied to the initial pad/via shape (or hole) to obtain the final shape on the top and bottom solder mask layer, respectively.
-
Solder Mask From The Hole Edge – use this constraint to determine the reference for the calculated mask expansion. When disabled, the perimeter of the object is used (the copper land edge for a pad or via). When enabled, the perimeter of the pad/via hole is used. For example, a 5mil Solder Mask Expansion applied to a 60mil diameter round pad will create a mask opening of 70mil (
pad diameter + (2 x expansion)). If the reference is the hole edge, and the same pad had a hole diameter of 30mil, then the 70mil mask opening would be achieved by a 20mil expansion (hole diameter + (2 x expansion)). -
Tented
-
Top
-
Tented – check if it's desired for any solder mask settings in the solder mask expansion design rules to be overridden, which results in no opening in the solder mask on the top layer of this via and is therefore tented. You may disable this option, though the via will still be affected by a solder mask expansion rule or specific expansion value.
-
-
Bottom
-
Tented – check if it's desired for any solder mask settings in the solder mask expansion design rules to be overridden, which results in no opening in the solder mask on the bottom layer of this via and is therefore tented. You may disable this option, though the via will still be affected by a solder mask expansion rule or specific expansion value.
-
-
Rule Application
During output generation.
Notes
-
Partial and complete tenting of pads and vias can be achieved by defining the appropriate value for the Expansion constraint:
- To partially tent a pad/via (covering the land area only) – if the expansion is from the land pattern perimeter, set the Expansion to a negative value that will close the mask right up to the pad/via hole. If the expansion is from the hole edge, simply set the Expansion to be 0.
- To completely tent a pad/via (covering the land and hole) – if the expansion is from the land pattern perimeter, set the Expansion to a negative value equal to, or greater than, the pad/via radius. If the expansion is from the hole edge, simply set the Expansion to be a negative value equal to, or greater than, the pad/via hole radius.
- To tent all pads/vias on a single layer, set the appropriate Expansion value and ensure that the scope of the rule (the Full Query) targets all pads/vias on the required layer.
- To completely tent all pads/vias in a design, in which varying pad/via sizes are defined, set the Expansion to a negative value equal to, or greater than, the largest pad/via radius.
- Solder mask expansion can be defined for pads and vias on an individual basis. While browsing properties for a pad or via through the Properties panel, options are available to follow the expansion defined in the applicable design rule, or to override the rule and apply a specified expansion directly to the individual pad or via in question. For pads, you can also manually select from a standard set of predefined mask shapes or create your own custom mask shape.
- You can also force complete tenting of the pad/via on the top and/or bottom, using the Tented options. When these options are enabled, the pad/via has no solder mask opening on the top/bottom of the board, and is therefore tented. These options correspond to the Solder Mask Tenting - Top and Solder Mask Tenting - Bottom properties for the pad when viewing properties through the PCB List panel.
- Solder mask expansion can also be defined at the individual level for the following objects (through the Properties panel, when browsing the properties of a selected object): Track, Region, Fill, Arc. Options are available to follow the expansion defined in the applicable design rule, to override the rule and apply a specified expansion directly to the individual object in question, or to have no mask at all.
Paste Mask Expansion
Default Rule: required
The shape that is created on the paste mask layer at each pad site is the pad shape, expanded or contracted radially by the amount specified by this rule.
Constraints

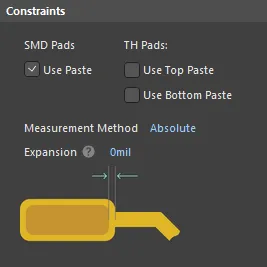
Default constraints for the Paste Mask Expansion rule
-
SMD Pads
- Use Paste For SMD Pads – check the box to enable the chosen expansion value by default for SMD pads scoped by the design rule. Clear the checkbox to remove the paste from the scoped pads.
-
TH Pads
- Use Top Paste – check the box to enable the chosen expansion value by default for the top side of thru-hole pads scoped by the design rule. Clear the checkbox to remove the paste from the scoped pads.
- Use Bottom Paste – check the box to enable the chosen expansion value by default for the bottom side of thru-hole pads scoped by the design rule. Clear the checkbox to remove the paste from the scoped pads.
-
Measure Method – use this drop-down to specify the paste mask as an absolute expansion or as a percentage of the pad area. When the option is set to Percent, the Expansion is defined as a percentage of the pad area. You can set the Expansion as follows:
- Expansion = 0 – the paste mask opening is the same size as the pad.
- Expansion < 0 – enter a negative value to define a paste mask area that is <Value> percent smaller than the pad area.
-
Expansion > 0 – enter a positive value to define a paste mask area that is
<Value>percent larger than the pad area.
- Expansion – the value applied to the initial pad shape to obtain the final shape on the paste mask layer. The expansion value will be reflected in the Pad Stack region of the Properties panel in its Pad mode.
Rule Application
During output generation.
Notes
- The paste mask expansion can be defined for pads on an individual basis. While browsing properties for a selected pad through the Properties panel, options are available to follow the expansion defined in the applicable design rule, to override the rule and apply a specified expansion directly to the individual pad in question, to select from a standard set of predefined mask shapes or to create a custom mask shape.
- Paste mask expansion can also be defined at the individual level for the following objects (through the Properties panel, when browsing the properties of a selected object): Track, Region, Fill, Arc. Options are available to follow the expansion defined in the applicable design rule, to override the rule and apply a specified expansion directly to the individual object in question, or to have no mask at all.
- The paste mask layer for thru-hole pads is supported in Draftsman documents and Gerber, Gerber X2, ODB++, IPC-2581, and PCB Print outputs.
