Parent page: Streamlining Board Design Documentation with Draftsman
Draftsman provides a range of additional drawing and annotation tools designed to add important information to a Draftsman drawing document. These include both automated note and highlighting systems.
The Active Bar (positioned at the top of the design space) offers a range of drop-down menus that include placement commands for all Annotation objects.

Annotation placement commands are also available from Draftsman's main Place menu, or from the Drawing Annotations toolbar – View » Toolbars » Drawing Annotations.

Callout
A Draftsman document Callout is a graphic pointer that can be placed in a document to provide information about a specific drawing location or object. The information associated with a Callout may be custom text or data sourced from a BOM entry, a Note item, a component Parameter, a board Region, or a via structure. Its drawing style and information source are configurable in the Properties panel. Callouts can have one or more pointers to source points.

Several Callouts of different types placed on a Board Assembly View.
To place a Callout, select Place » Annotations » Callout from the main menu or the  icon from the Active Bar dropdown.
- When the command is launched, the cursor will change to a crosshair indicating Callout placement mode. Position the cursor in the drawing space to choose between the two Callout placement types as indicated by the cursor highlighting:
- Object Callout – when the cursor highlights a side or corner of an object outline (such as the perimeter of a drawing view or component), the placed Callout will be 'attached' to that specific object.
- General Callout – when there is no highlighting at the cursor, the placed Callout simply refers to that location, rather than an object.
- Click to place the Callout pointer at the desired location, as determined above.
- Move the cursor to a suitable position for the Callout Source Text and click to confirm the placement.
- Callouts support multiple sources. After placing the Callout's Source Text position you can move and click again to identify as many other Source locations as required.
- Once the required number of Sources have been defined, right-click to complete the placement of this Callout. You remain in Callout placement mode.
- Repeat this sequence of steps to place another Callout, or right-click a second time to drop out of Callout placement mode.
Smart Callout text can be placed and configured to read the matching BOM entry for a component (or components), refer to an existing Note Item entry, or just display custom text.
By default, the pointer of placed object type Callout is a dot (positioned on an object outline), while the general type of Callout is indicated by an arrowed pointer. The 'head style' of these pointer ends can be changed in the Properties panel. Note that the Callout pointer line can include a GOST compliant mechanical attachment Symbol.
The information text that is shown at the end of the Callout (the Callout 'tag') is determined by the Source Text property options in the Properties panel. By default, an object type Callout will display its BOM entry; a general type Callout will show a custom text string, initially set to '?'.
If the Source Text setting in the Properties panel is not applicable to the type of Callout you have placed, its tag text will be shown as N/A. For example, if the Source Text is set to BOM for a General Callout (indicated by an arrow pointer), then the callout is referring to a general location, rather than to a BOM component. An Object type callout, which specifies a component, is required in this case.
The end position of a placed Callout may be graphically modified. Select a Callout to enable its end position editing handle, which can be dragged to a new location.

Drag a selected Callout's editing node to move its end point.
The starting/target point for a placed Callout can be moved to a new location through a drag and drop action. When moved, the starting node binds to the new object and causes the Callout data to update accordingly, as shown in this animated ![]() demonstration.
demonstration.
An existing Callout can have additional sources added and removed. Click to select the Callout, then right-click on it to display the context menu, as shown below.

Callouts can reference multiple sources; if a specific source reference is selected then it can be deleted.
The context menu will include an Add Source command, and if it already has multiple sources defined and an individual source was selected when the right-click was performed, the menu will also include a Delete Source command. Note the Spacebar and Delete Source shortcuts, use these to quickly add and delete Sources to/from a Callout, respectively.
Solder and Glue joint Symbols
The GOST defined symbols for Soldered and Glued joints provide further mechanical information that can be included in Draftsman design production documents.
The symbols for indicating glued and soldered mechanical joints are governed by the GOST 2.313-82 drawing standard for mechanical connections, and are available as special options in Draftsman’s Callout object.
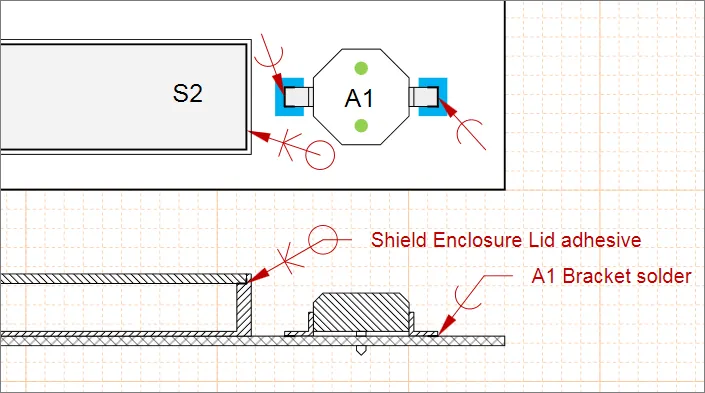
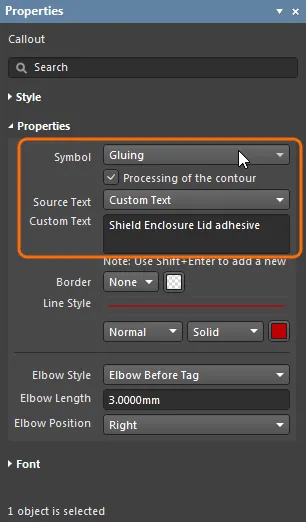
When a Callout has been placed to indicate a glued or soldered mechanical connection, the special symbols can be selected from the Symbol drop-down menu in the Properties panel.
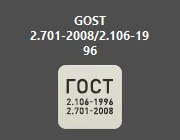
This option is available only if the GOST 2.701-2008/2.106-1996 extension (shown below) is installed from the Extensions and Updates page.
The Symbols and options are defined as follows:
-
 Gluing – indicates mechanical joint areas for gluing.
-
 Soldering – indicates mechanical joint areas for soldering.
-
 Processing of the contour option – check when a glue or solder joint seam is to be made in a closed area. Places a circle symbol at the end or elbow of the Callout line.
Callout Properties
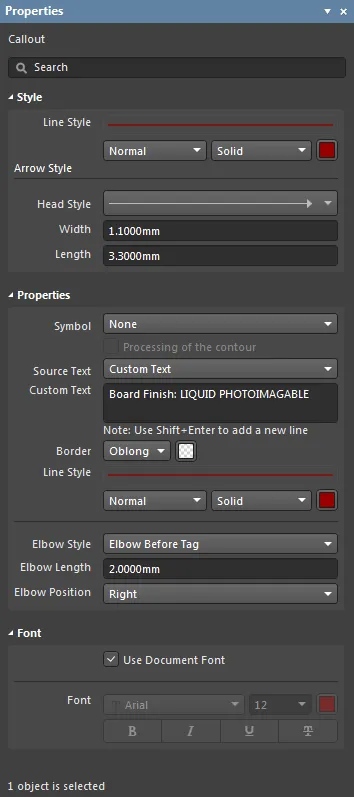
The Callout mode of the Properties panel.
Style
- Line Style – the thickness and style of the Callout pointer line and elbow. Use the line weight drop-down menu to choose from a range of line thickness presets and the line pattern menu to choose from a range of line styles. The associated color button (
 ) opens the color selector where the line color can be specified by RGB or HEX value, by freeform selection, or from a range of presets. Note that the slider control sets the color Opacity level, where 0% represents full transparency.
Arrow Style
- Head Style – select the drop-down to choose from a range of preset pointer styles (headers).
- Width – the width of the target pointer head, such as an arrow. This setting also defines the diameter of a round head style.
- Length – the length of the pointer head, such as an arrow.
Properties
- Symbol – select a Soldering or Gluing symbol (as defined by GOST
2.313-82) from the drop-down menu to add that mechanical attachment indicator to the Callout pointer line. Enable the Processing of the contour option when a glue or solder joint seam is to be made in a closed area to place a circle symbol at the end or elbow of the Callout line.
- Source Text – use the drop-down menu to specify the data source that is used to generate the Callout text string (tag).
Custom Text – the Callout text will be the string entered in the associated Custom Text field.Note Item – the Callout text is a reference to a Note Item entry that exists in the current drawing. Use the resulting Note Item drop-down menu to select the item (row) number in the Note object.-
BOM Item – the Callout text will refer to the BOM entry number reference for the targeted (attached) component. This source option applies when a Callout is attached to a component.
When Draftsman is sourcing BOM data from a project BOM document, the component's BOM entry reference (Line #) must be available in the source document – the BOM Item Callout tag will be otherwise blank.
► See the Line # Column section in BOM Management with Active BOM for more information.
-
Component Parameter – the Callout text will be a Parameter value that is available from the attached component (such as Description, Pattern, etc), as selected from the resulting Parameter drop-down menu.
Note that component Parameters are transferred to a PCB document via an ECO when the host project design is Compiled.
► See Creating the PCB Footprint.
Board Region – the Callout text will be the name of the underlying Board Region when the Callout has been placed on a Board Region View.Via Structure – the Callout text will be the name of the underlying via feature when the Callout has been placed on a Via Type View.
-
Border – use the drop-down menu to choose the graphic shape style at the end of the Callout line (circle, square, etc.), which will automatically expand to accommodate the accompanying text tag string. The associated color button ( ) opens the color selector where the fill color of the end shape (that surrounds the text tag) can be specified by RGB or HEX value, by freeform selection, or from a range of presets. Note that the slider control sets the color Opacity level, where 0% represents full transparency.
If a Callout has multiple sources that are different BOM items, all of the BOM item numbers will be displayed when the Callout has its Border property set to Underline.
- Line Style – the thickness and style of the Callout end shape's Border line (outline). Use the line weight drop-down menu to choose from a range of line thickness presets and the line pattern menu to choose from a range of line styles. The associated color button (
 ) opens the color selector where the line color can be specified by RGB or HEX value, by freeform selection, or from a range of presets. Note that the slider control sets the color Opacity level, where 0% represents full transparency.
- Elbow Style – use the drop-down menu to specify or disable the horizontal line (elbow) attached to the end of the Callout line. The Callout text tag and its border are attached to the elbow.
- Elbow Length – set the horizontal length of the elbow.
- Elbow Position – set the elbow and text tag to project to the left or right of the Callout line.
Font
- Use Document Font checkbox selected – the font used for the text tag is that defined by the document options. See the Document Font entry in the General region of the Properties panel when in Document Options mode.
- Use Document Font not selected – use the Font drop-down menus to choose the desired font type and size and select the lower buttons to enable text attributes. The associated color button (
 ) opens the color selector where the font color can be specified by RGB or HEX value, by freeform selection, or from a range of presets. Note that the slider control sets the color Opacity level, where 0% represents full transparency.
Center Mark
The Draftsman Center Mark is crosshair object that automatically locks to the radius origin of a Circle and Arc in a Draftsman document. A placed Center Mark is available as a reference location for placed dimensioning objects such as Linear and Ordinate dimensions.
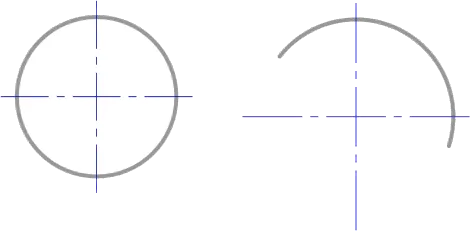
To place a Center Mark, select Place » Annotations » Center Mark from the main menu or the  icon from the Active Bar dropdown. After launching the command, the cursor will change to a cross-hair and the editor will enter Center Mark placement mode. Placement is made by performing the following actions:
- Hover the cursor over a Circle or Arc outline, which will be highlighted (colored orange) as the Center Mark graphic snaps to the Circle/Arc radius center point.
- Click the Circle/Arc outline to confirm the placement of the Center Mark object.
- Continue placing further Center Marks or right-click or press Esc to exit placement mode.
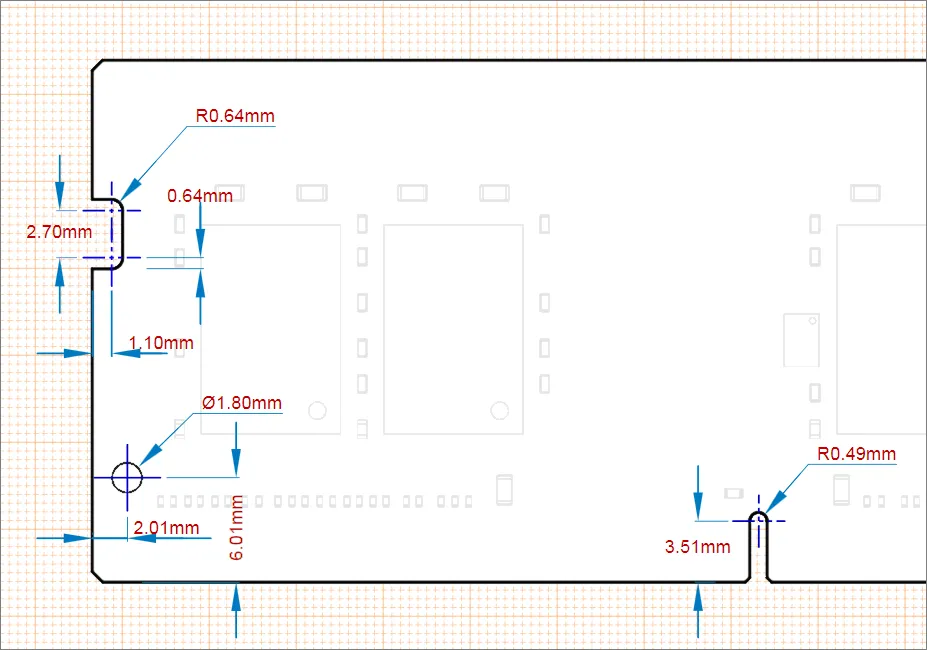
Center Marks placed on a drawing document are available for dimension bindings. When placing Linear or Ordinate dimensions, select the highlighted dot at intersection of the Center Mark cross as a dimension reference node.
The line style and color of a Center Mark’s indicator cross are available as settings in the Properties panel. The panel also includes a marker Rotation property that can be used to document the angular placement of circles/arcs in a drawing. In this case, a placed Angular Dimension uses one line of a Center Mark cross as an angle dimension reference.

Select a Center Mark by clicking on the intersection of its cross-hairs. Once selected, an editing node is available at its center point.

A selected Center Mark
Click and drag the Center Mark's node to move it to a Circle/Arc object in a different location. The Center Mark is attached to the target Circle/Arc in the same way as during its initial placement – hover then click on the Circle/Arc outline.
Center Mark Properties
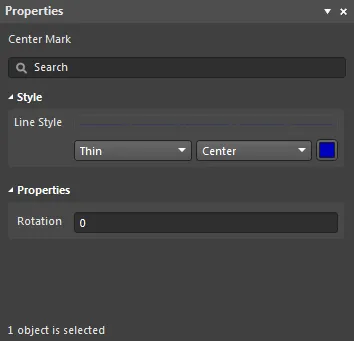
The Center Mark mode of the Properties panel.
Style
- Line Style – select the thickness, graphic style and color of the Center Mark cross-hair lines.
Properties
- Rotation – specify the rotation angle of the Center Mark cross-hair graphic, which can be used to document the angular placement of circles/arcs in a drawing. In this case, a placed Angular Dimension uses one line of a Center Mark cross as an angle dimension reference.
Surface Finish Indicator
Draftsman allows the placement of Surface Finish graphical symbols and their associated parameters that comply with the ISO 1302:2002 International Standard for surface texture in technical product documentation. The standard specifies the rules for the indication of surface texture in drawings, based on special symbols and attributes that describe the permitted surface material for the product – in this case, a printed circuit board.
The addition of Surface Finish indicators in Draftsman avoids the need for a separate Surface Finish tool or application when this standardized information is required for PCB manufacture. The graphical symbols are accompanied by a range specialized text codes, as defined by the ISO standard, that are added via the Draftsman Properties panel when a placed Surface Material object is selected.
The symbol style and text attributes for a placed Surface Finish object are configurable in the Properties panel.

A number of Surface Finish objects of different styles placed on a Board Fabrication View.
To place a Surface Material symbol in a drawing, select Place » Annotations » Surface Finish from the main menu (or the  icon from the Active Bar). When the command is launched, the cursor will change to a crosshair indicating Surface Finish symbol placement mode. As the cursor is hovered over objects, the object edges will be highlighted as orange-colored lines.
To attach a Surface Finish symbol to a drawing object face:
- Position the cursor on a highlighted line then click to nominate that edge position.
- Move the cursor to specify the symbol orientation relative to the edge then click to confirm the placement.
To place a free Surface Finish symbol that is not attached to an object edge:
- Position the cursor in any position where an object edge is not highlighted.
- Click to confirm the placement.
If you are placing a surface finish object and the option to Allow Different Requirements has been enabled (pre-placement), the object must be placed in free space and not attached to an edge of an existing view.
The attached surface indicator can be dragged along the line, and optionally, away from the drawing via an automatic Extension Line – enabled by the With Leader option in the Properties panel. The information attributes that are associated with the Surface Finish symbol, as specified in the Properties panel, will refer to the object face to which it is attached. For a free Surface Finish symbol that is not attached to an object face, its information attributes specify the base, default requirements for all object faces. The panel's Allow Different Requirements option indicates that any attached symbols in the drawing may overrule those base requirements.
A Surface Finish indicator may also be placed in free space, and not attached to (or associated with) a specific drawing view surface – see the symbol styles information below.
In most cases, only one or two surfaces need to be defined, such as the surface of the top and bottom layers, so a minimal number of symbols/attributes are usually required. However, the indicators may be applied to the face of any engineered object, including the surfaces of rendered components.

The style of the Surface Finish symbol itself indicates the allowed processing of the surface material, as follows:
-
 Any manufacturing process permitted (default).
-
 Material shall be removed.
-
 Material shall not be removed.
- A symbol enclosed in brackets is appended to the indicator when the panel's Allow Different Requirements option is checked. This style of Surface Finish indicator, which is placed in free space, specifies a default requirement for all surfaces unless otherwise specified (by other surface indicators that are attached to particular object faces/surfaces).
The string-based parameters (attributes) that are associated with the symbol indicate a range of manufacturing options, as defined by the standard:
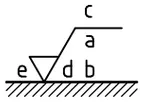
- First requirement (
a)
- Second requirement (
b)
- Manufacturing Method (
c)
- Surface Lay and Orientations (
d)
- Predefined options, with matching symbol graphics, as selected from the drop-down menu in Draftsman's Properties panel (default is
None)
- Machining Allowance (
e)
By default, no parameters are included when a Surface Finish indicator is first placed. The default Surface Finish indicator settings can be edited in the Draftsman
Preferences dialog – see the
Surface Finish Sign section under
Defaults.
The position and orientation of a placed Surface Finish may be graphically modified. Select a Surface Finish object to enable its editing modes:
- For an attached symbol, click and drag its attachment point node to change the connection position.
- For an attached symbol without an arrowed leader line, drag its mid-point node to invert the symbol orientation.
- For a free (not attached) symbol, drag its node or the graphic itself to change its position.

Drag a selected Surface Finish symbol's editing nodes to move its position, orientation and connection point.
Surface Finish Properties
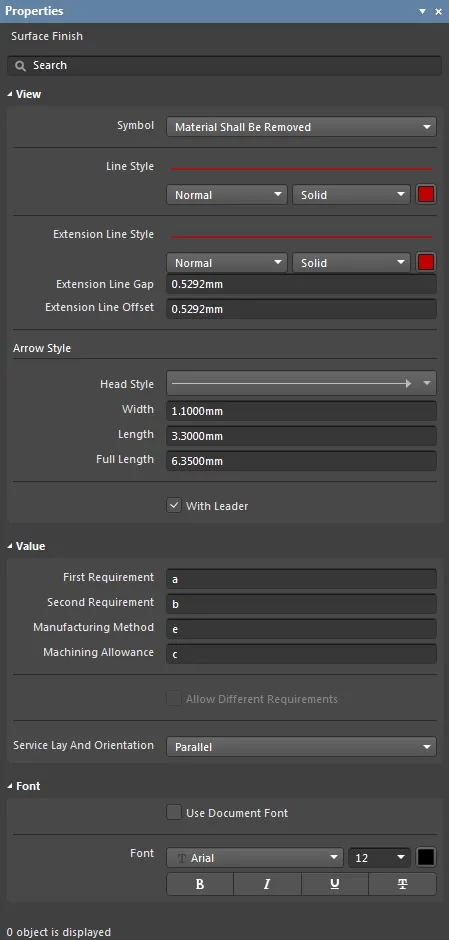
The Surface Finish mode of the Properties panel
View
- Symbol – the standardized graphic symbol that will be shown in the Surface Finish indicator. Use the drop-down menu to choose a surface manufacturing process, as defined in the ISO 1302:2002 standard.
- Line Style – the thickness and style of the line used to render the Surface Finish symbol and its leader/pointer line, if enabled. Use the line weight drop-down menu to choose from a range of line thickness presets and the line pattern menu to choose from a range of line styles. The associated color button (
 ) opens the color selector where the line color can be specified by RGB or HEX value, by freeform selection, or from a range of presets. Note that the slider control sets the color Opacity level, where 0% represents full transparency.
- Extension Line Style – the thickness and style of the line that automatically extends from an object edge when a Surface Finish indicator point is moved beyond the object's bounds. Use the line weight drop-down menu to choose from a range of line thickness presets, and the line pattern menu to choose from a range of line styles. The associated color button (
 ) opens the color selector where the line color can be specified by RGB or HEX value, by freeform selection, or from a range of presets. Note that the slider control sets the color Opacity level, where 0% represents full transparency.
- Extension Line Gap – the spacing between the target object edge and the beginning of the extension line.
- Extension Line Offset – the distance that the extension lines will protrude beyond the Surface Finish symbol.
Arrow Style
- Head Style – select the drop-down to choose from a range of preset pointer styles (headers).
- Width – the width of the target pointer head, such as an arrow. This setting also defines the diameter of a round head style.
- Length – the length of the pointer head, such as an arrow.
- Full Length – the length of the arrow lines when positioned on the outside of the surface finish line.
- With Leader – enable to add an arrowed connector line between the Surface Finish indicator and the target object face.
Value
- First Requirement – a coded and numerical tolerance for the surface texture.
- Second Requirement – an additional coded and numerical tolerance for the surface texture.
- Manufacturing Method – the permitted processes to be used to manufacture the surface.
- Machining Allowance – a numerical constraint for the surface machining accuracy.
- Allow Different Requirements – when checked, an additional bracketed symbol is added to the selected Surface Finish object (applies to a free, i.e. not attached, symbol only). This indicates that other attached Surface Finish objects in the drawing may override the currently selected Surface Finish object, which acts as a general/base setting for all surfaces.
- Surface Lay and Orientation – use the drop-down menu to specify the desired pattern style and direction for the surface.
Font
- Use Document Font checkbox selected – the font used for the Surface Finish indicator's characters is that defined by the document options. See the Document Font entry in General section of the Properties panel when in Document Options mode.
- Use Document Font not selected – use the Font drop-down menus to choose the desired font type and size, and select the lower buttons to enable text attributes – the Surface Finish symbol will proportionally scale with the font size. The associated color button (
 ) opens the color selector, where the font color can be specified by RGB or HEX value, by freeform selection, or from a range of presets. Note that the slider control sets the color Opacity level, where 0% represents full transparency.
Note
A Note object is an active text-based list that can be placed in a Draftsman document to provide additional and optionally targeted information that relates to drawing views.
The entries in a Note list can include parameters that are available to the project document and individual list entries can be referred to by placed Callout objects. A Callout–Note reference behaves as an active link, and therefore, changes to the Note entry (such as its list number or border graphic) will be reflected in the Callout label.
The Note object's visual style and its list entries are configurable in the Properties panel.

Two Note objects in a drawing with example Callout objects that refer to Note list entries.
To place a Note Item, select Place » Annotations » Note from the main menu or the  icon from the Active Bar, and then click to place the default Note entries in the drawing space. To view/modify the properties of a specific note in the list, simply click to select that entry in the list. The Selected Element region of the Properties panel will update to reflect the properties for that entry accordingly. Use the Add/Delete buttons to include and remove list entries, and configure the order of the text entries using the Up/Down buttons. Any number of note entries can be added to a Note item list.
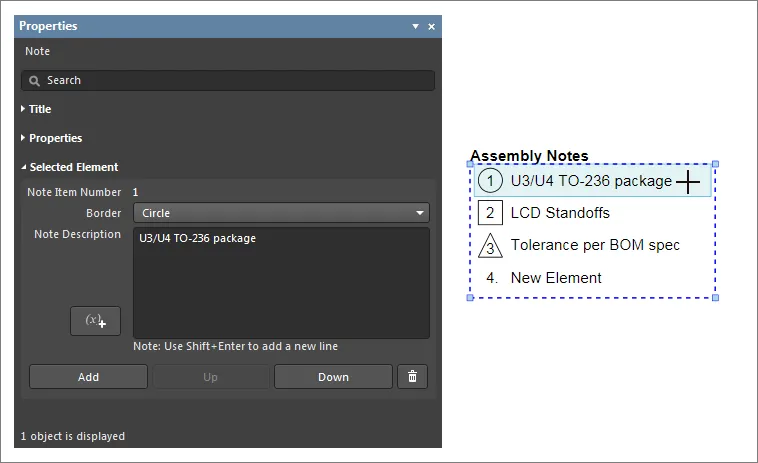
Select a single entry in a Note Item list to edit its content in the Properties dialog.
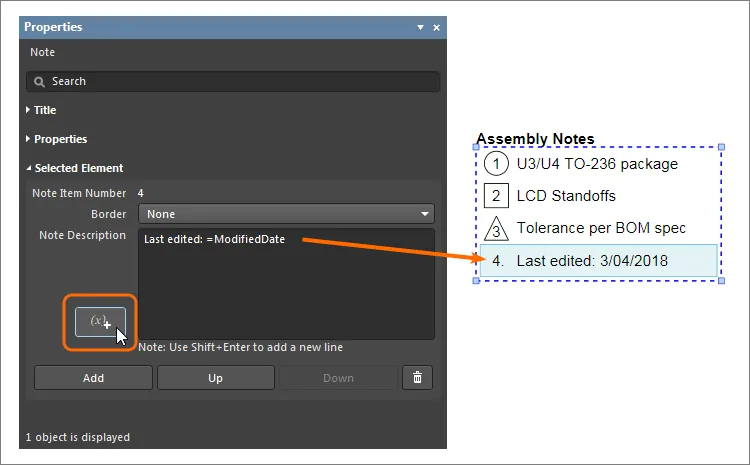
To use a Parameter in a Note, first select the relevant note entry and then click the  button in the Properties panel to open the
 ![]() Document Parameters dialog. The dialog can be configured to present all system, project and PCB parameters related to the active Draftsman document. Select a Parameter and click OK to confirm the selection – the value string for that parameter will be inserted at the current cursor position within the Note Description text box.
Document Parameters dialog. The dialog can be configured to present all system, project and PCB parameters related to the active Draftsman document. Select a Parameter and click OK to confirm the selection – the value string for that parameter will be inserted at the current cursor position within the Note Description text box.
Insertion of a parameter in this way is also supported for the
Text object.
The position of a placed Note object may be graphically changed by selecting the table object in the design space then dragging it to a new location. To resize a selected Note object, drag any of its editing nodes to set the width – the list text will automatically wrap to remain constrained to the modified area.

Drag a selected Note object's node to resize the list.
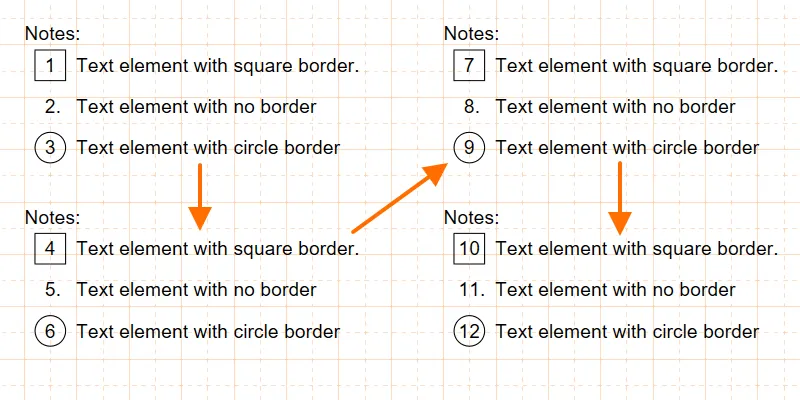
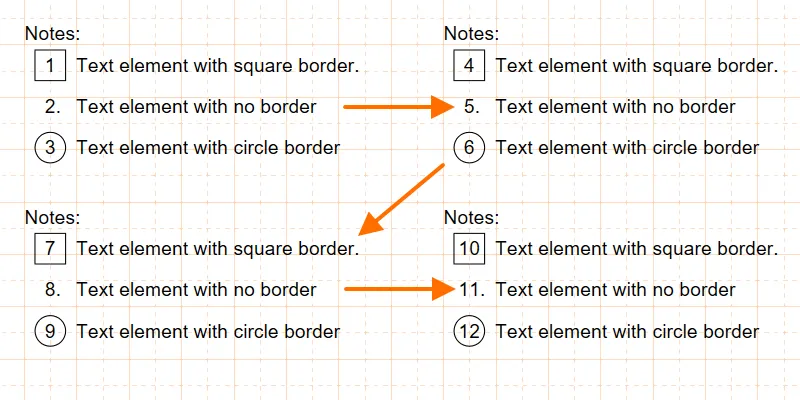
When multiple Note objects are placed within the same sheet of a Draftsman document, the list entry (element) numbering will sequentially flow from one list to the next based on the relative Note locations. A top-to-bottom, left-to-right approach is taken when considering list position, if necessary, will automatically re-order when a Note list is moved.
Note Properties
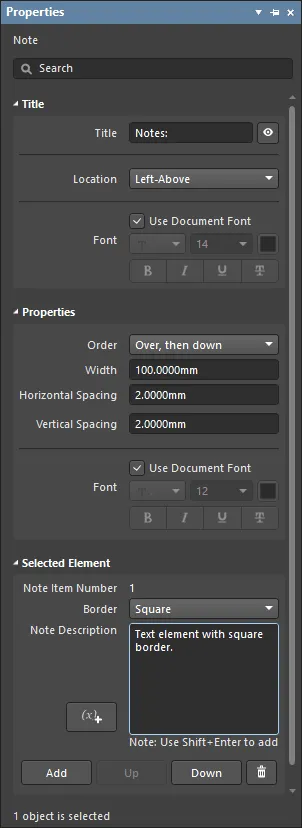
The Note mode of the Properties panel.
Title
- Title – the title name string that will be displayed (if enabled) with the Note object. Use the associated
 button to toggle its visibility. Enter the title name and any desired system/custom parameters to create a meaningful name. See the Parameters section in the Properties panel's Document Options mode for a list of the currently available document parameters.
- Location – select the drop-down to choose from a range of relative locations for the title. The Manual option is automatically selected if the title is manually moved (dragged and dropped to a new location).
- Font – sets the displayed font used for the object's title string.
- Use Document Font checkbox selected – the title font used is that defined by the document options. See the Document Font entry in the General section of the Properties panel when in Document Options mode.
- Use Document Font not selected – use the drop-down menus to choose the desired font type and size and select the lower buttons to enable text attributes. The associated color button (
 ) opens the color selector where the font color can be specified by RGB or HEX value, by freeform selection, or from a range of presets. Note that the slider control sets the color Opacity level, where 0% represents full transparency.
Properties
- Order – when multiple Note objects are placed in a document, this option defines the numbering of list entries based on the relative Note locations:
-
Over, then Down
-
Down, then Over
- Width – the boundary width of the selected Note object. The text entries will automatically wrap to remain constrained within the object width.
- Horizontal Spacing – the distance between the list entry numbering and their associated text entries.
- Vertical Spacing – the distance, or line spacing, between the list entry elements.
- Font – sets the font used for the Note text entries.
- Use Document Font checkbox selected – the font used is that defined by the document options. See the Document Font entry in the General section of the Properties panel when in Document Options mode.
- Use Document Font not selected – use the drop-down menus to choose the desired font type and size, and select the lower buttons to enable text attributes. The associated color button (
 ) opens the color selector, as described above.
Selected Element
The below property items refer to the currently selected element (list entry) in the Note object.
- Note Item Number – indicates the entry number of the currently selected list element.
- Border – the graphic outline style applied to the number of the selected list element. Use the drop-down menu to select from a range of predefined geometric shapes.
- Note Description – the text entry field for the currently selected Note list element. Select the associated
 button to open Draftsman's Document Parameters dialog where any of the available parameters may be selected for inclusion in the Note entry.
- Add – click to add a new entry (element) to the end of the Note list.
- Up / Down – use to move the selected entry up or down one row. The list entries are automatically renumbered to accommodate the change.
-
 - click to remove the selected entry.